Rielbook, from the first sign-up to the month-end payroll.
Every screen a company uses, in the order you will meet them — with the real screen beside each step. Read it straight through on your first day, then come back to the chapter you need.
How to read this manual
Every picture here is the real Rielbook screen, filled with an example company called Sovann Building Supply — a building-materials shop in Phnom Penh with five staff, a price list of 172 items and a couple of staff loans. Your own screens will show your own company, but the buttons are in the same places.
- A name in a box, like New invoice, is a button or link you press. A green one, like Save invoice, is the main button on that screen.
- A route like Sales documents›Invoices means: find Sales documents in the menu on the left, then press Invoices.
- Numbered steps must be done in that order. Bulleted lists can be done in any order.
- Press any screenshot to see it full size. Tall pages are shortened in the text; the full page opens when you press it.
Under every chapter heading is a line saying which plans it belongs to, or whether it is an add-on bought separately. If a chapter describes a screen you cannot find, read that line first.
Getting started
Opening an account, signing in, finding your way round the screen, and setting the company up so every document and figure comes out right.
Create your account
You can sign yourself up from the front page, or we can open the account for you and send you a link. Either way you end up as the company's Owner, the one person who can change everything.
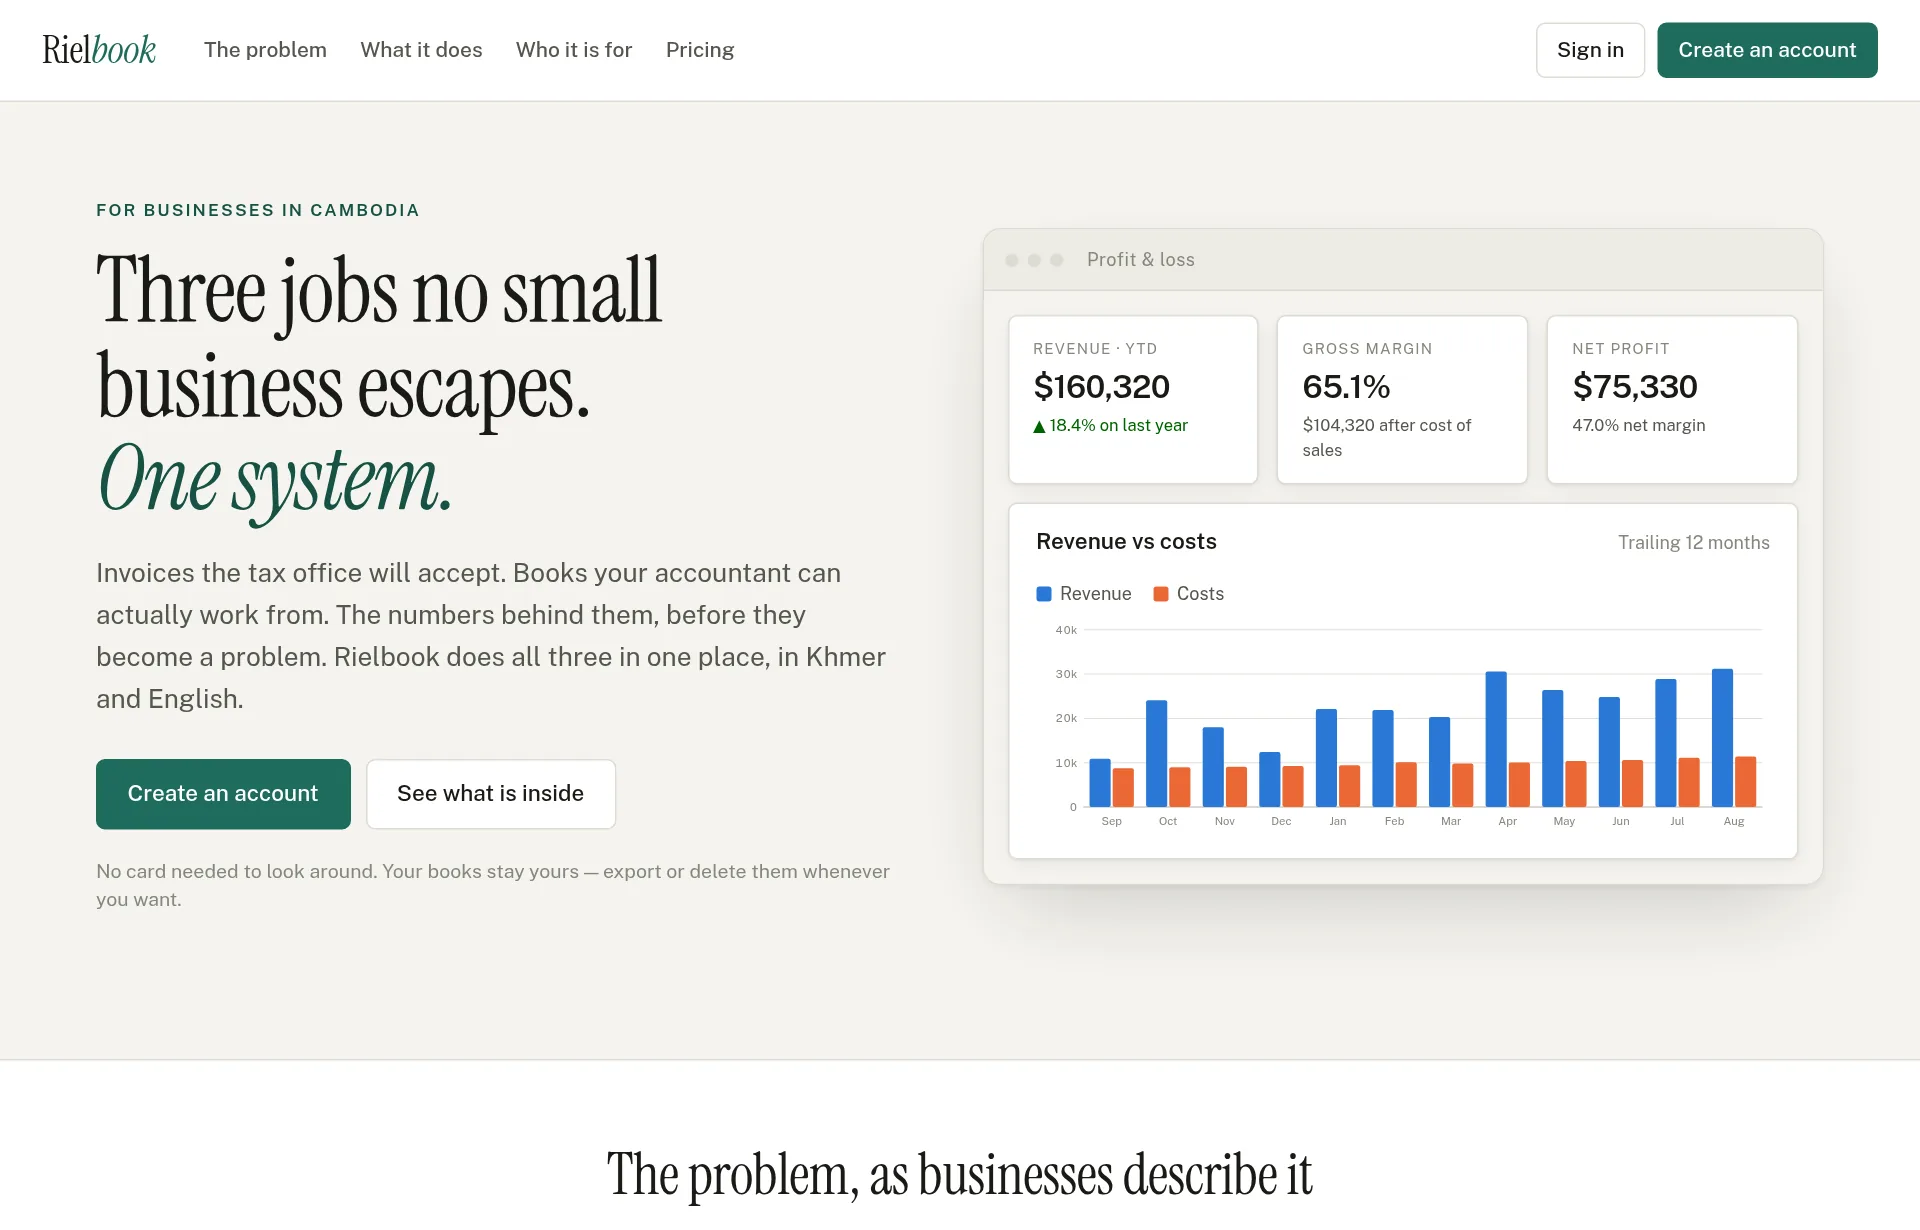
- Go to rielbook.site and press Create an account.
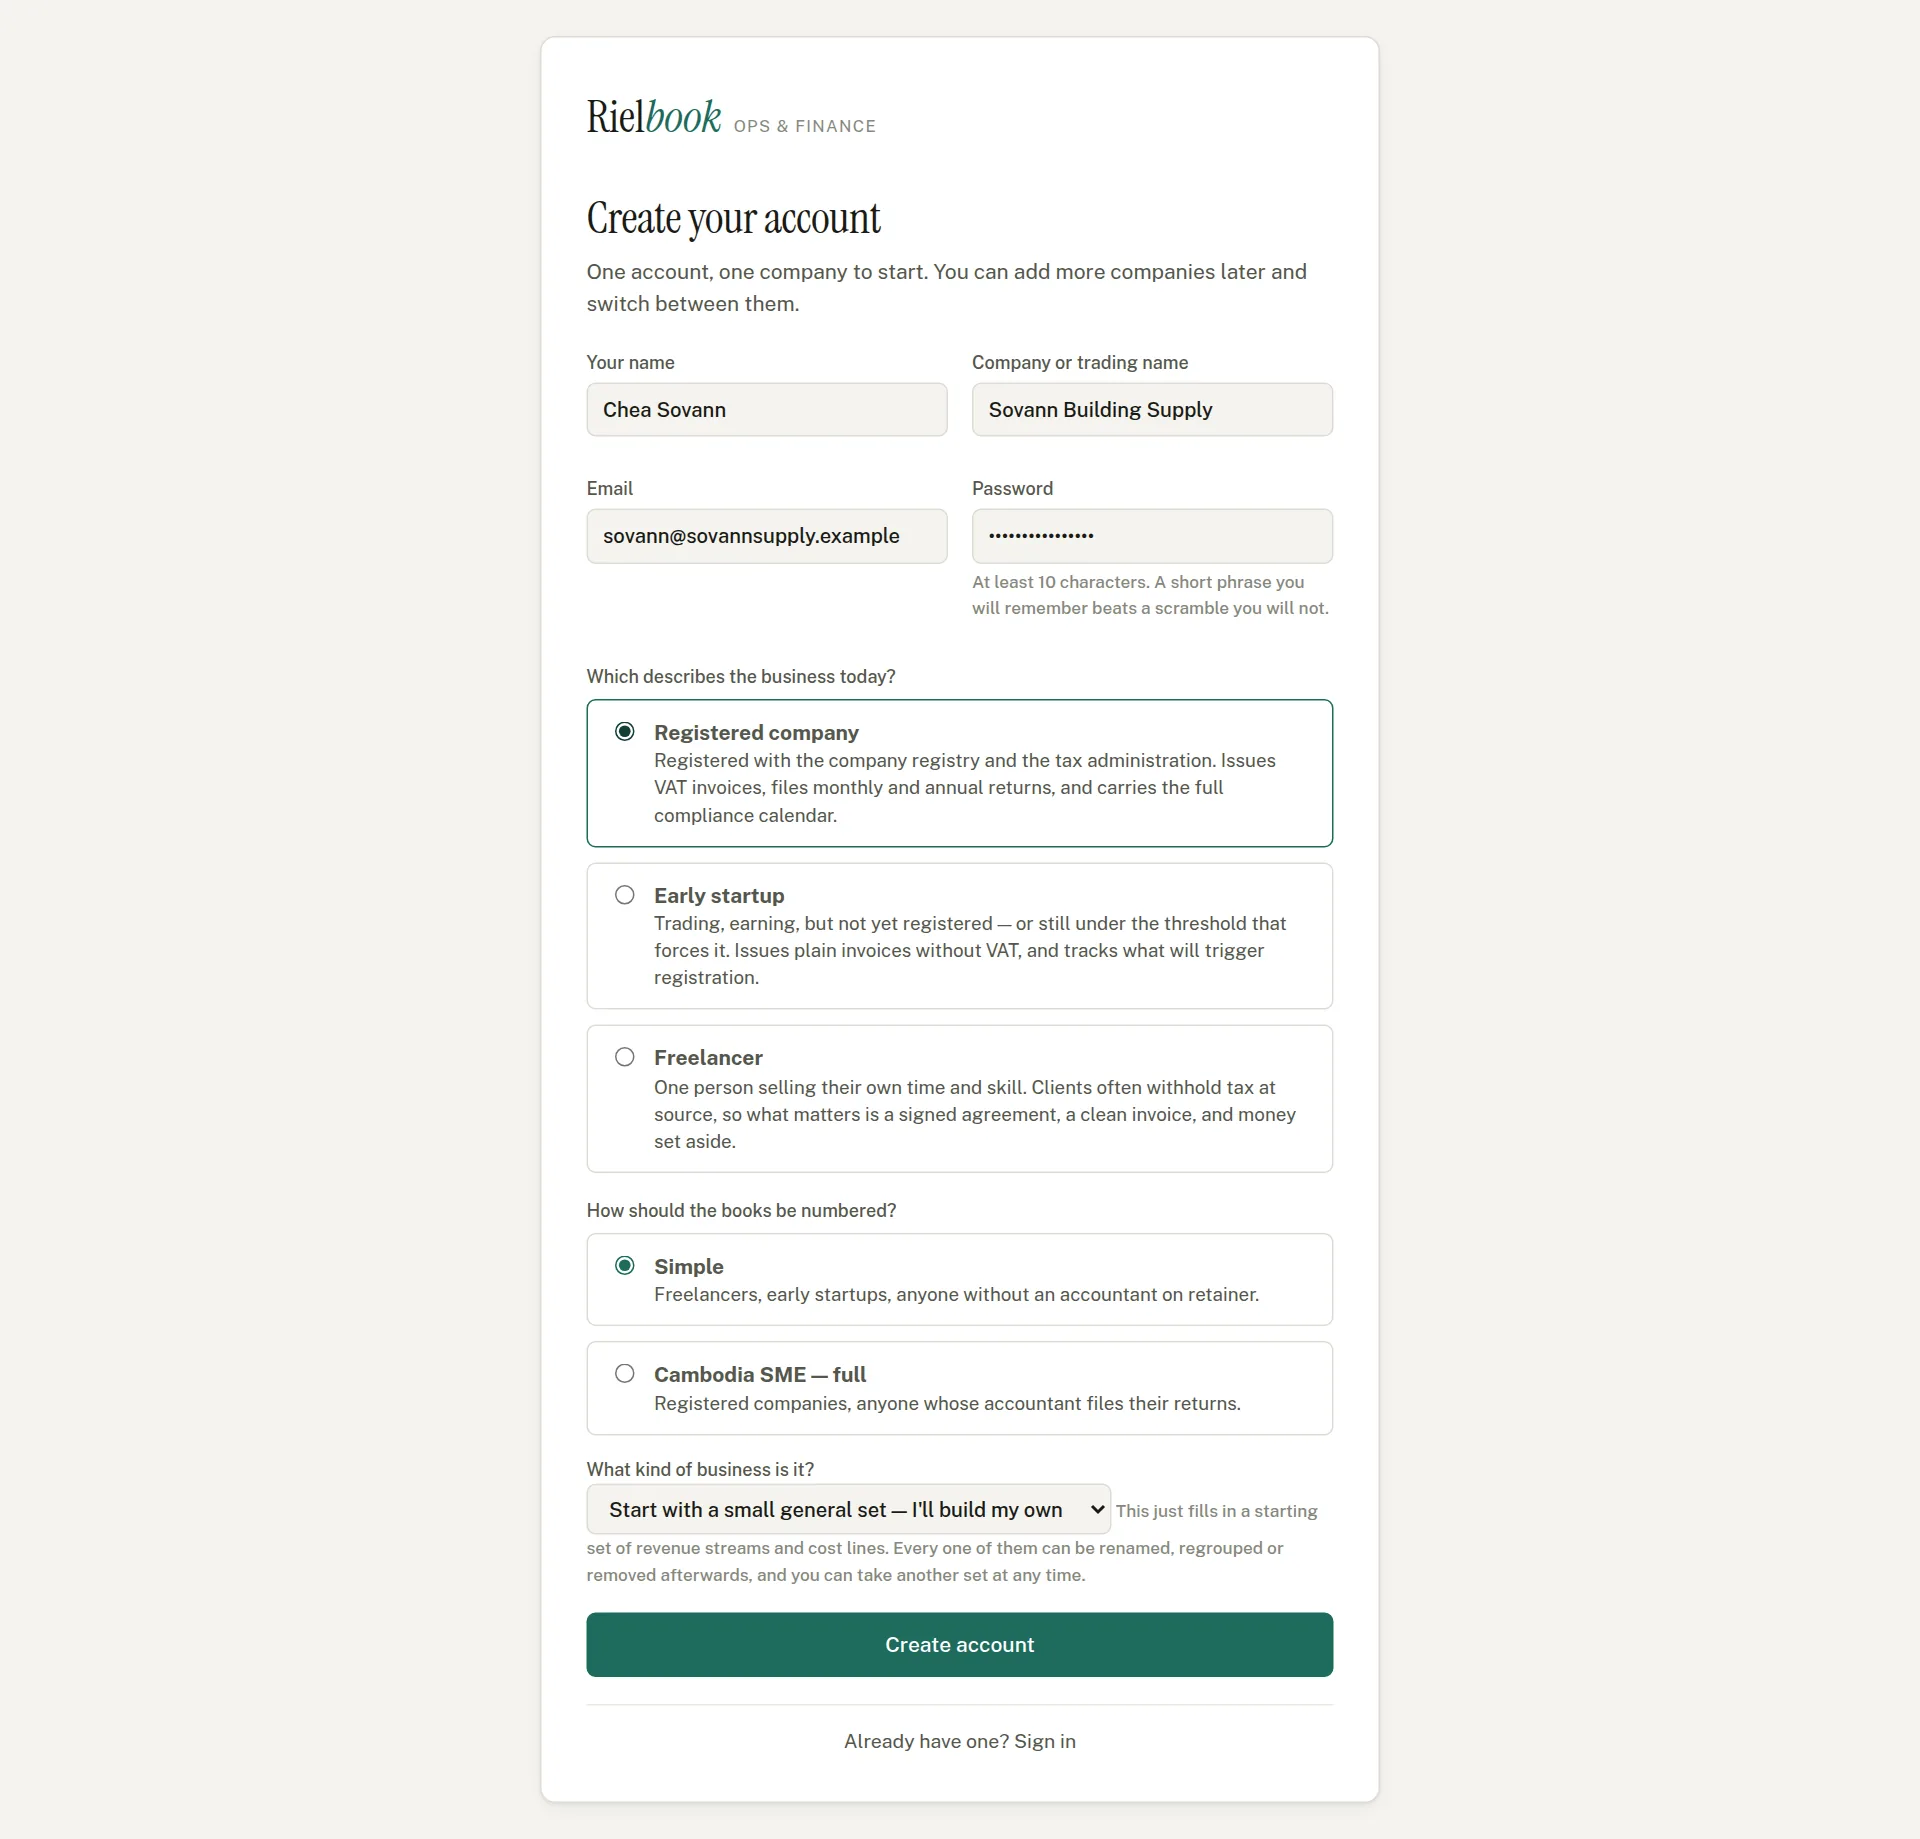
- Type your name and the company or trading name — the name people know the business by. The legal name for invoices is added later, in settings.
- Type your email and a password of at least ten characters. A short phrase you will remember is safer than a scramble you will not.
- Choose which describes the business today:
- Registered company — registered with the company registry and the tax administration; issues VAT invoices and has the full filing calendar.
- Early startup — trading but not yet registered; plain invoices without VAT.
- Freelancer — one person selling their own time; a signed agreement, a clean invoice and money set aside for tax.
- Choose how the books are numbered. Simple suits most small businesses. Cambodia SME — full is the chart an accountant filing your returns will expect. My own chart is for a company that already has one — see Bring in your own chart of accounts.
- Pick what kind of business it is. This only fills in a starting set of revenue and cost lines — every one can be renamed or removed afterwards.
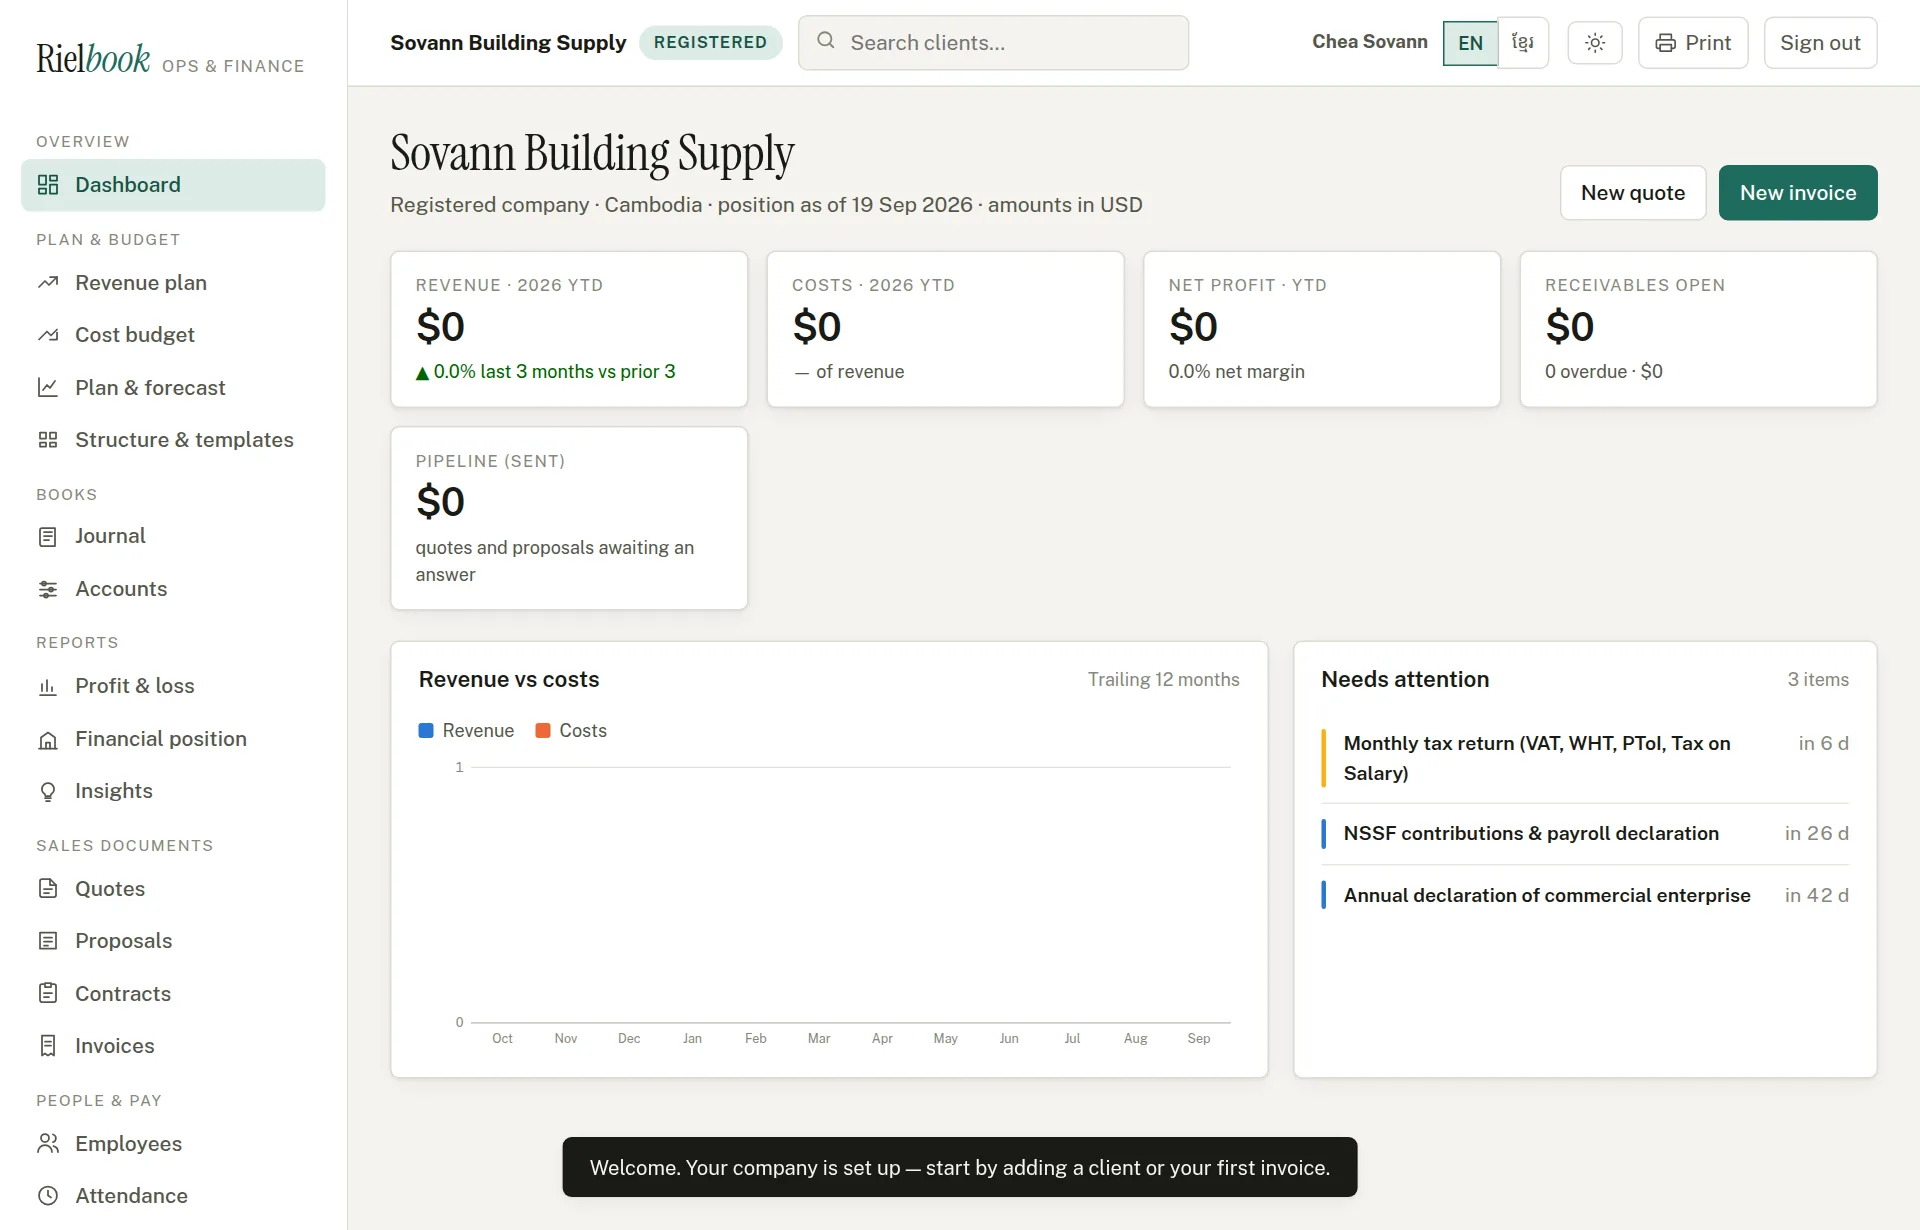
- Press Create account. You land on your dashboard, already signed in.
Signing in, and a forgotten password
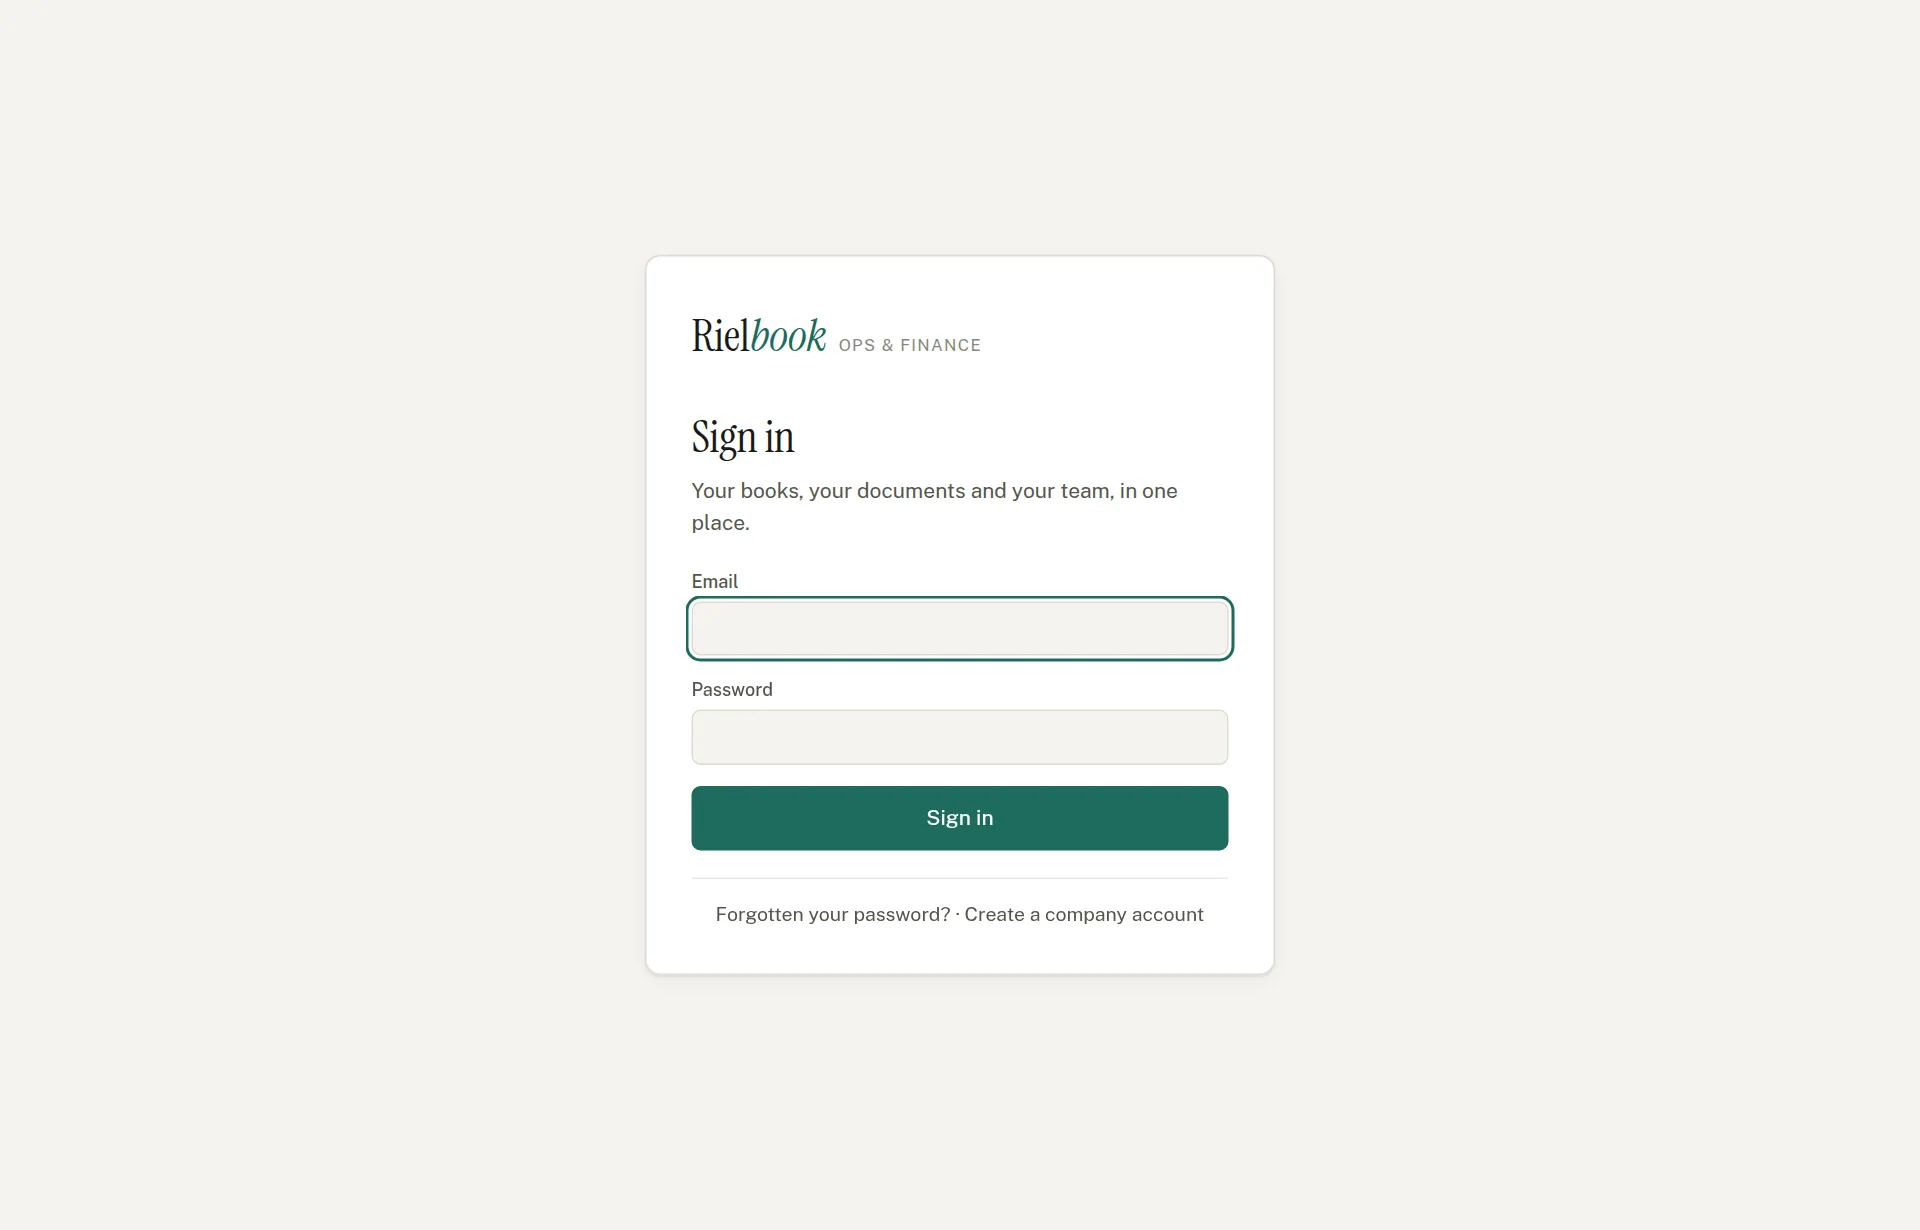
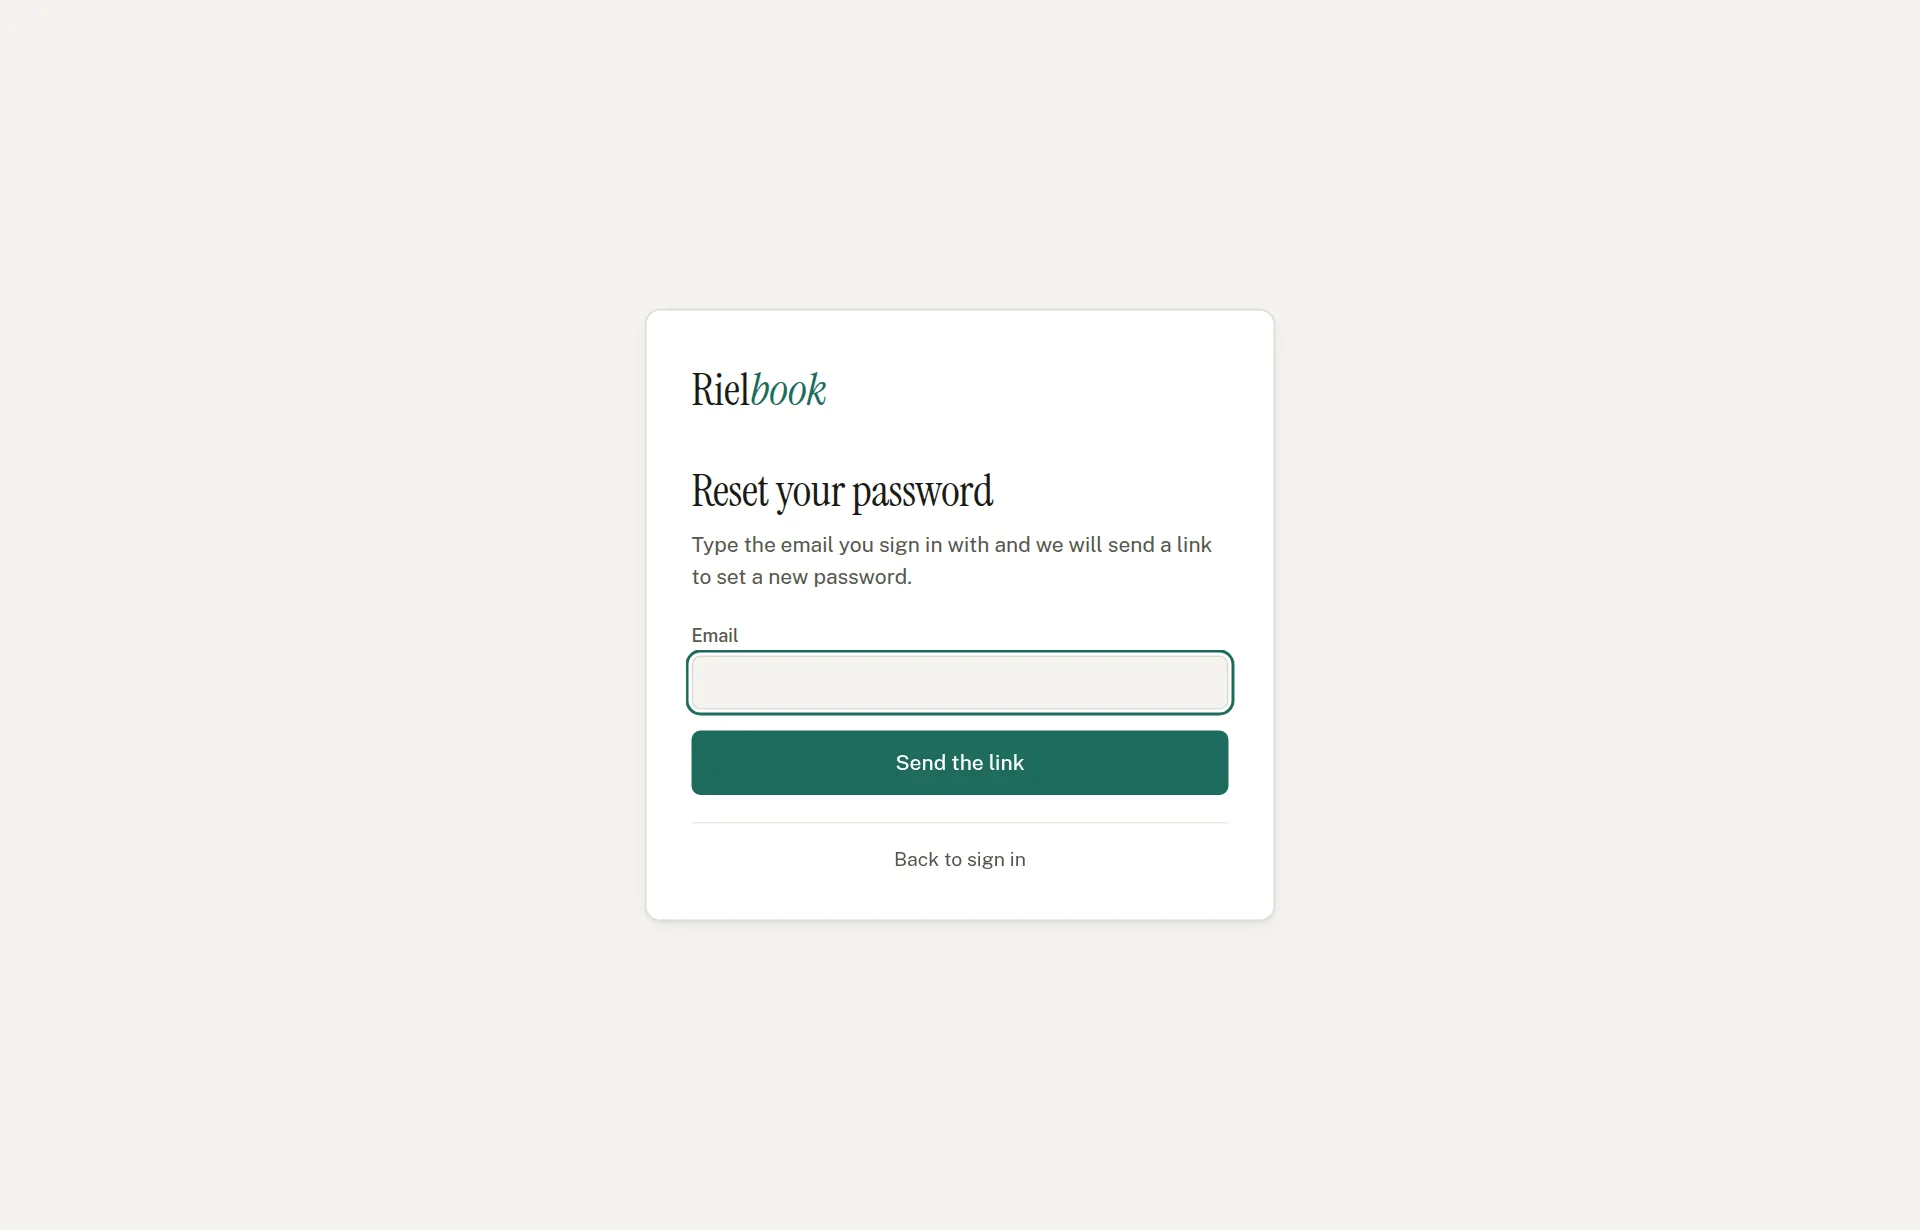
- Go to rielbook.site and press Sign in.
- Type your email and password, and press Sign in.
- If you have forgotten the password, press Forgot your password?, type your email, and follow the link that arrives. If no email comes, ask your company's owner — or us — for a reset link.
To change your password, press your own name at the top right. Everyone can do this, whatever their role. To leave, press Sign out — always do this on a shared computer.
Finding your way round the screen
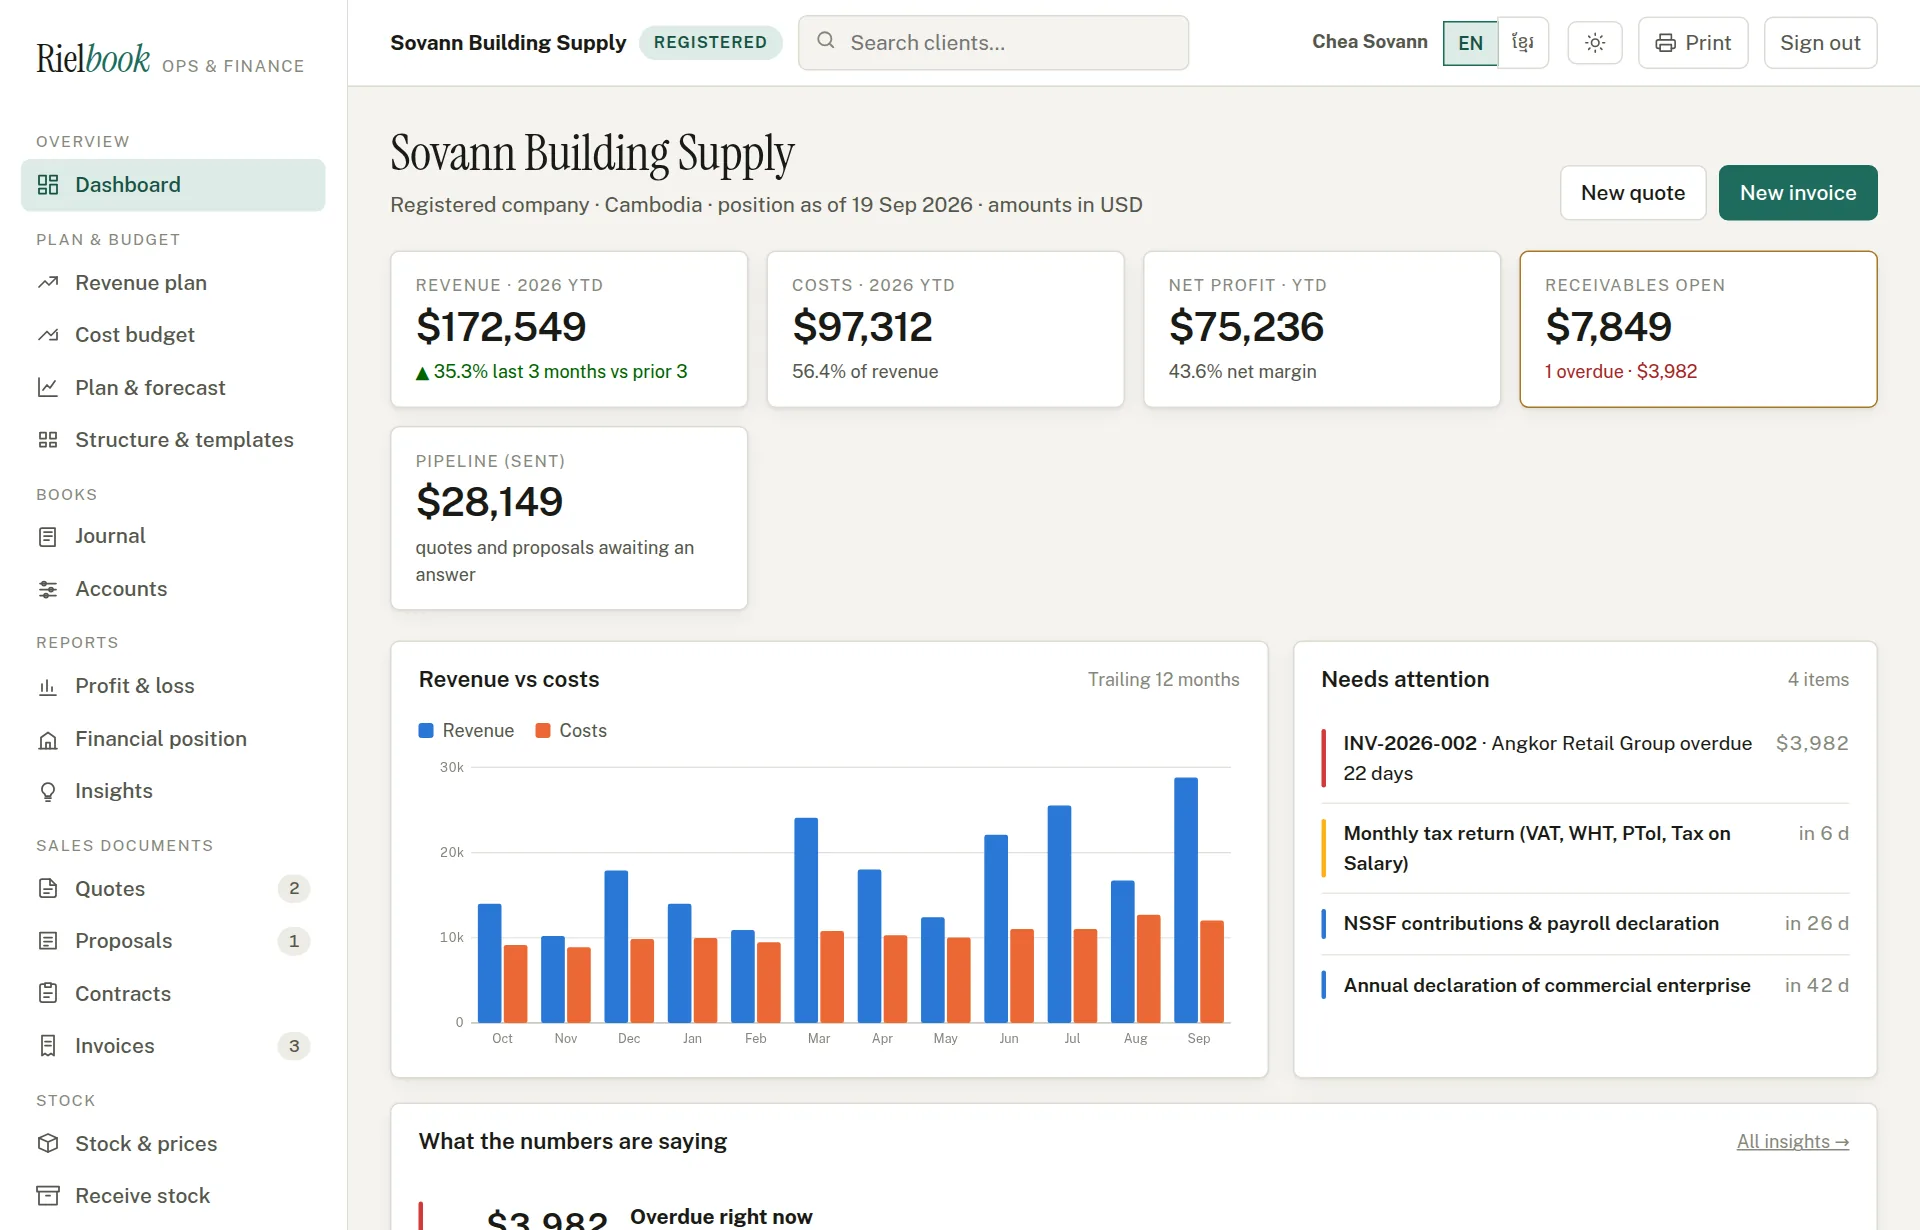
The menu on the left
Grouped by what you are doing: Overview, Plan & budget, Books, Reports, Sales documents, Stock, People & pay, Directory and Governance. A small number beside an item — as beside Invoices — counts what is waiting for you there, such as invoices sent and not yet paid.
The top bar
- The company name, and a badge saying what kind of company it is. If you work for more than one company, this becomes a drop-down that switches between them.
- Search clients… — type part of a client's name to jump straight to them.
- Your name — press it to change your password.
- EN / ខ្មែរ — switches the screens between English and Khmer. See Working in Khmer.
- The sun button — light, dark or follow your computer.
- Print — prints the page you are looking at. Documents have their own Print / PDF button that prints only the document.
- Sign out.
The dashboard
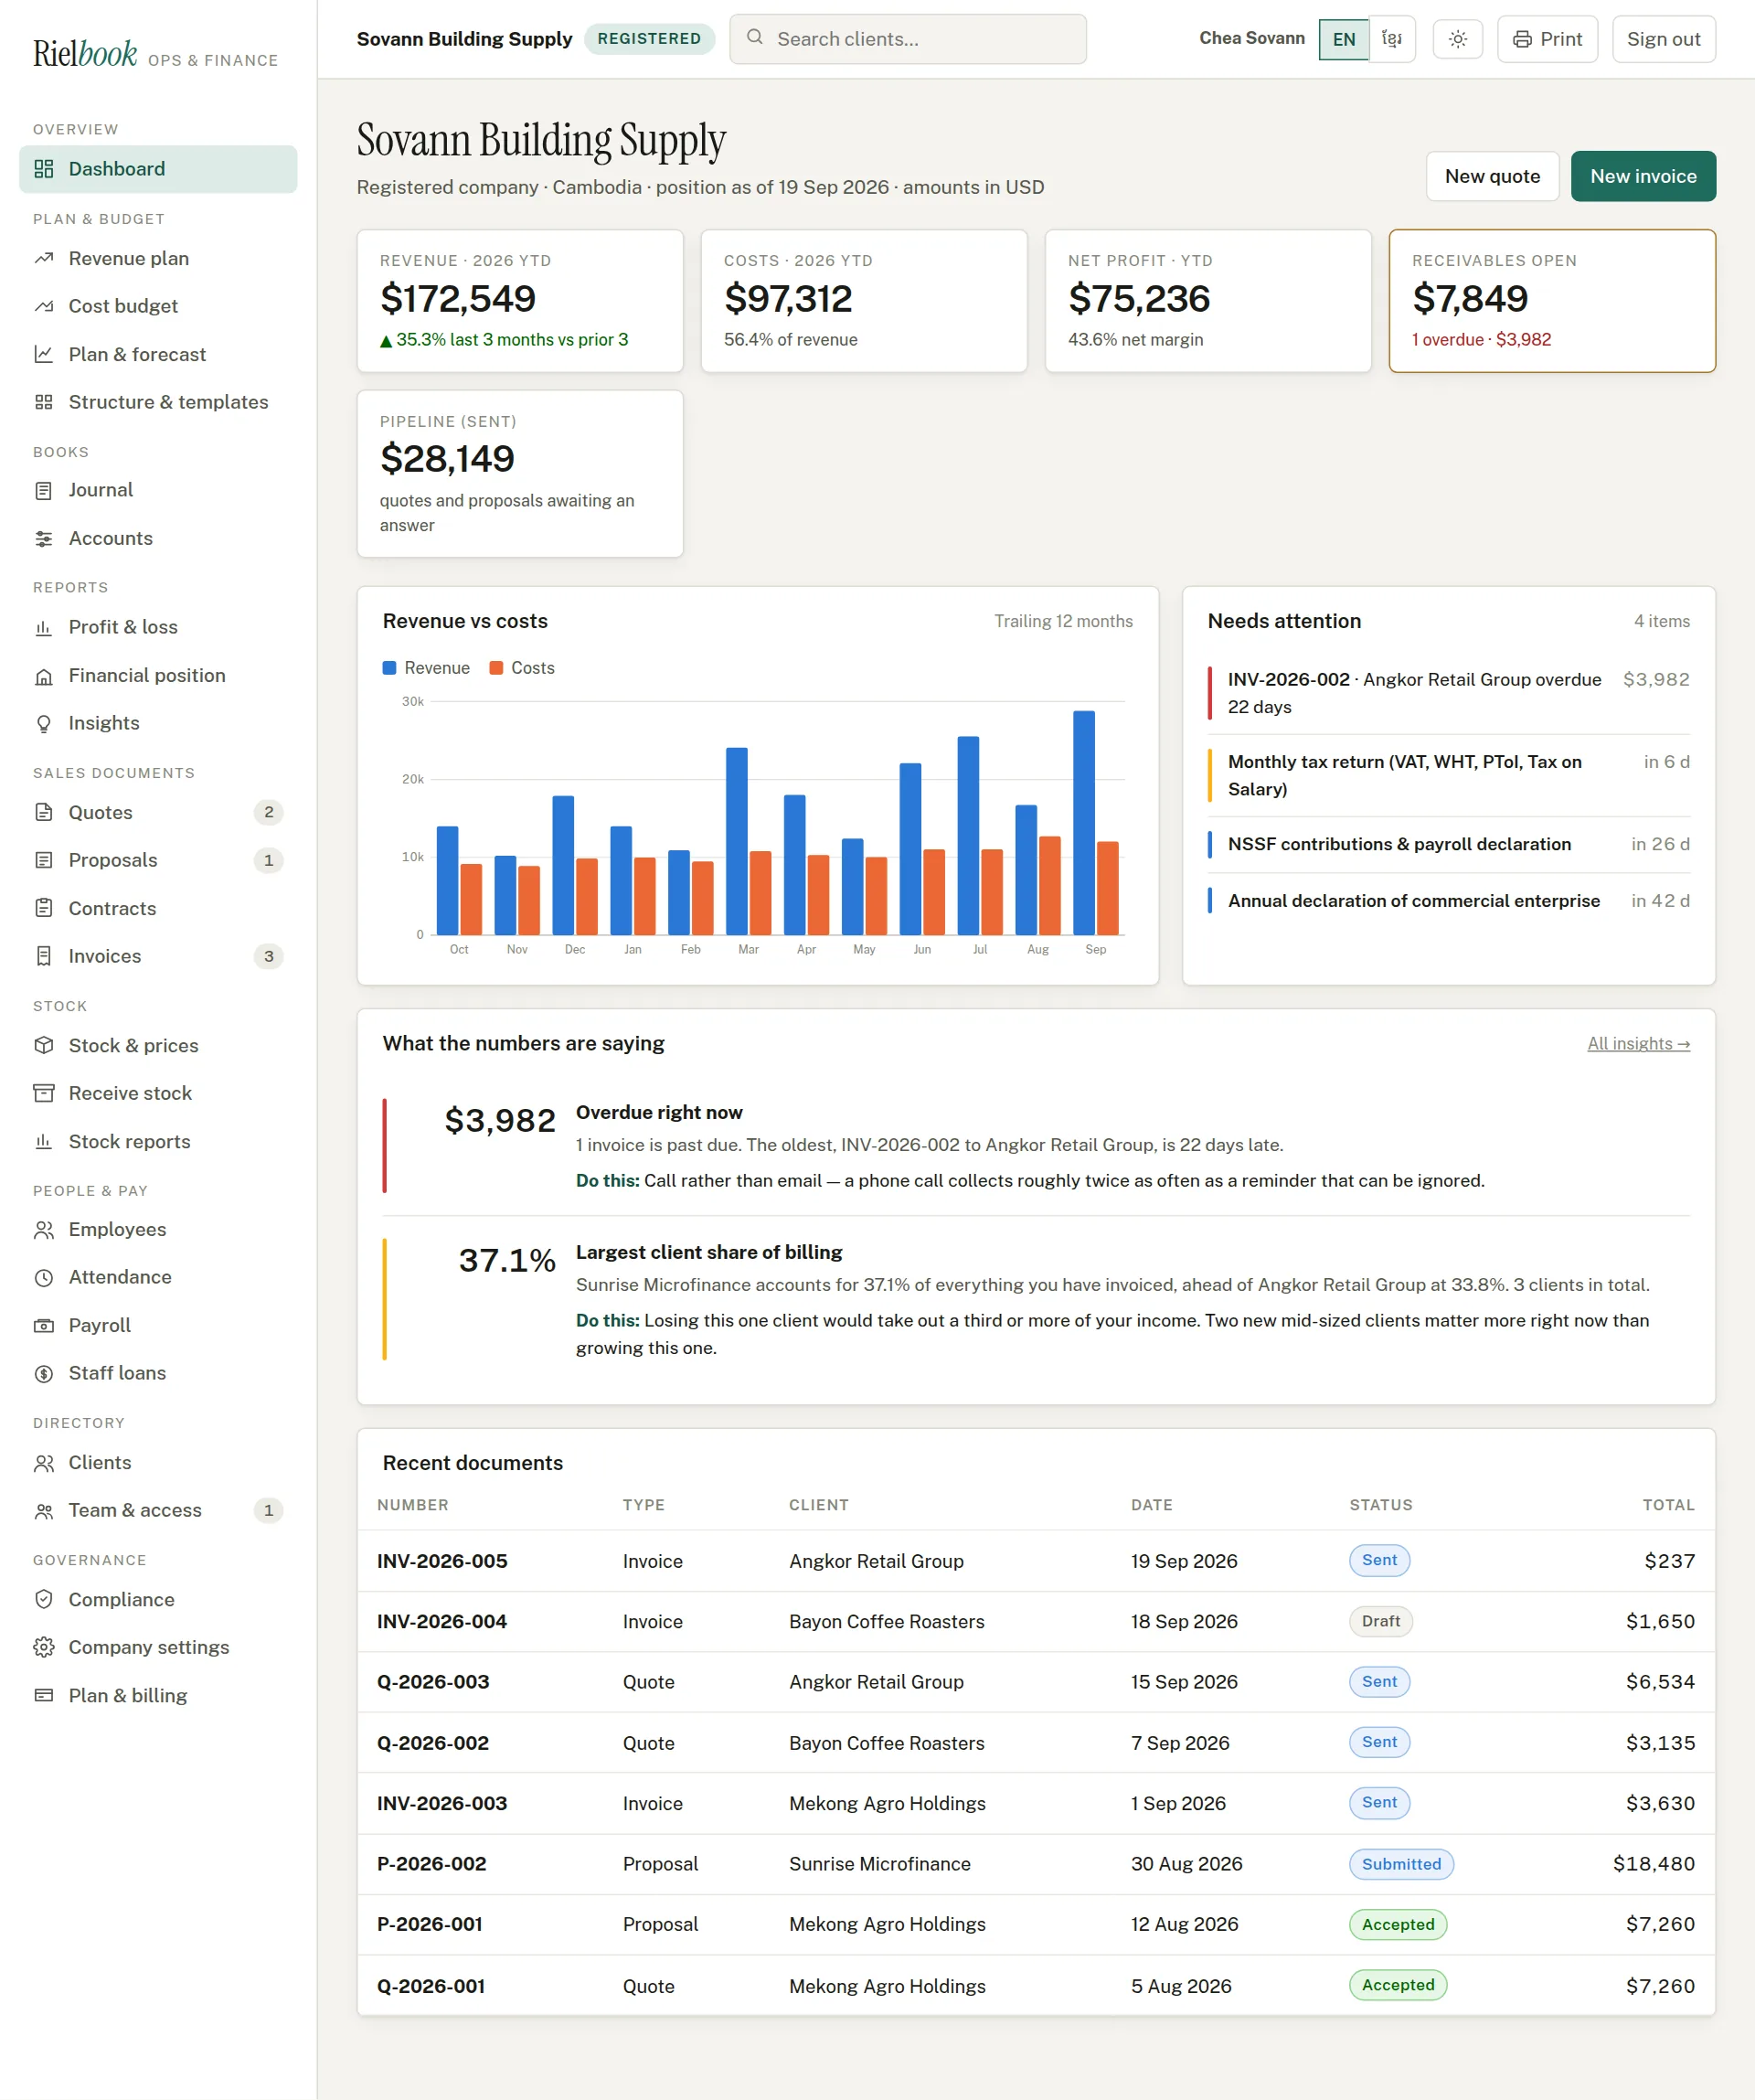
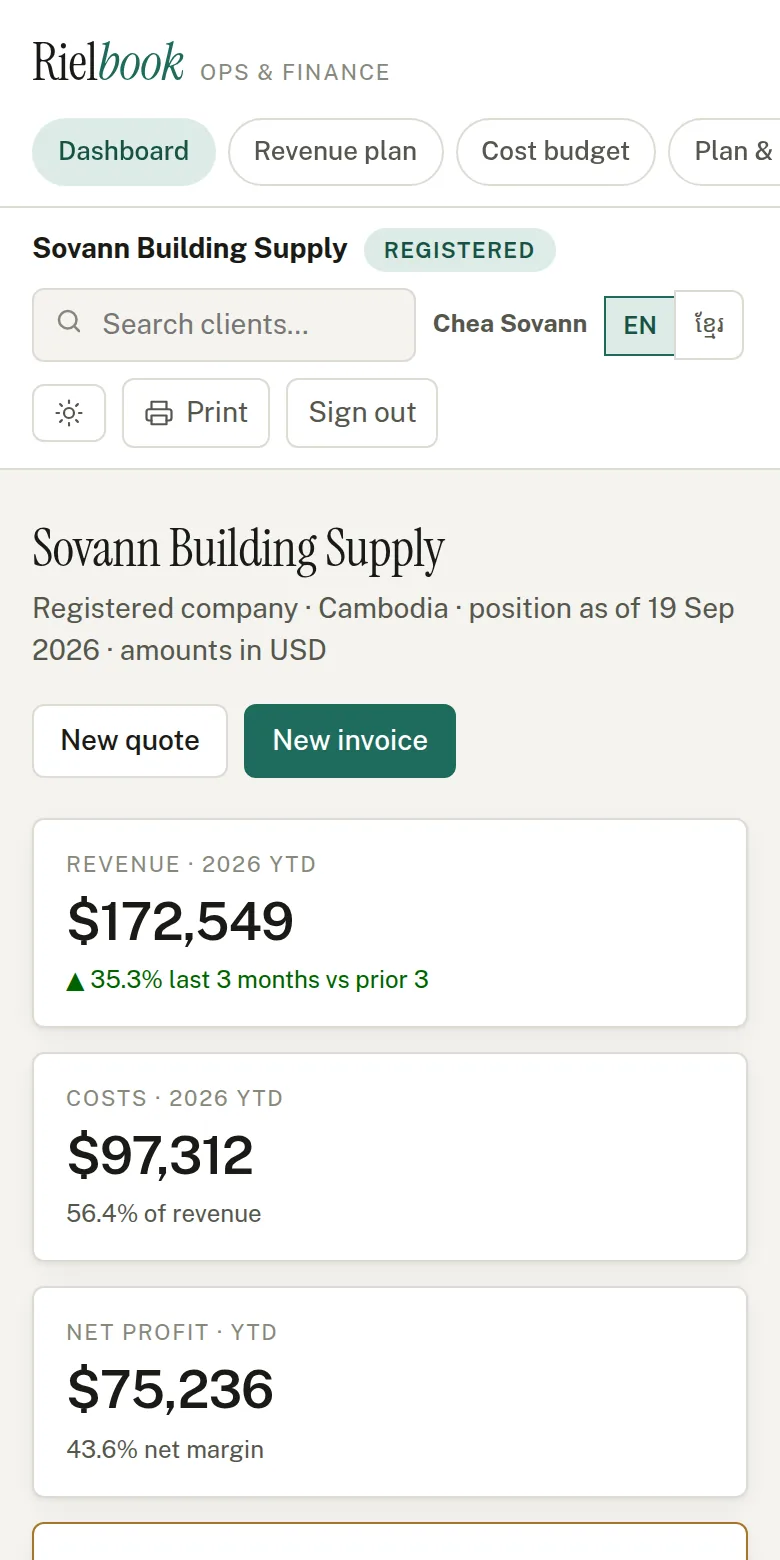
The first page after signing in. From left to right along the top: revenue and costs for the year so far, net profit, receivables open — what clients owe you, with the overdue part in red — and the pipeline of quotes and proposals still waiting for an answer. Underneath, the revenue vs costs chart for the last twelve months, and Needs attention: overdue invoices and the filing deadlines coming up, with how many days are left.
Company settings — do this first
Everything printed on your quotes, invoices and payslips comes from here. Ten minutes on this page saves re-issuing documents later. Only the Owner can open it.
Governance›Company settings
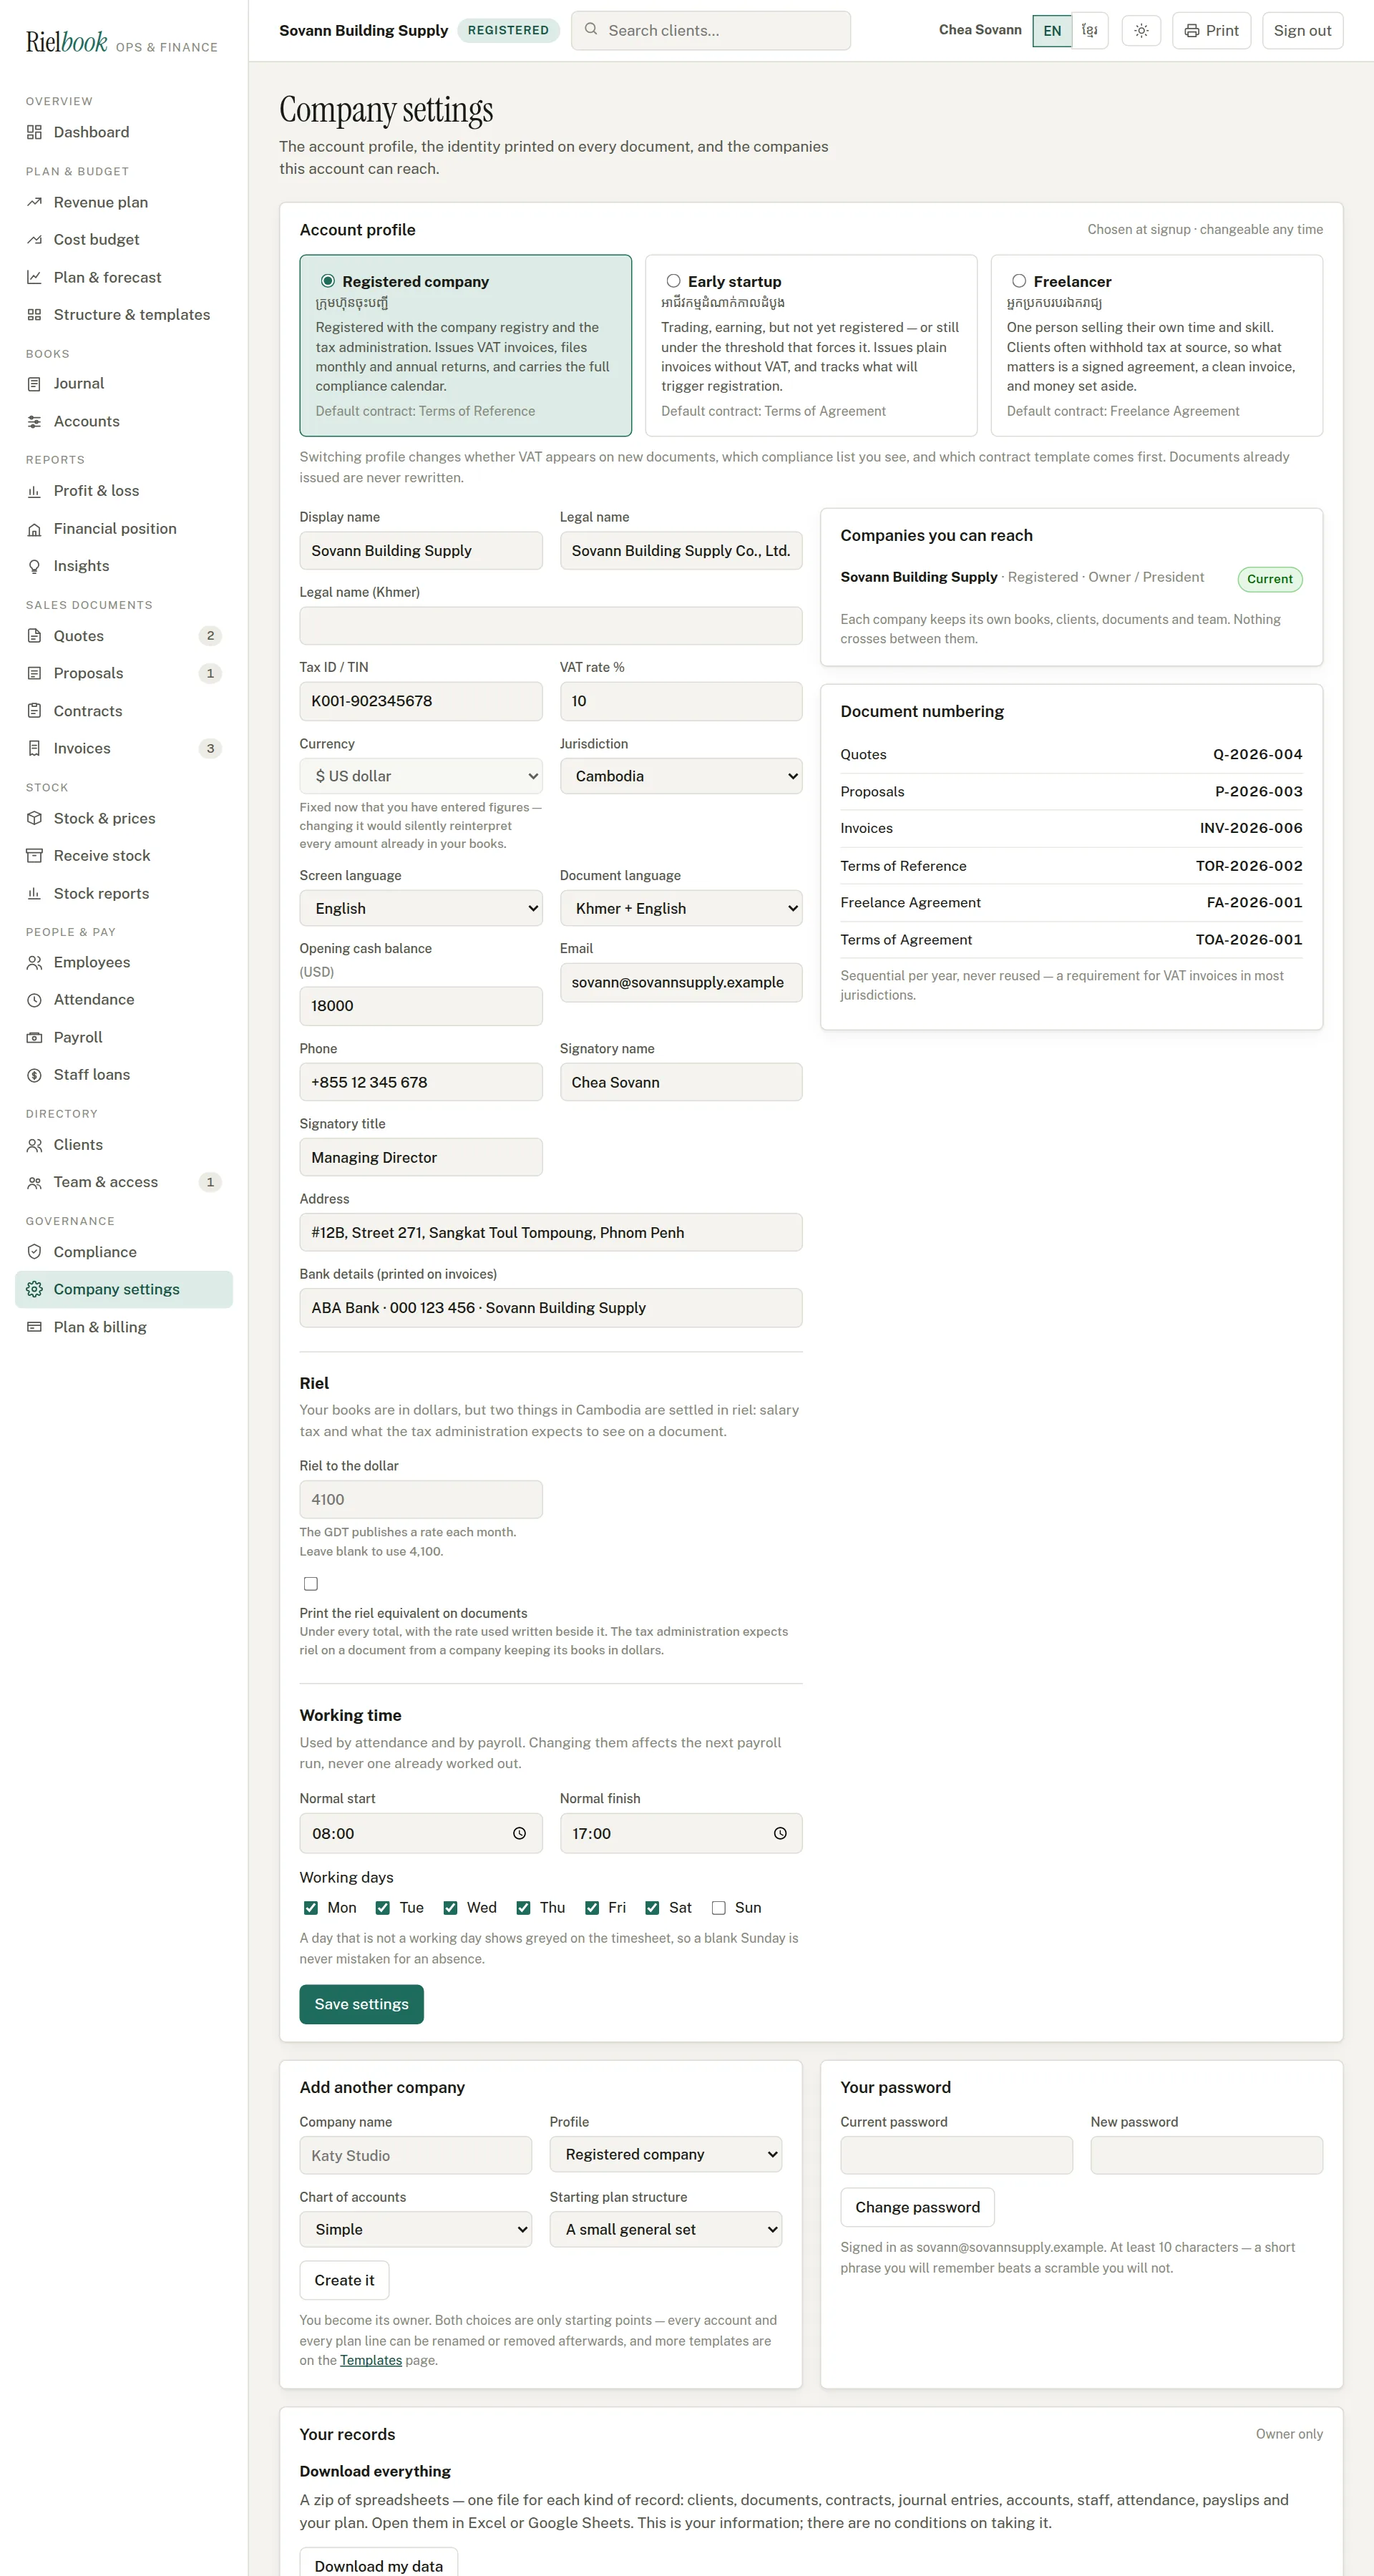
- Account profile. Confirm the kind of company. Switching it changes whether VAT appears on new documents and which filing calendar you see; documents already issued are never rewritten.
- Names. The display name is what appears in Rielbook. The legal name — and the legal name in Khmer — is what prints on documents. Use exactly what is on your registration certificate.
- Tax ID / TIN and VAT rate %. A registered company in Cambodia charges 10%. Leave VAT at 0 if you are not registered for it.
- Currency. Choose whether the books are kept in US dollars or riel. Choose carefully: once any figure has been entered, this locks, because changing it would silently turn every amount into the other currency.
- Screen language is the starting language for everyone in the company; each person can still switch their own with EN / ខ្មែរ in the top bar. Document language is how your quotes and invoices print: English, Khmer, or Khmer + English side by side. You can still switch a single document when you open it.
- Opening cash balance. The money in the bank on the day you start using Rielbook, so the cash figure is right from day one.
- Email, phone, signatory name and title, address, bank details. These print at the top and bottom of every document. Put the account number clients should pay into under Bank details.
- Riel. If your books are in dollars, set riel to the dollar — the monthly rate published by the tax administration. Leave it blank to use 4,100. Tick Print the riel equivalent on documents if your invoices should show the riel total beside the dollar total, which the tax administration expects.
- Working time. Normal start and finish times and the working days. Attendance and payroll use these to count hours, overtime and absences.
- Press Save settings at the bottom of the form.
On the right of the same page, Document numbering shows the next number each kind of document will take. Numbers run in sequence per year. A number that has gone out to a client is never given out again, even if that invoice is later deleted — a legal requirement for VAT invoices.
Notices, and the bell
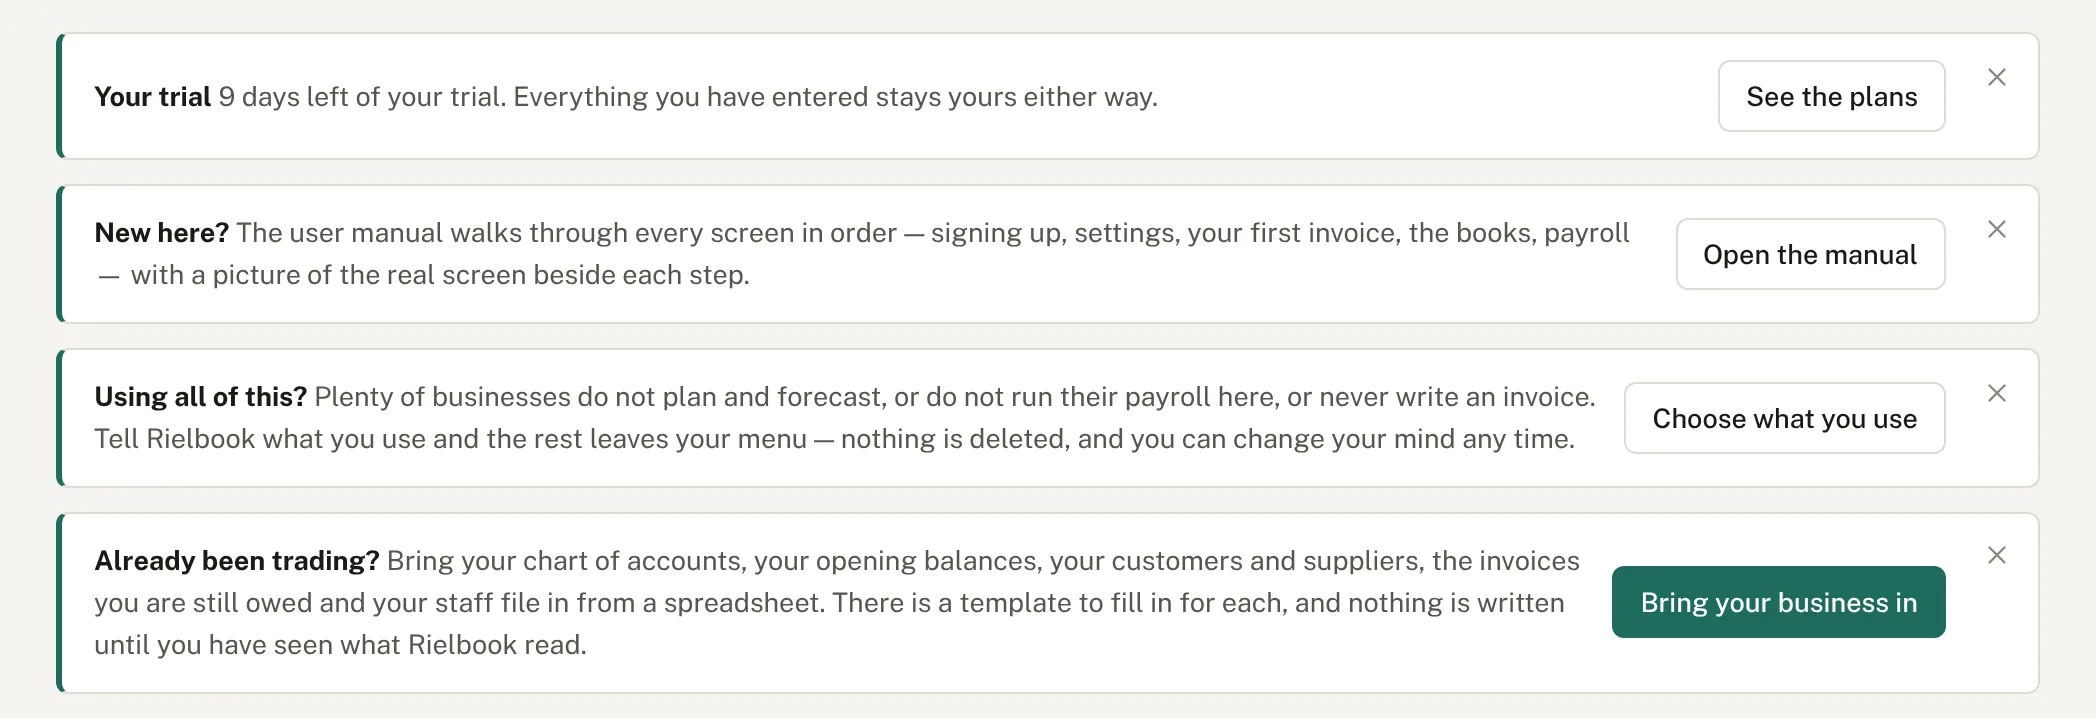
Rielbook says something only when it has something worth saying: that your trial is running short, that you can bring your old figures in from a spreadsheet, that part of the menu can be switched off if you do not use it. When it does, it appears as a card at the top of your dashboard.
Closing one
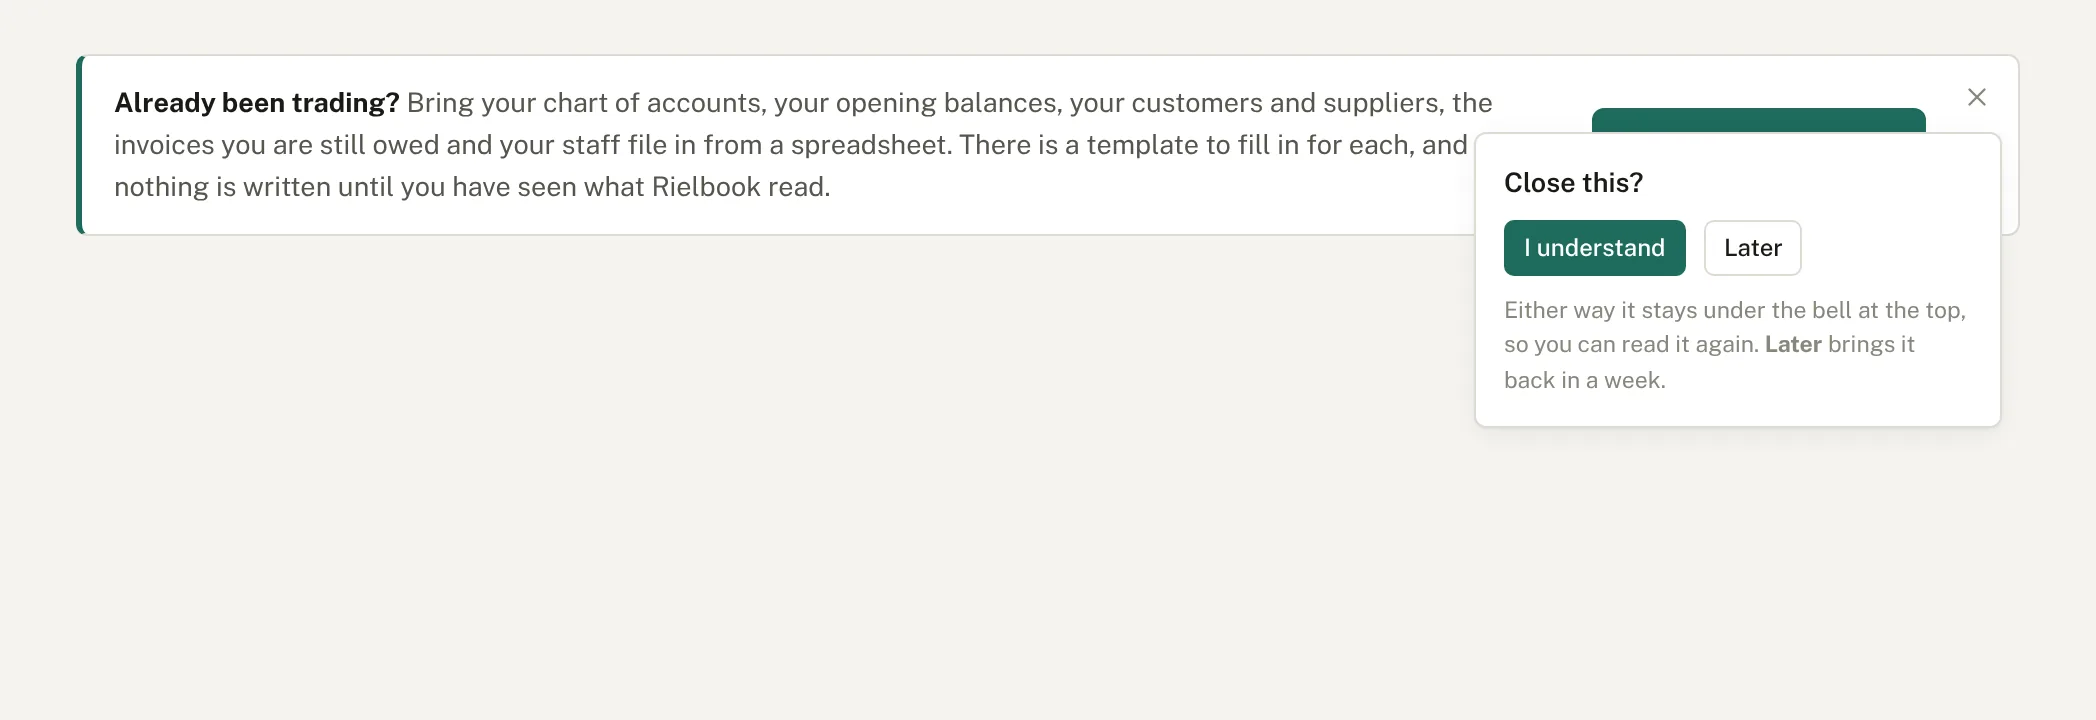
Every card closes with the × in its corner — and closing it asks what you meant by it, because those are two different answers.
The bell
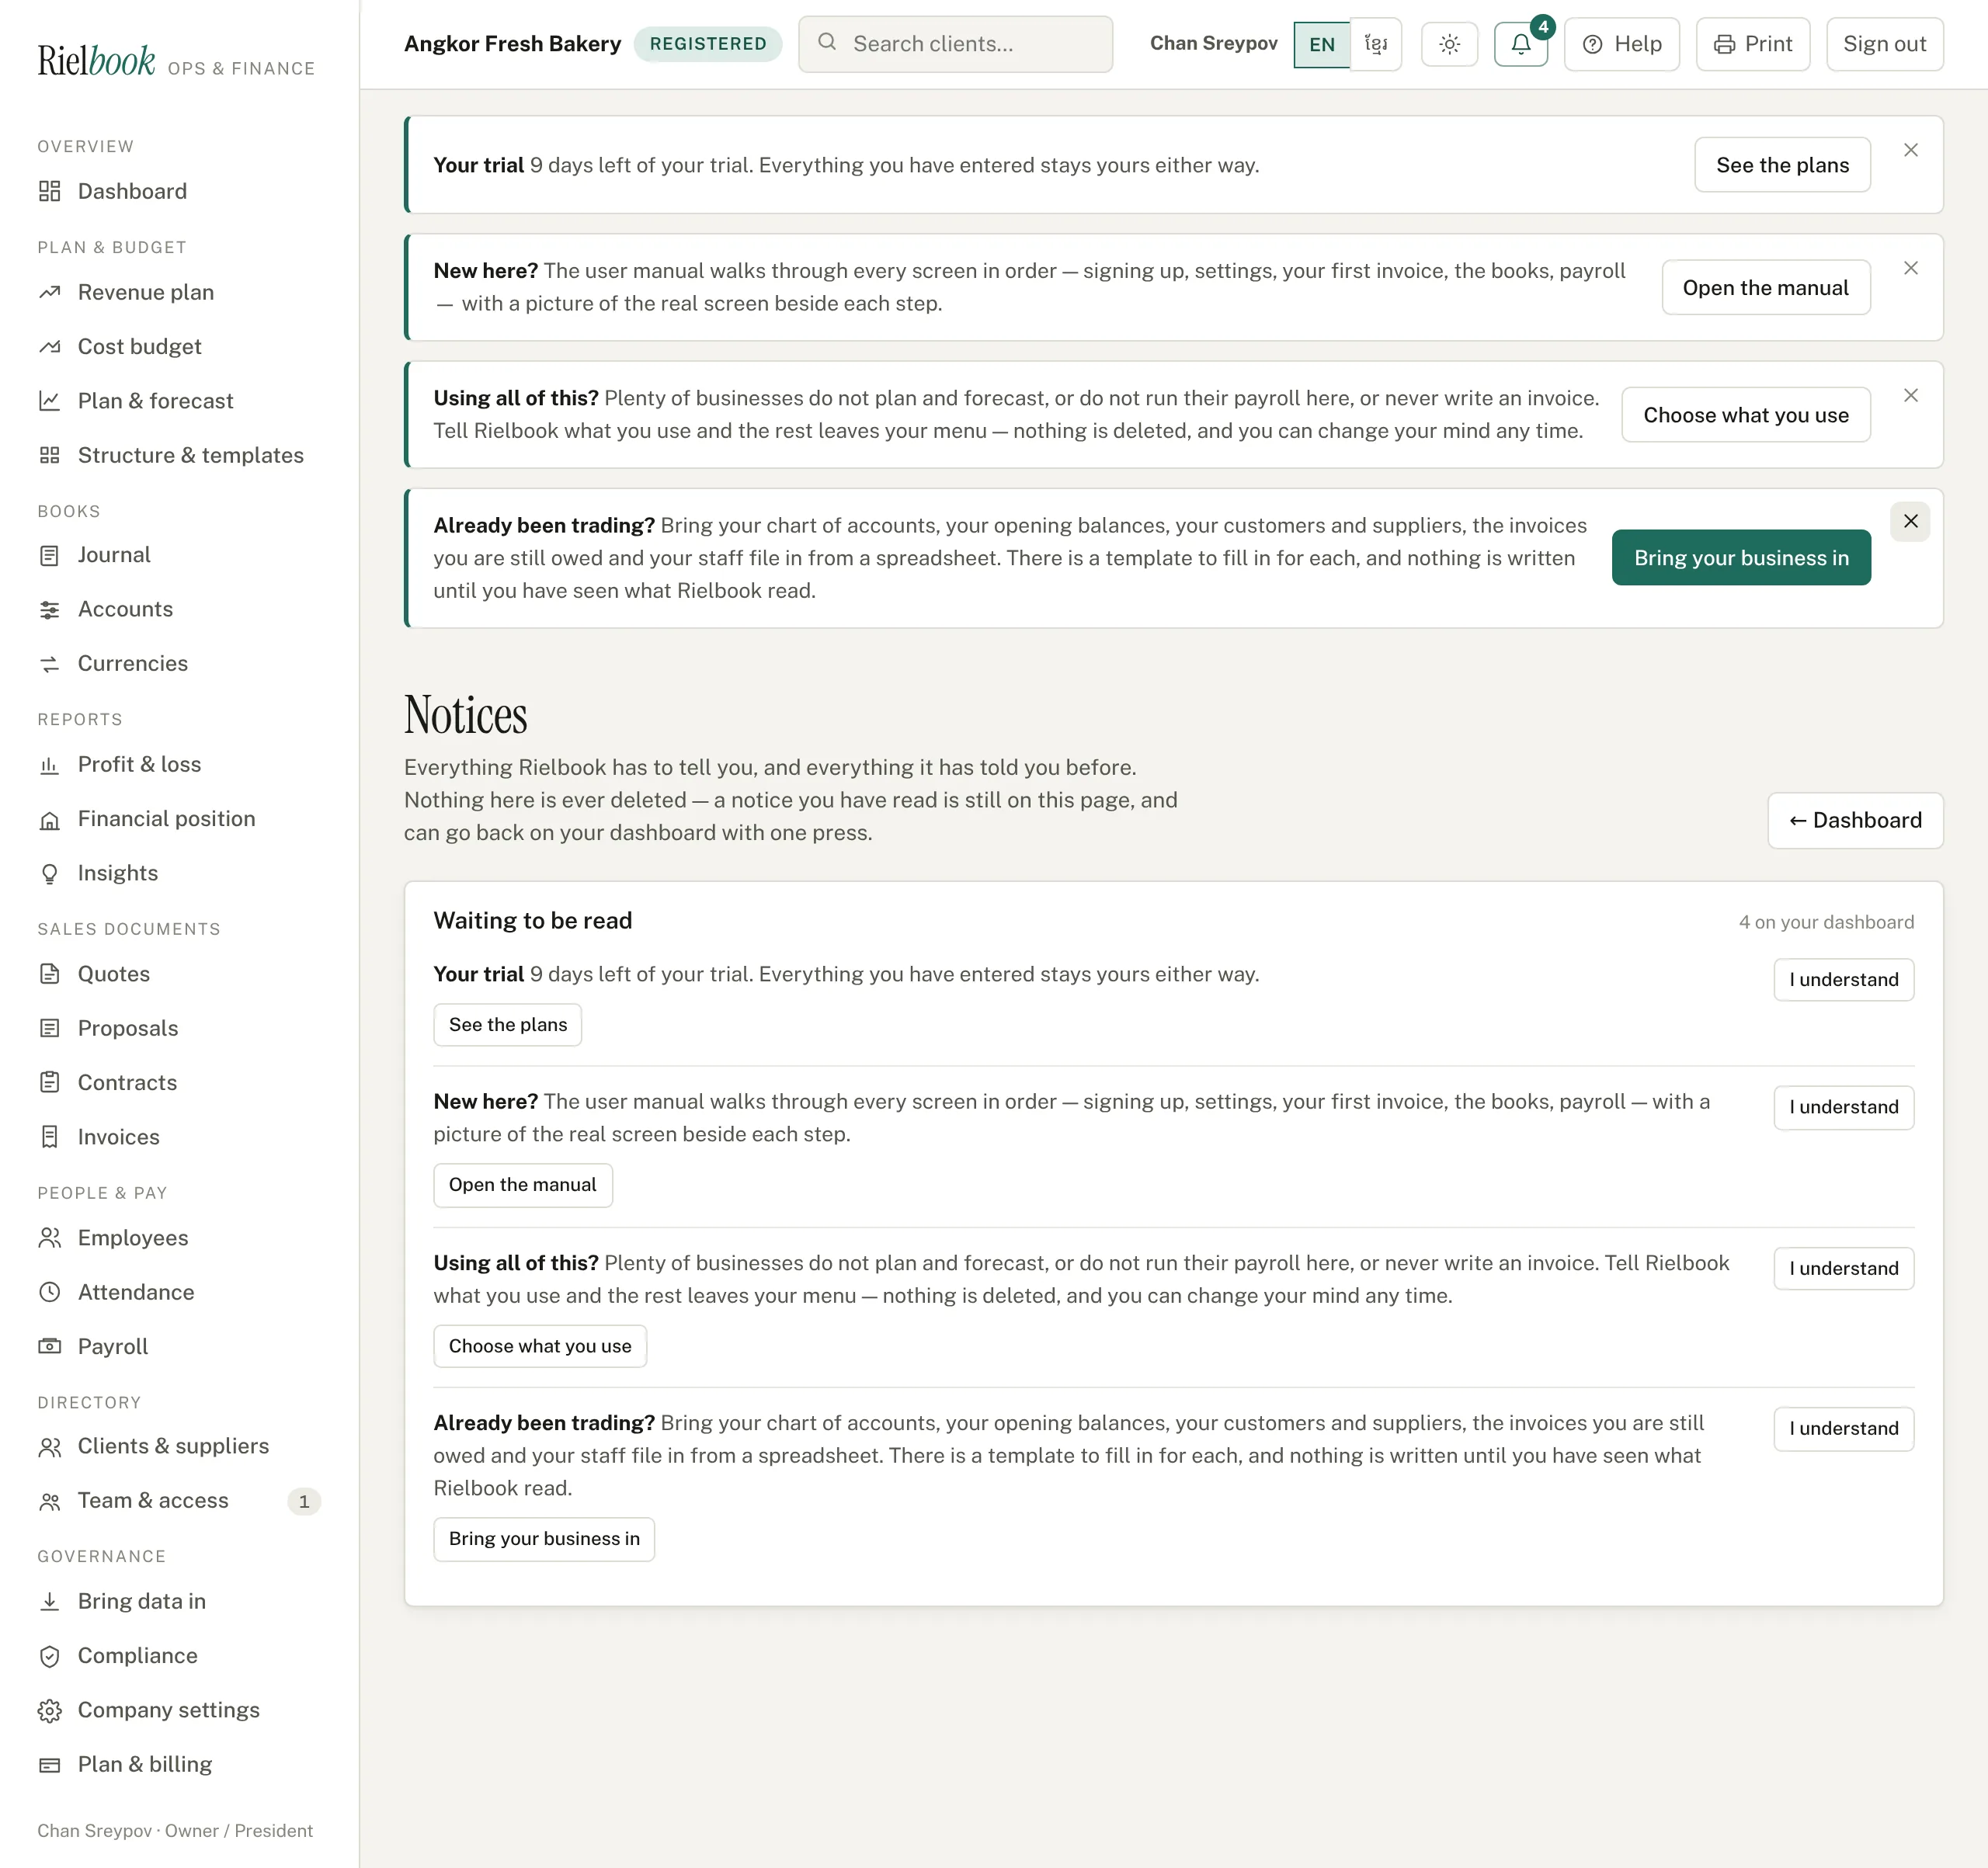
Top right, beside Help. The number on it is how many notices are still waiting to be read.

Pressing it opens Notices: what is waiting, and underneath it everything you have already answered, with what you said and — for anything you put off — the day it is coming back.
Three things worth knowing
- They are yours, not the company's. Two people in the same business each get their own. One of them pressing I understand does not take the card off anybody else's screen.
- Your trial comes back. Clearing the trial notice does not mean silence until the day it ends: it returns with a week to go, with three days, on the last day, and when it has run out. Four reminders over the last ten days, and never two days running.
- A notice stops on its own when it stops being true. Once you have told Rielbook what you use, the card asking you to goes — from your dashboard and from the bell — because there is nothing left to say. It is not hidden; it no longer applies.
Bringing an existing business in
Almost nobody signs up to Rielbook on the day they start trading. A hardware shop that has been open six years arrives with a chart of accounts from its accountant, a balance at the bank, a list of customers and suppliers, a drawer of invoices nobody has paid yet, and nine people on the payroll. If the first hour here is spent typing all that in by hand, there is no second hour.
So none of it has to be typed. Every one of those has a template to fill in and an importer that reads it back. They all live on one page: Governance›Bring data in.
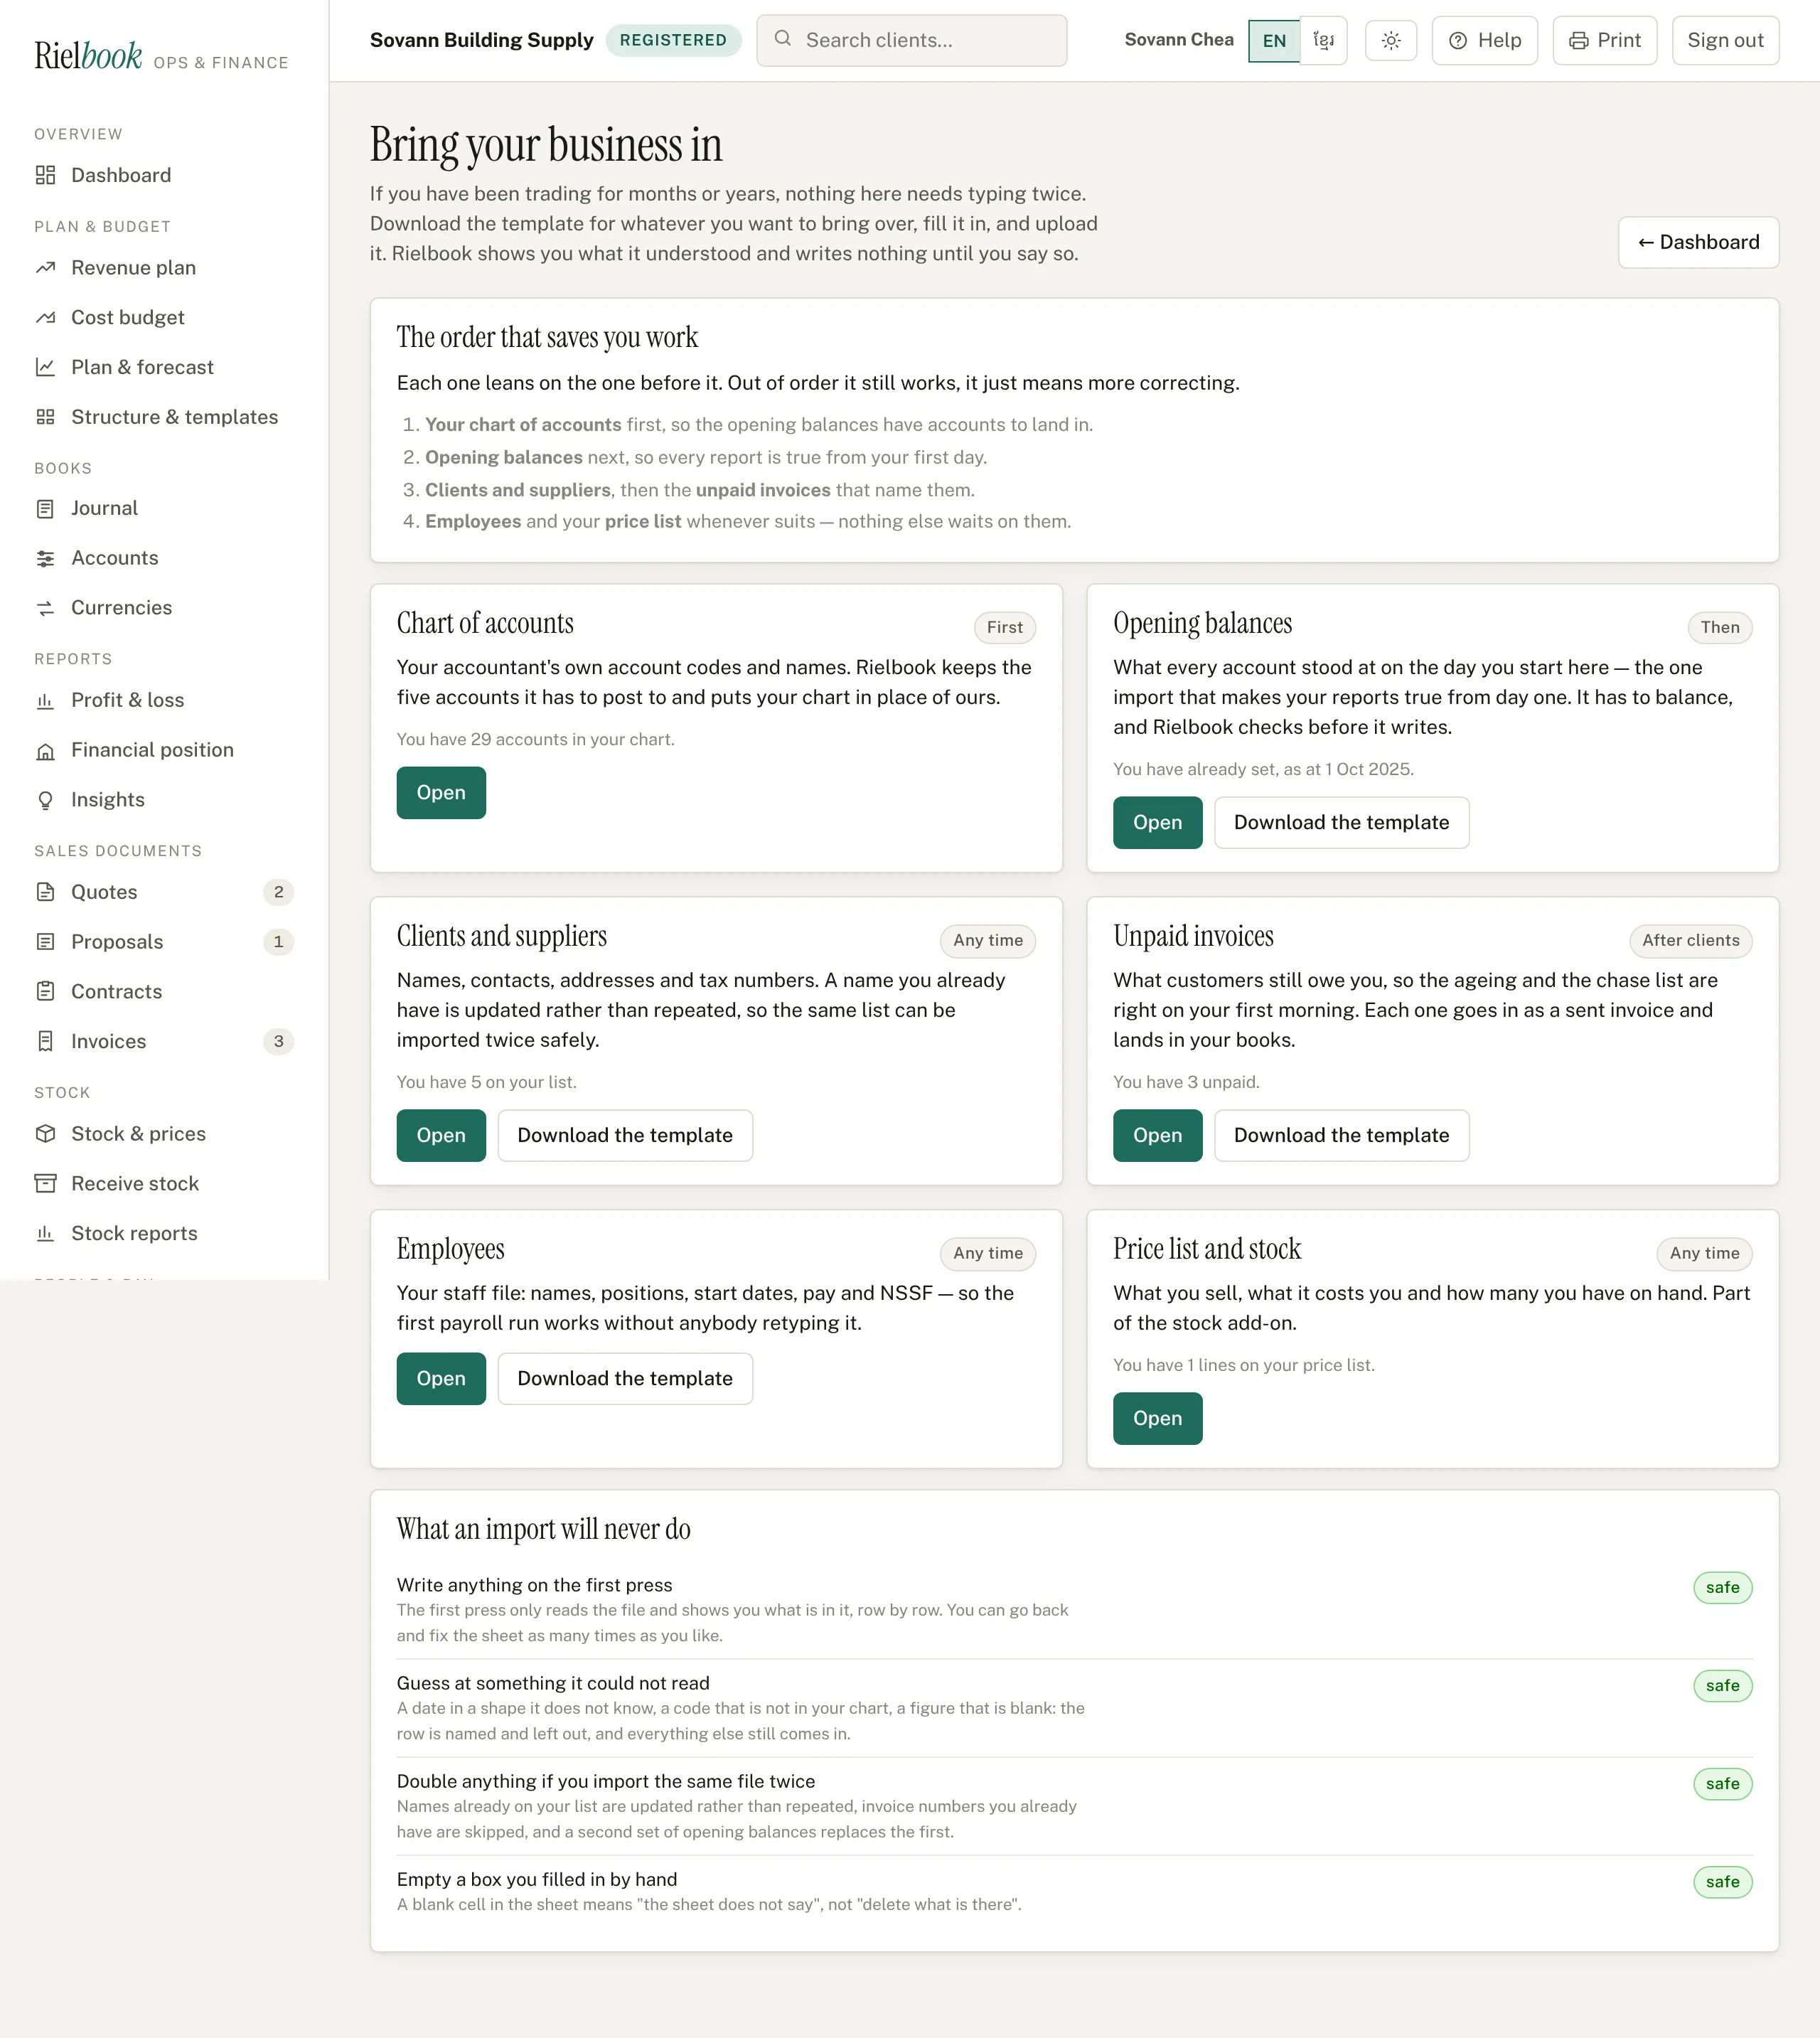
- Nothing is written until the second press. The first press only reads the file and shows you what it understood, row by row. You can go back and fix the sheet as many times as you like.
- A row it cannot read is named, never guessed. A date in a shape it does not know, a code that is not in your chart, an amount that is blank — the row is named, the reason is in plain words beside it, and everything else still comes in.
- The same file twice does not double anything. Names already on your list are brought up to date rather than repeated, invoice numbers you already have are skipped, and a second set of opening balances replaces the first instead of adding to it.
1. The order that saves you work
Each one leans on the one before it. Out of order it still works — it just means more correcting afterwards.
- Your chart of accounts, so the opening balances have accounts to land in. This one has a chapter of its own under Accounts.
- Opening balances, so every report is true from your first day.
- Clients and suppliers, then the unpaid invoices that name them.
- Employees and your price list whenever suits — nothing else waits on those.
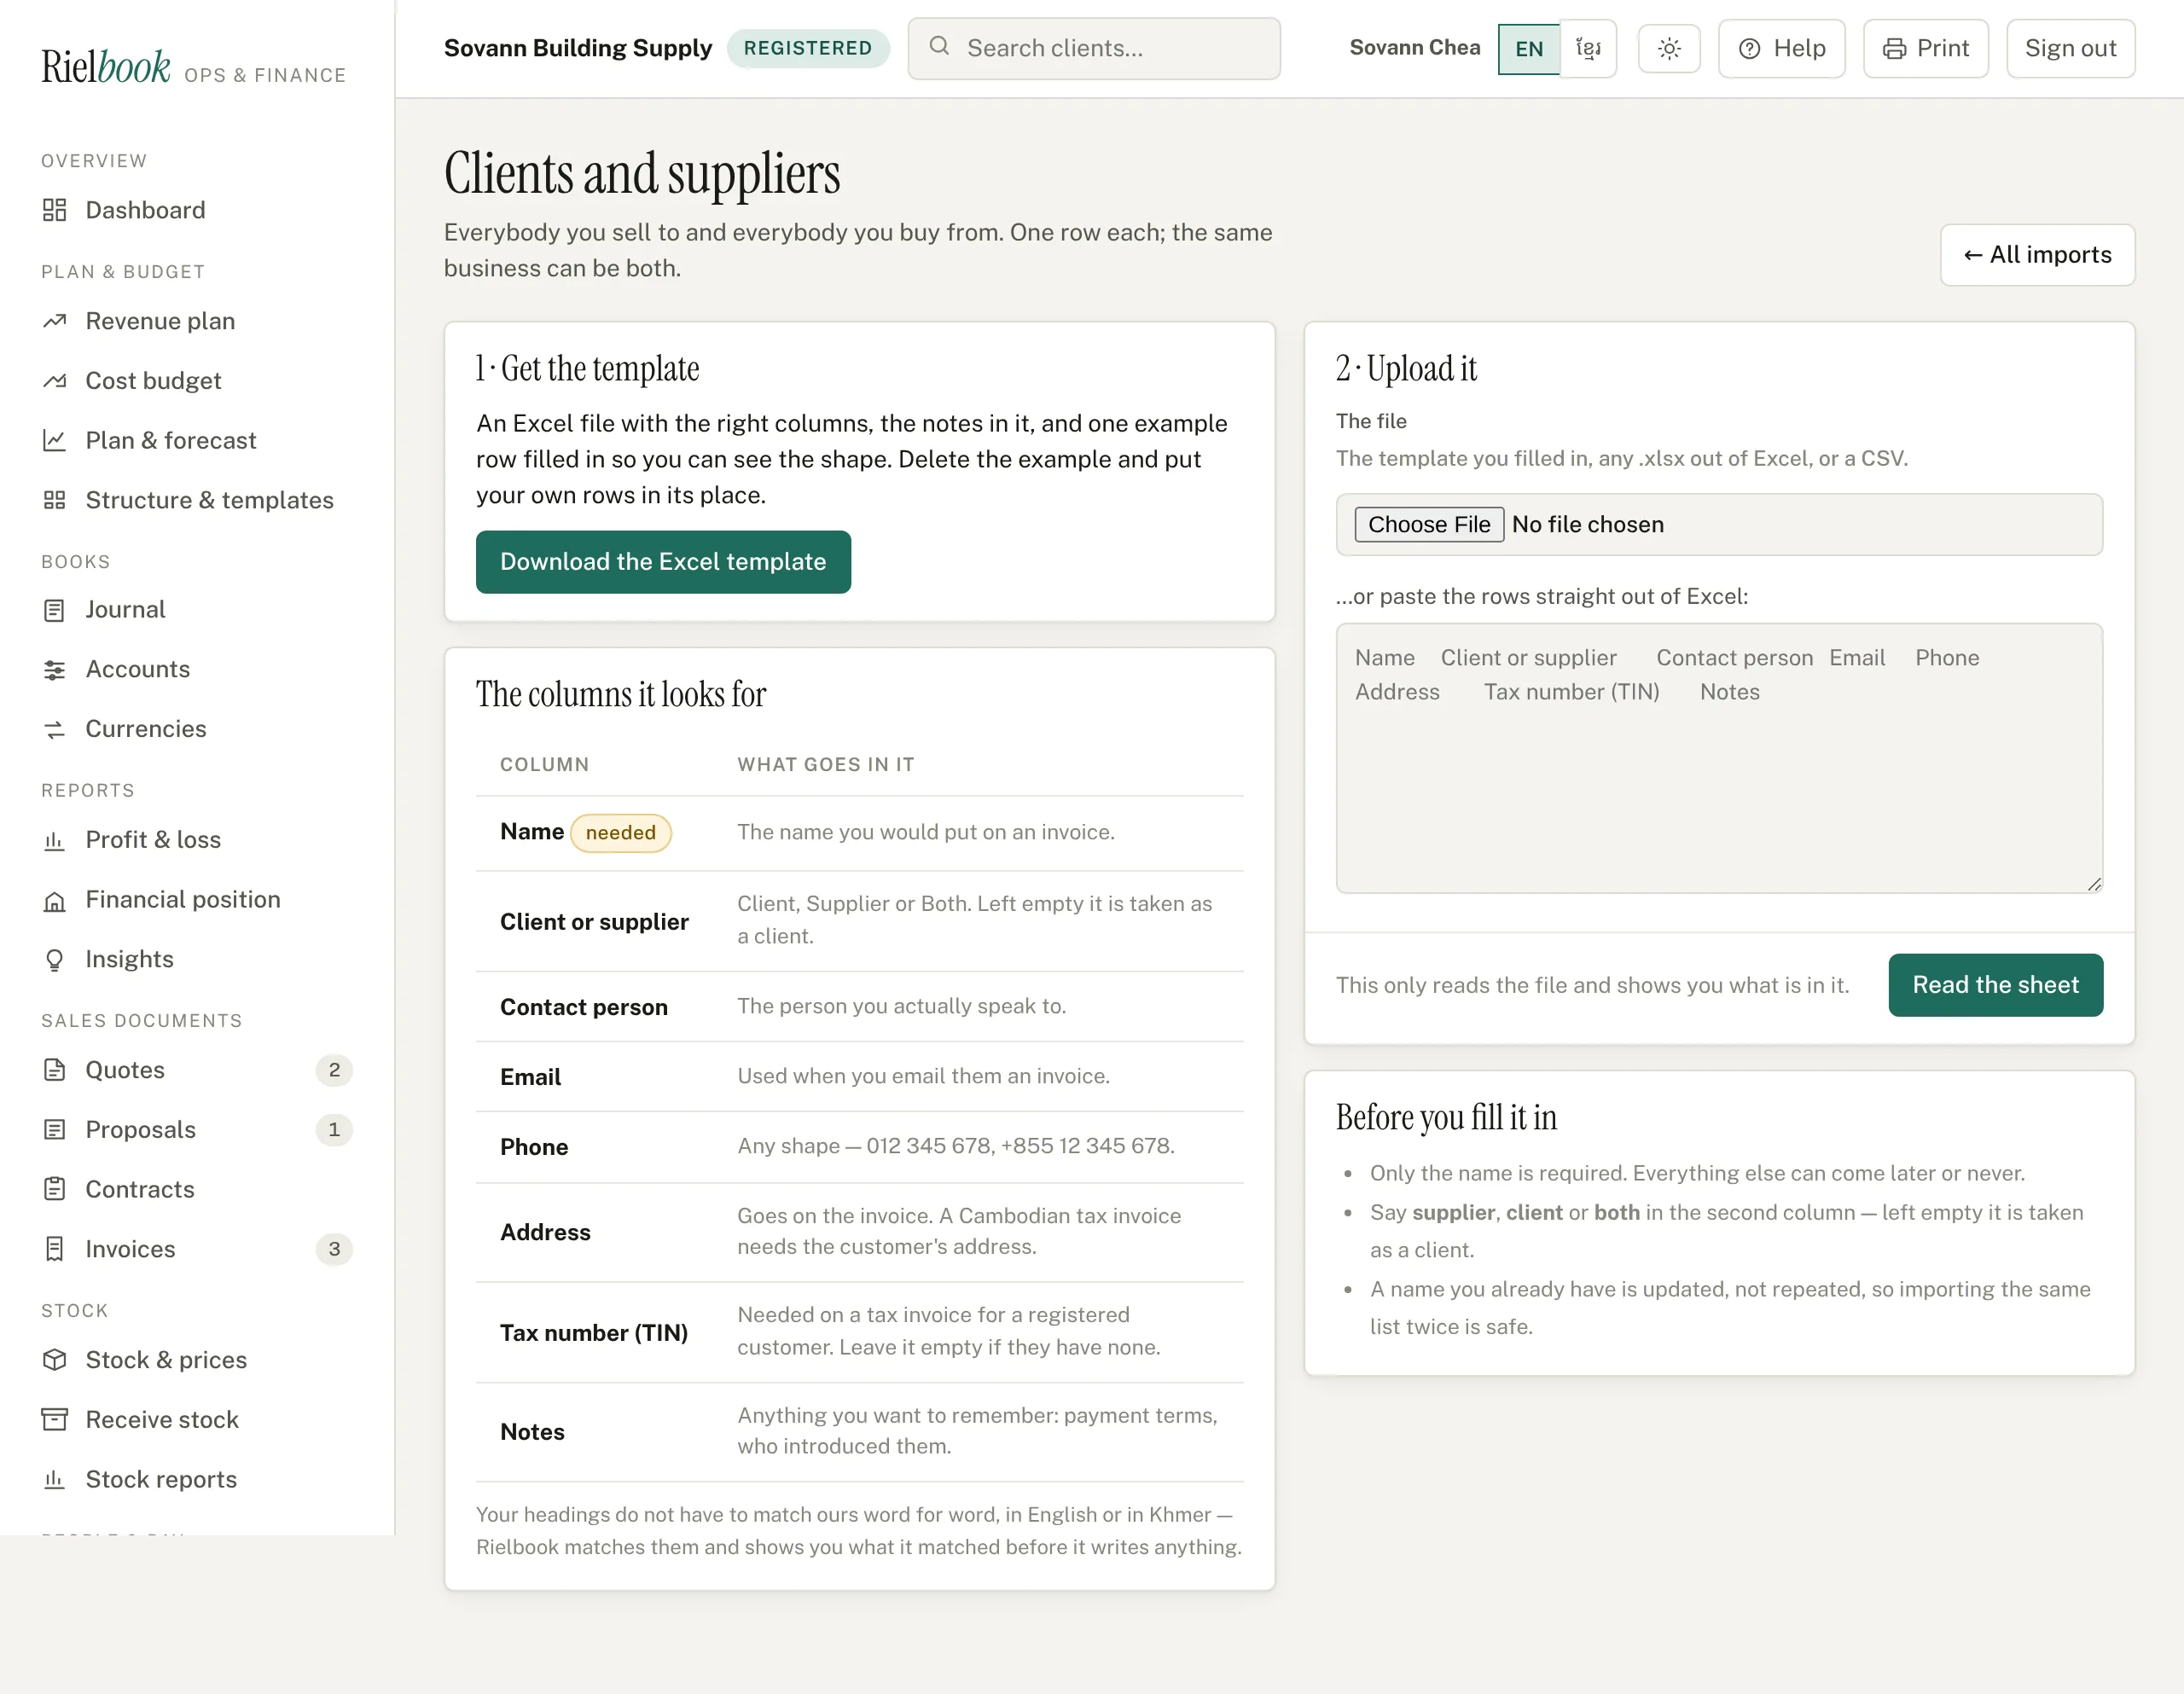
2. Get the template, fill it in, upload it
Each card has a Download the template button. What you get is an Excel file with the right columns, a second sheet explaining every one of them in plain words, and one example row so you can see the shape expected. Delete the example and put your own rows in its place — and if you forget, Rielbook passes over it anyway, so the example never becomes a customer.
3. Check what it read
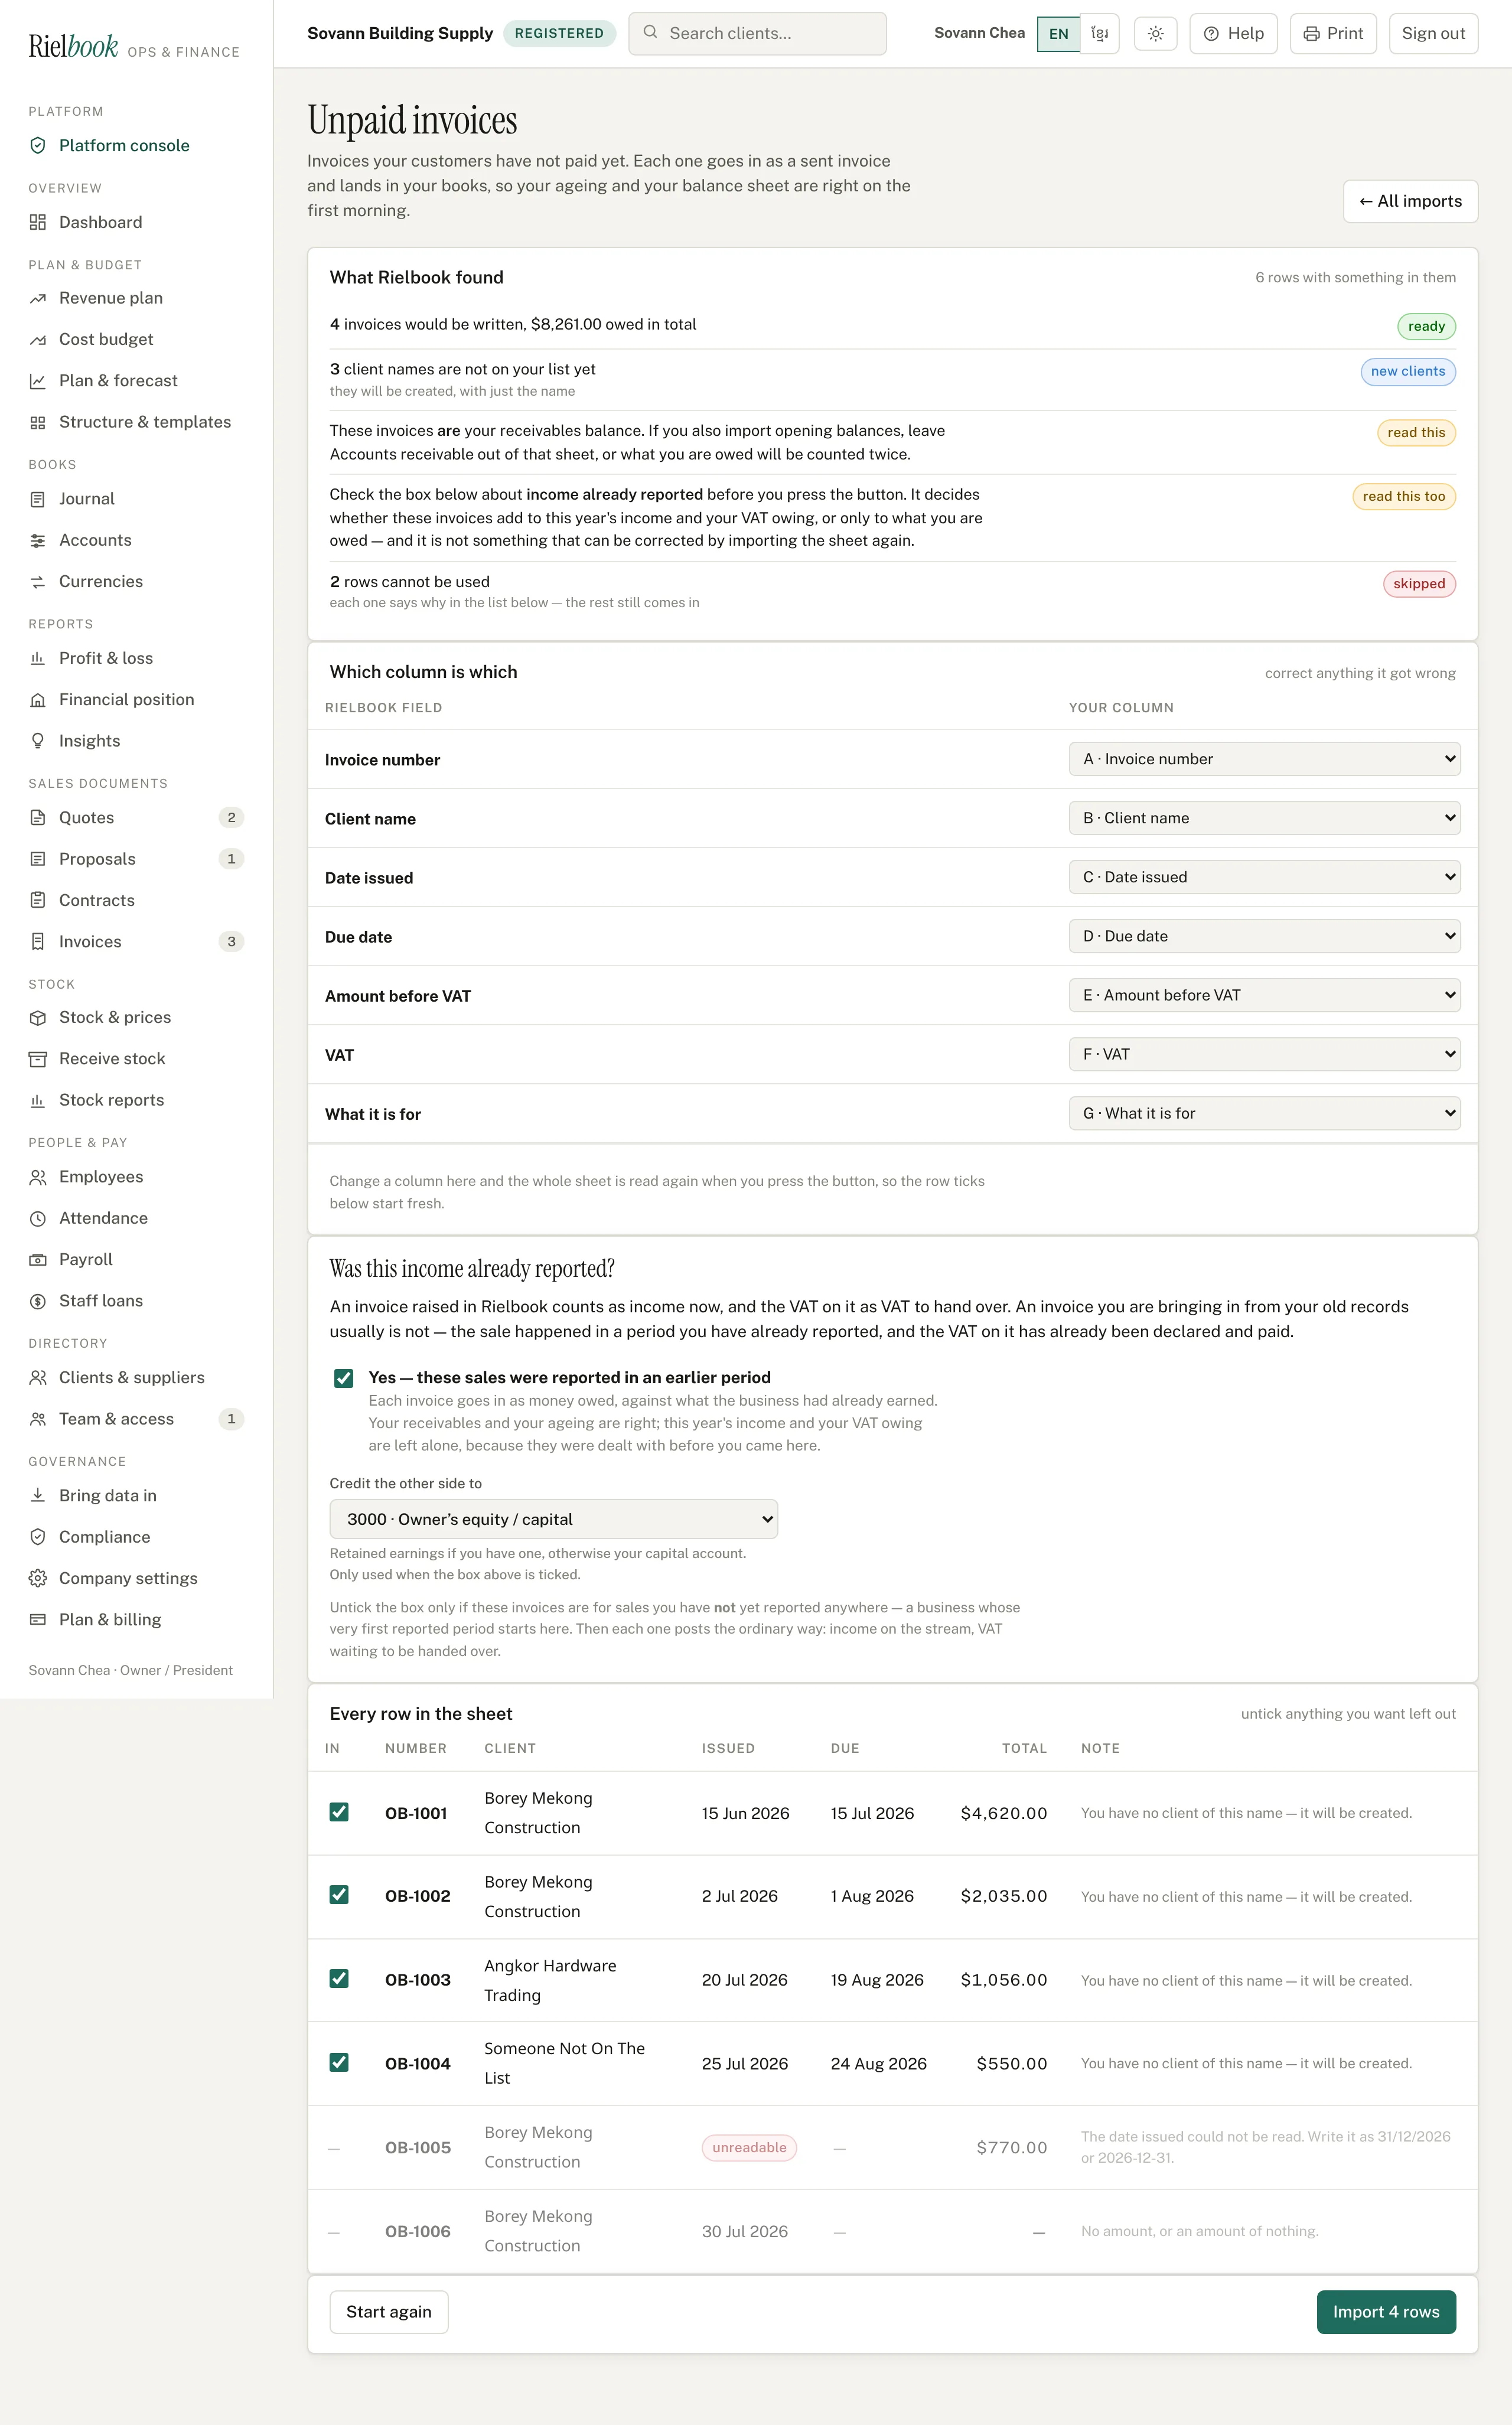
The second screen is the one that matters. At the top is a summary of what is about to happen; underneath is every row in your sheet with a tick-box beside it. Untick anything you want left out.
4. The question only you can answer
On the unpaid-invoices import there is one question that is not in the sheet, and getting it wrong is expensive: were these sales already reported?
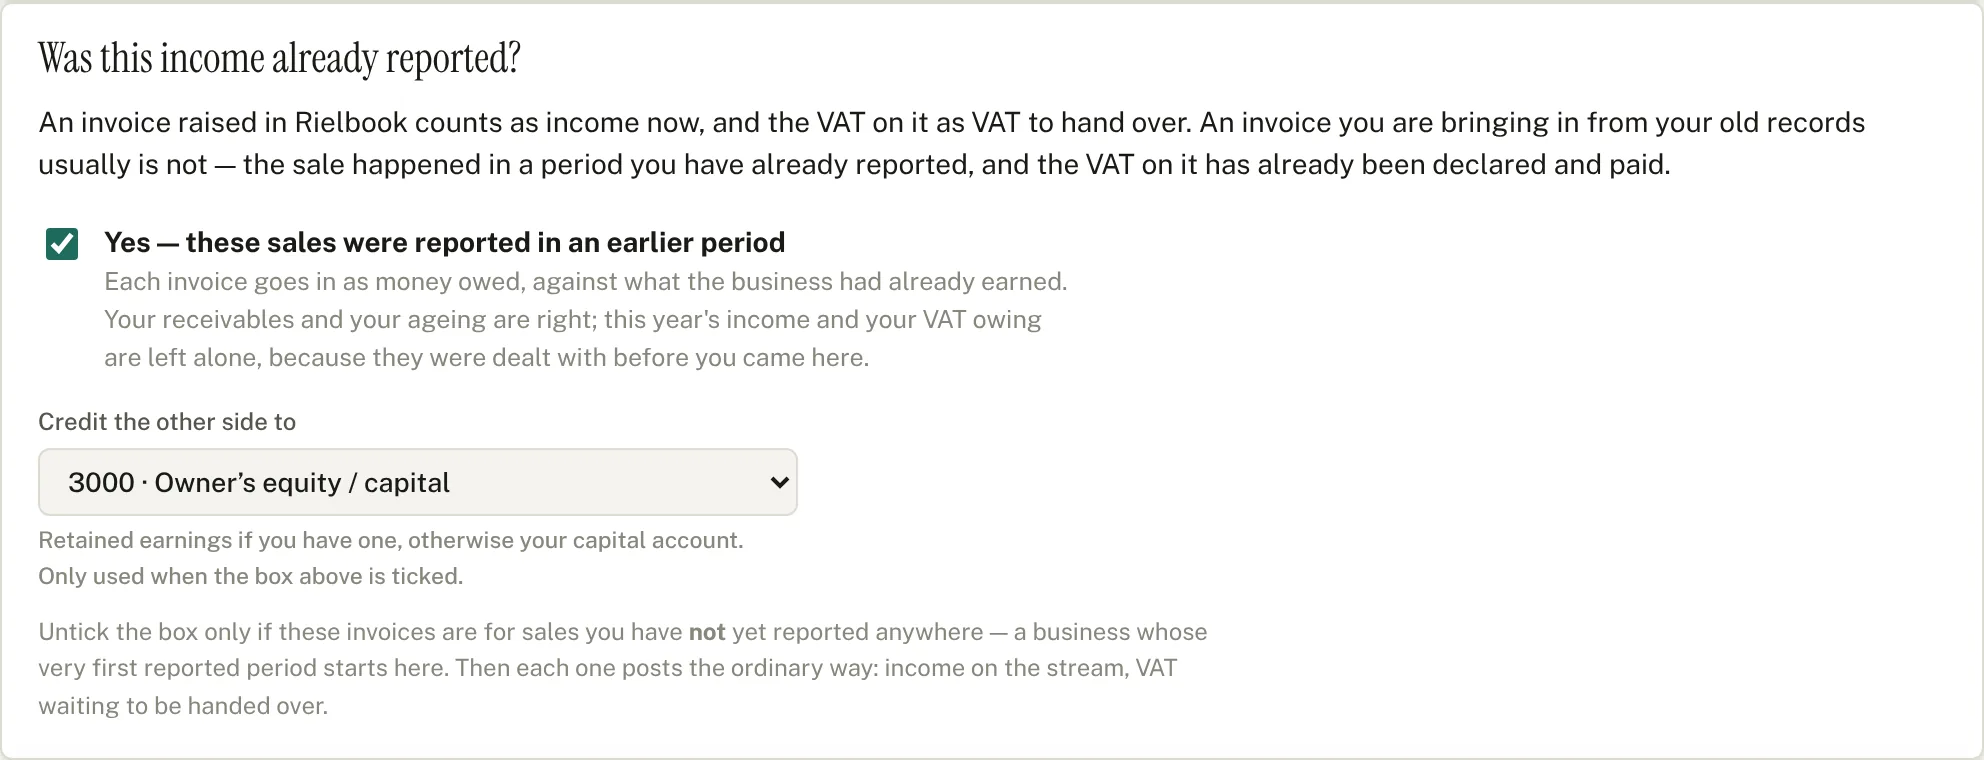
An invoice you raise in Rielbook counts as income now, and the VAT on it as VAT to hand over. An invoice you bring in from your old records usually is not: that sale was in a period you have already reported, and its VAT has already been declared and paid. Credit income and VAT again and this year's profit & loss carries revenue you did not earn this year, and your VAT owing shows money you have already handed over.
5. Opening balances, and the one thing to get right
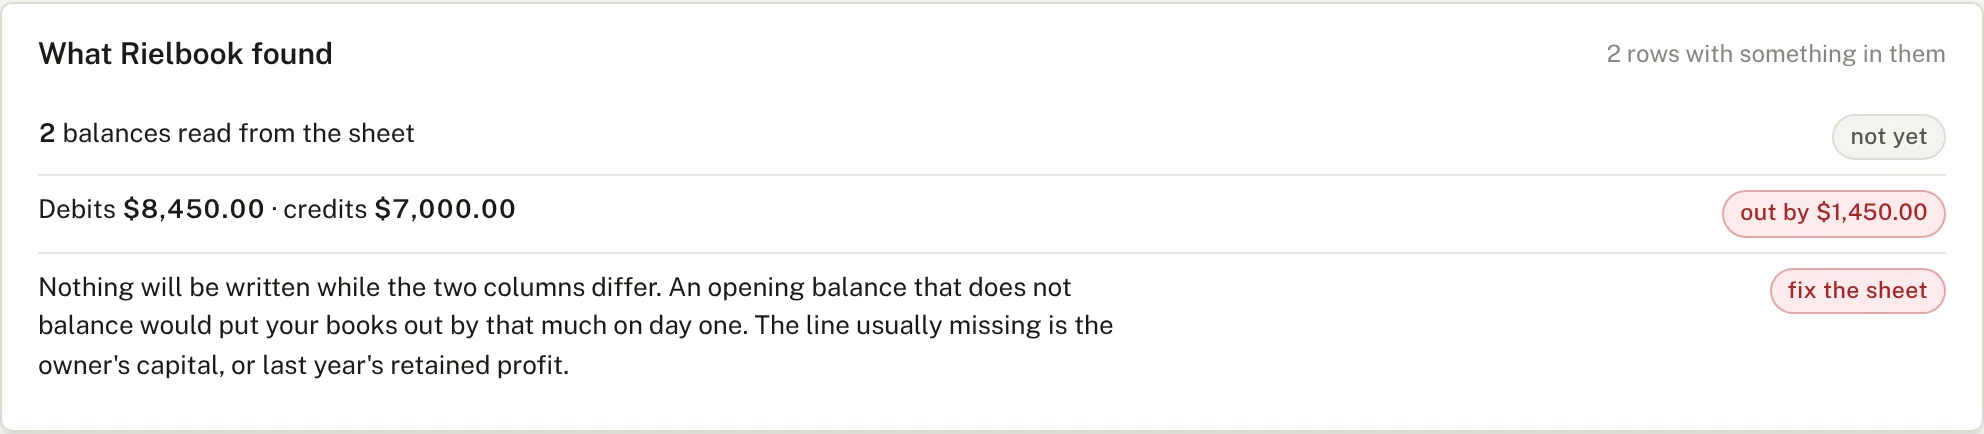
The opening balances import is a trial balance: what every account stood at on the day before you started using Rielbook. One line per account, the figure in Debit or in Credit — never both — and the two columns have to come to the same total.
If they do not, Rielbook writes nothing at all and tells you how far out you are.
6. What comes in, and what it does to your books
| What you import | What it changes |
|---|---|
| Chart of accounts | Your codes and names replace ours. The five accounts Rielbook has to post to — bank, receivables, payables, VAT, capital — are kept, and you say which of yours does each job. |
| Opening balances | One journal entry, dated the day before you start. It is in your journal like any other entry, so you can open it, read it and correct it. Every report builds on top of it from that day on. |
| Clients and suppliers | The directory only. Nothing financial — a client list does not change a single figure. |
| Unpaid invoices | Each one goes in as a sent invoice and posts to your books. If the sale was already reported — the usual case — it posts as money owed against what the business had already earned, leaving this year's income and your VAT alone. If it was not, it posts the ordinary way: receivables up, income on the stream, VAT waiting. Either way your ageing and your chase list are right on the first morning. |
| Employees | The staff file, so the first payroll run works. It sets what each person is paid now; it does not create past payslips. |
| Price list and stock | What you sell, what it costs you, and how many you have. Part of the stock add-on, and it has its own chapter. |
If something goes wrong
- "No account has this code." The opening-balances sheet names an account your chart does not have. Import your chart of accounts first, or correct the code. Easier: download Your own account codes and fill that in instead.
- "The date issued could not be read." Write dates day first — 31/12/2026 — or year first, 2026-12-31. A cell formatted as a date in Excel works too. What never works is month first: 03/04/2026 has to mean one thing, and here it means the 3rd of April.
- "That import has expired." The sheet you read is kept only until you write it. Upload it again — nothing was written in between.
- Half the list came in and half did not. Your plan has a limit on how many clients or employees you can have. The message says how many could not be added, and nobody already in is touched. Move up a plan and import the same sheet again to bring the rest in.
- You imported the wrong file. For clients and employees, import the right one over the top — names match and are corrected. For opening balances, import the corrected sheet; it replaces the old one. For invoices, open each one and delete it.
Turning off what you do not use
Rielbook does a great deal, and most businesses want some of it. A freelance designer has no stock, no payroll and no interest in a twelve-month forecast. A hardware shop lives in stock and barely touches contracts. A small construction firm plans everything. Shown the whole menu, all three spend their first week deciding which half to ignore — and a menu item somebody has decided to ignore is worse than no menu item at all, because it nags.
So tell Rielbook what you use. Governance›Company settings, under What this company uses.
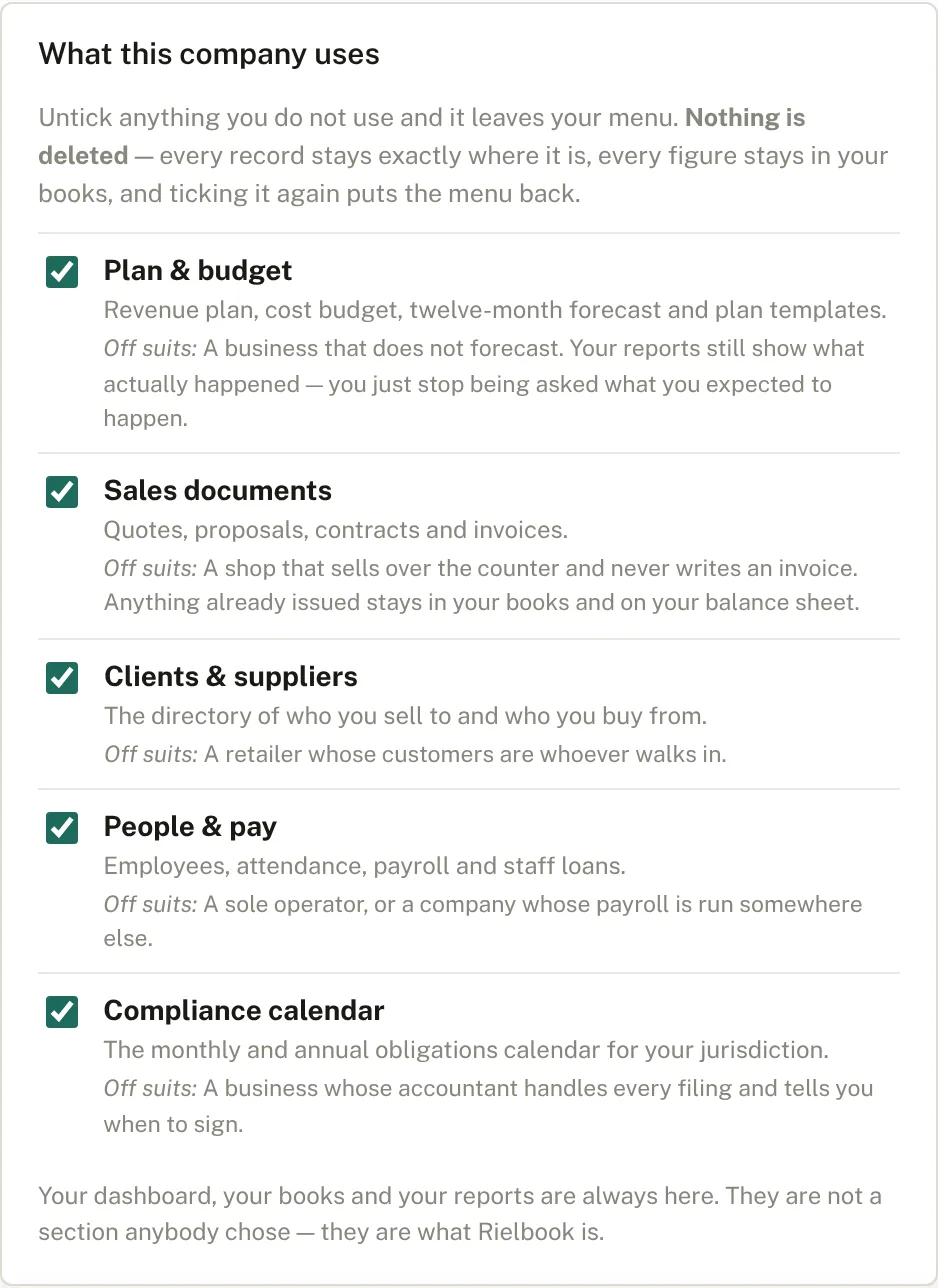
What each one covers
| Section | What goes with it | Switching it off suits |
|---|---|---|
| Plan & budget | Revenue plan, cost budget, twelve-month forecast, plan templates | A business that does not forecast. Your reports still show what actually happened — you just stop being asked what you expected to happen. |
| Sales documents | Quotes, proposals, contracts, invoices | A shop that sells over the counter and never writes an invoice. Anything already issued stays in your books and on your balance sheet. |
| Clients & suppliers | The directory of who you sell to and buy from | A retailer whose customers are whoever walks in. |
| People & pay | Employees, attendance, payroll, staff loans | A sole operator, or a company whose payroll is run somewhere else. |
| Compliance calendar | The monthly and annual obligations calendar | A business whose accountant handles every filing and tells you when to sign. |
What a new company starts with
Everything, with one exception: a company that says it is a Freelancer starts with People & pay off, because a sole operator has no payroll to run. Everything else is on, for everybody, because a preset that guesses wrong costs somebody a feature they needed and a confused half-hour finding out why it is not there.
On a new company's dashboard there is one line inviting you to say what you use. It goes away as soon as you have.
If somebody follows an old link
They get a page saying the section is switched off, that nothing was deleted, and — if their role allows it — a button to turn it back on. Not "page not found", which would read as though Rielbook had lost something.
Working in Khmer
Press ខ្មែរ in the top bar and the menu, page titles, buttons and column headings switch to Khmer at once. Press EN to switch back. It is your own setting — the person next to you can keep English.
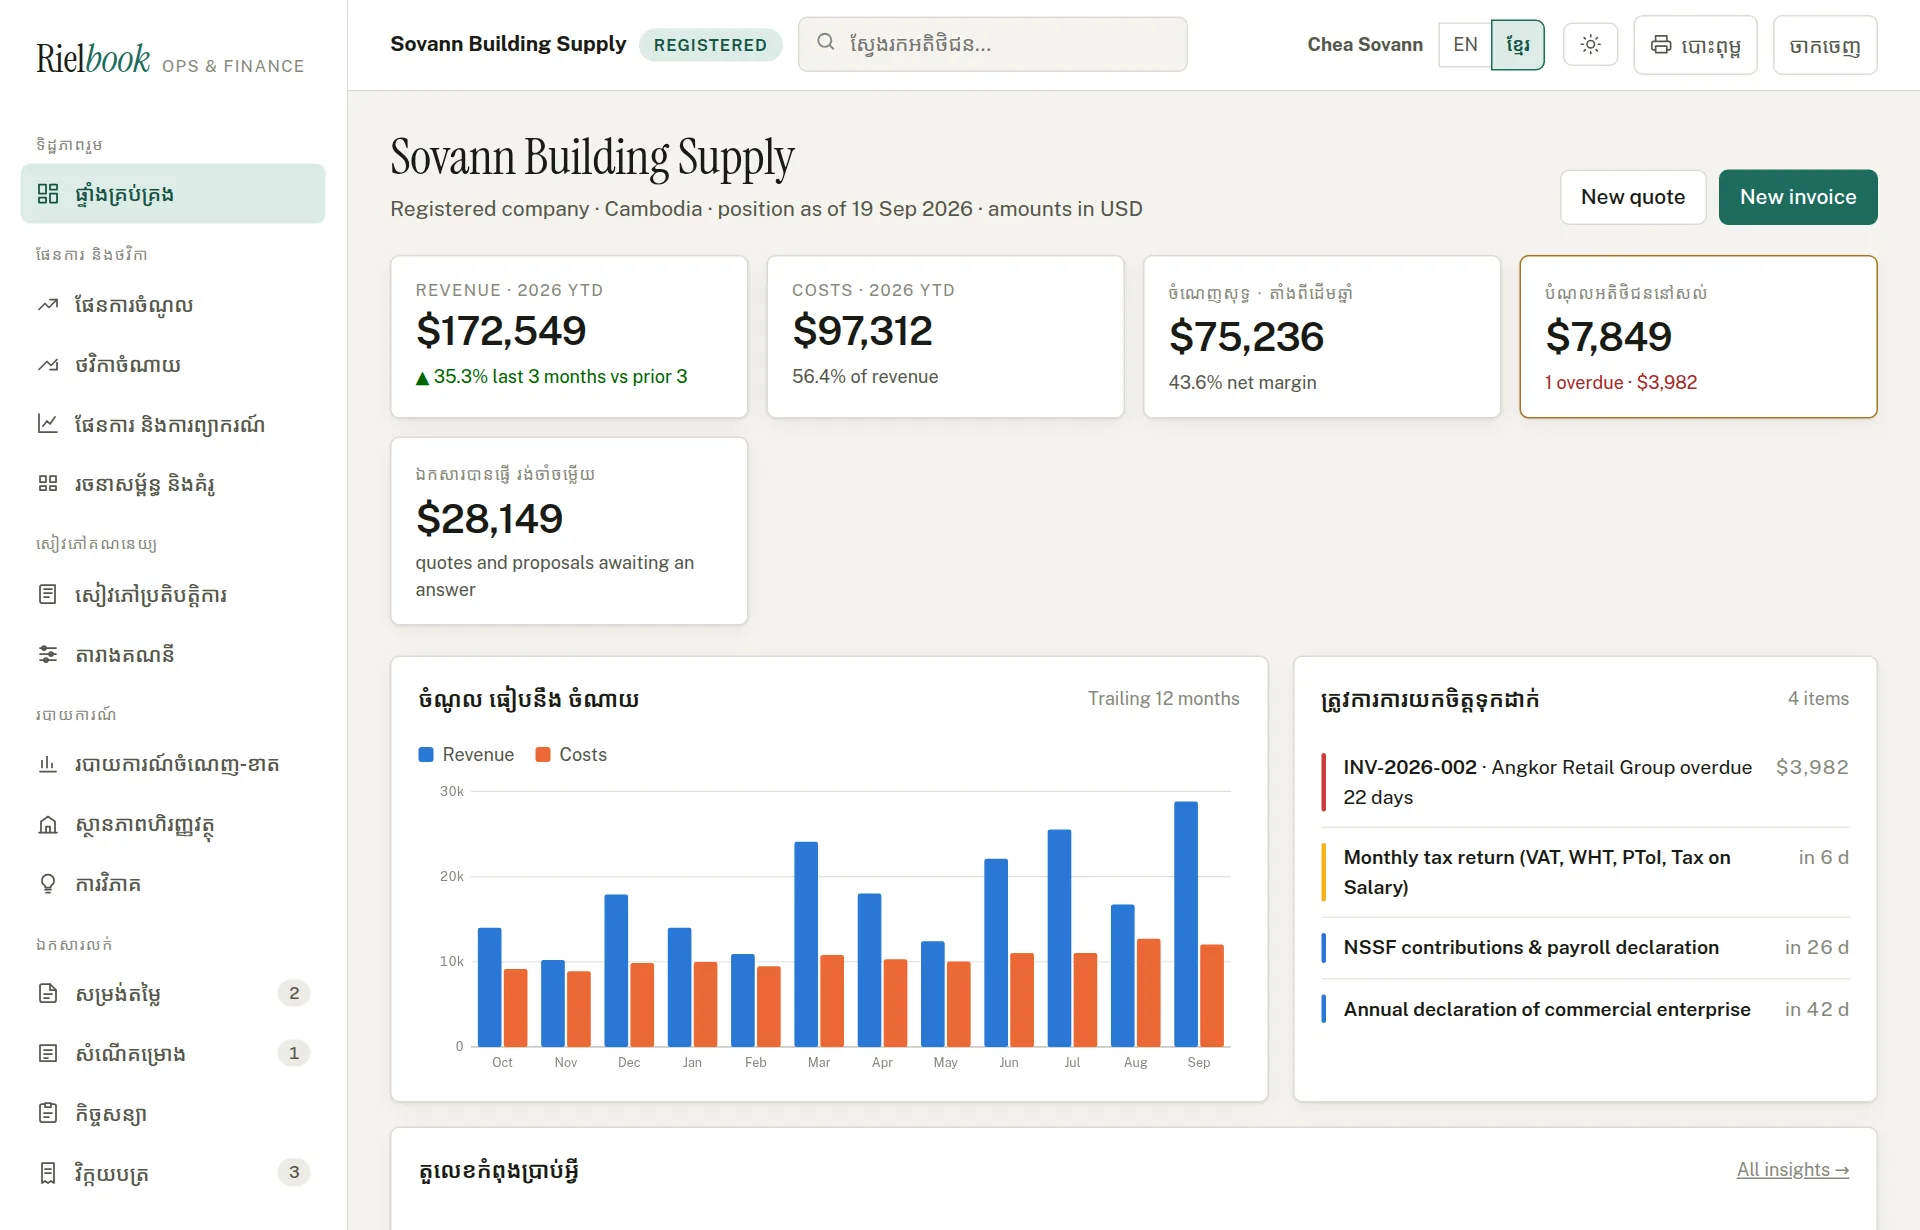
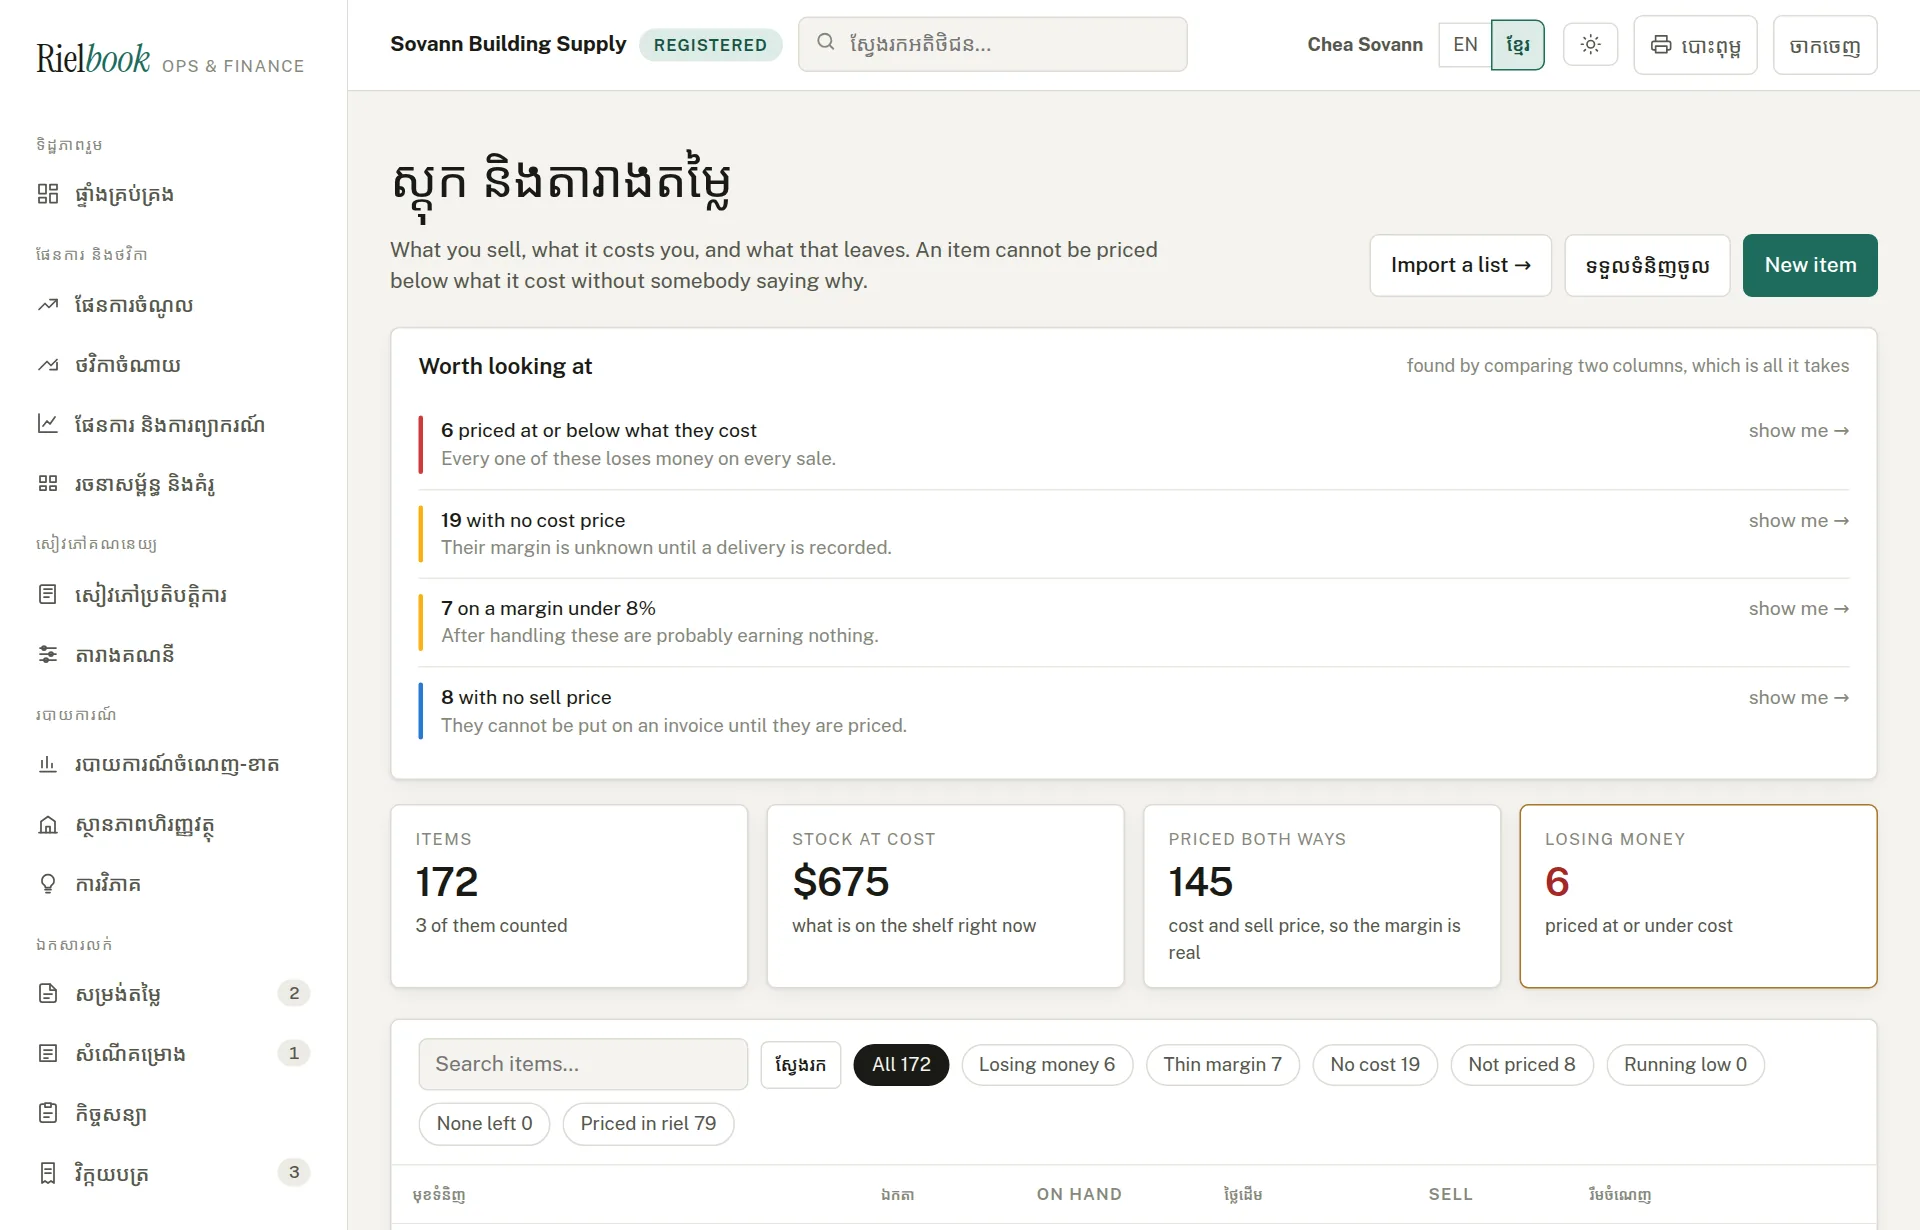
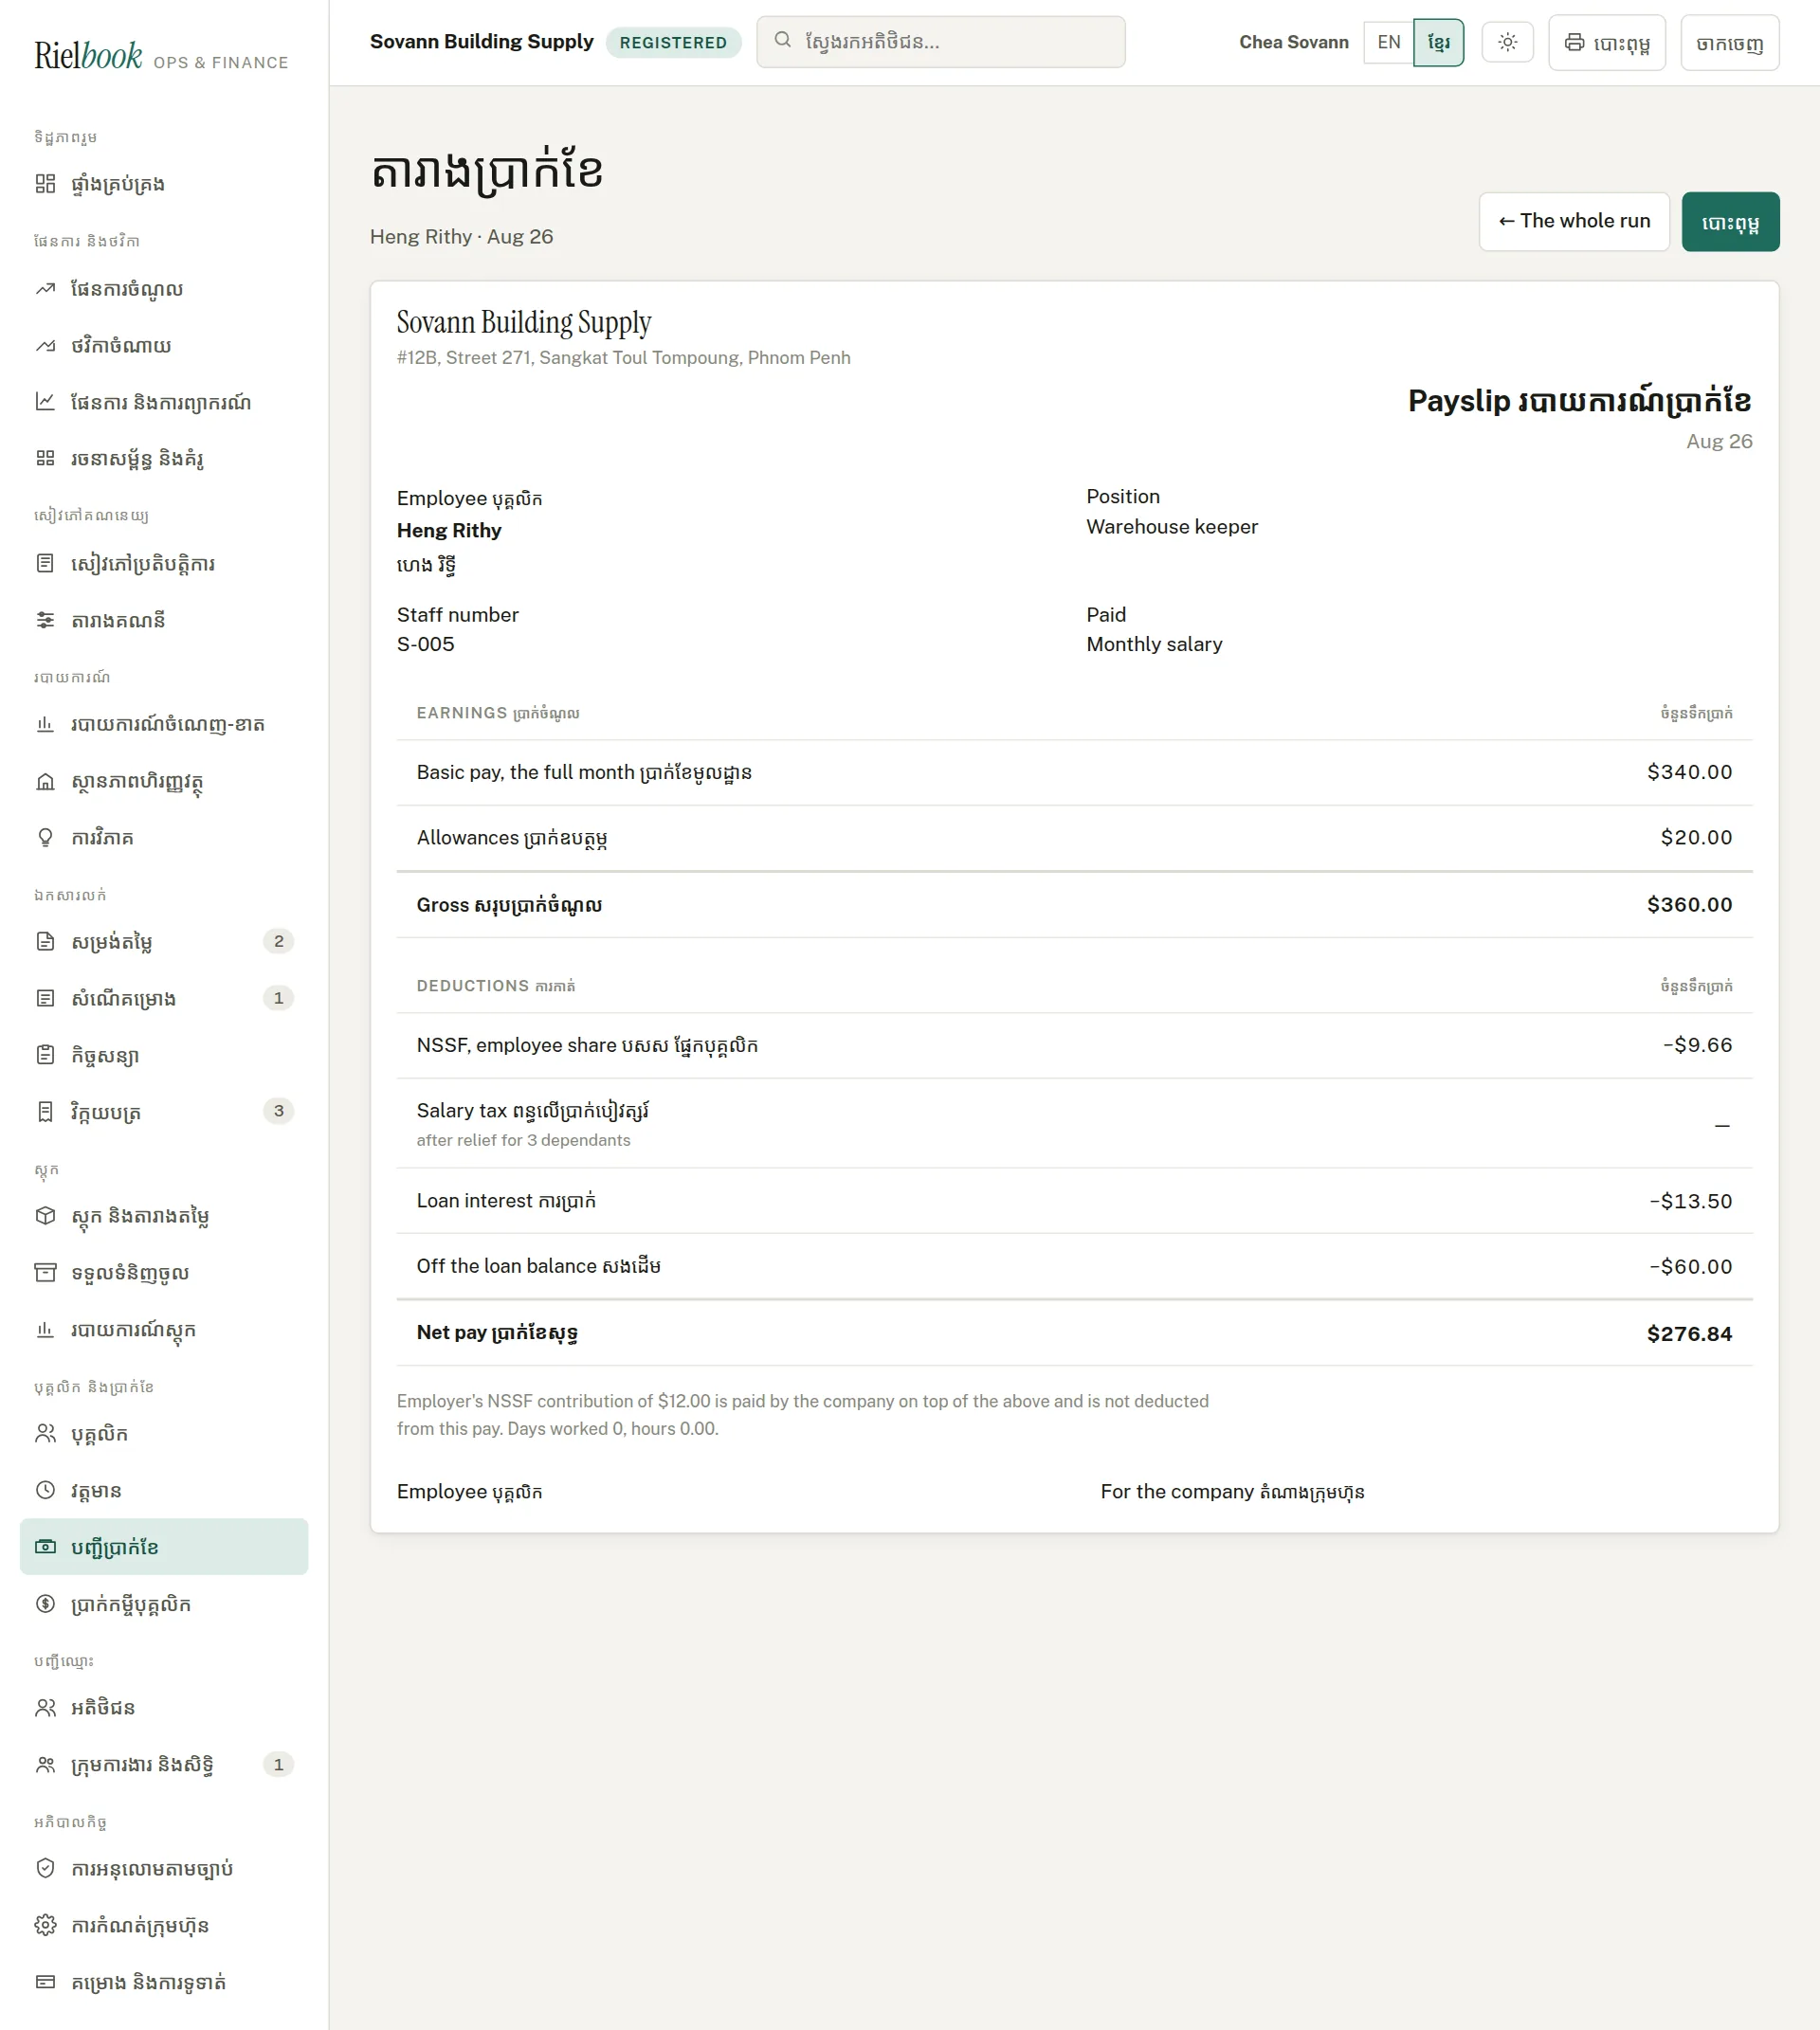
- Quotes, proposals and invoices follow the document language in settings, not the screen language, so a Khmer-speaking bookkeeper can still send an English invoice. Payslips always print in Khmer and English together. Contracts print each clause in whichever language you typed it.
- Menus, headings, buttons and the words in tables are translated. Some longer explanations on the screens are still in English; they are being translated as we go.
- Wherever you type a name — a client, an employee, an item — there is usually a second box for the name in Khmer. Fill it in and it prints on Khmer documents.
Team & access — who can see what
Everyone who uses Rielbook signs in with their own email. Each person has one role, and the role decides which parts of the menu they can open. Someone never sees a page their role does not allow — the item is simply not in their menu.
Directory›Team & access
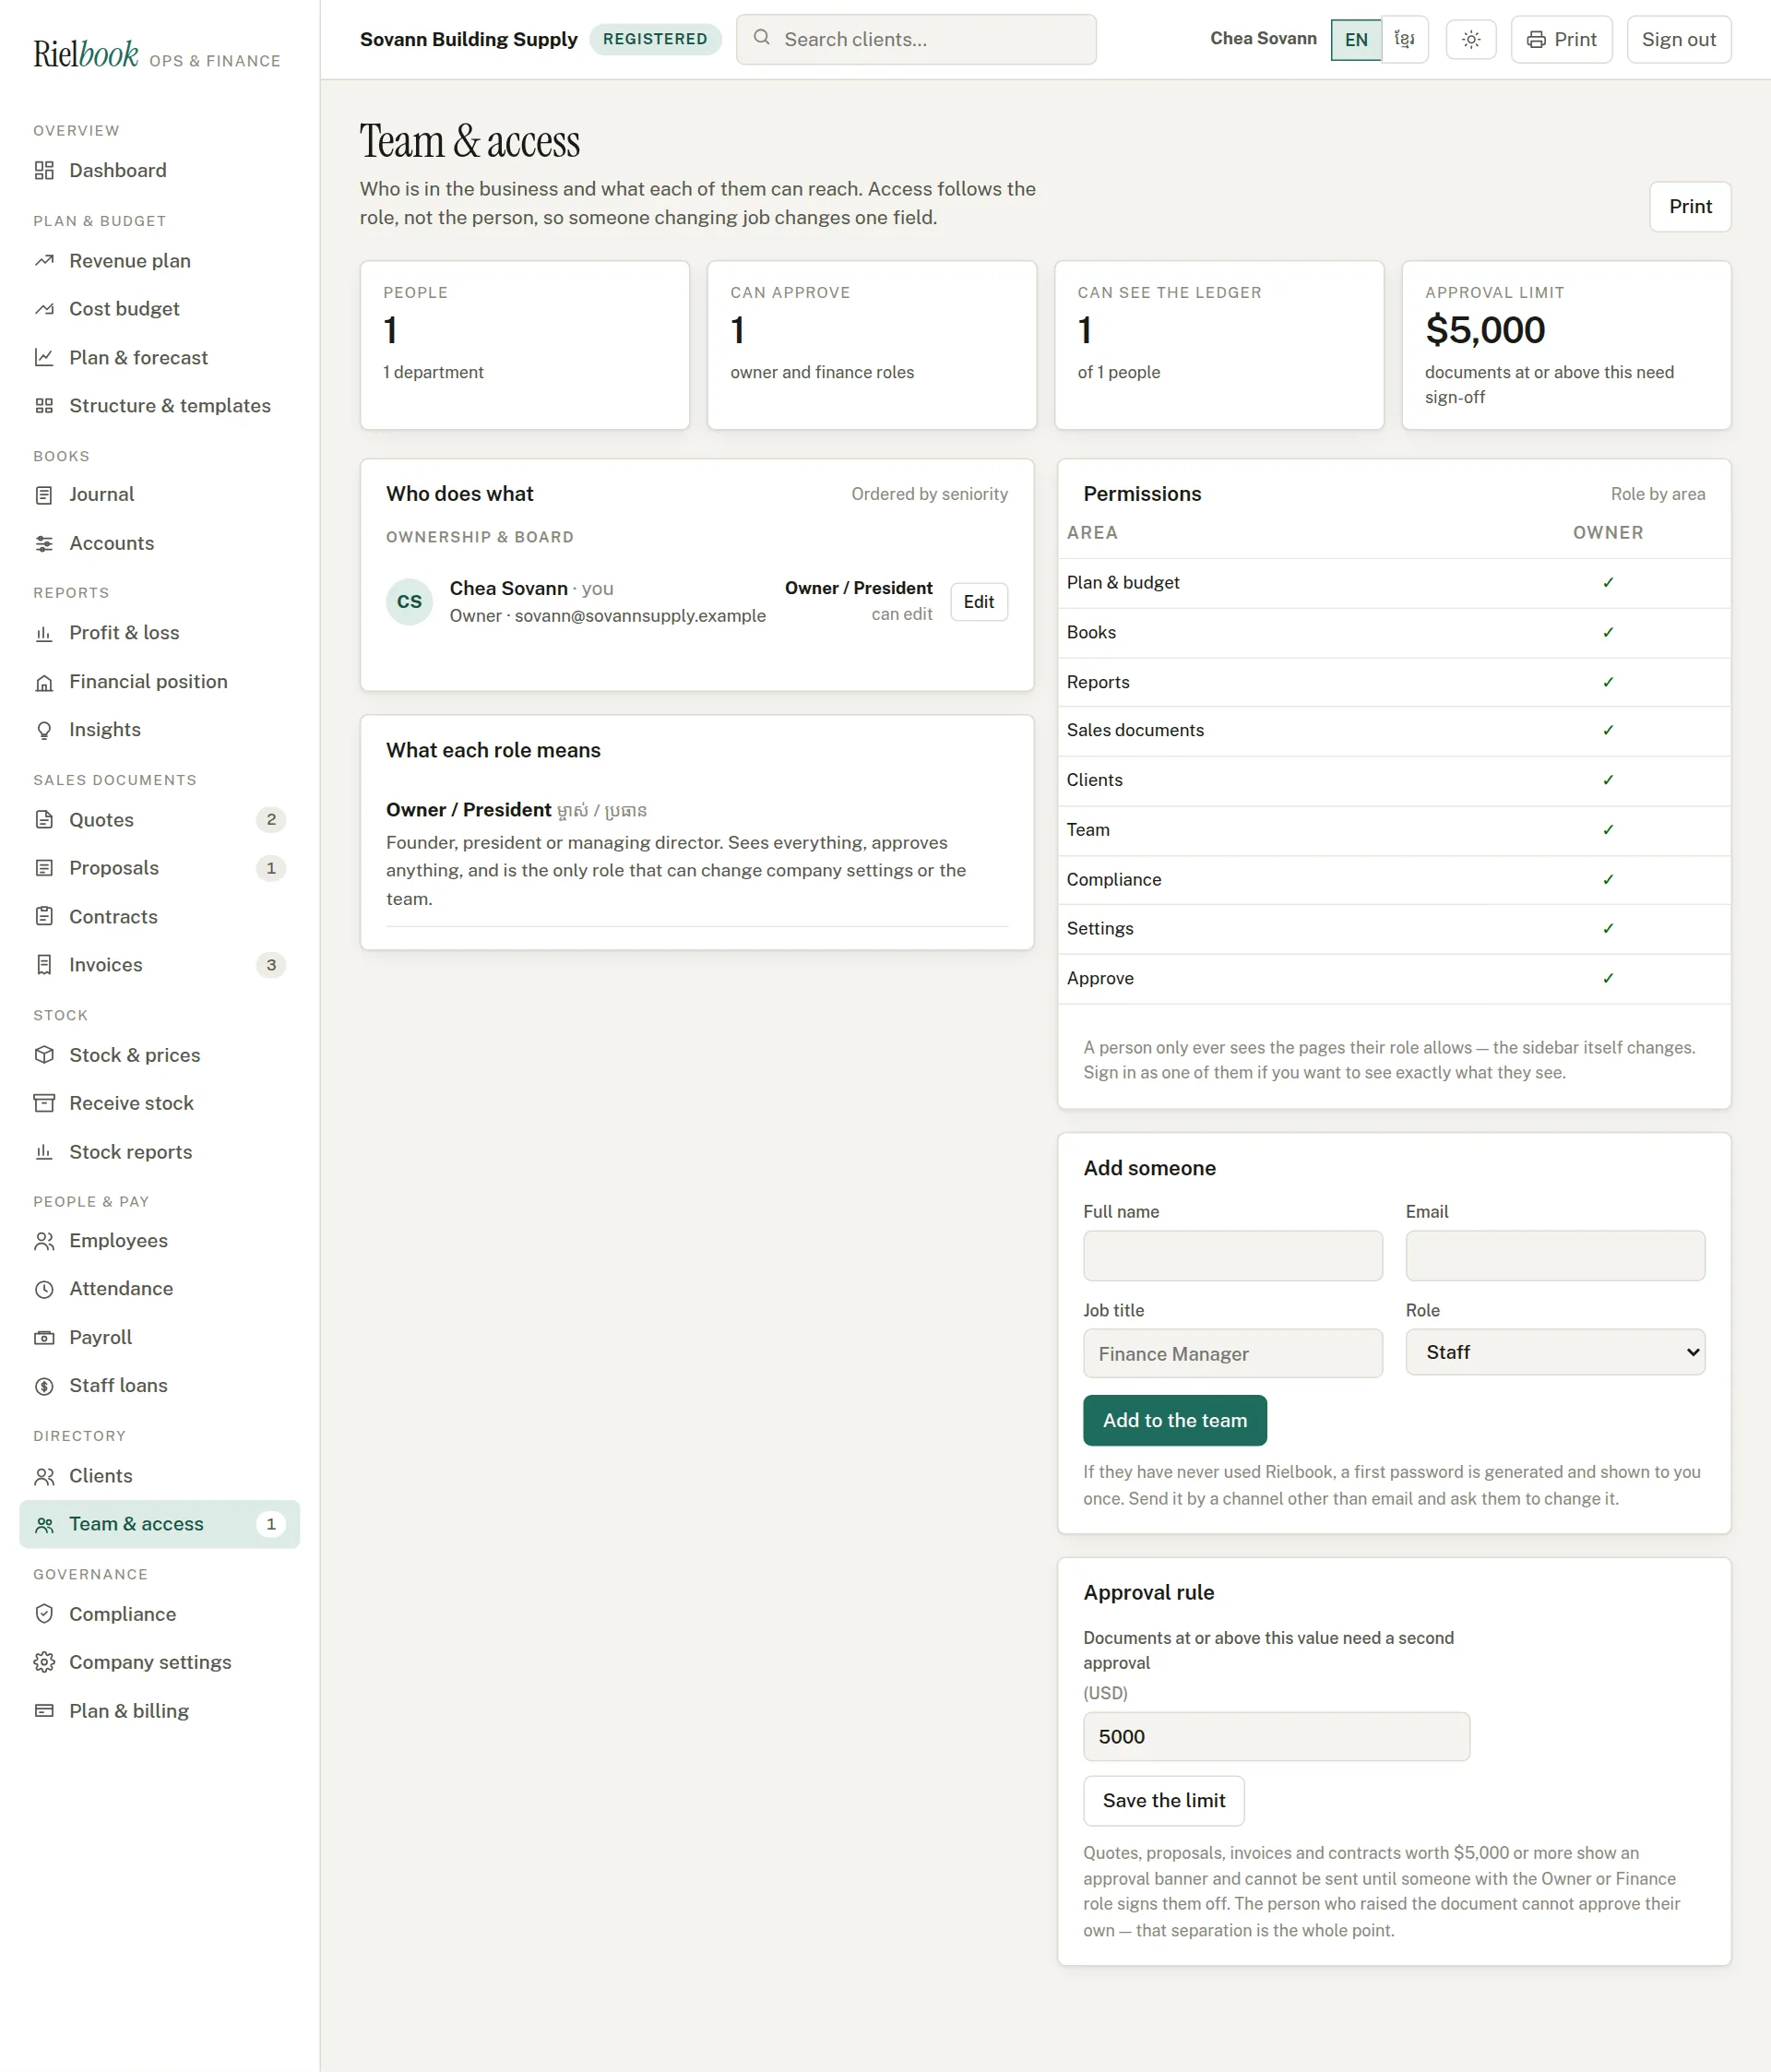
| Role | Can open | Changes things? |
|---|---|---|
| Owner / President | Everything, including settings and billing | Yes |
| Shareholder / Board | Plan & budget, reports, compliance | Read only |
| Finance & accounting | Plan, books, reports, sales documents, clients, compliance; can approve | Yes |
| HR & people | Employees, attendance, leave, payroll, staff loans, compliance | Yes |
| Operations | Sales documents, clients, plan | Yes |
| Sales & marketing | Sales documents and clients | Yes |
| Staff | Sales documents | Read only |
Add someone to the team
- Under Add someone, type their full name, email and job title.
- Choose their role from the table above.
- Press Add to the team. If they have never used Rielbook, a first password is made and shown to you once — send it to them by a channel other than email (Telegram, or in person) and ask them to change it after signing in.
The approval rule
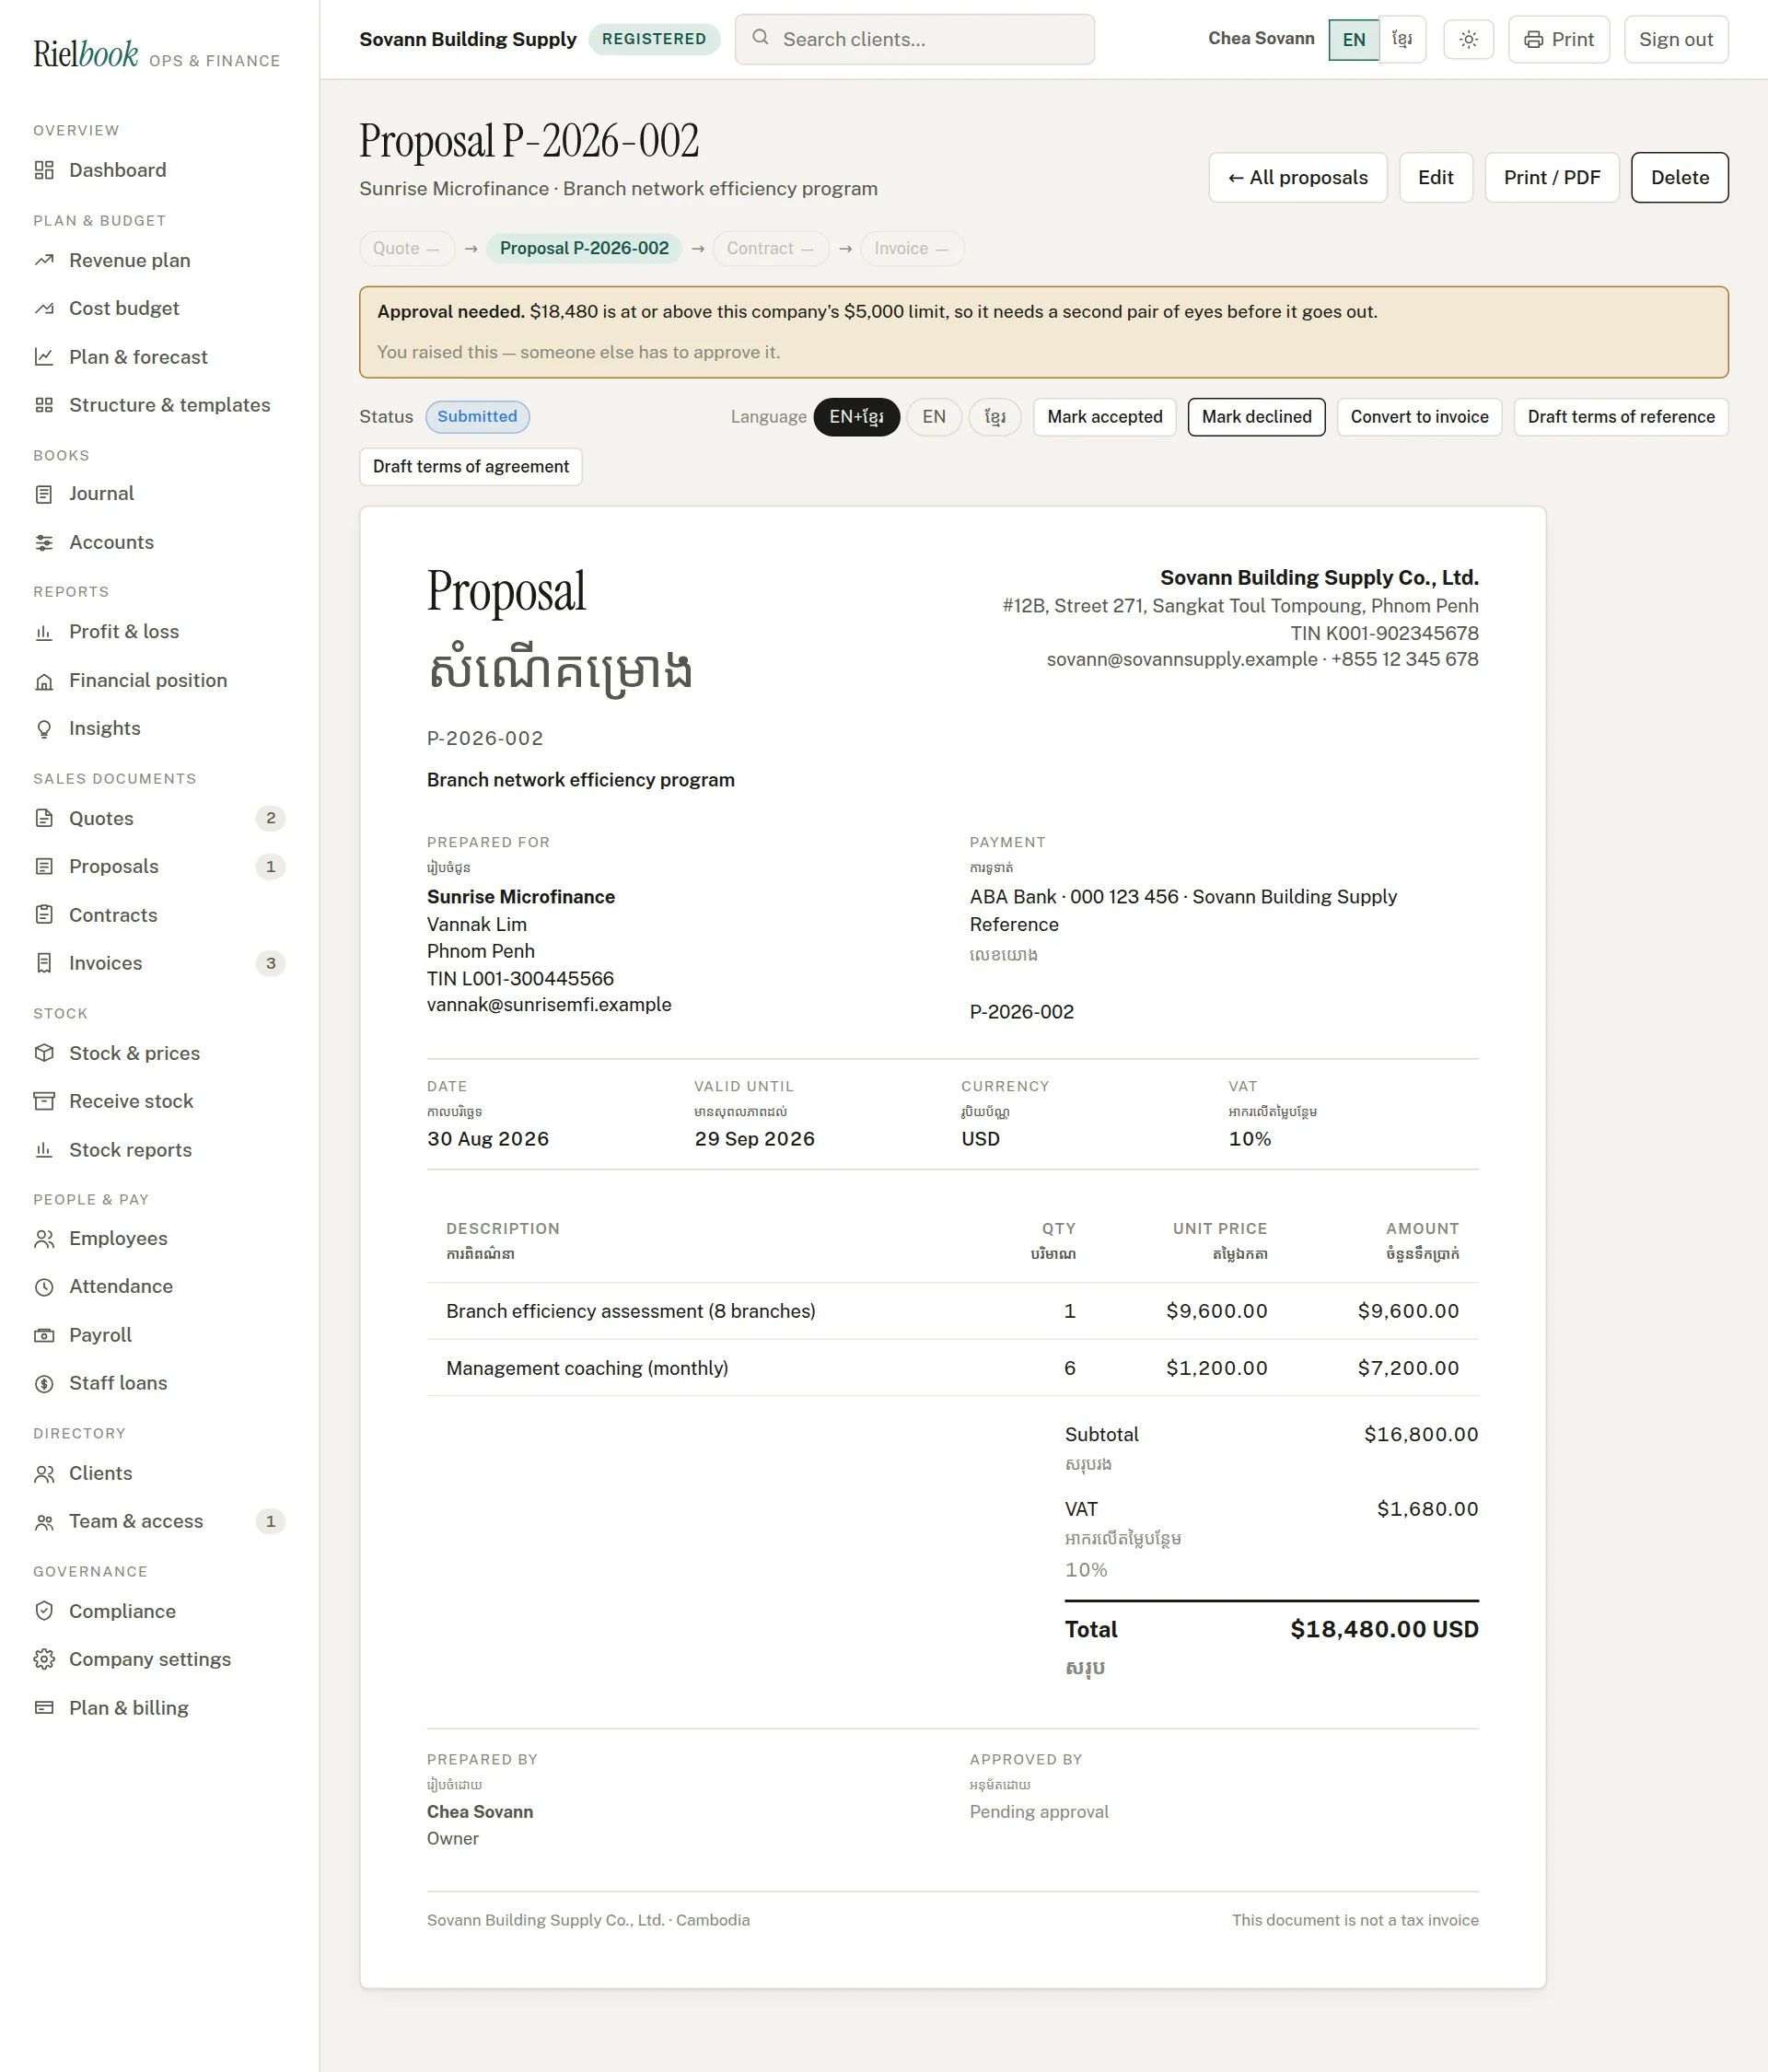
Under Approval rule, set an amount. Any quote, proposal, invoice or contract worth that much or more shows an Approval needed banner and cannot be sent until the Owner or Finance signs it off — and the person who raised it cannot approve their own document. Leave it at 0 to switch the rule off.
Selling
Clients, then the paperwork that follows a sale in Cambodia: a quote, sometimes a proposal, a contract for bigger jobs, and the invoice. Each step can carry the last one forward, so nothing is typed twice.
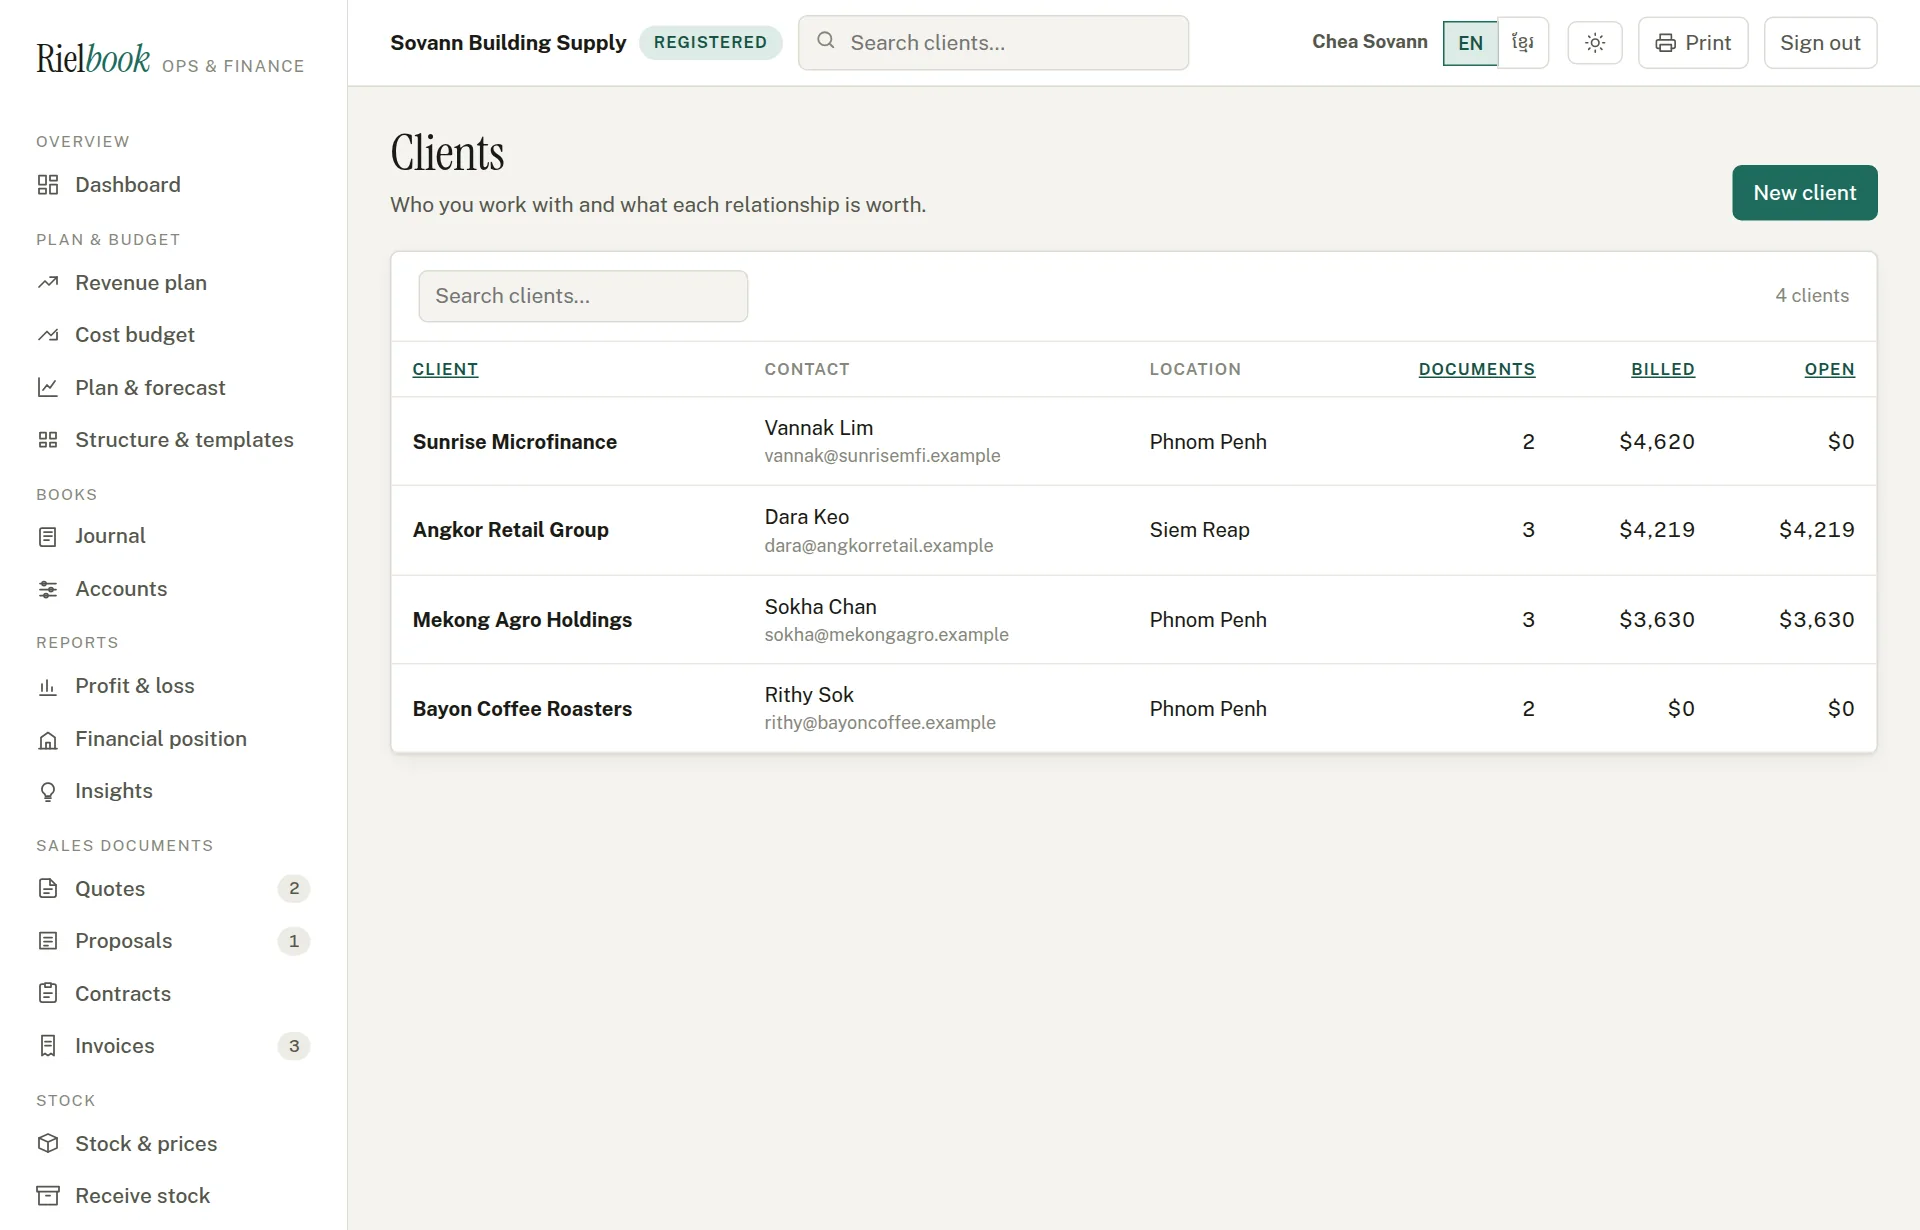
Clients
Directory›Clients
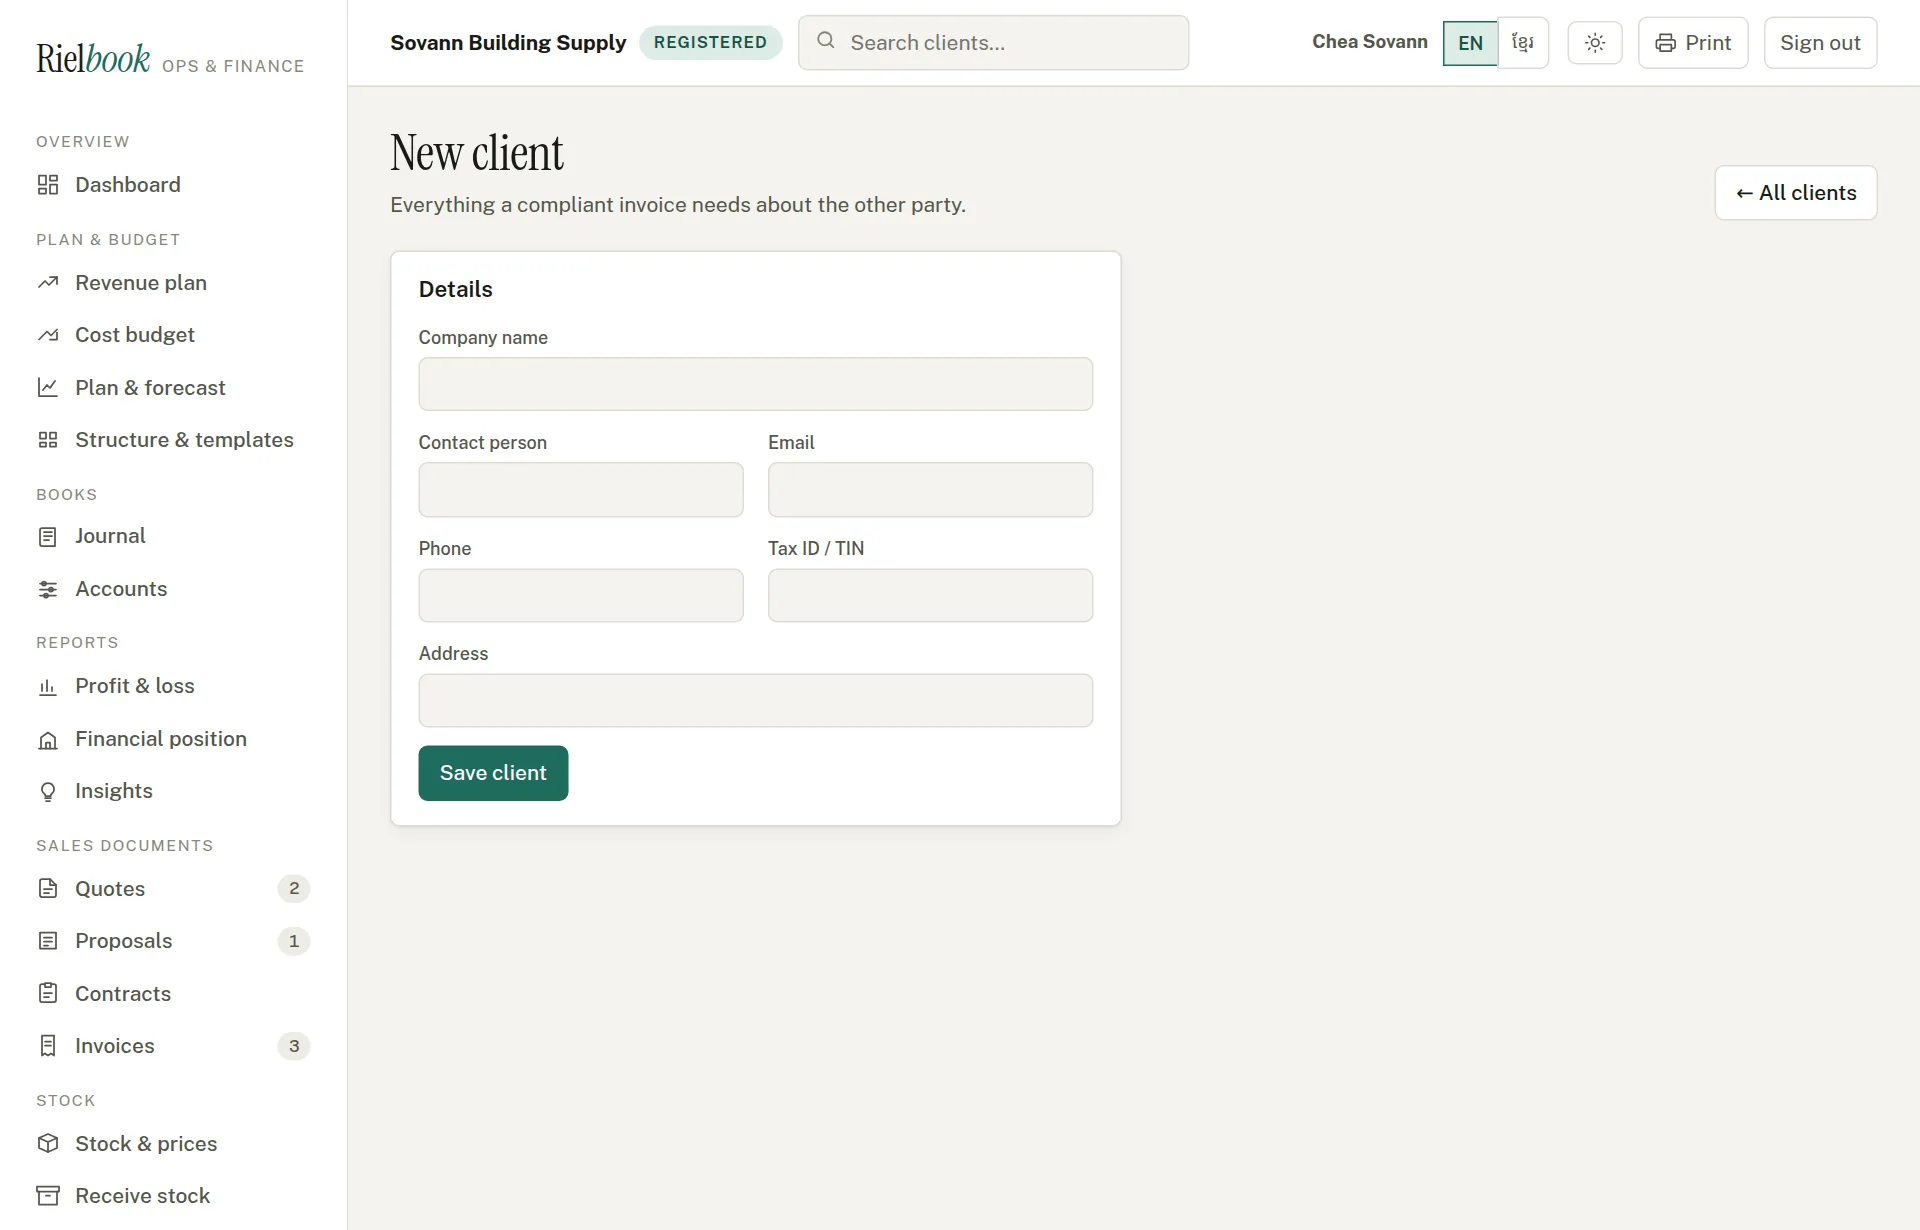
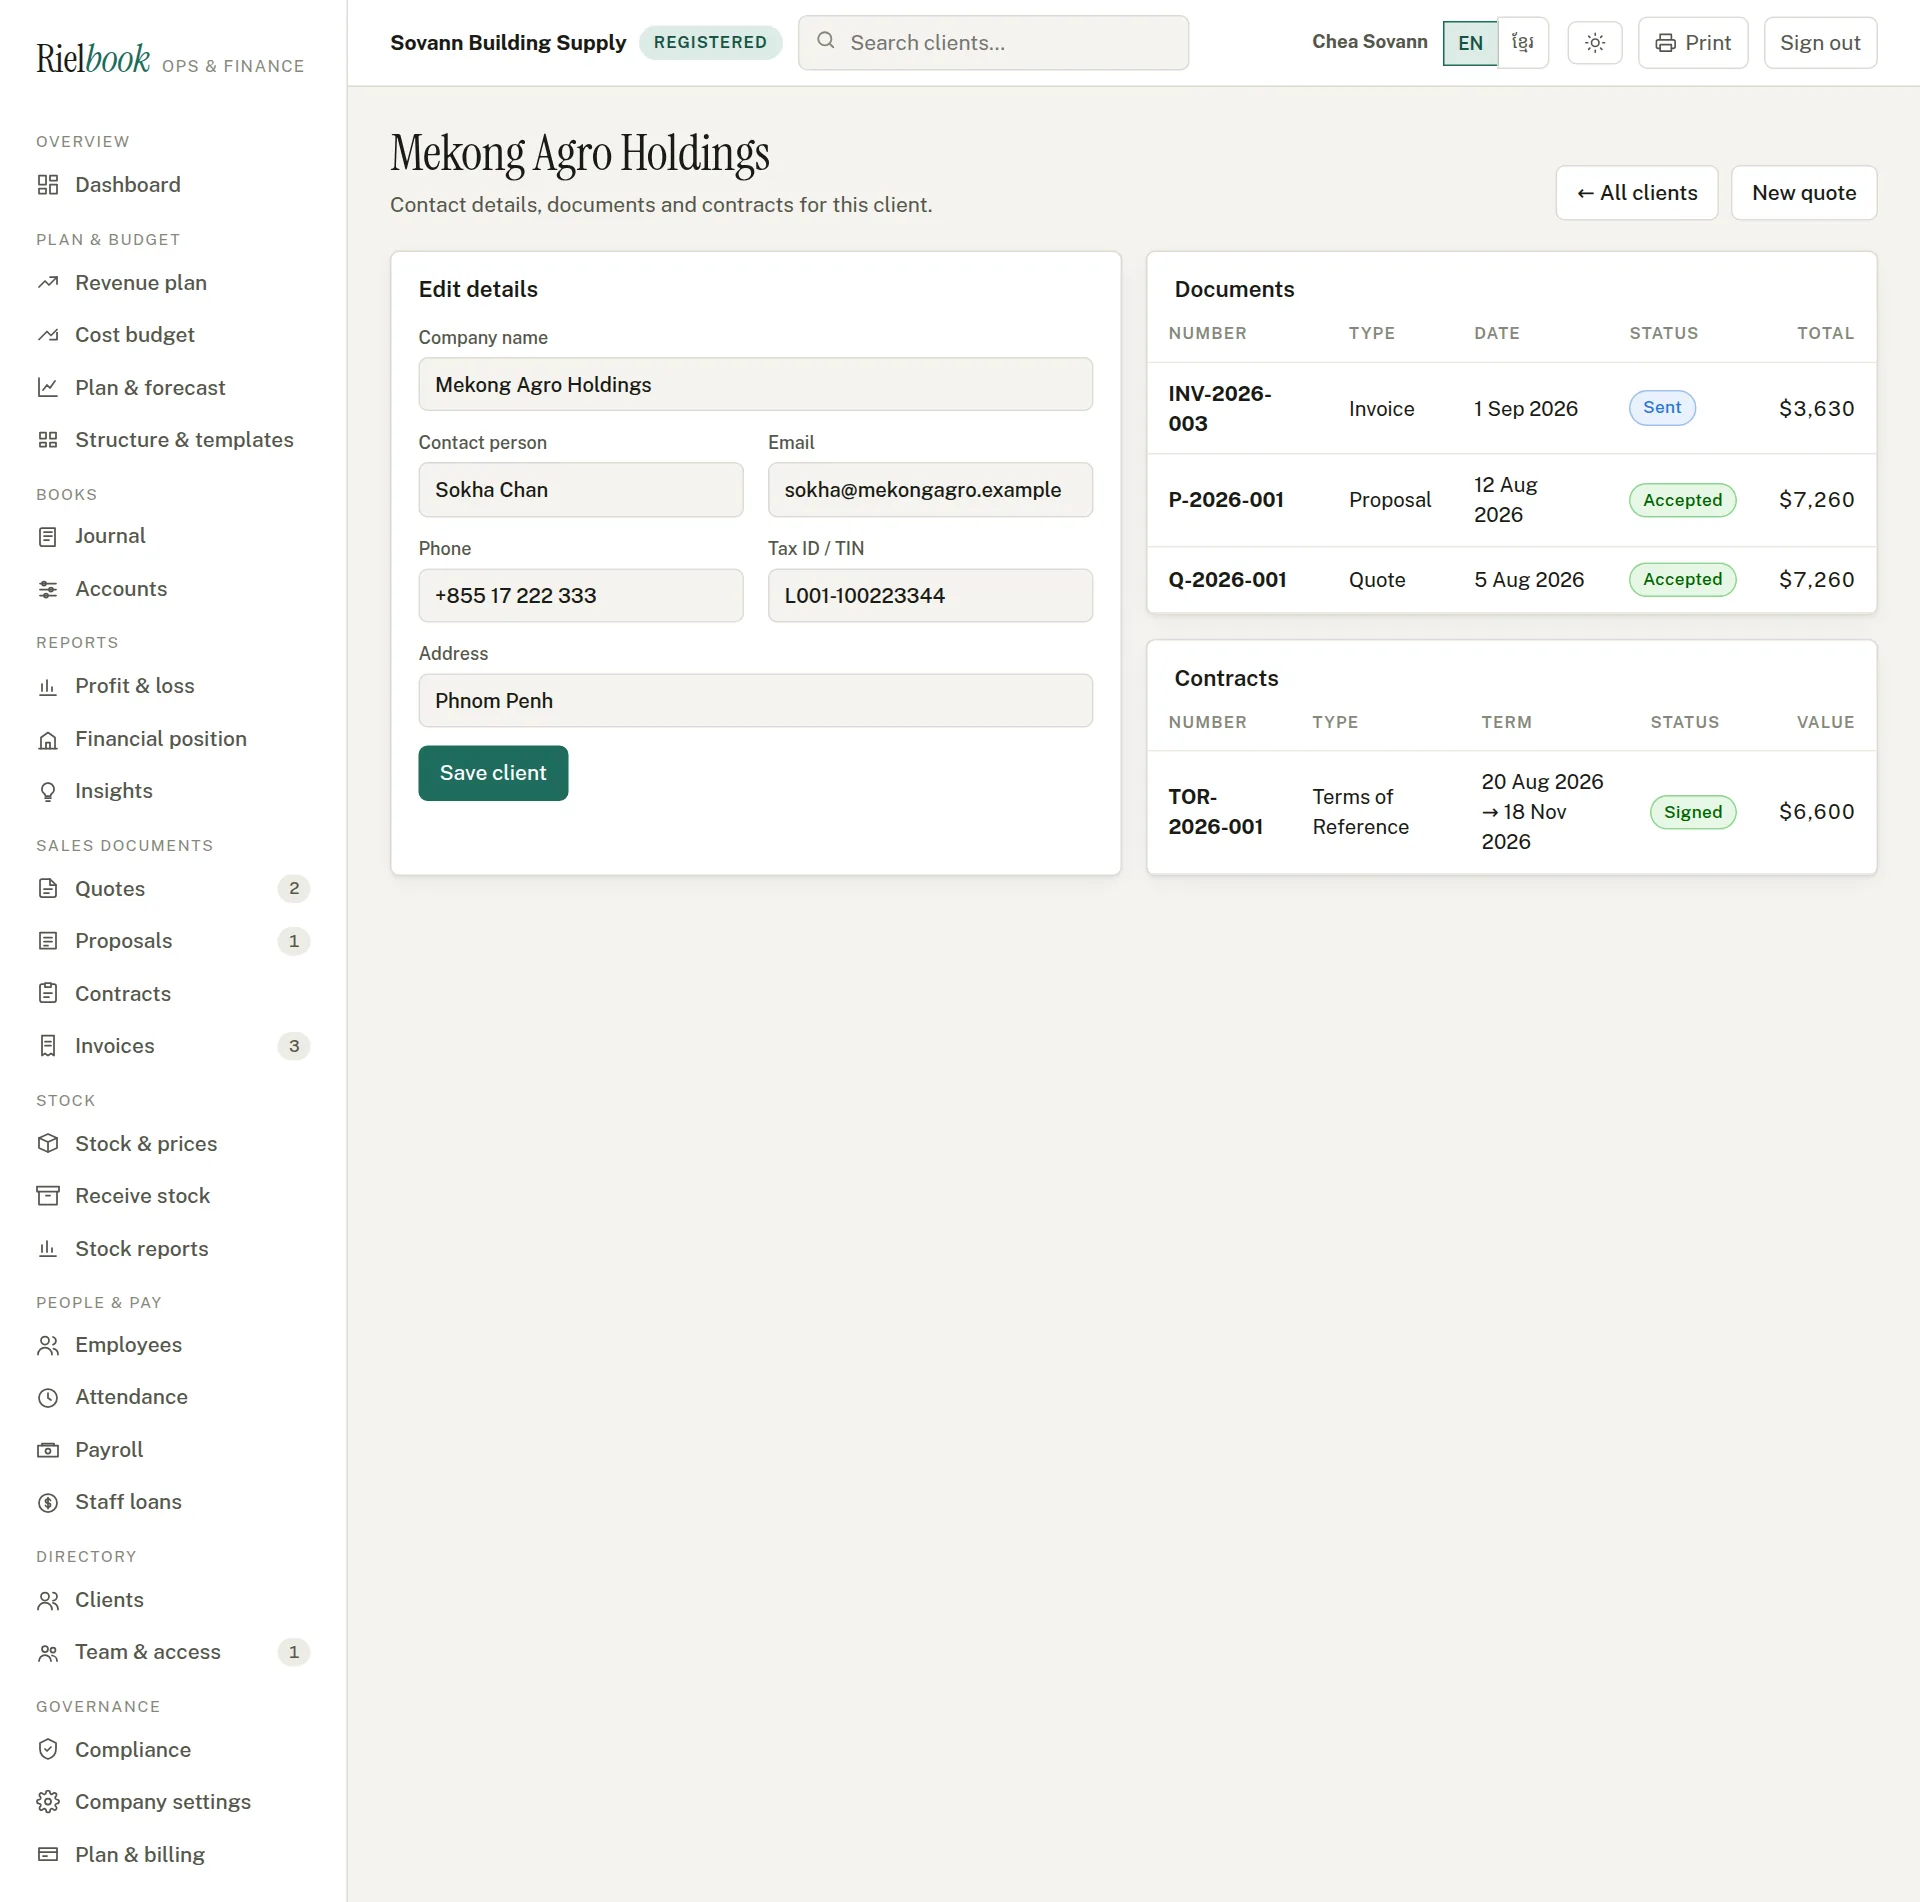
Add a client
- Press New client.
- Type the company name, the contact person, email, phone and address.
- Type the client's TIN if they are VAT-registered. A VAT invoice to a registered business must show their TIN, so fill this in before you invoice them.
- Press Save client.
Open any client to see their details, every quote, proposal, invoice and contract you have raised for them, and what they currently owe.
Quotes
A quote is a price you offer before the work or the sale is agreed. It is not a tax invoice and never touches the books.
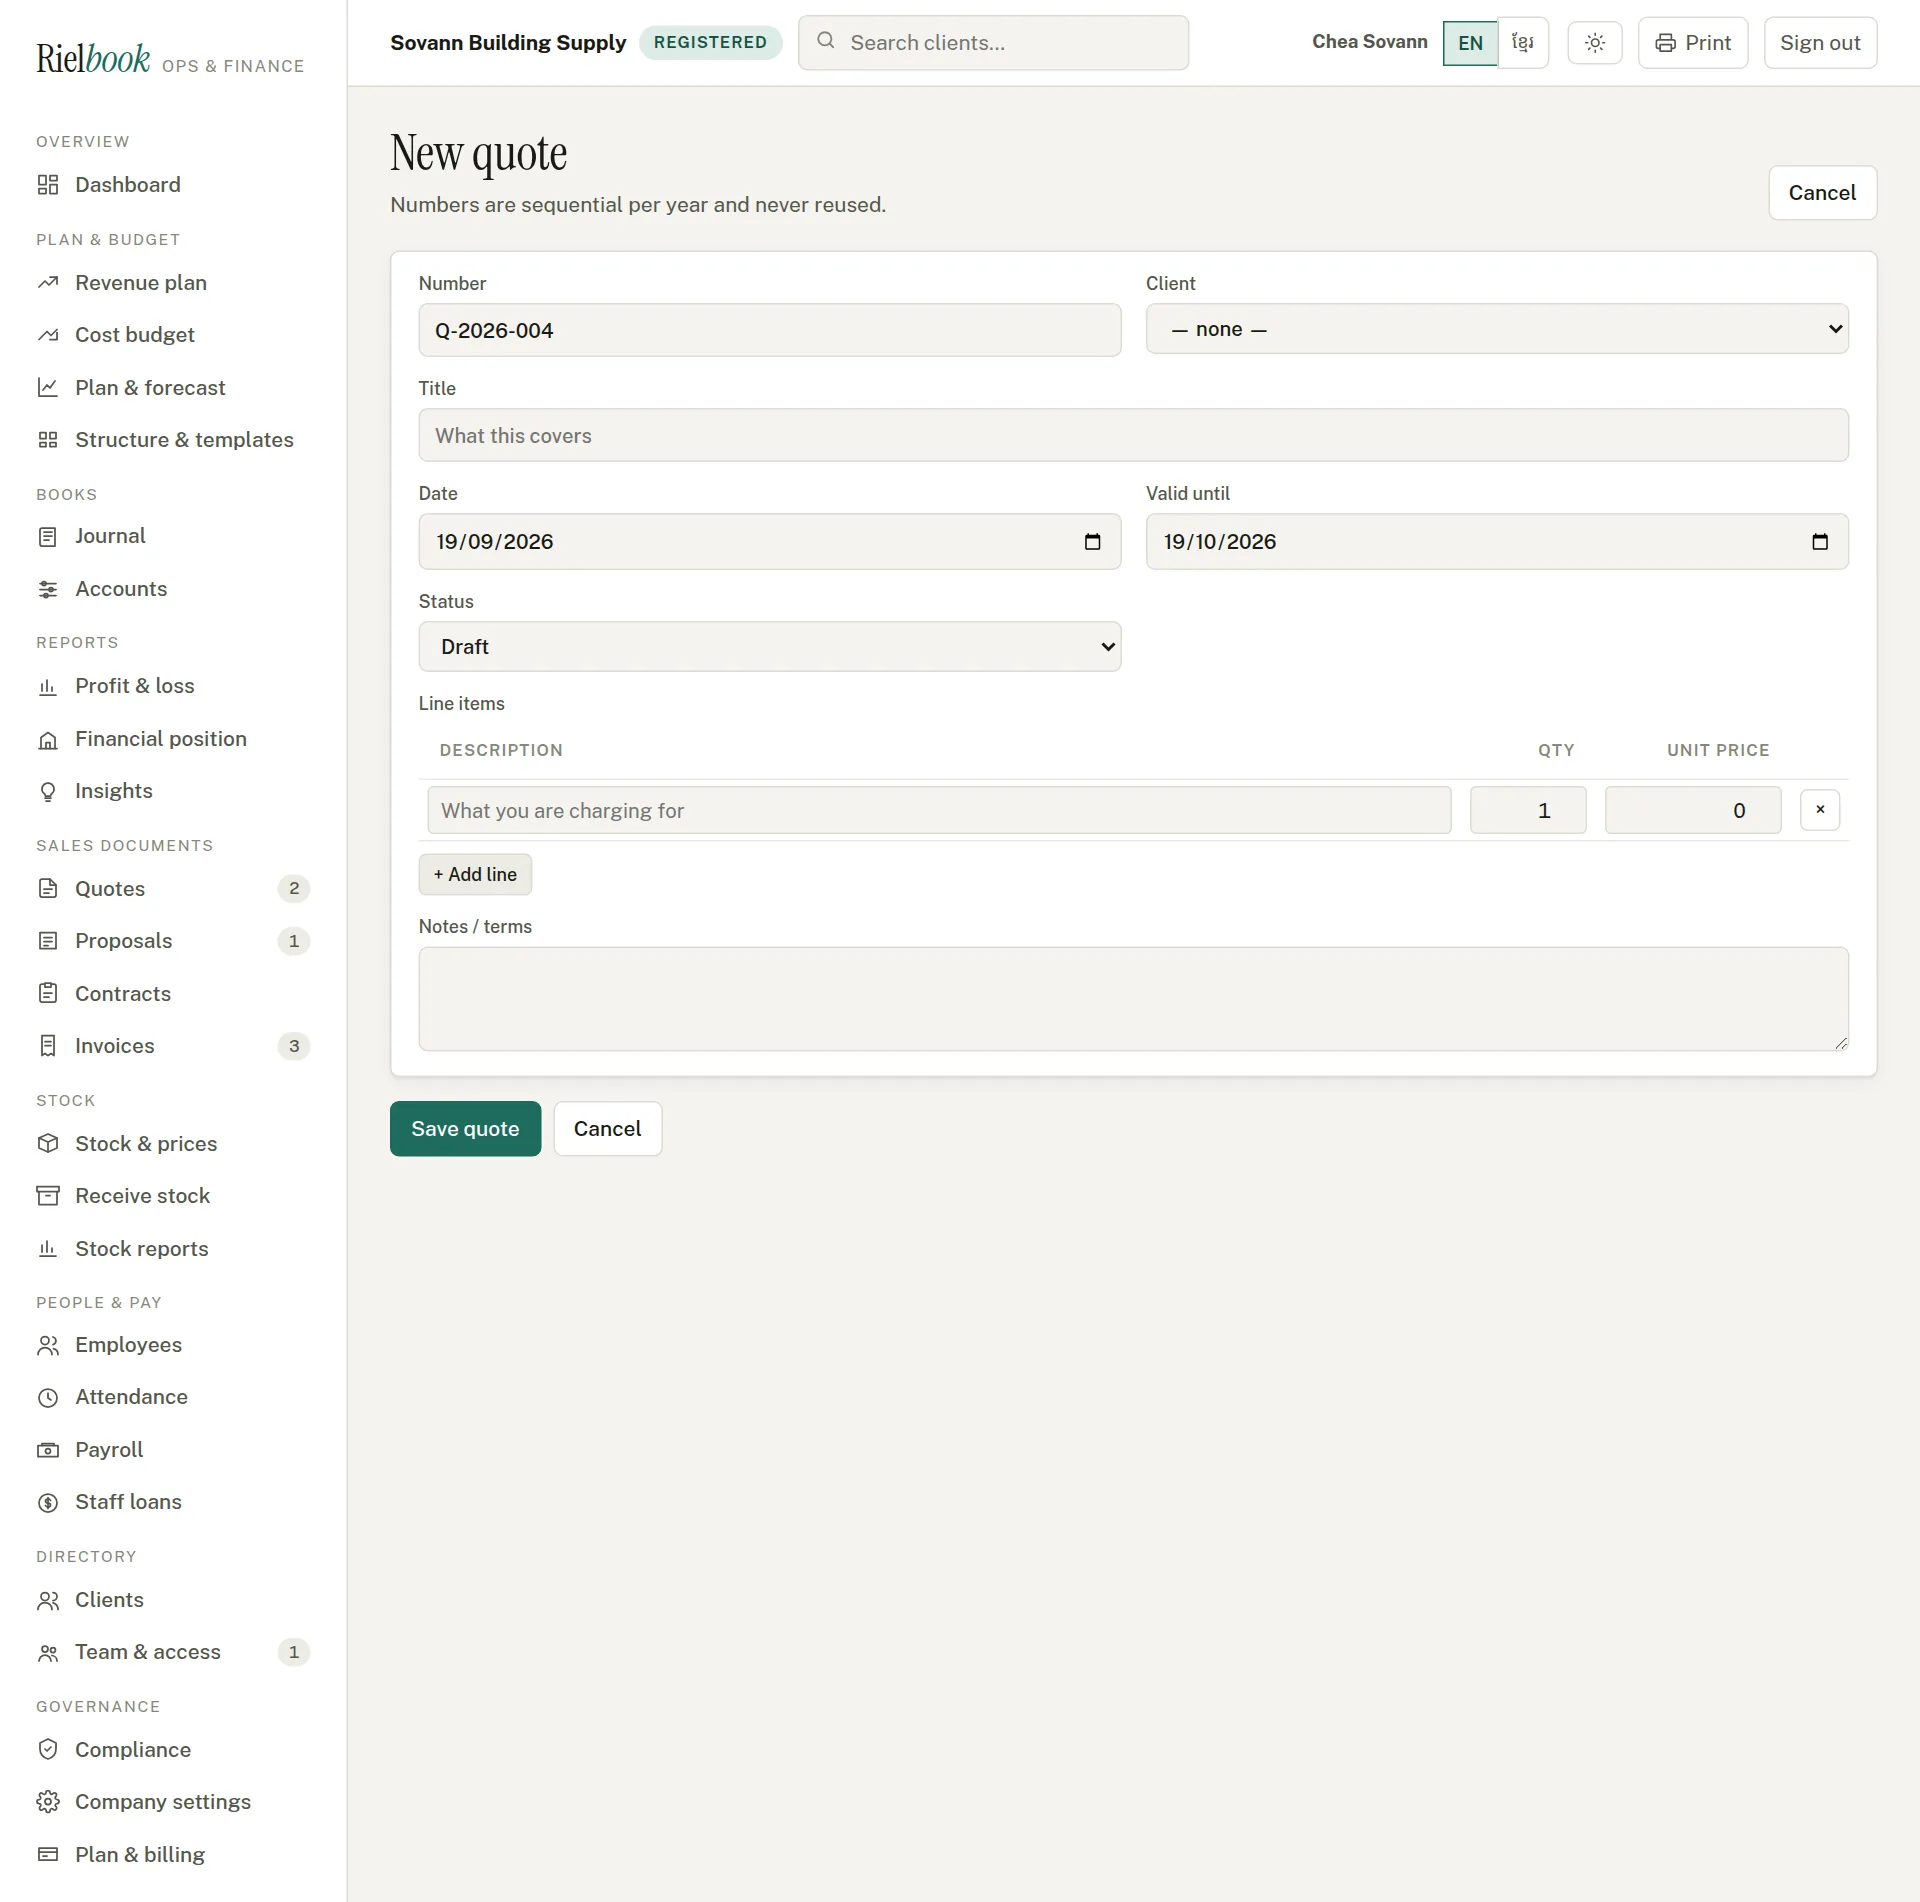
Sales documents›Quotes›New quote
- Choose the client, and give the quote a short title — what it covers.
- Check the date and valid until. The number is filled in for you.
- Add a line for each thing you are pricing: a description, the quantity and the unit price. Press + Add line for more lines, and × to remove one.
- Add any notes or terms — delivery time, what is not included, how long the price holds.
- Leave Status at Draft and press Save quote.
After it is saved
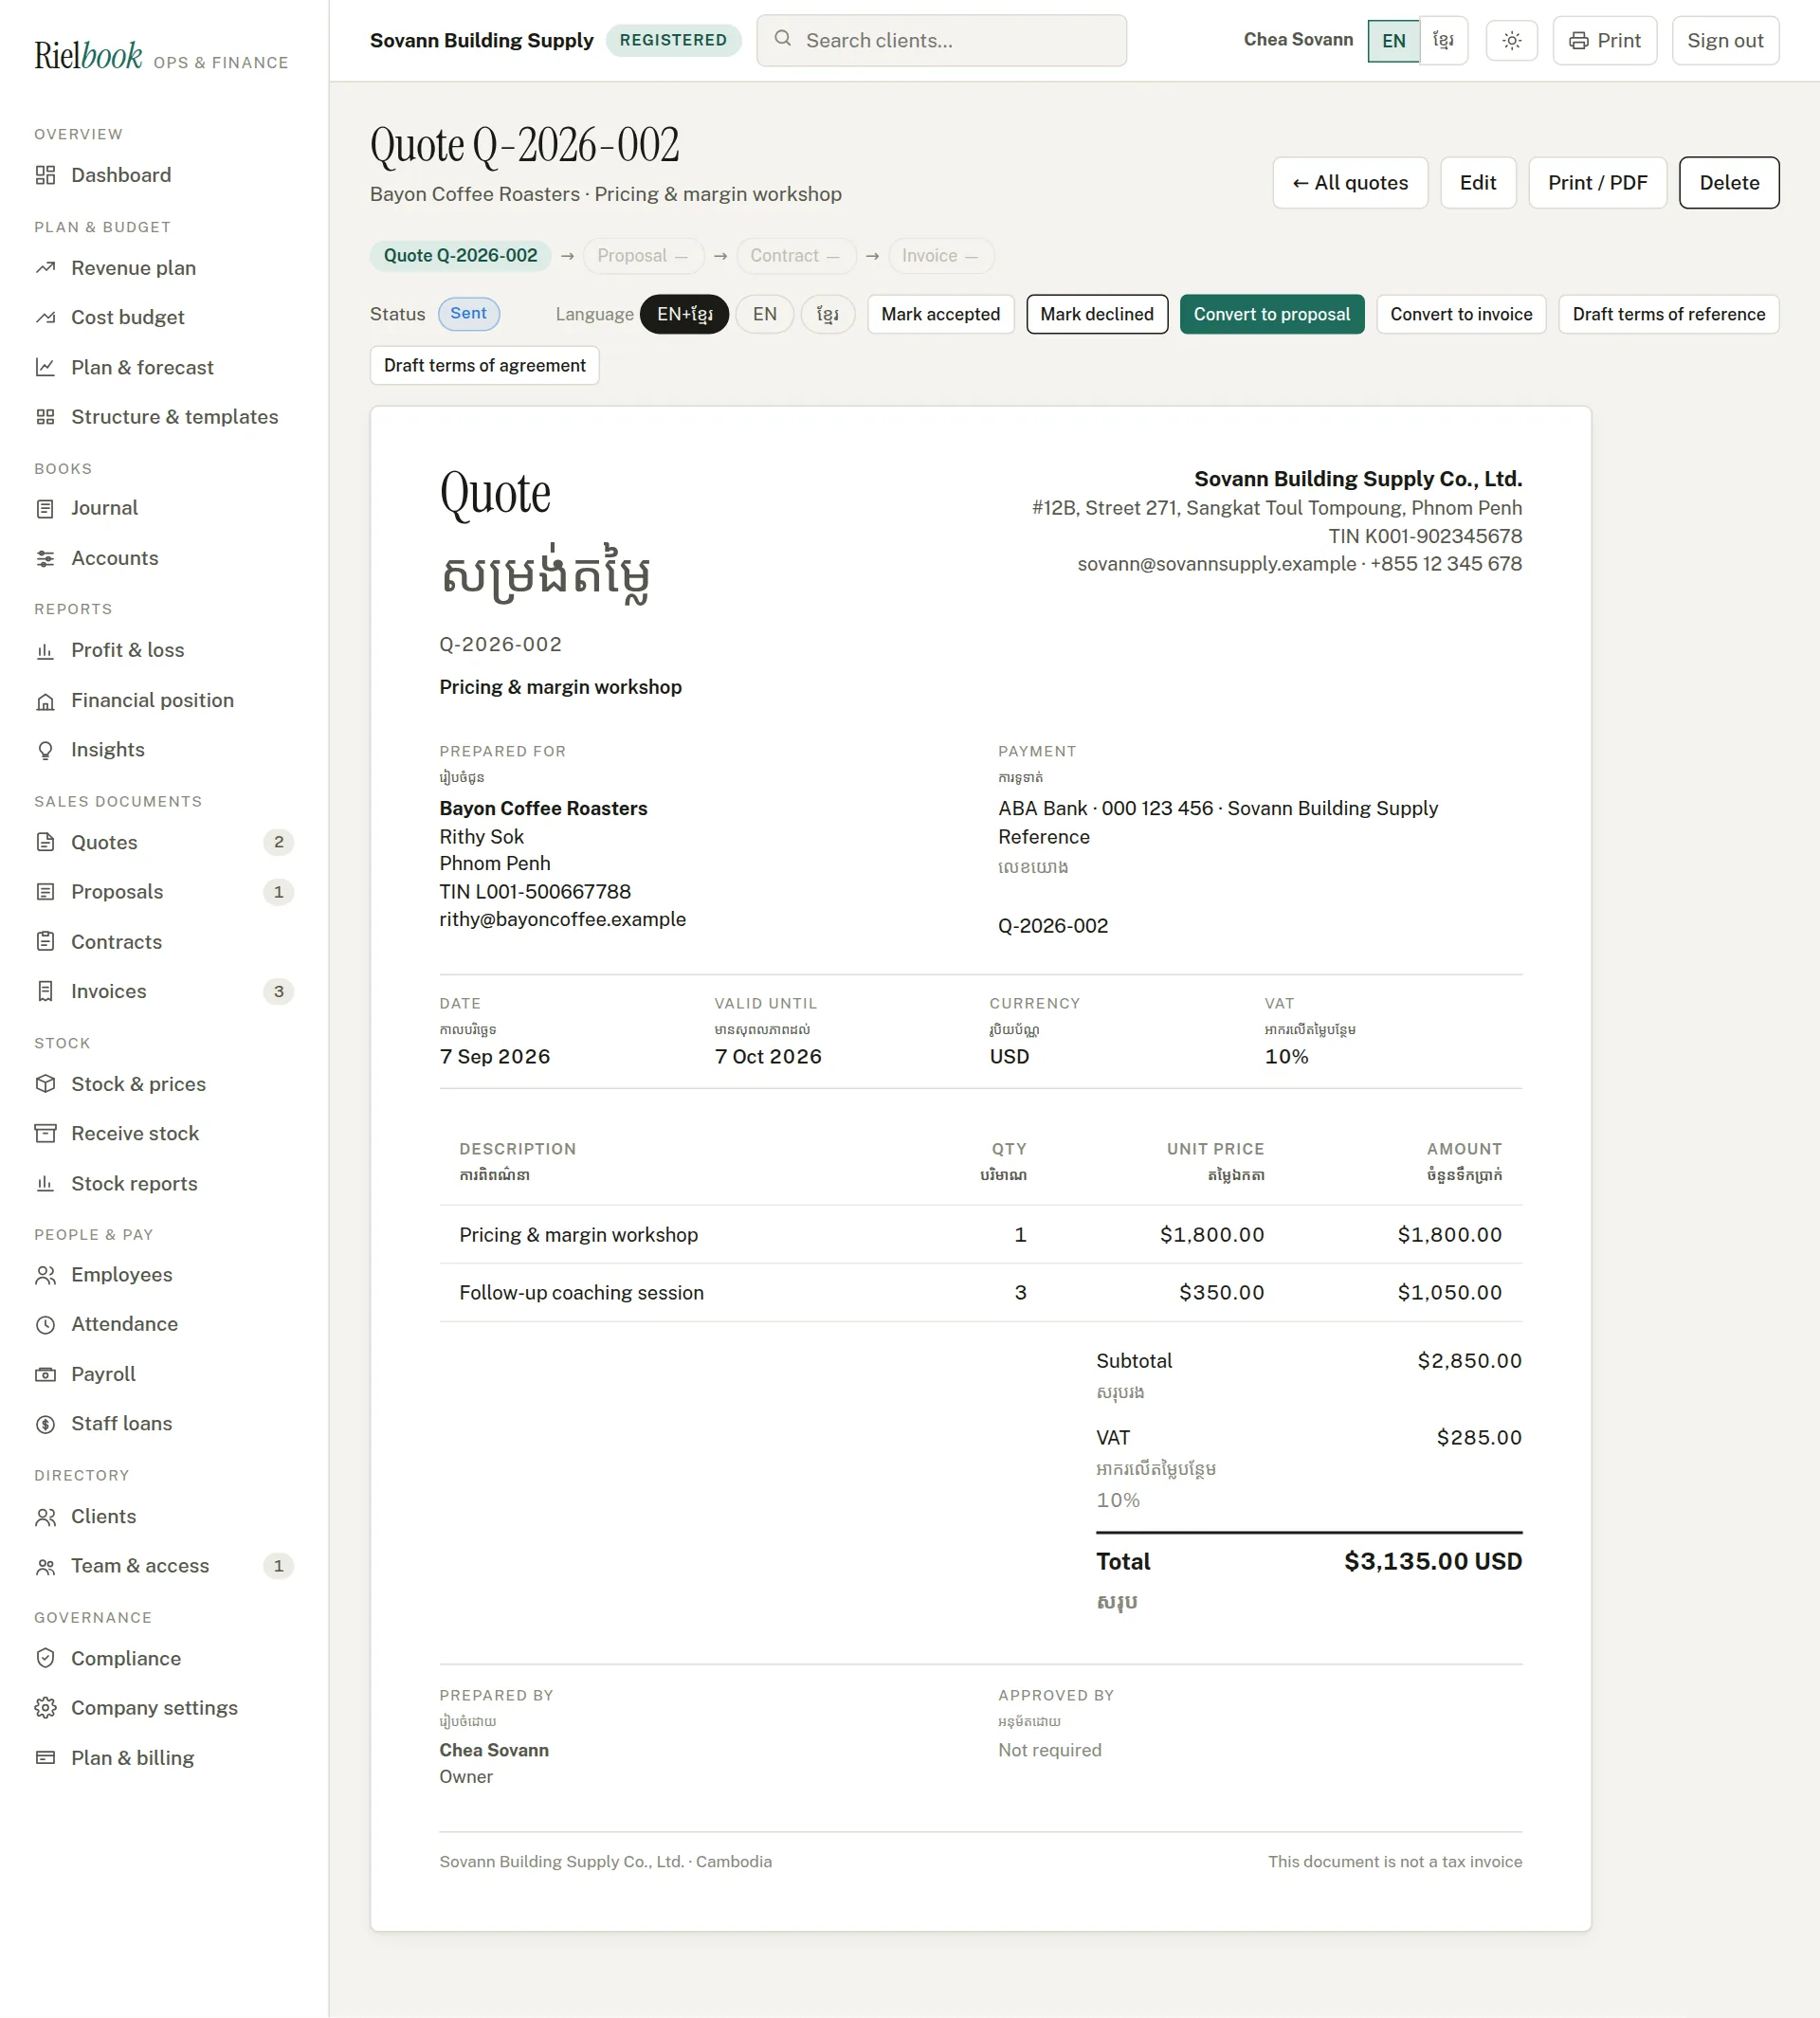
- Print / PDF opens a clean page to print or save as PDF and send to the client. Choose EN+ខ្មែរ, EN or ខ្មែរ above the document first.
- Mark sent once it has gone to the client. Then Mark accepted or Mark declined when they answer — this is what the win rate in Insights is worked out from.
- From a sent or accepted quote, carry it forward with Convert to proposal, Convert to invoice, or Draft terms of reference / Draft terms of agreement. The lines and the client come with it.
- The chain across the top — Quote → Proposal → Contract → Invoice — shows which of those already exist for this sale.
Proposals
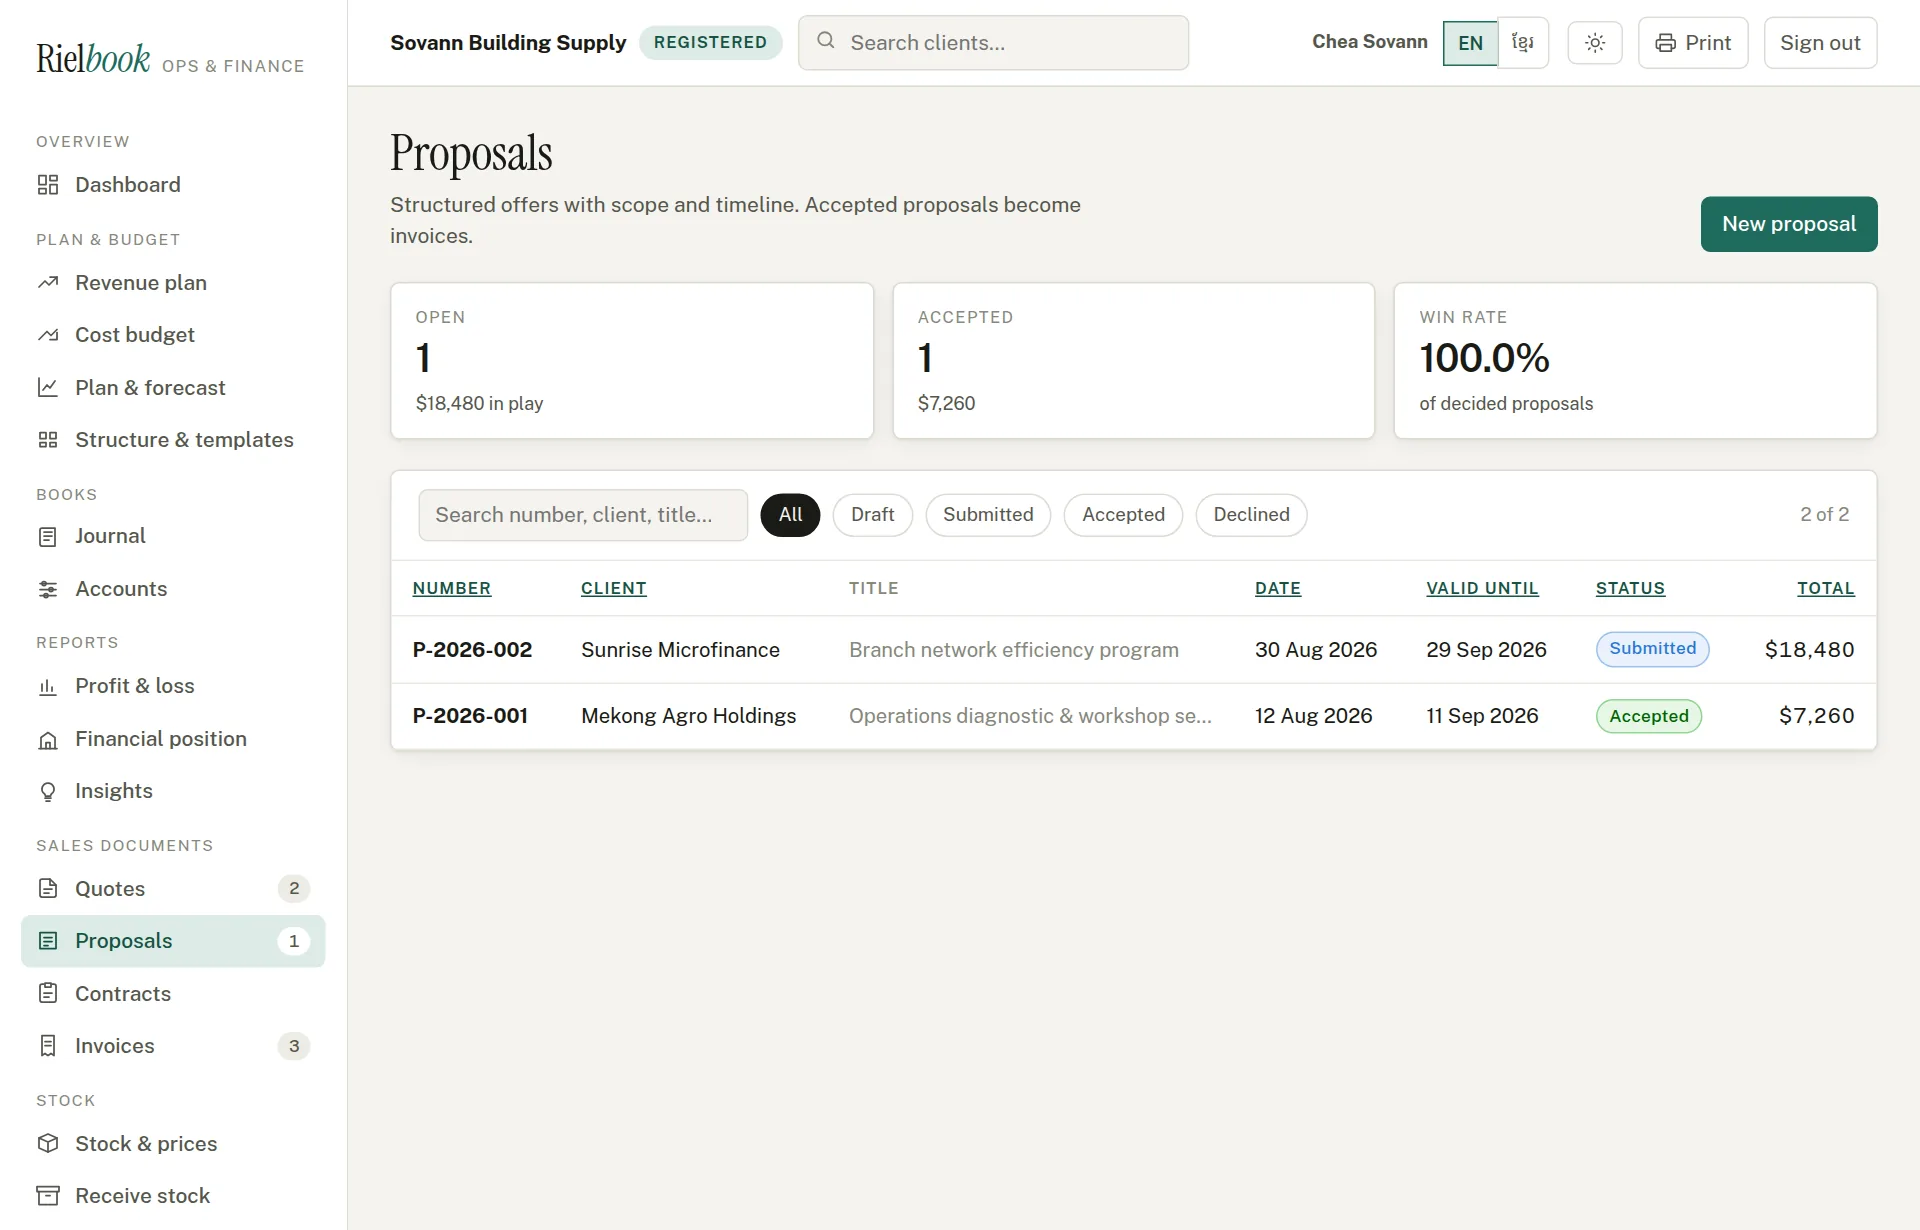
A proposal is a fuller offer for larger work: objective, scope, deliverables, milestones, payment terms and what is excluded, as well as the price. It is made the same way as a quote — Sales documents›Proposals›New proposal — with those extra sections on the form. Instead of sent, a proposal is Mark submitted, then accepted or declined.
Contracts
Three ready templates, each bilingual Khmer and English: Terms of Reference (a precisely defined piece of work, the usual one for a registered company), Terms of Agreement (a plain engagement agreement), and a Freelance Agreement.
Sales documents›Contracts
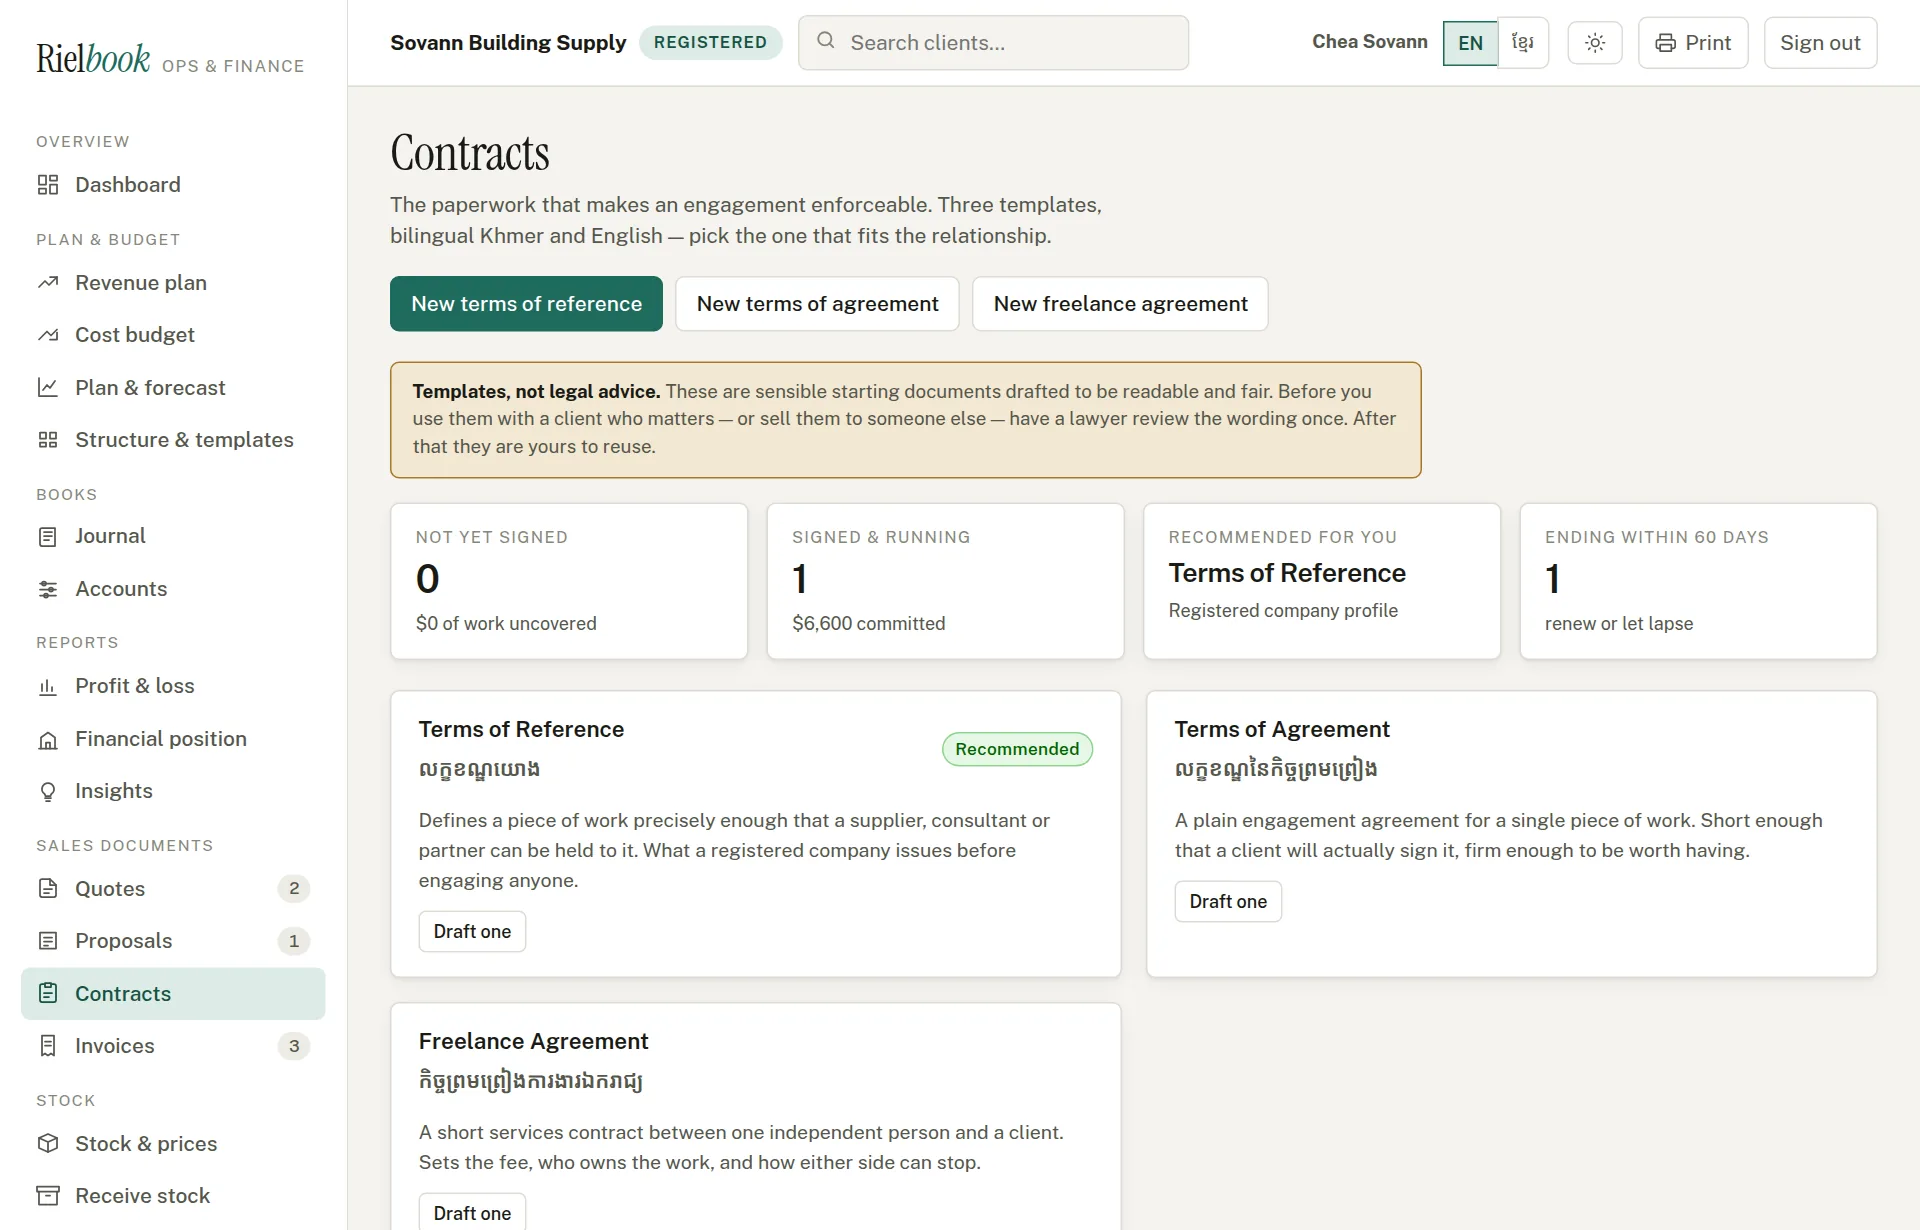
- Press New terms of reference (or one of the others) — or, better, open an accepted quote or proposal and press Draft terms of reference so the client, value and dates come across.
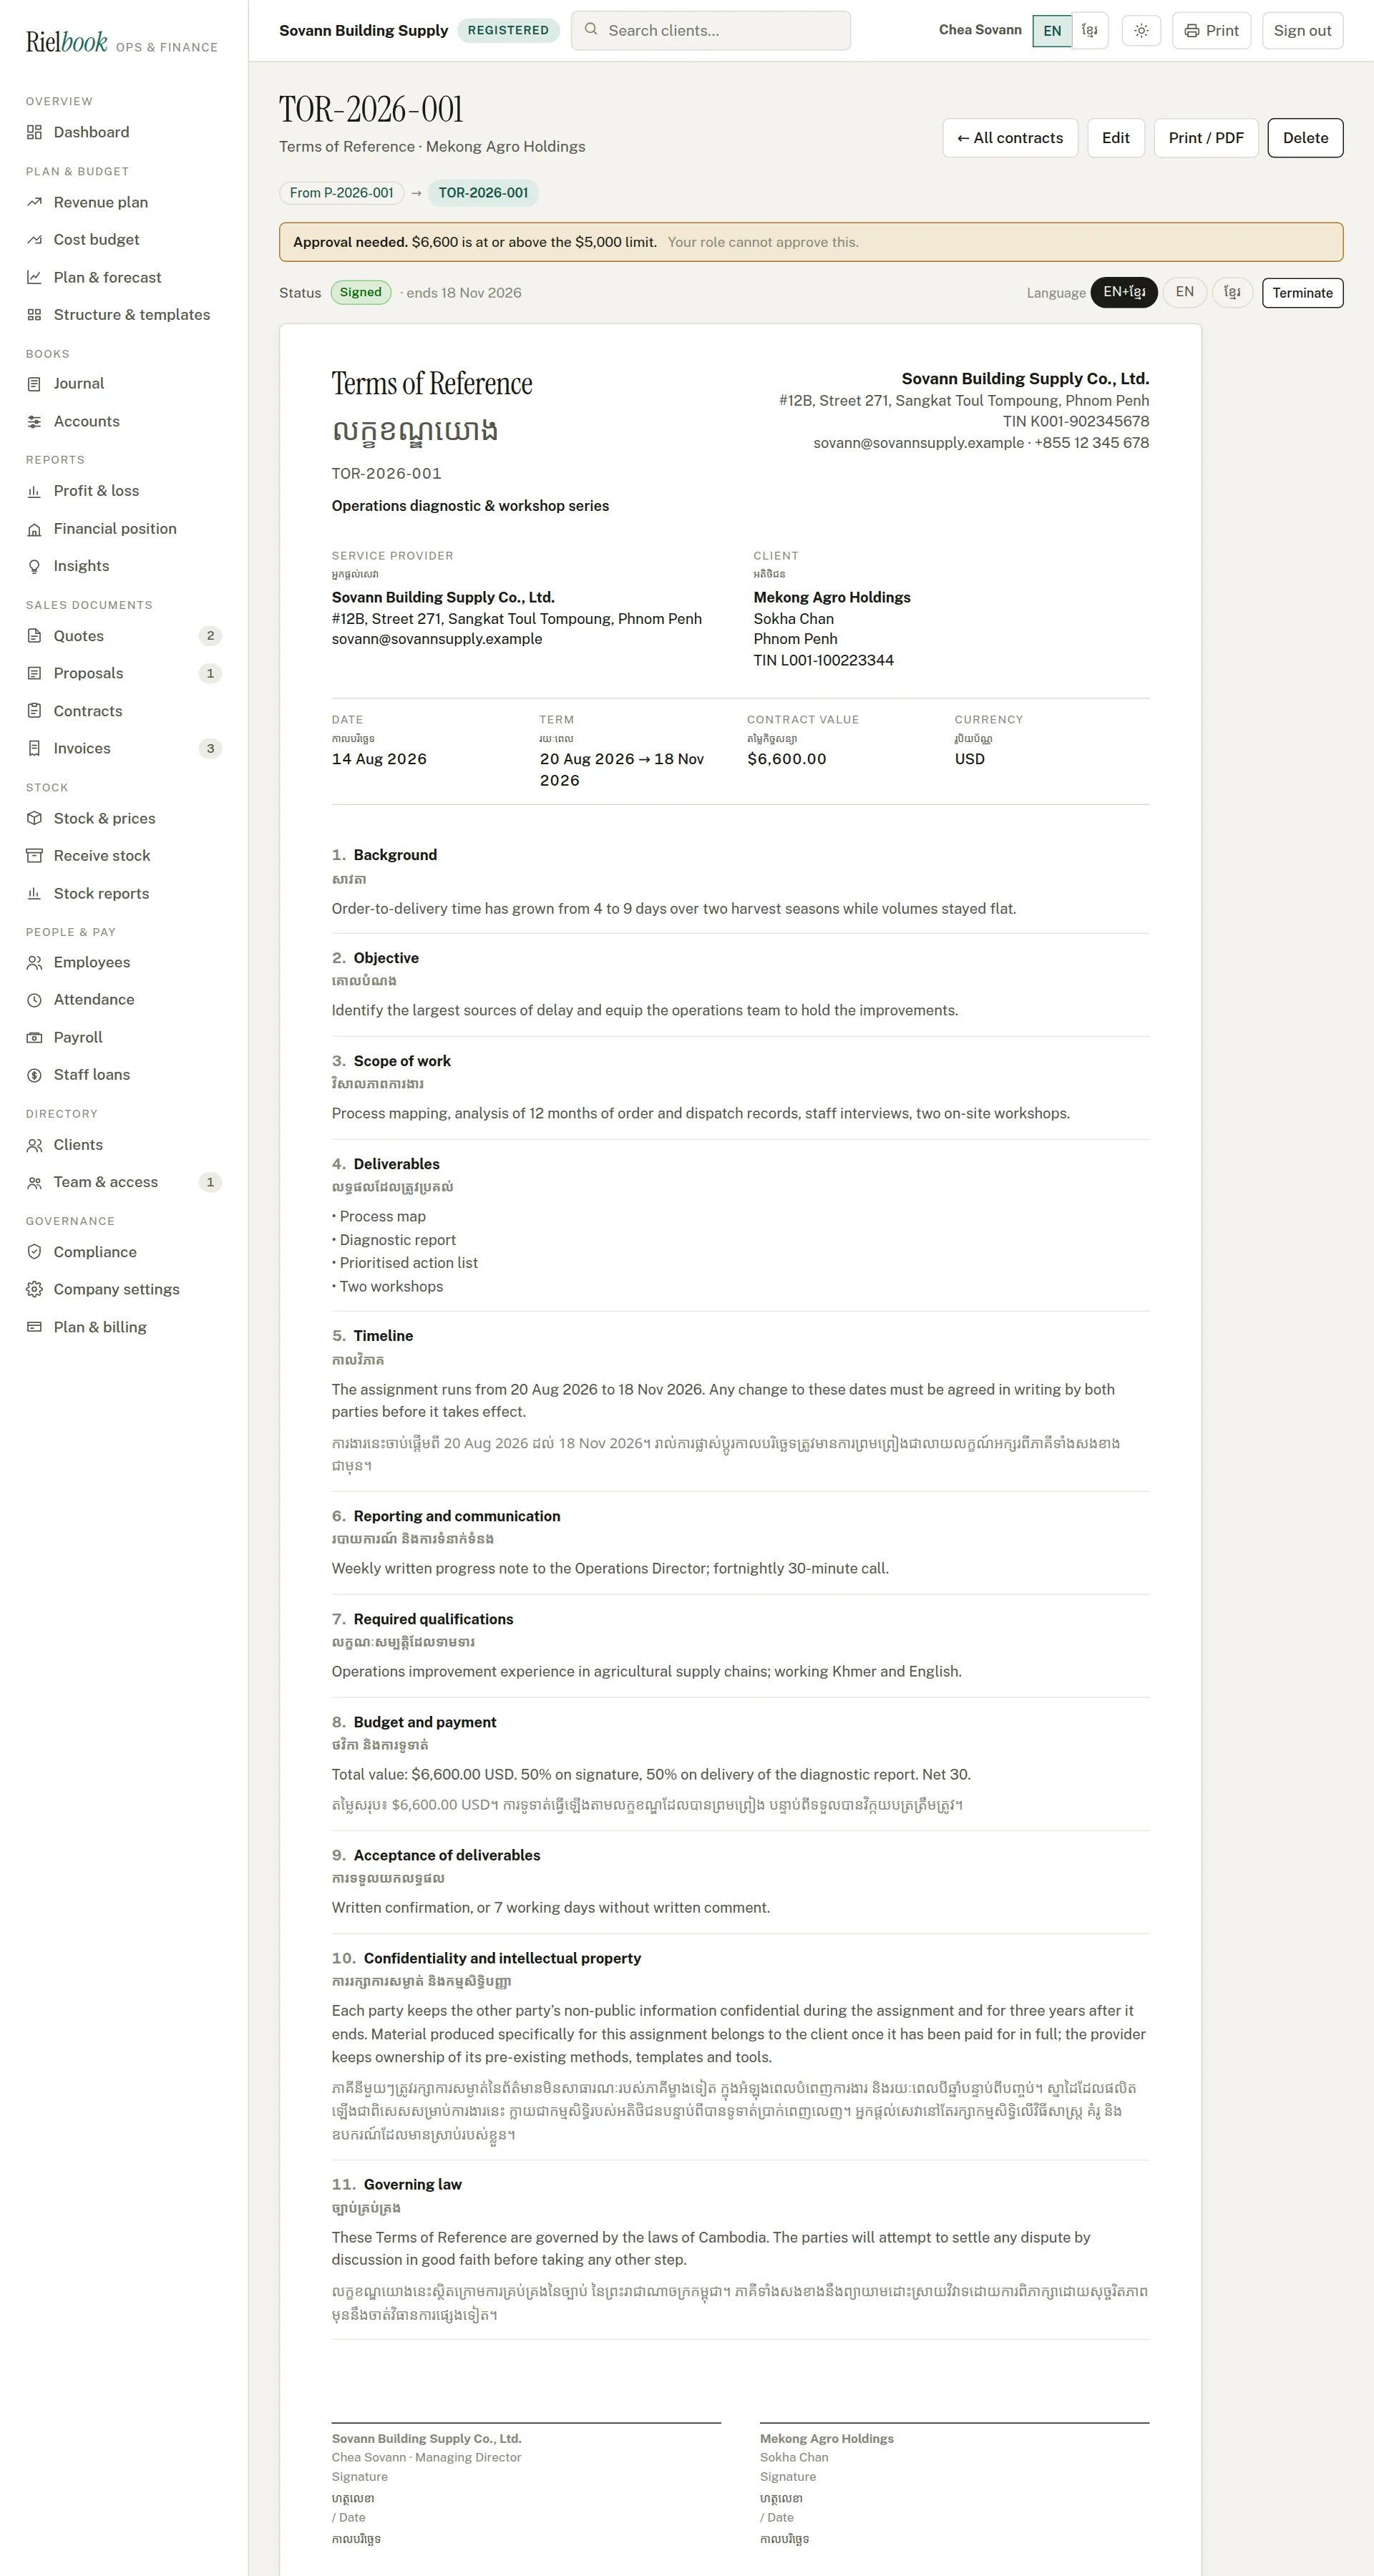
- Fill in each numbered clause — background, objective, scope, deliverables, reporting, qualifications, budget and payment, acceptance — in Khmer or English; each prints in the language you typed. The timeline is written for you from the start and end dates.
- Set the start and end dates and the value, and press Save contract.
- Print it, have both sides sign, then set the status to Signed. Ending within 60 days on the contracts page warns you in time to renew.
Invoices
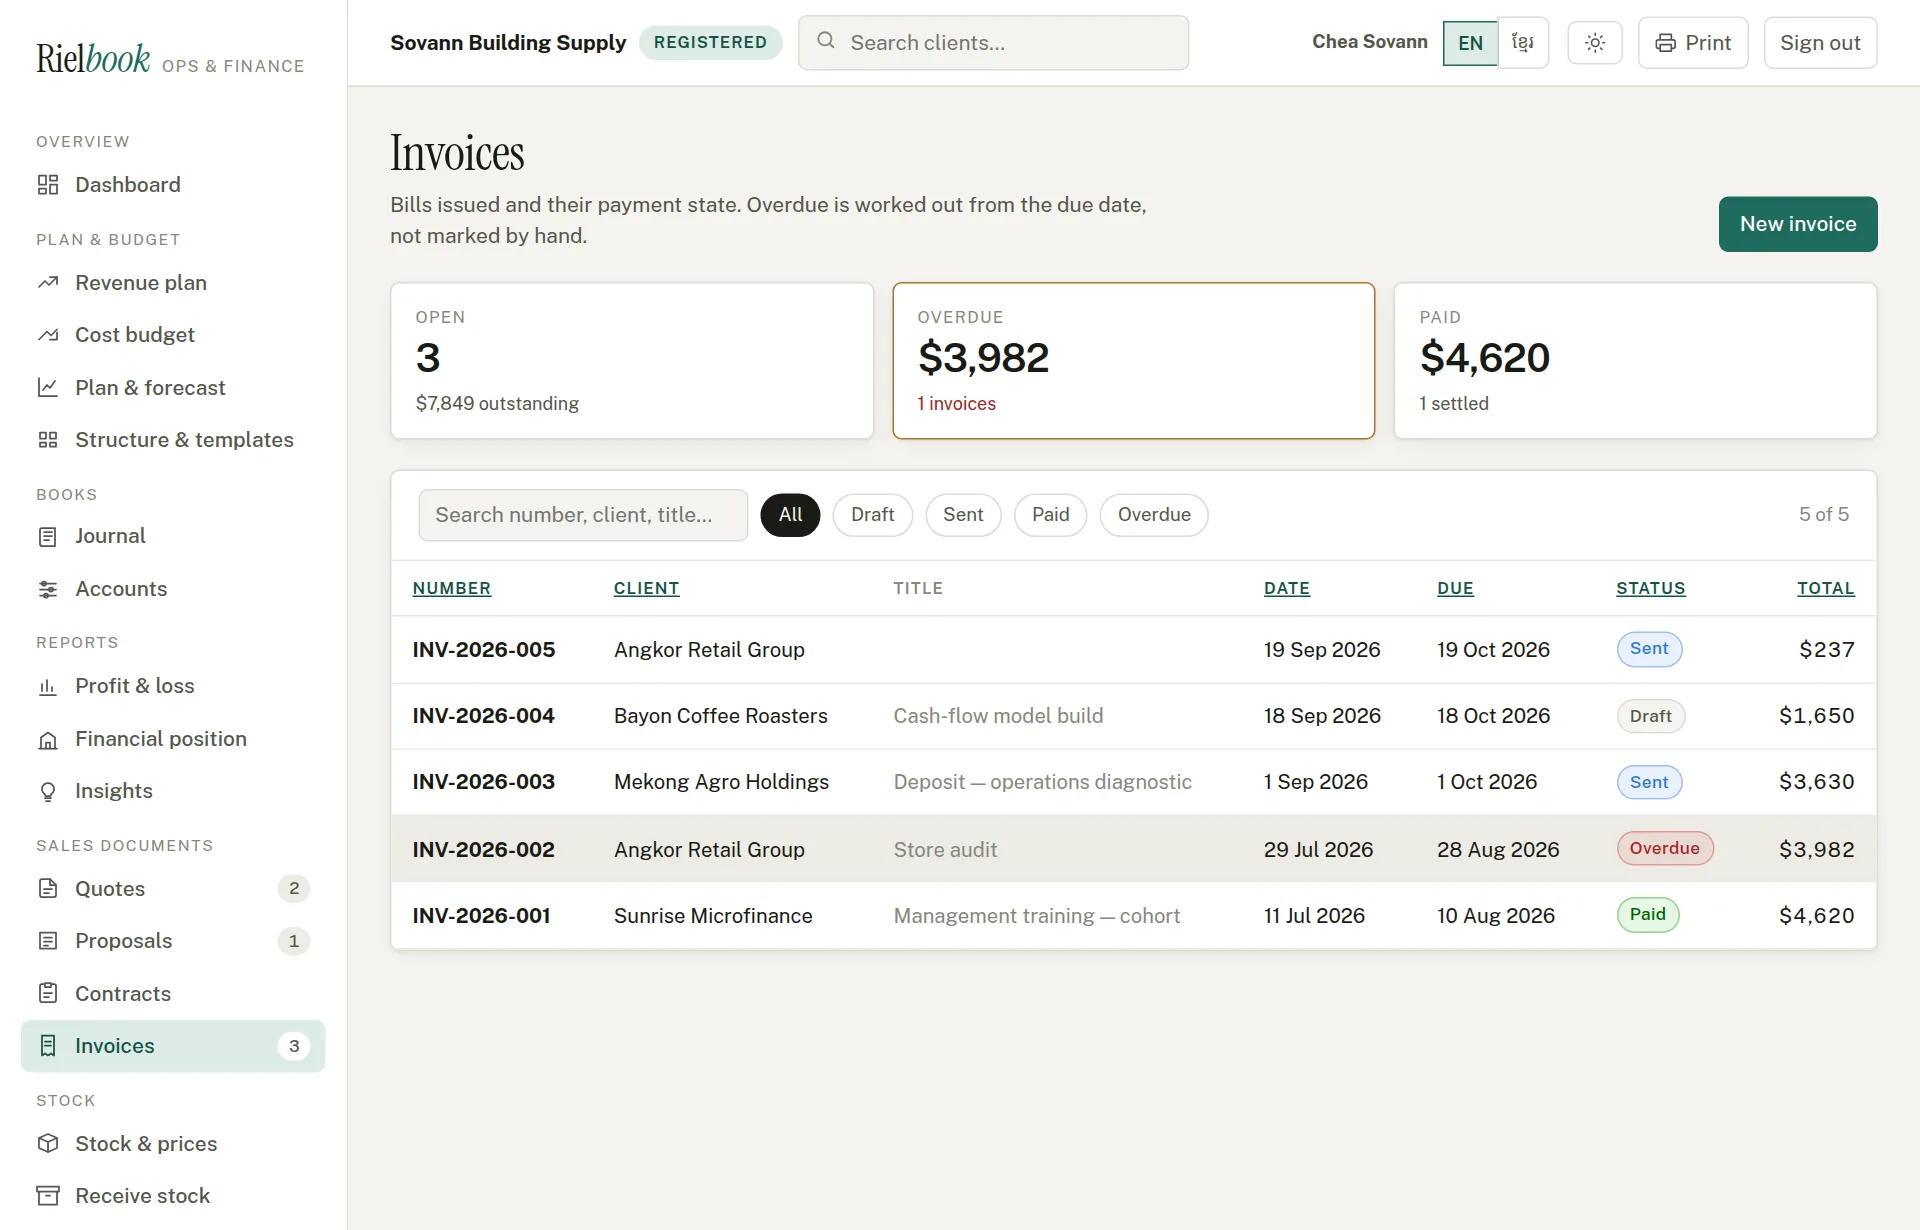
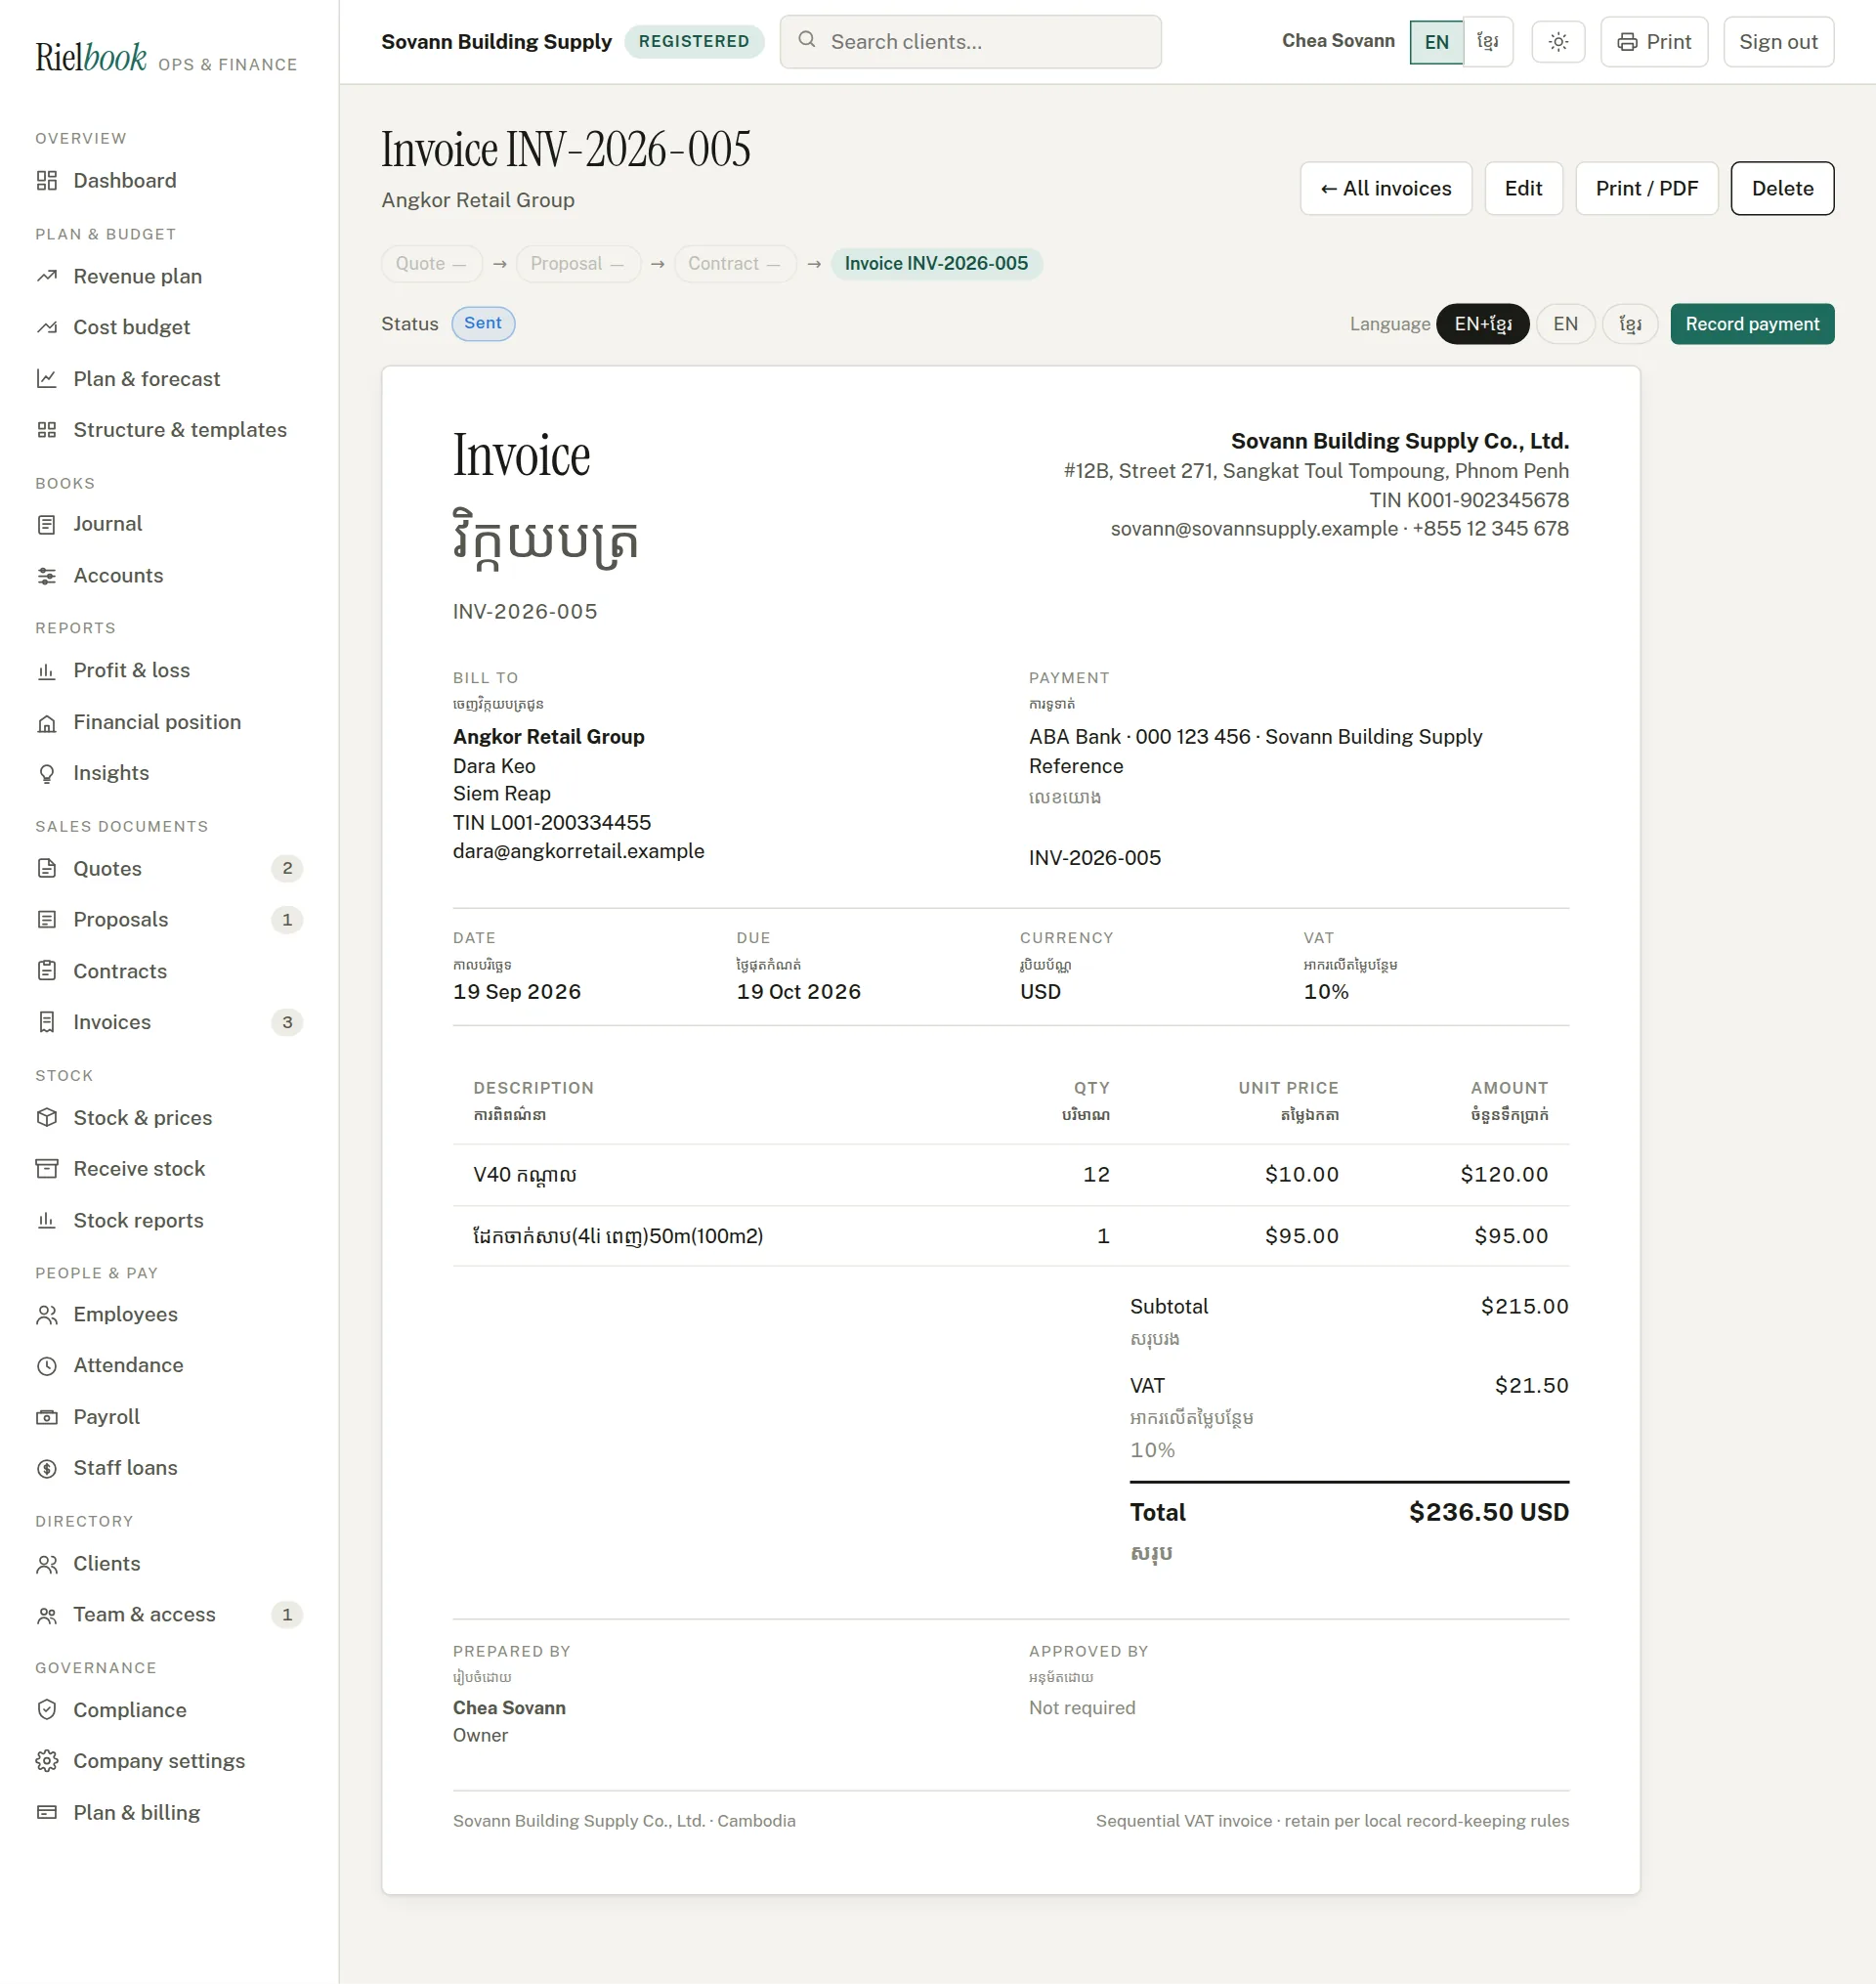
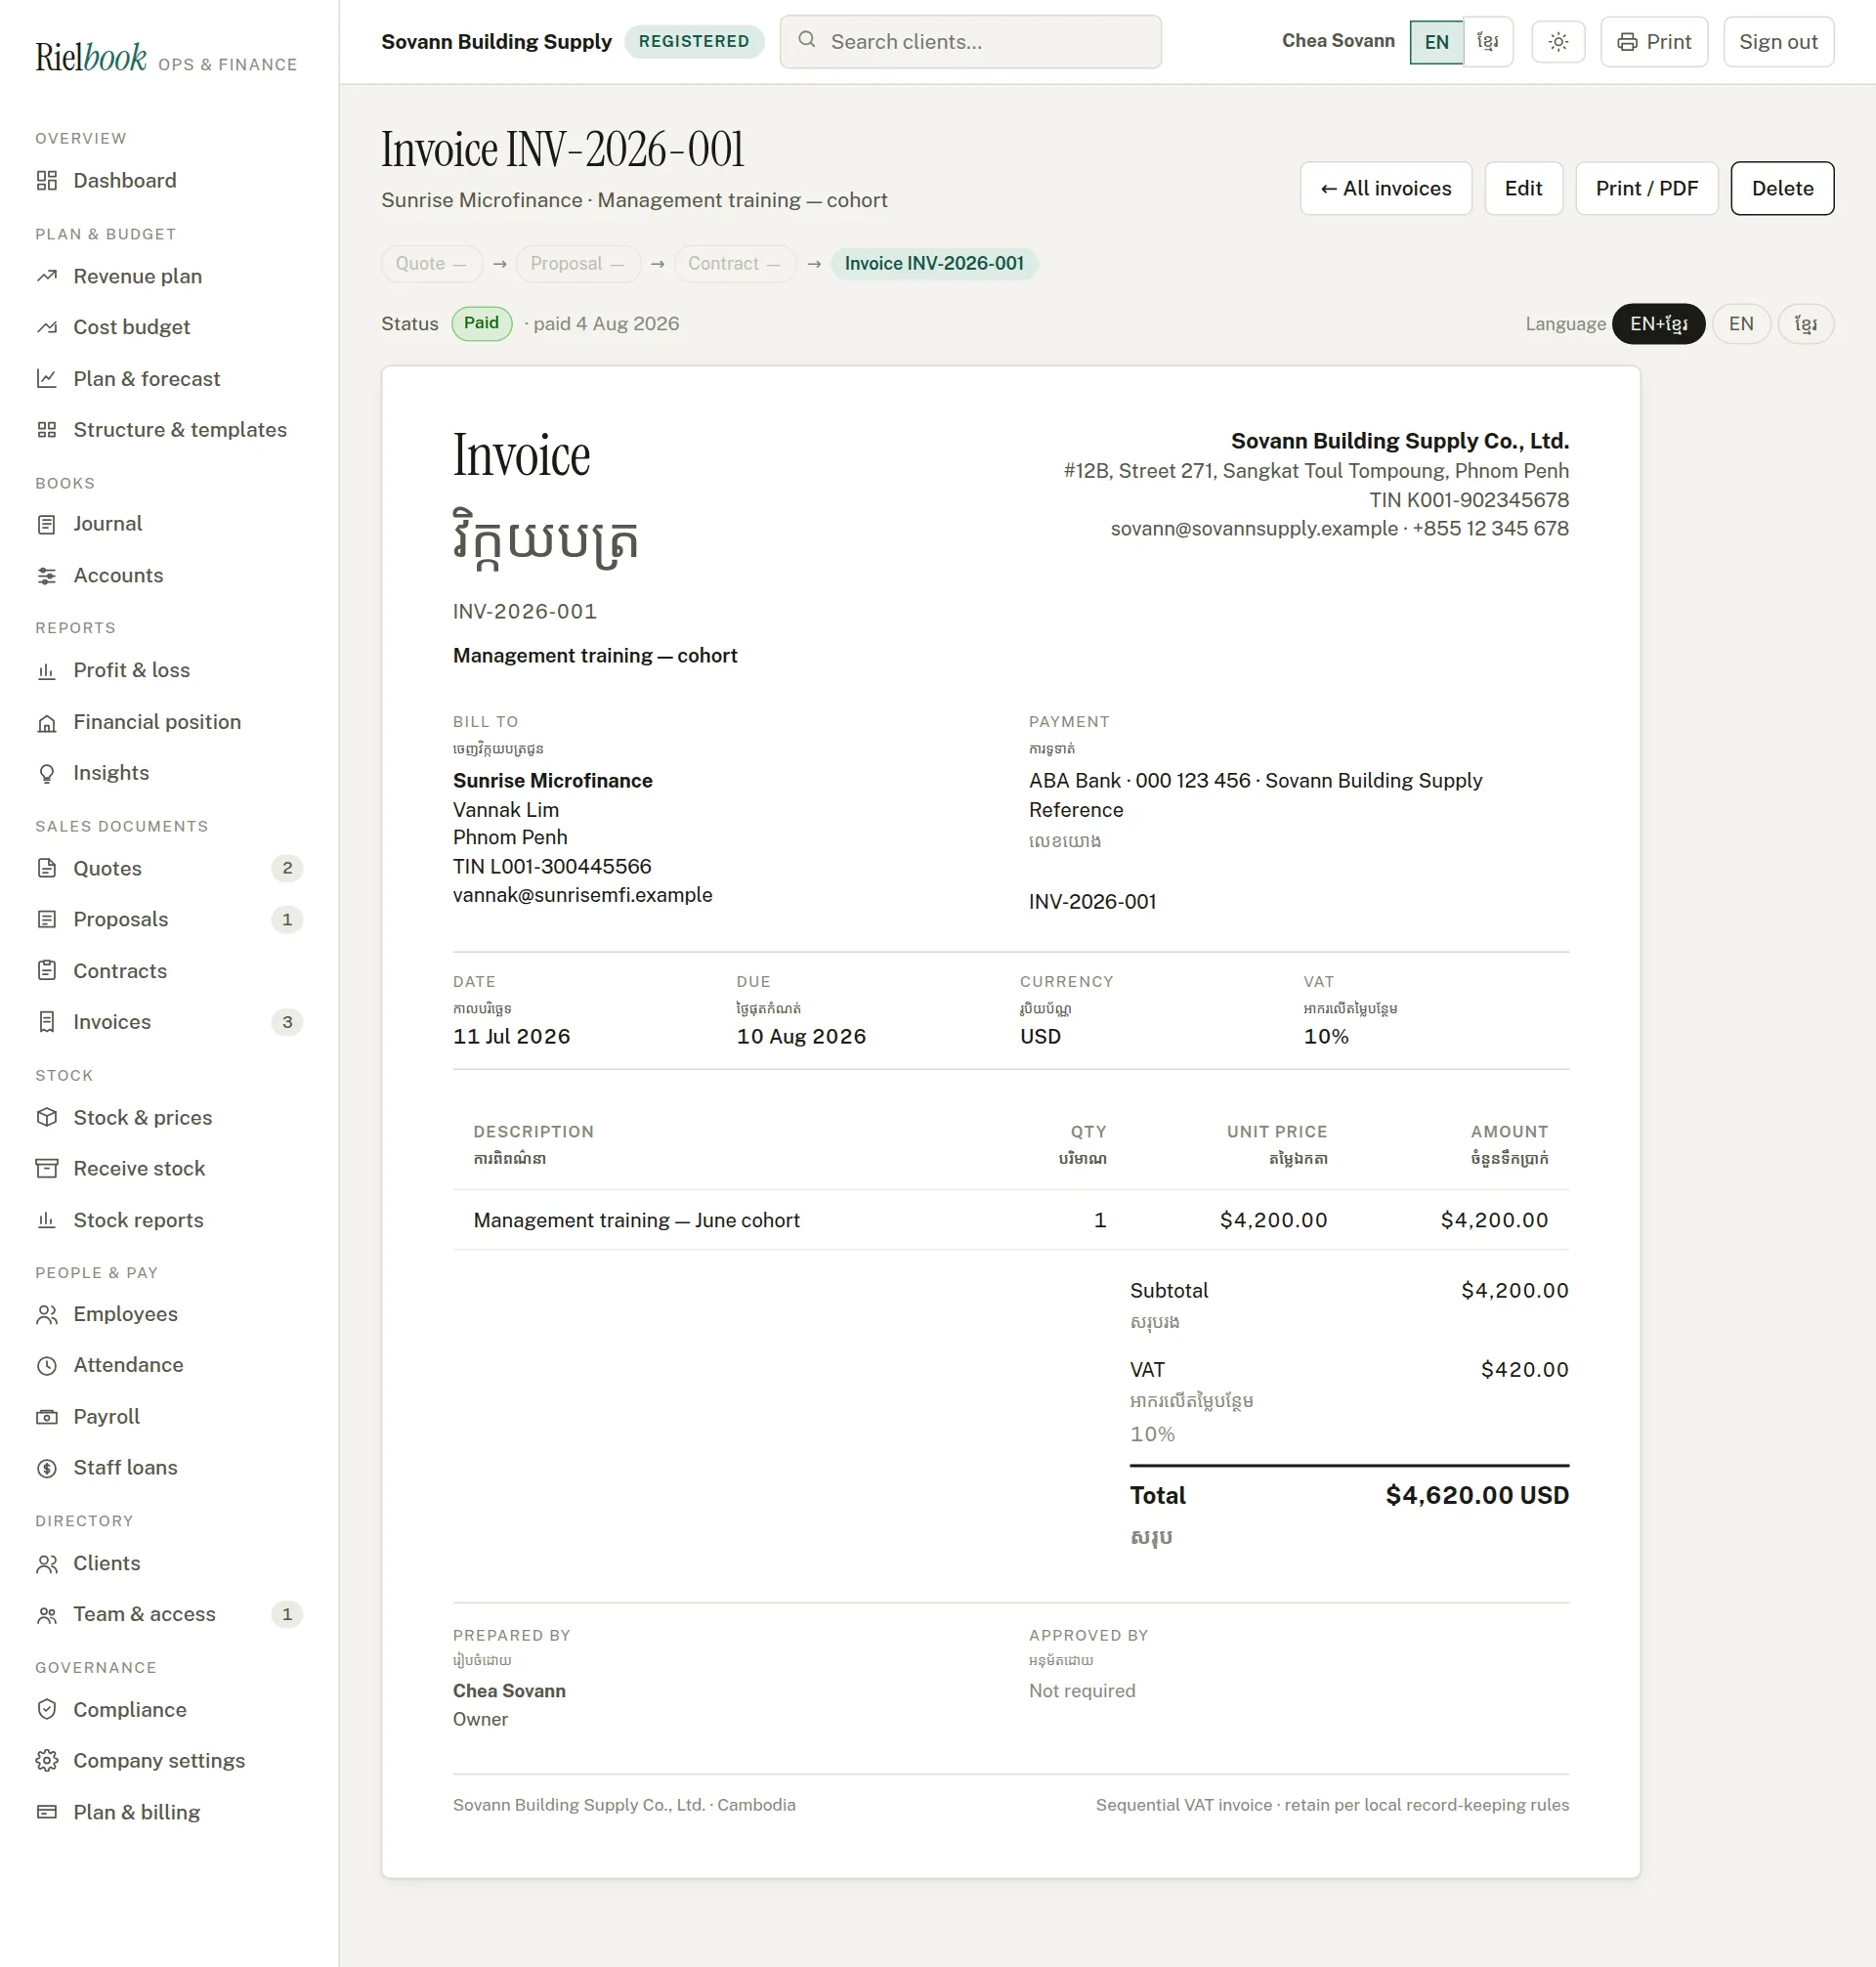
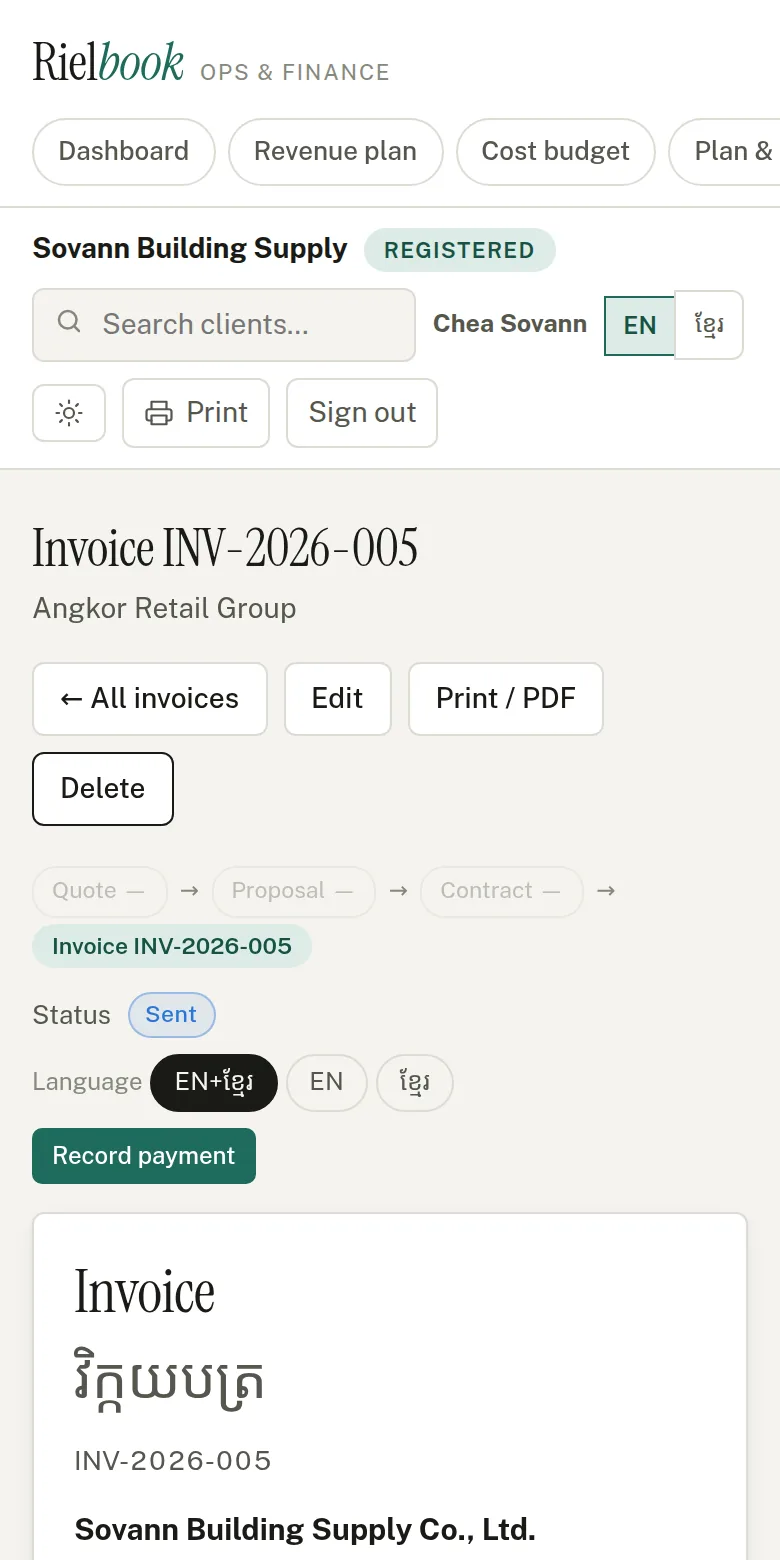
The invoice is the document that counts: when you mark it sent, Rielbook writes the sale into your books — the amount the client owes, your revenue and the VAT. When you record the payment, it moves from owed to cash.
Sales documents›Invoices
Write an invoice
- Press New invoice — or convert an accepted quote or proposal.
- Choose the client. Check the date and the due date.
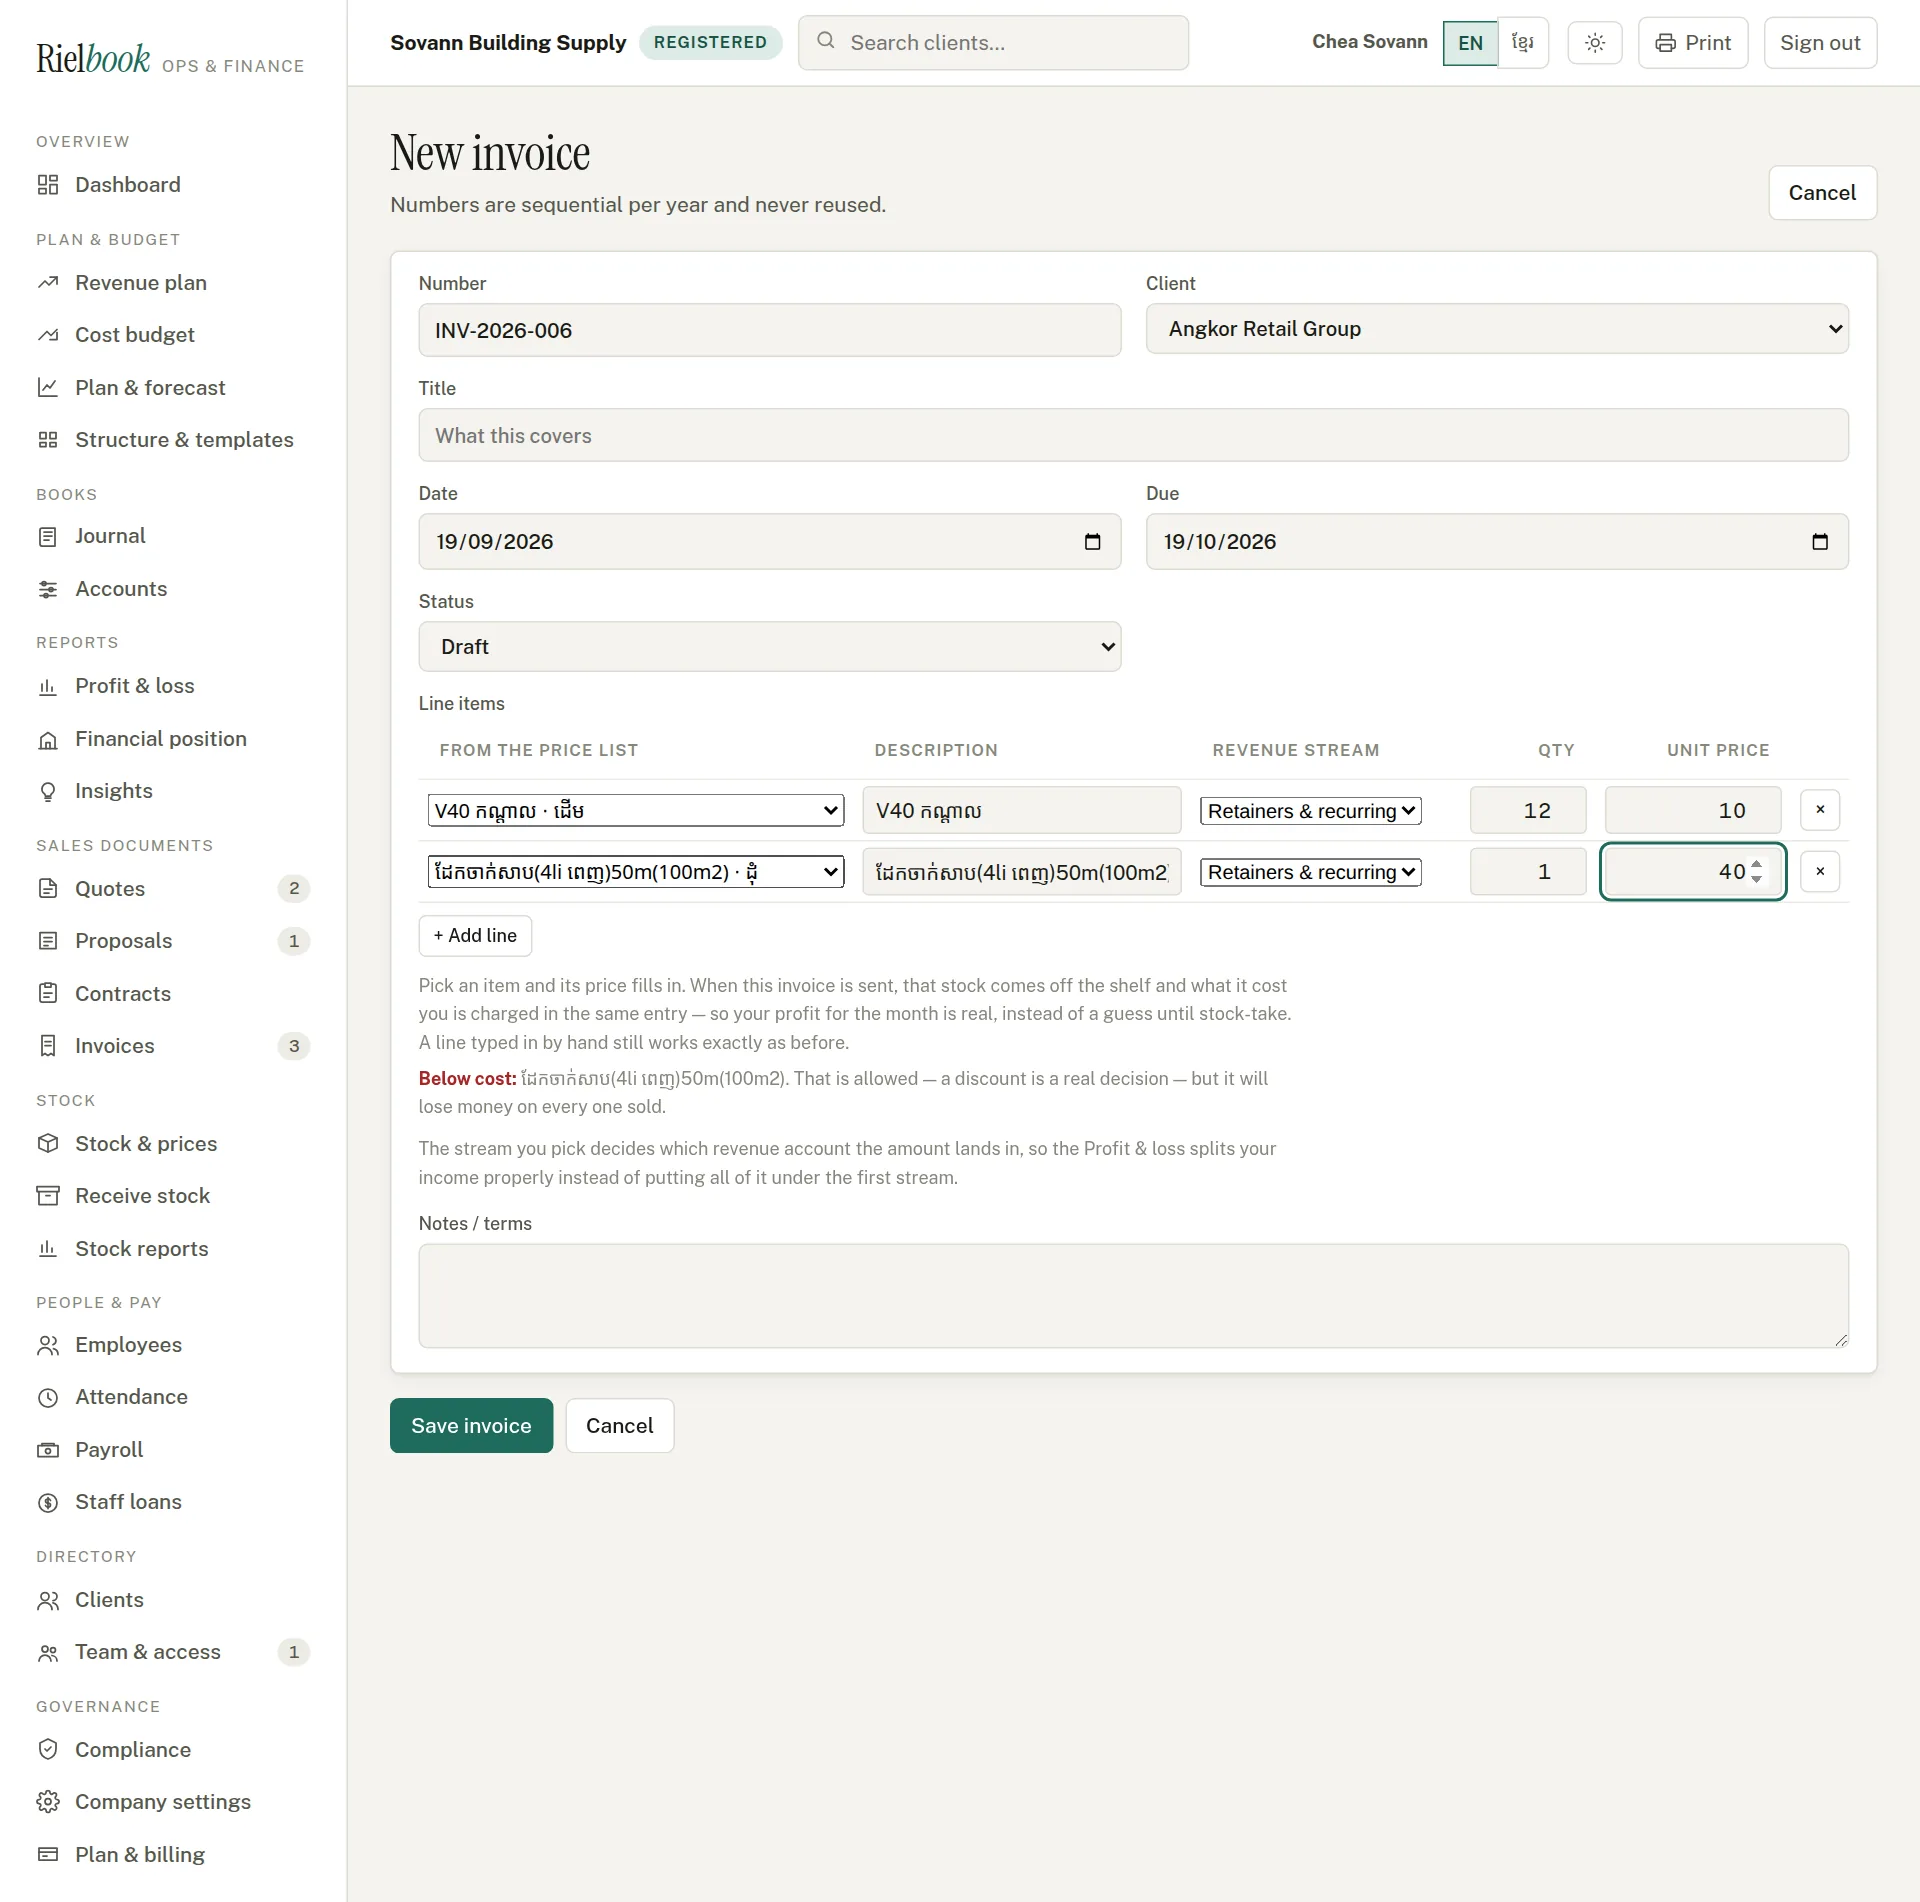
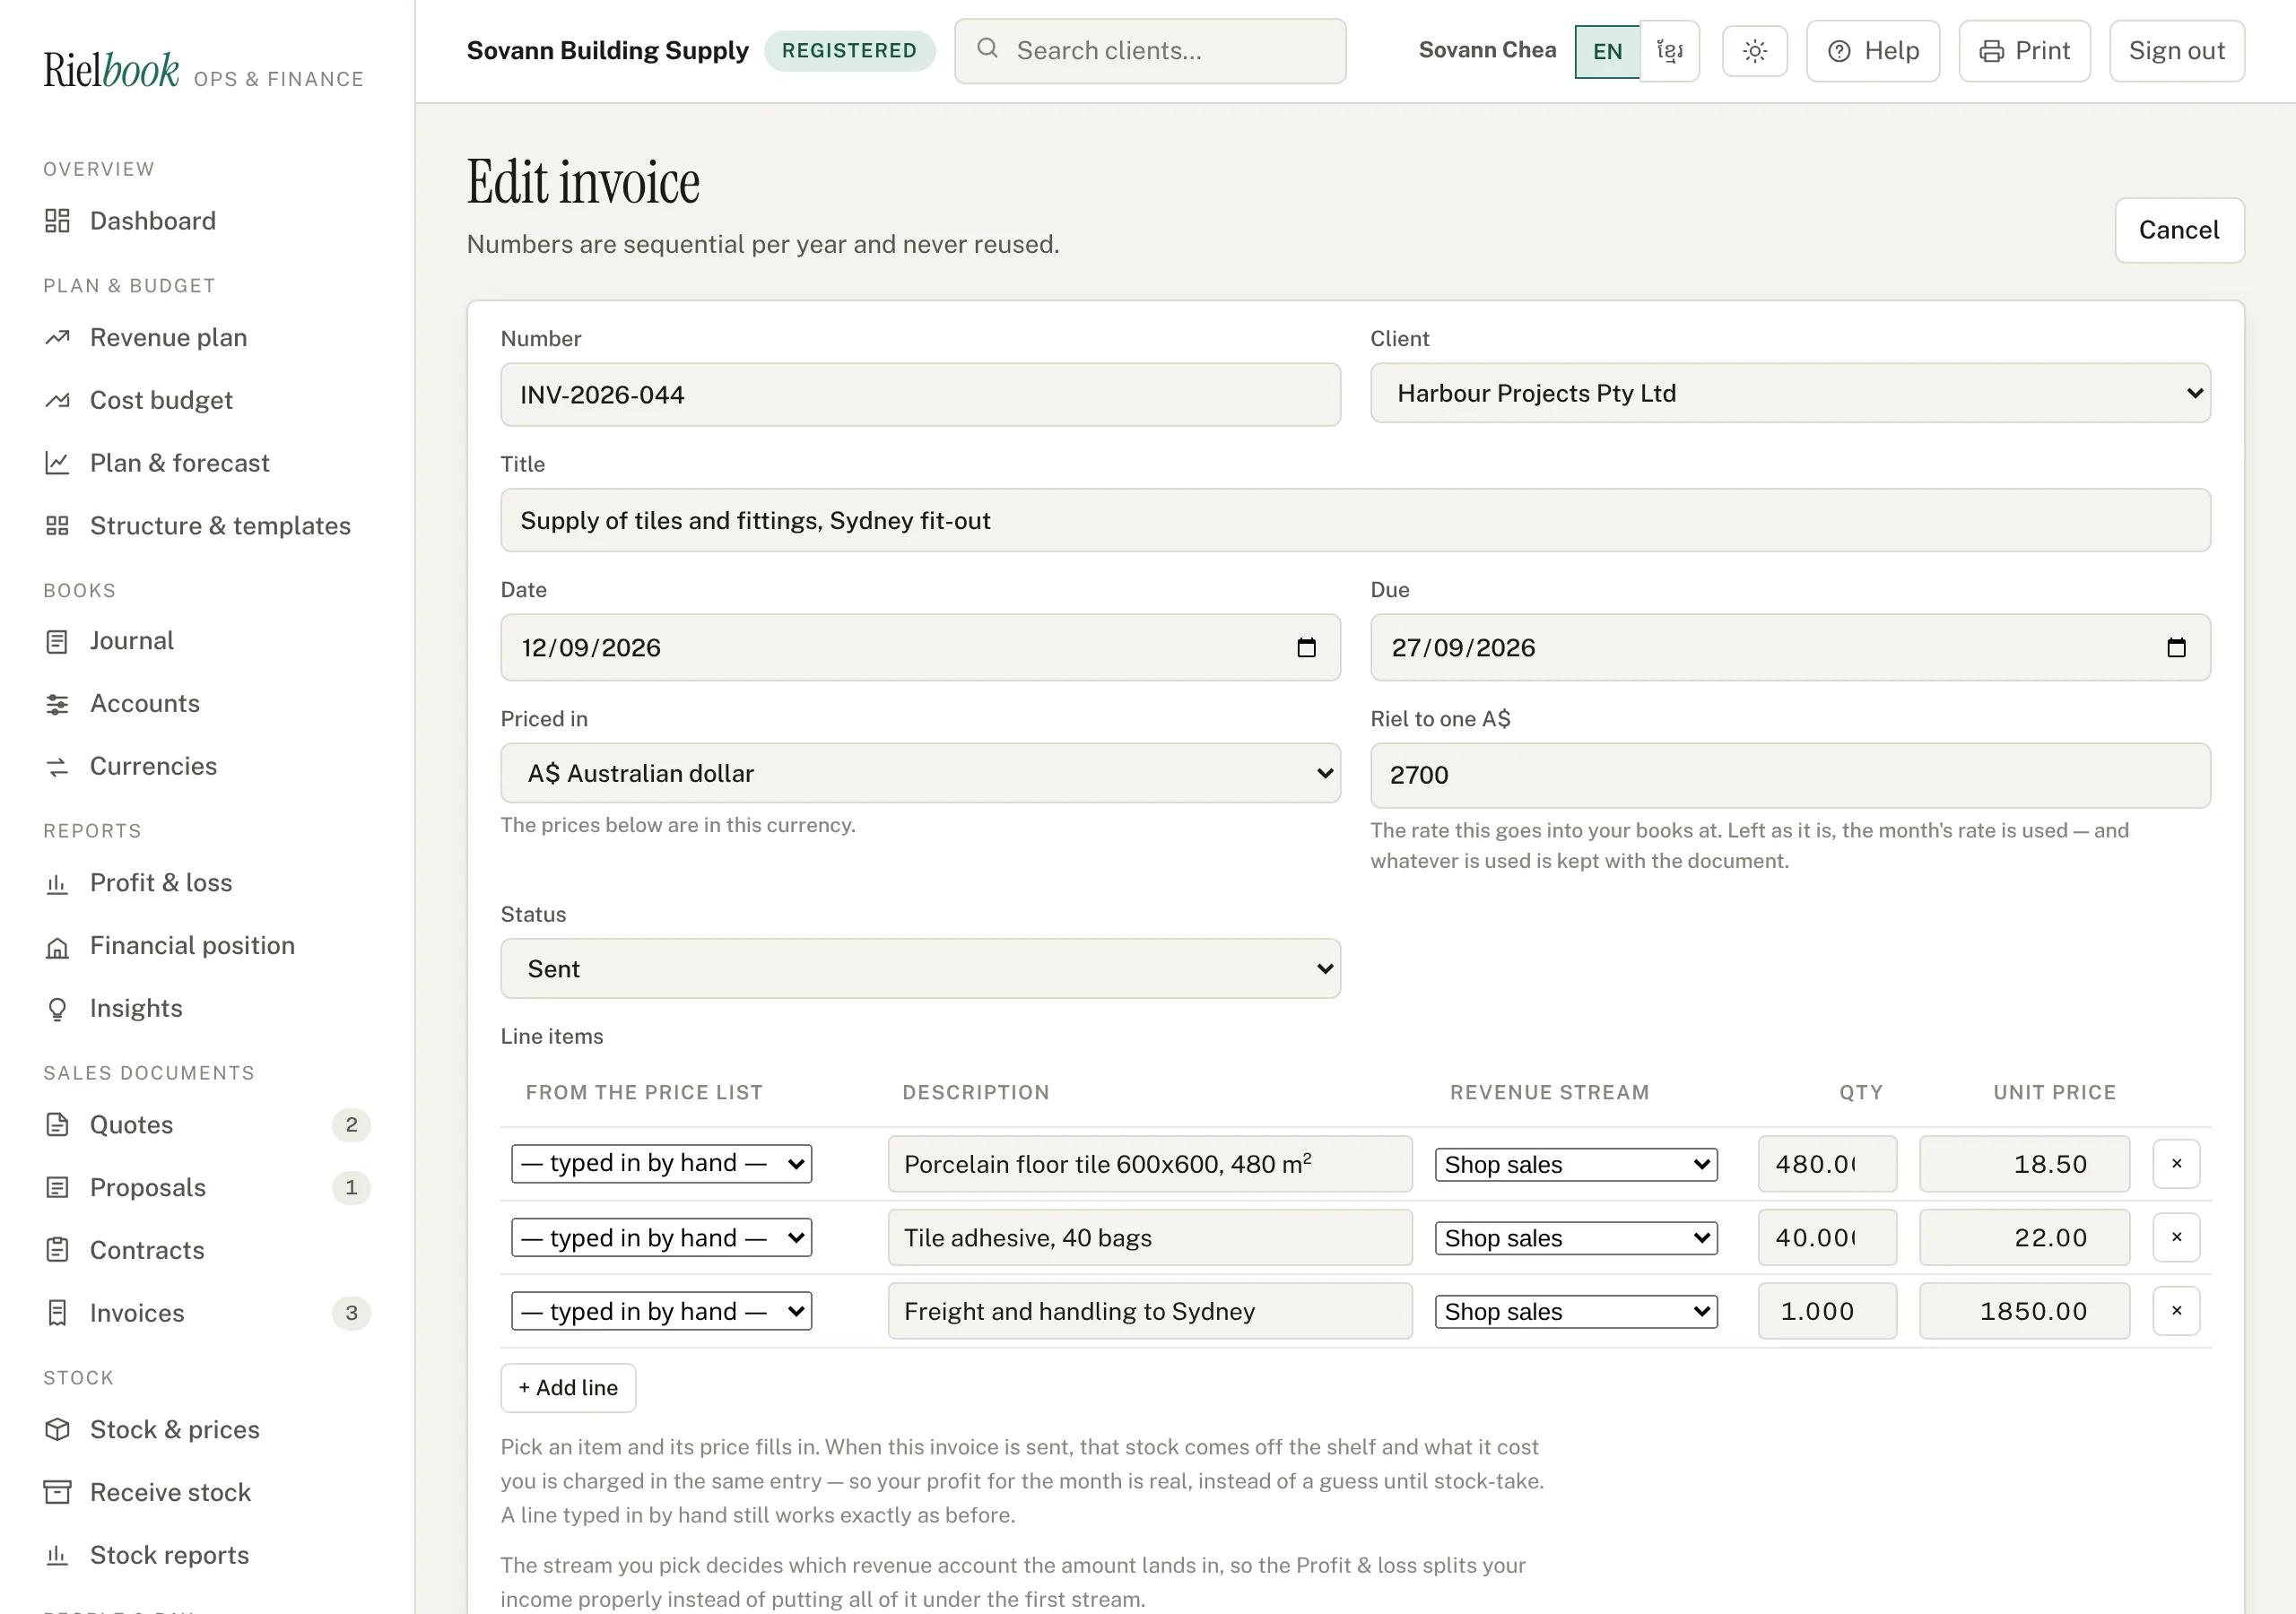
- Add the lines. For each line give a description, quantity and unit price, and choose the revenue stream it belongs to — this is what splits your Profit & loss by kind of income.
- If your company has the stock add-on, the first column, From the price list, lets you pick an item instead of typing: the description and price fill in for you. See Selling from stock.
- Add notes or payment terms, and press Save invoice. It is saved as a Draft — nothing is in the books yet.
- Billing a client in their own currency? There is a Priced in box beside the date — see More than one currency.
Send it, then record the payment
- Open the invoice and check it. Choose the language above the document, then press Print / PDF and send the PDF to the client.
- Press Mark sent and confirm. This posts the sale to your books, and — for items from the price list — takes the stock off the shelf.
- When the money arrives, press Record payment. The invoice becomes Paid and the money moves into your bank and cash.
Books and reports
Most of your books write themselves: invoices, payments, payroll, deliveries and staff loans all post their own entries. This part shows where those entries land, how to add the few that do not come from anywhere else, and how to read the reports.
How a figure travels through Rielbook
Everything in this part rests on one idea, and it is worth ten minutes now because it explains every report you will ever look at. Rielbook stores a figure once, in one place, and every report works it out again from that one place the moment you open the page. There is no refresh button, no overnight job and no second copy that can drift out of step with the first.
So yes — it is immediate
Post an entry and press Post entry. Open Reports›Profit & loss in the next second and the figure is already different. The same is true of marking an invoice sent, recording a payment, receiving a delivery and finishing a payroll run. Nothing waits.
If a figure has not moved, it is one of four things, and all four are visible on the screen in front of you:
| What you are looking at | Why the figure did not move |
|---|---|
| The date on the entry | The profit & loss shows one period at a time — this year to date unless you change it at the top. An entry dated last year, or next month, is in the books but outside what that page is showing. Change the period and it appears. |
| The document is still a draft | A quote, a proposal or an invoice saved as a draft is not in the books at all. An invoice reaches the ledger when you mark it sent, and moves from owed to cash when you record the payment. That is deliberate: a draft is a piece of paper you are still thinking about. |
| The kind of account | The profit & loss only shows income and costs. An entry between two asset accounts — moving cash into the riel till, say — changes nothing on it, because nothing was earned or spent. Look at the financial position instead. |
| Your own role | Some people cannot open some pages. The chapter on Team & access says who sees what. |
What the chart of accounts actually decides
Every line of every entry points at one account. The account's kind — asset, liability, equity, income, expense — decides which report it appears on, and the account's What it is used for decides which line of that report it sits on.
- Income accounts make up Revenue at the top of the profit & loss.
- Expense accounts are costs. Whether you group one as cost of sales, operating expense or tax decides where it appears and therefore your gross margin — but a cost is counted either way.
- Asset and liability accounts are the financial position: what you hold and what you owe. They never touch the profit & loss.
- Equity is the owner's stake. Money the owner takes out, grouped as Owner drawings, is shown on the profit & loss so you can see it beside the profit it came from.
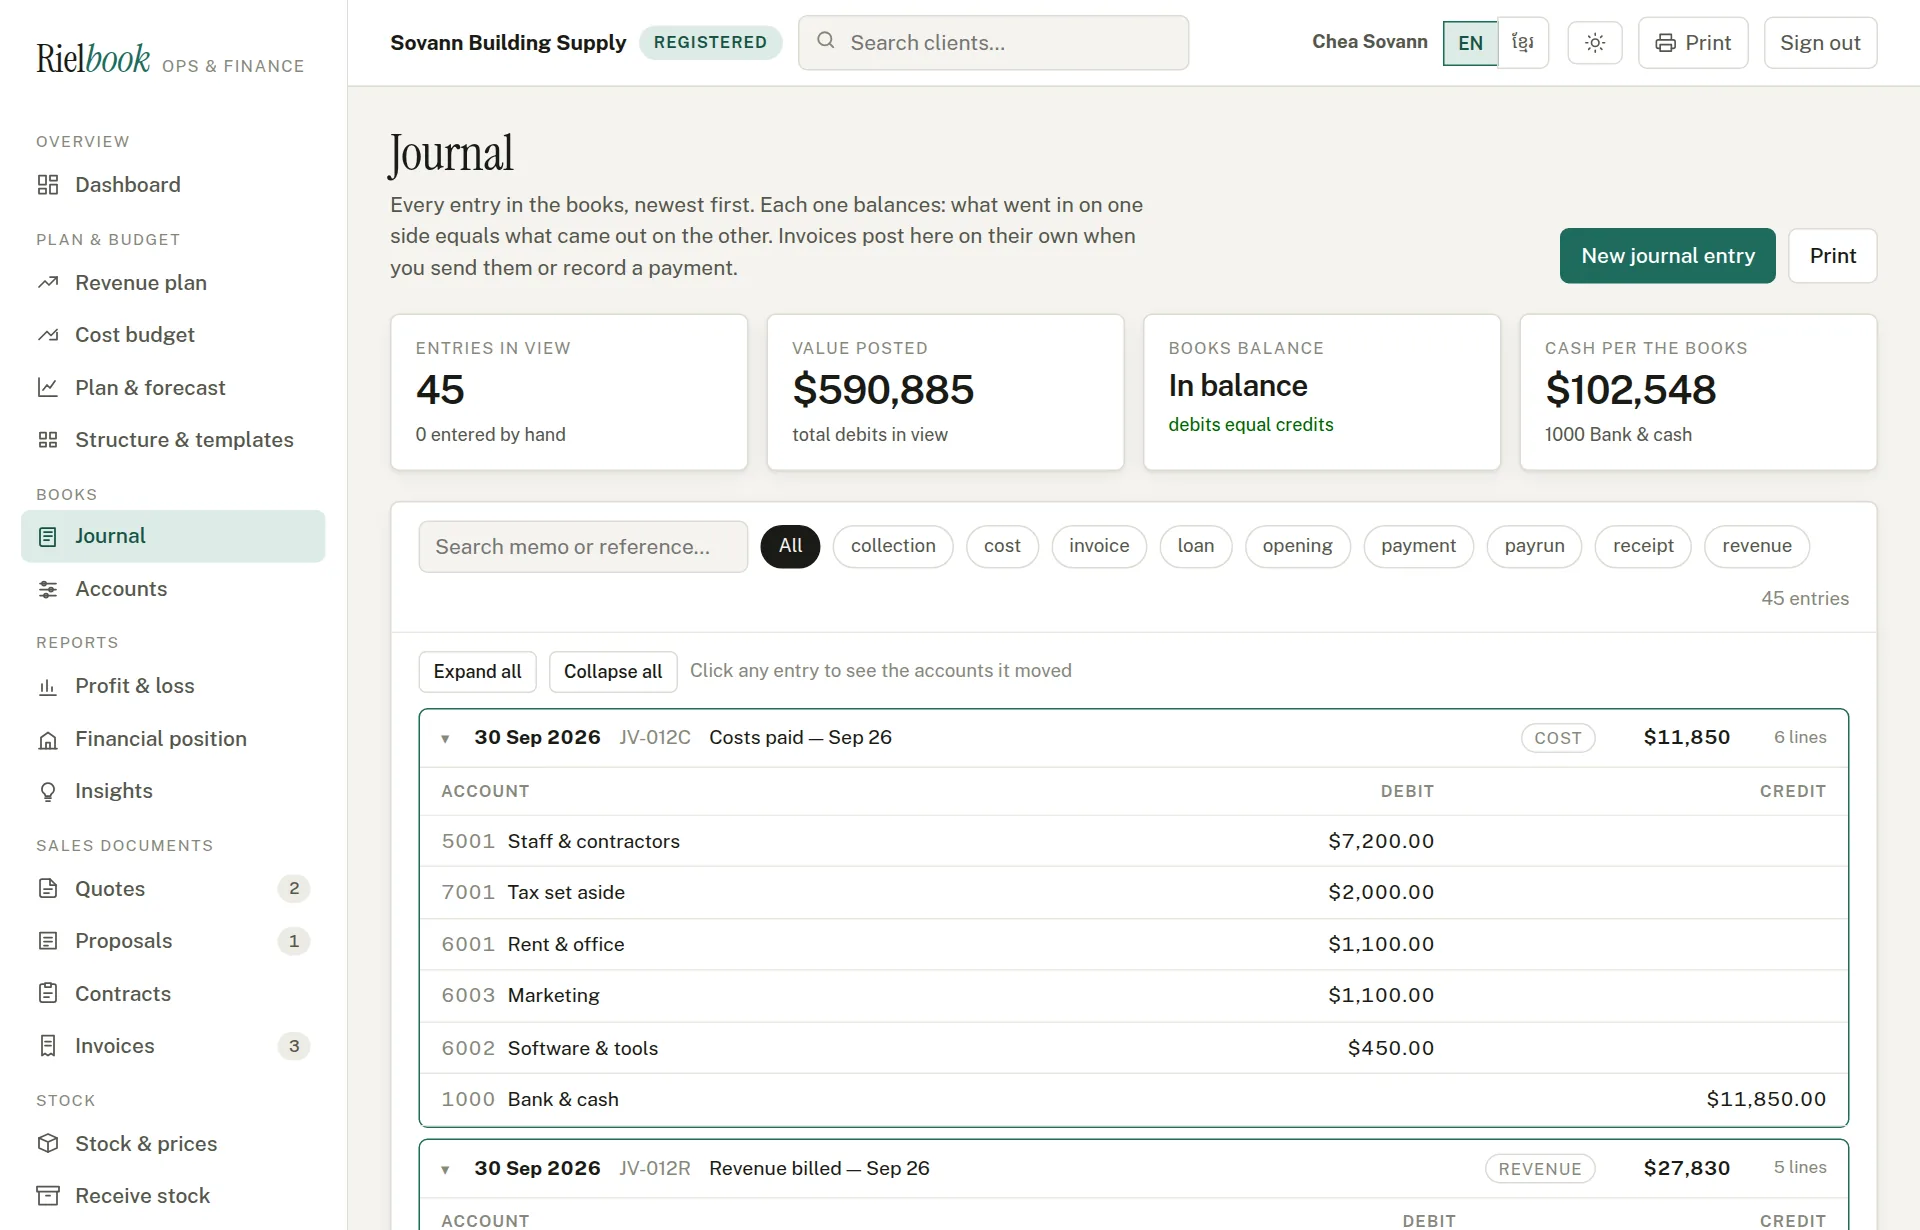
The journal
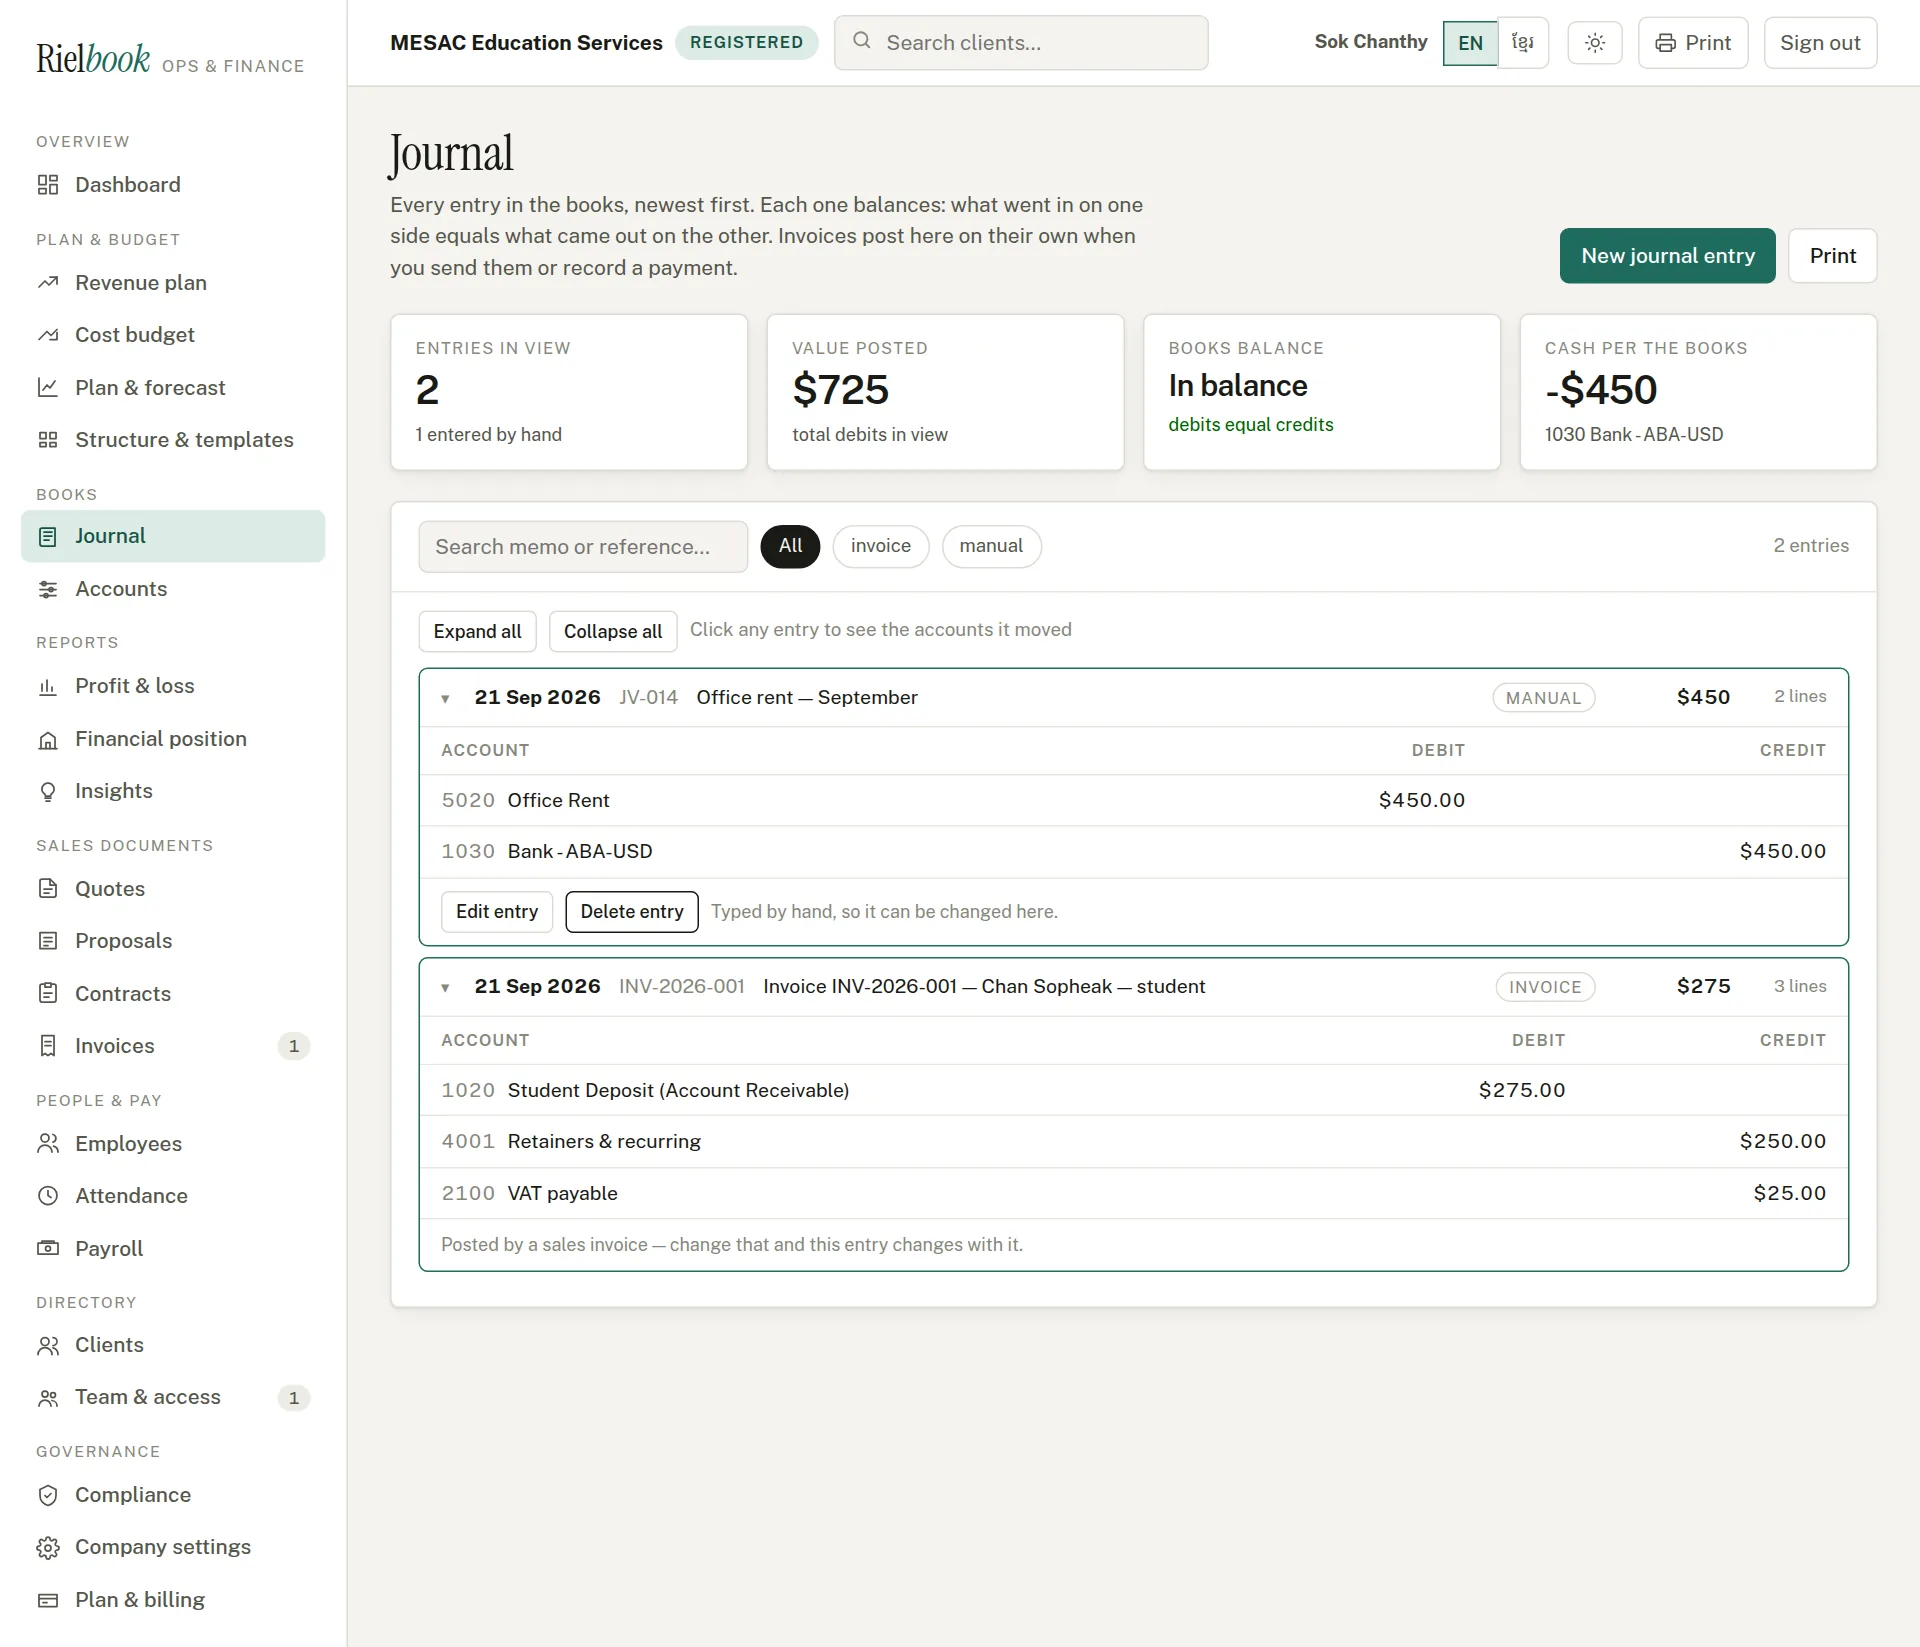
Every entry in the books, newest first. Each one balances — what went into one side equals what came out of the other — and Rielbook refuses to save one that does not.
Books›Journal
Enter something by hand
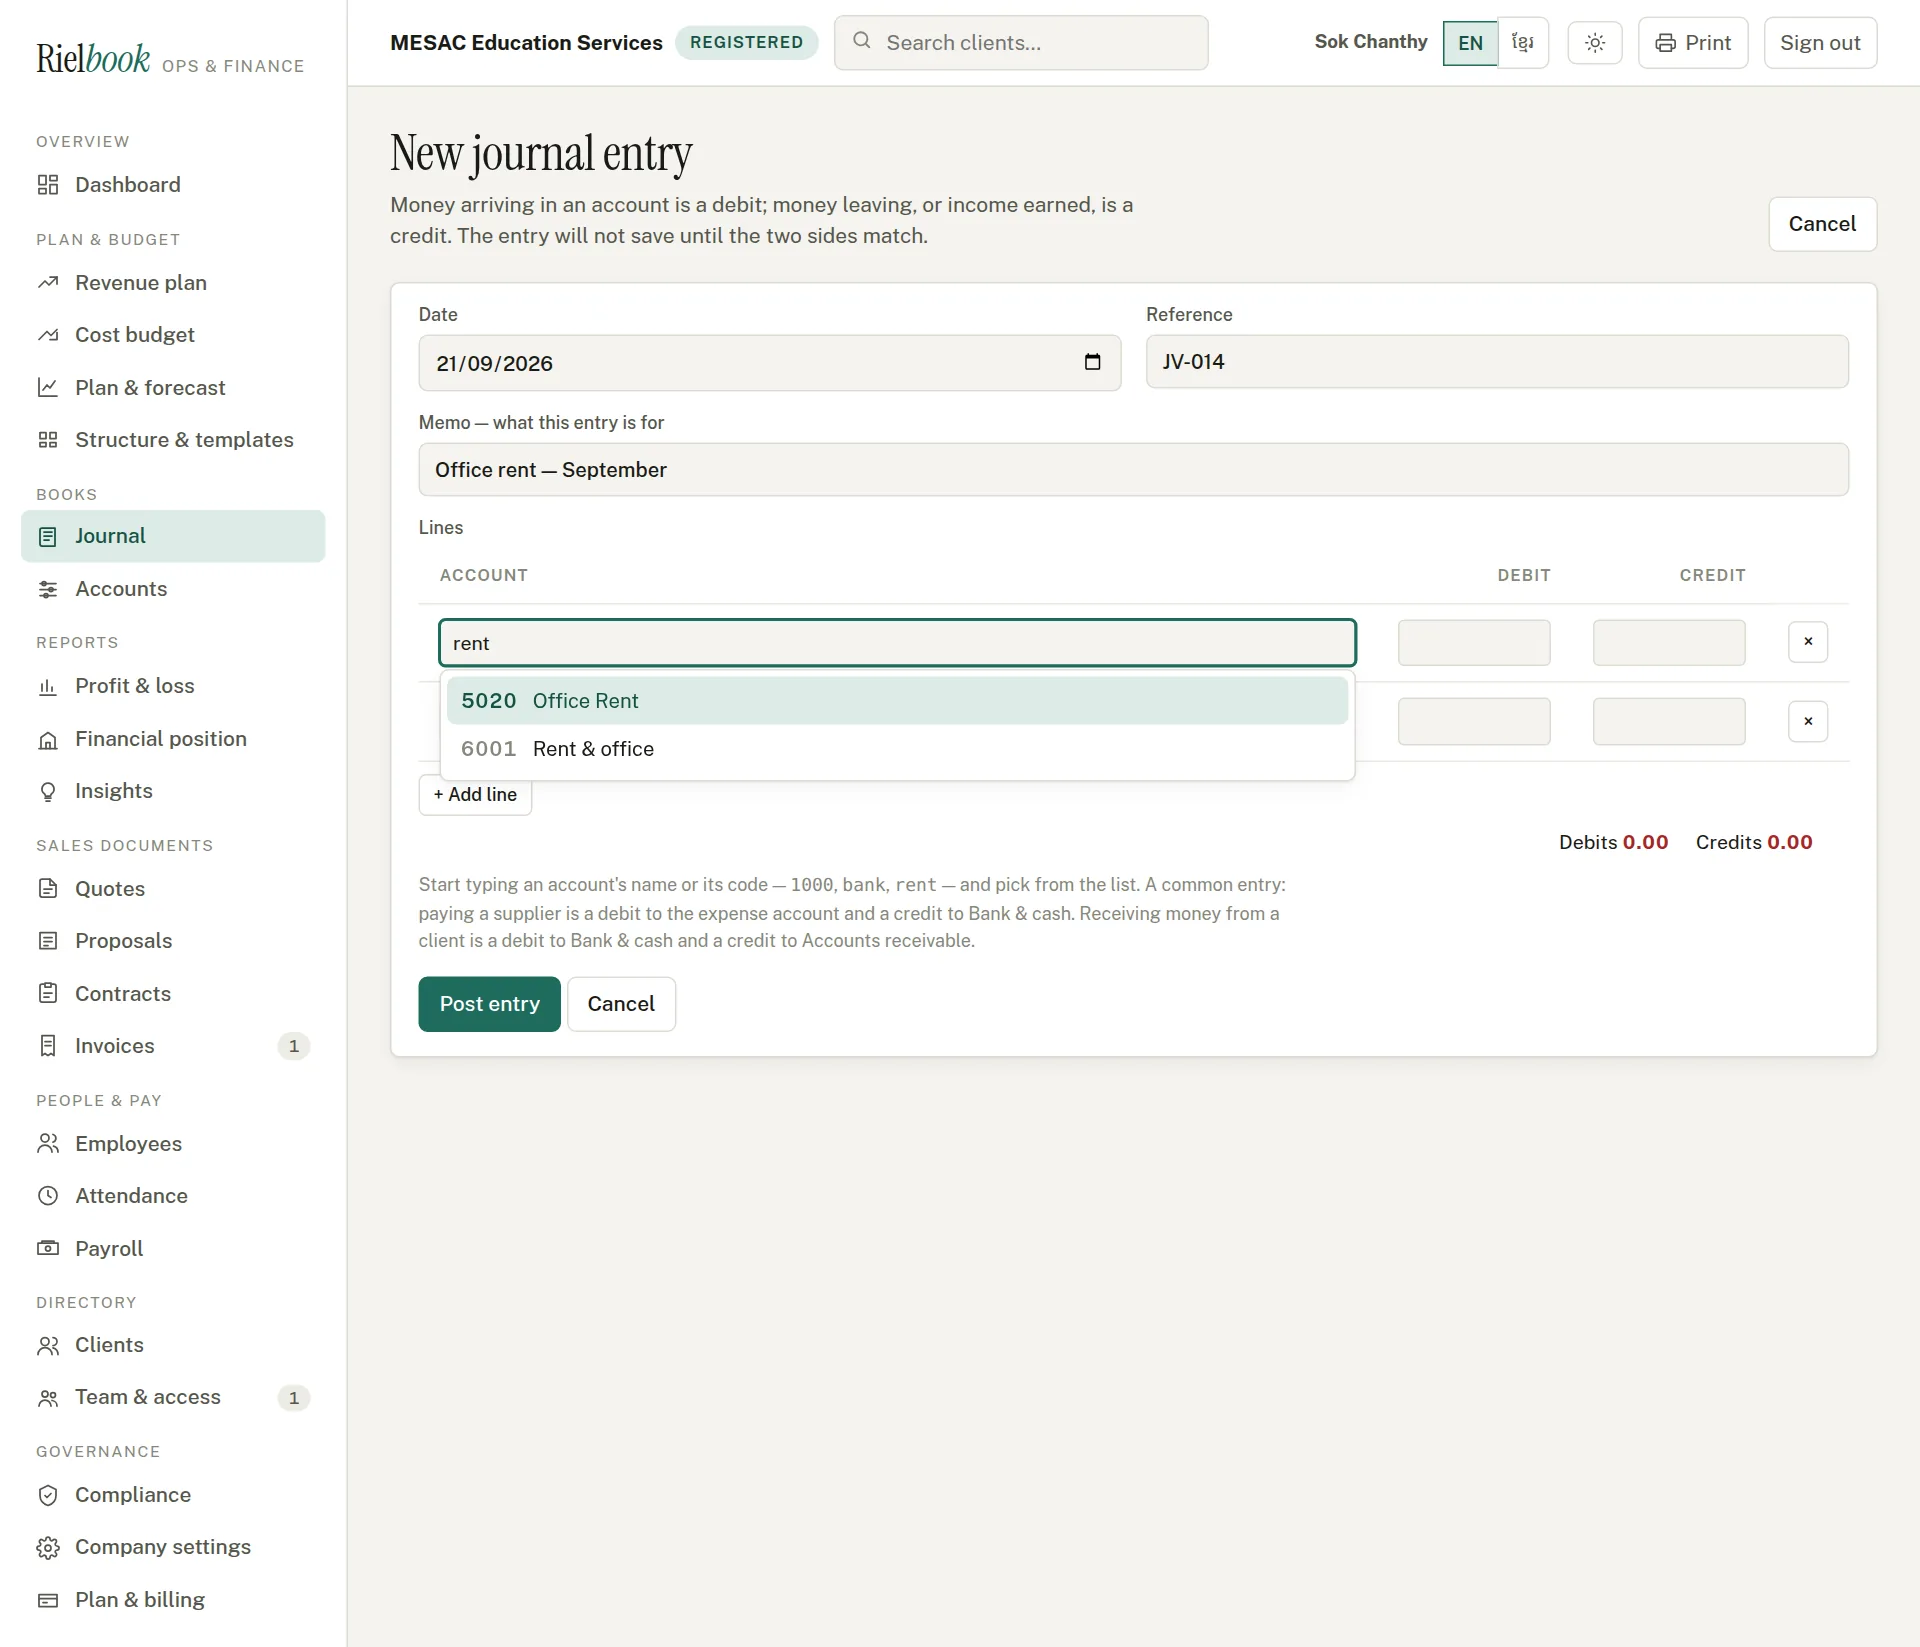
For money that did not come from an invoice or payroll — bank charges, rent paid, the owner putting money in.
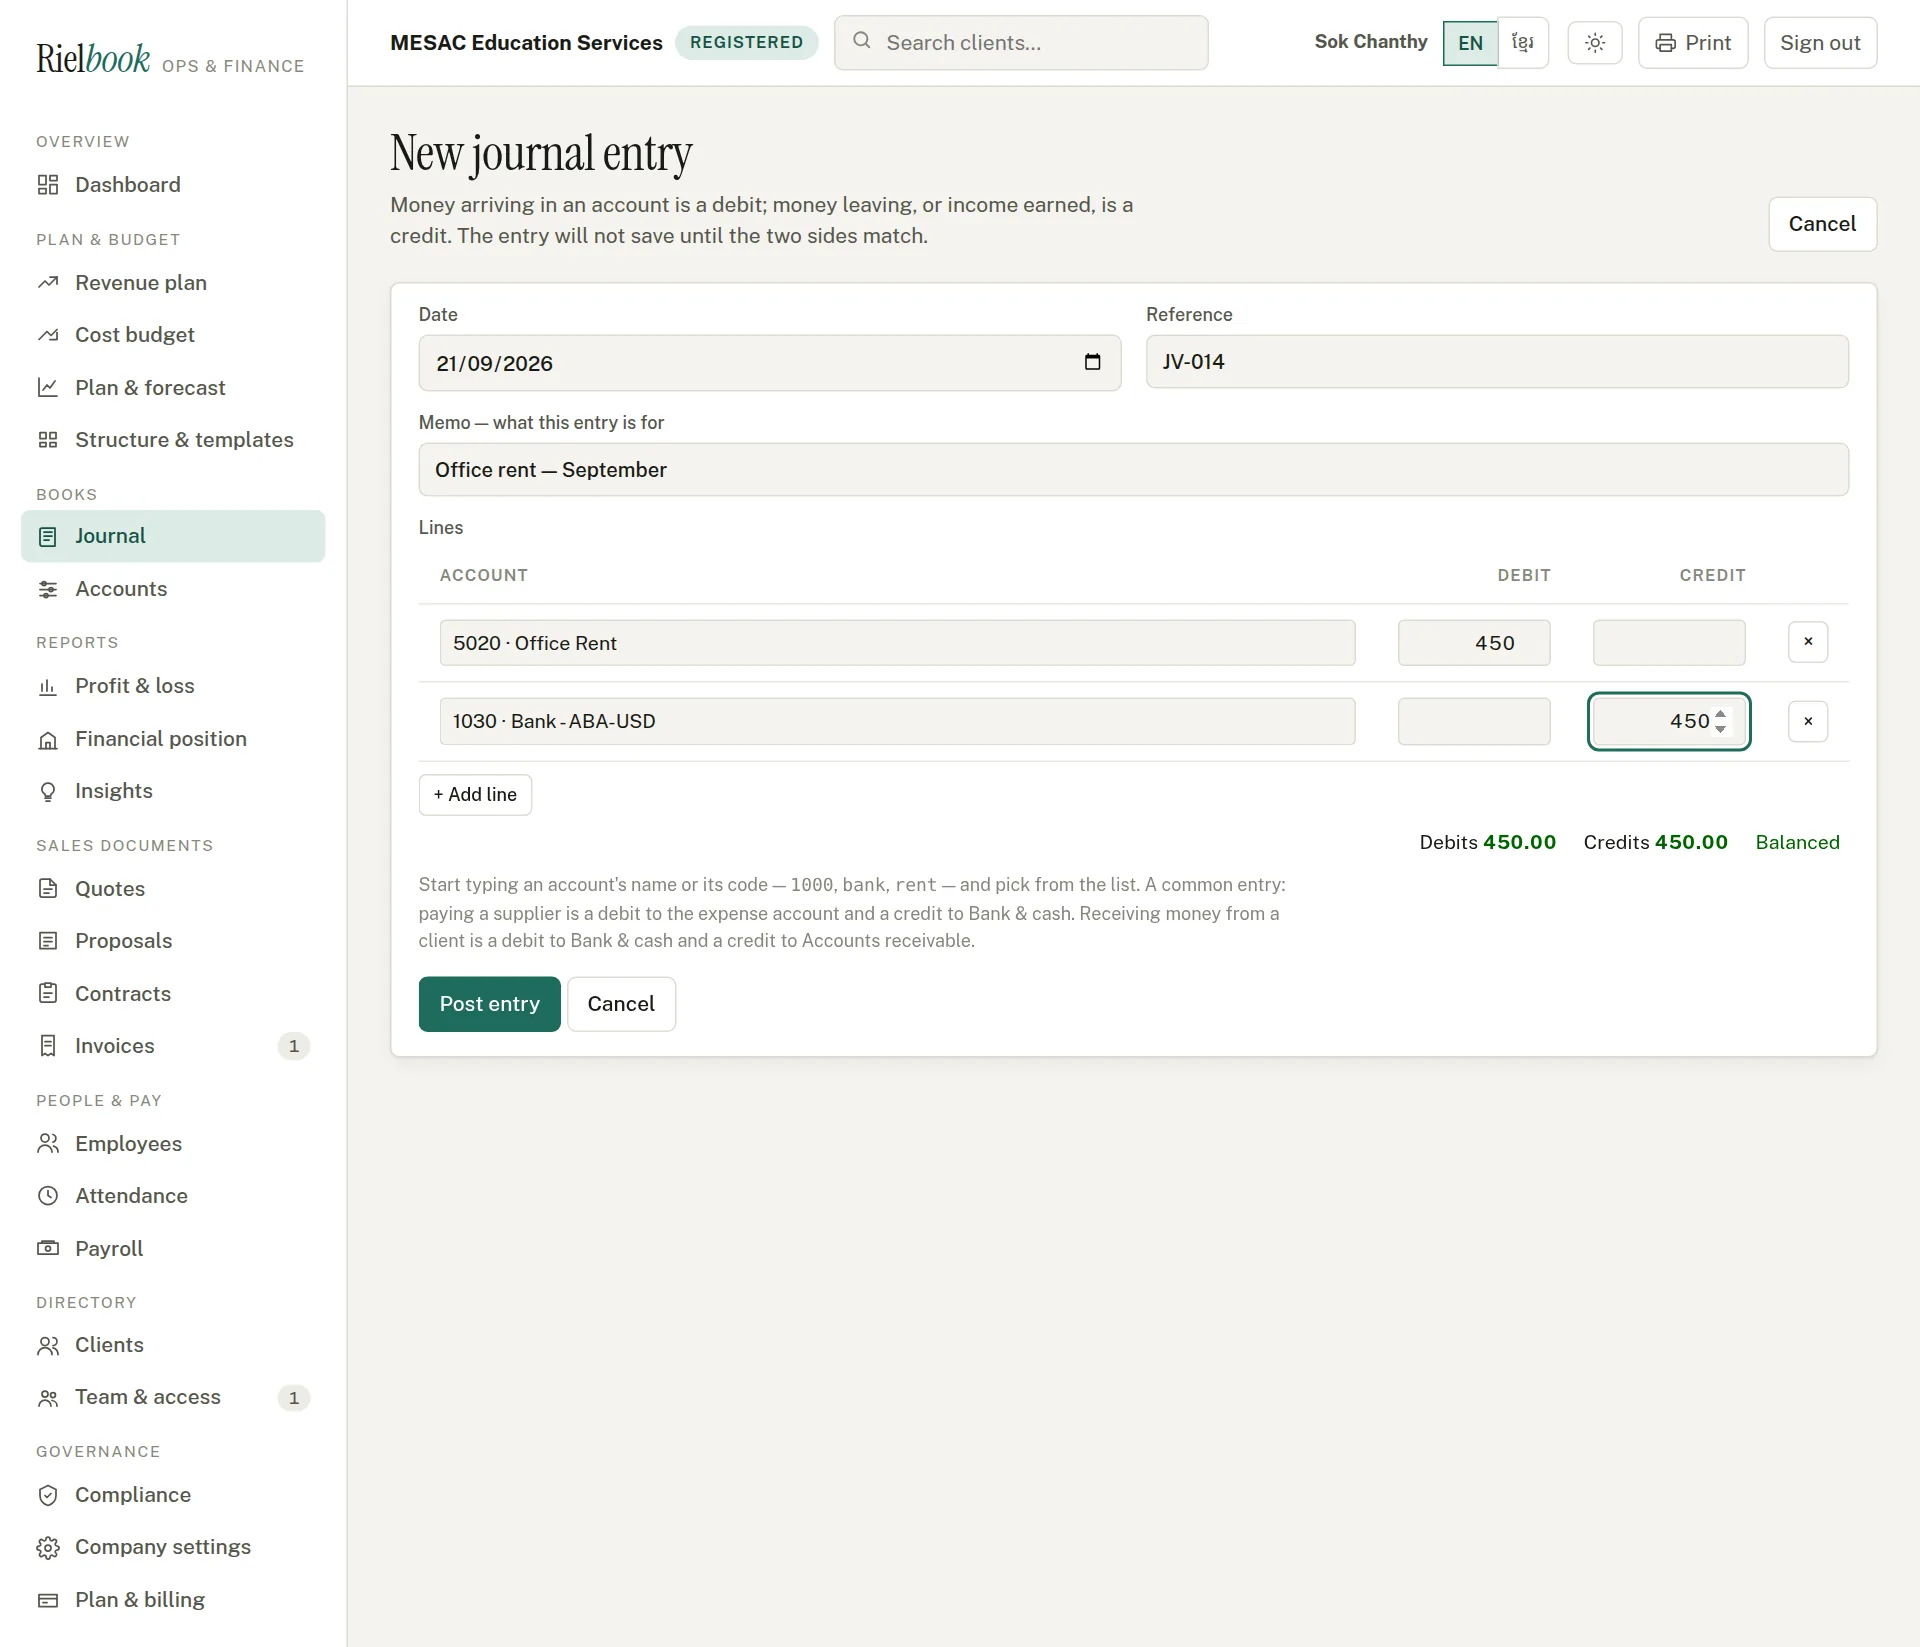
- Press New journal entry.
- Set the date, a reference (the receipt or transfer number) and a memo saying what it was for.
- On the first line, start typing the account the money went to — part of its name or its code,
rentor5020— and pick it from the list that drops down. Type the amount under Debit. - On the next line, find the account it came from and type the same amount under Credit. Paying a supplier: debit the expense, credit Bank & cash.
- Press + Add line for a third or fourth line — an entry can have as many as it needs, as long as the two columns agree.
- Check that Debits and Credits at the bottom match, and press Post entry.
Correcting an entry
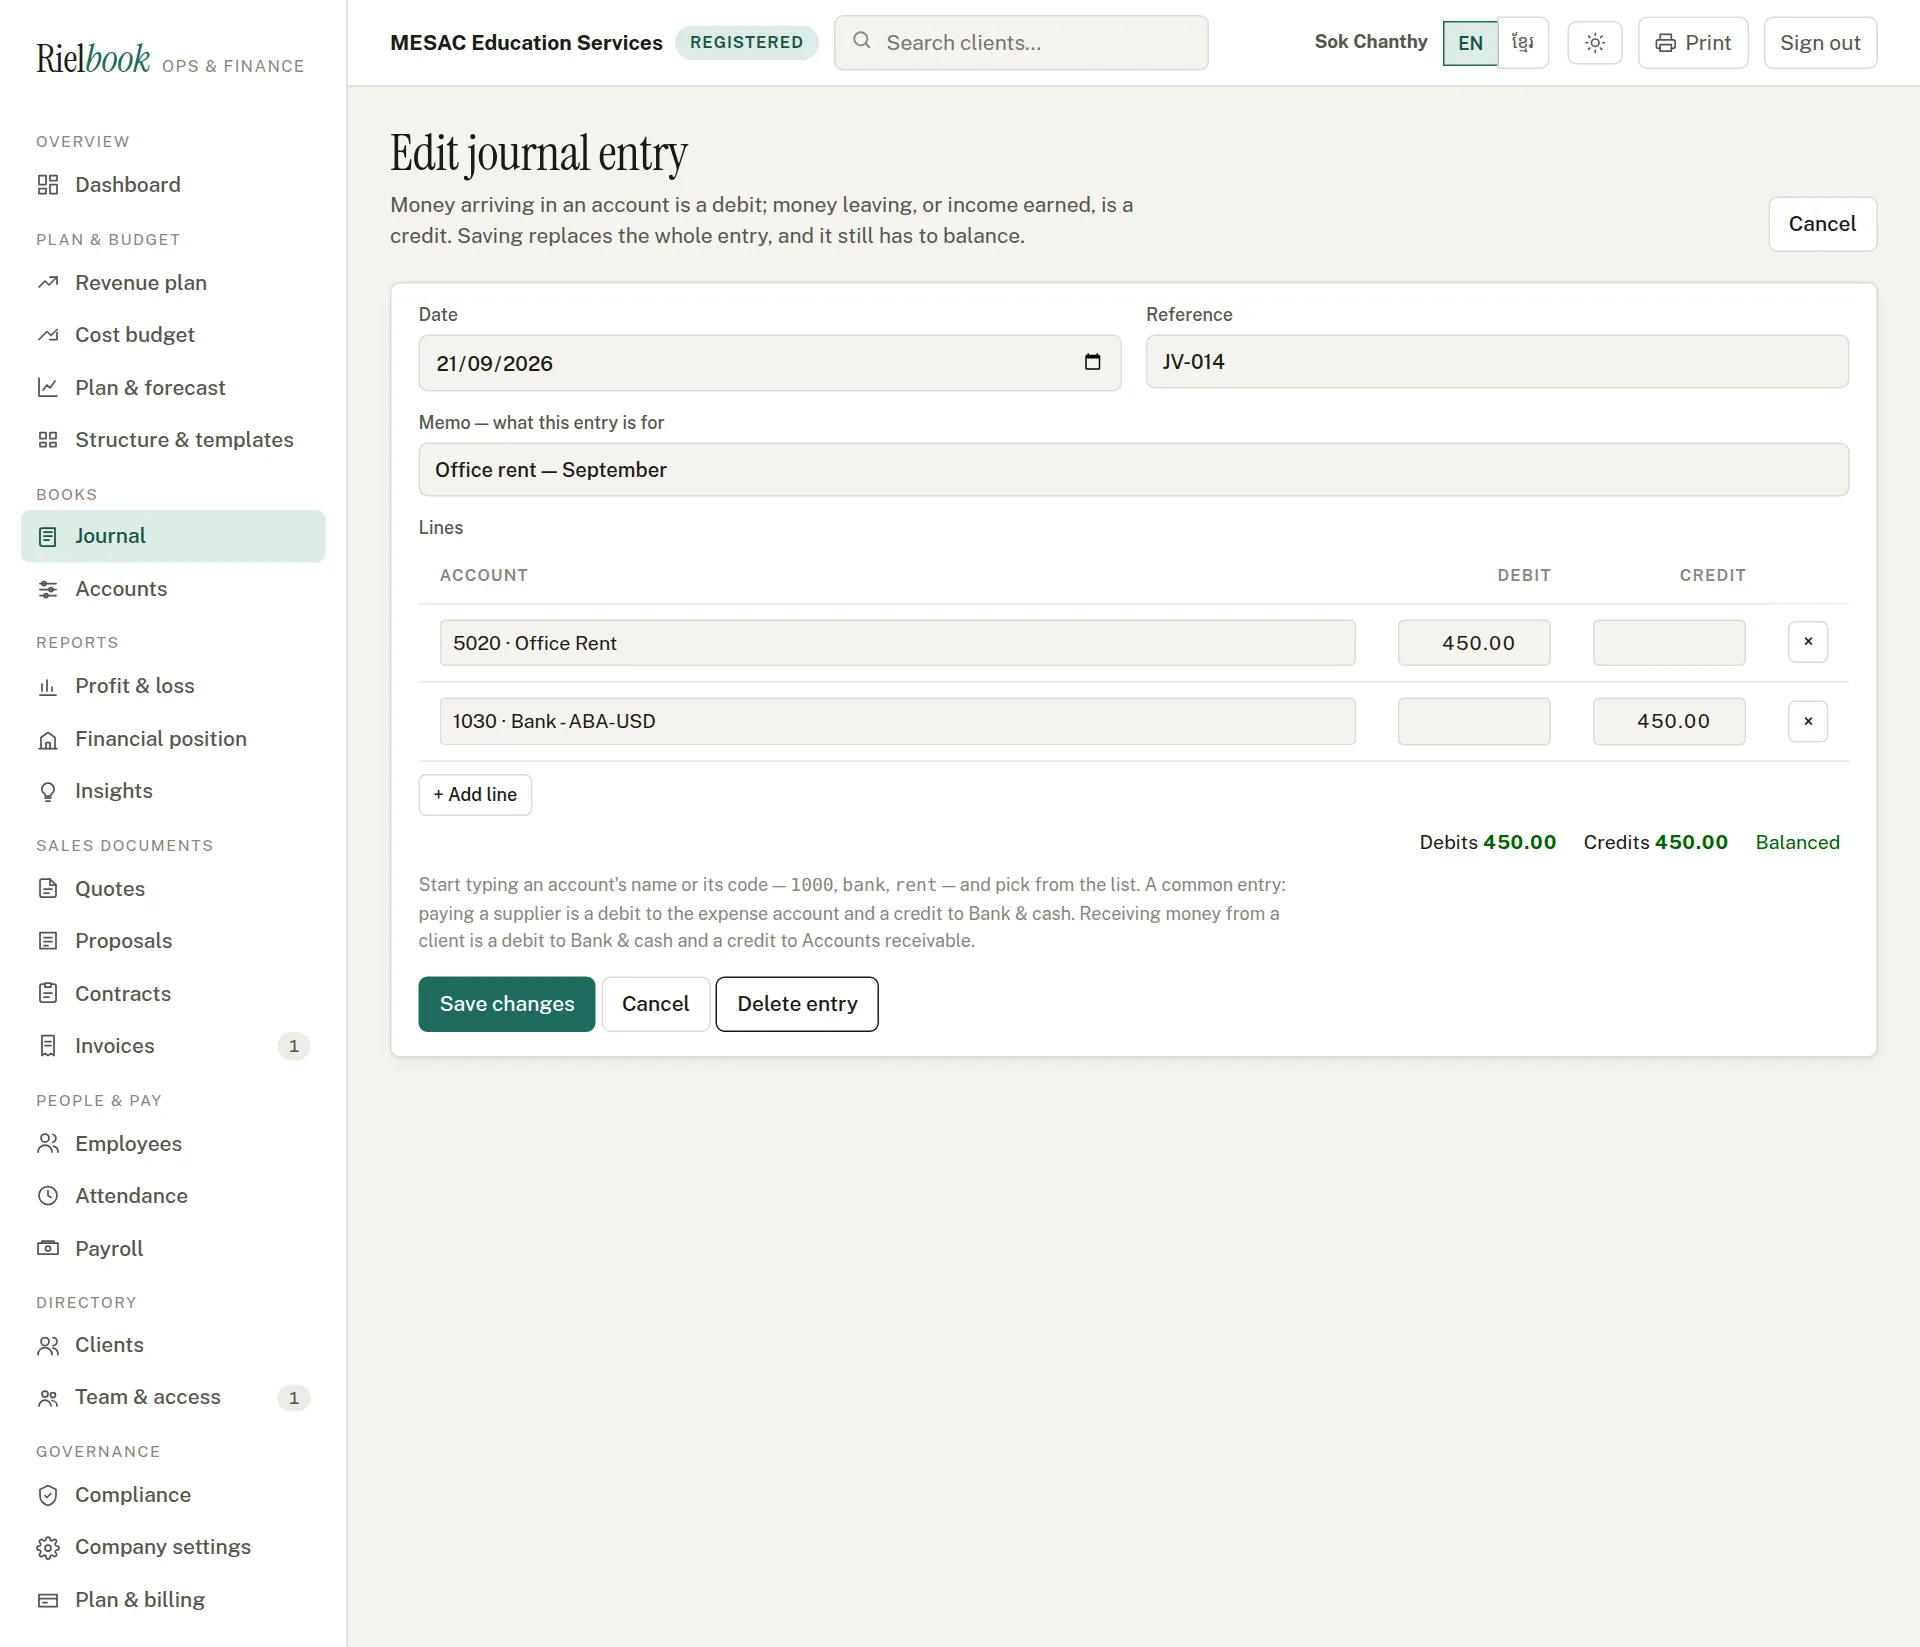
Everybody types a figure wrong sooner or later. An entry you typed can be corrected in place: open the Journal, press the entry to unfold it, then Edit entry. Change the date, the reference, the memo, the accounts or the amounts, and press Save changes — it stays the same entry, and it still has to balance. Delete entry removes it altogether.
Accounts — your chart and the trial balance
Every account with its balance, grouped as assets, liabilities, equity, income and expenses. The box at the top says Balanced when debits equal credits — the first thing any accountant checks.
Books›Accounts
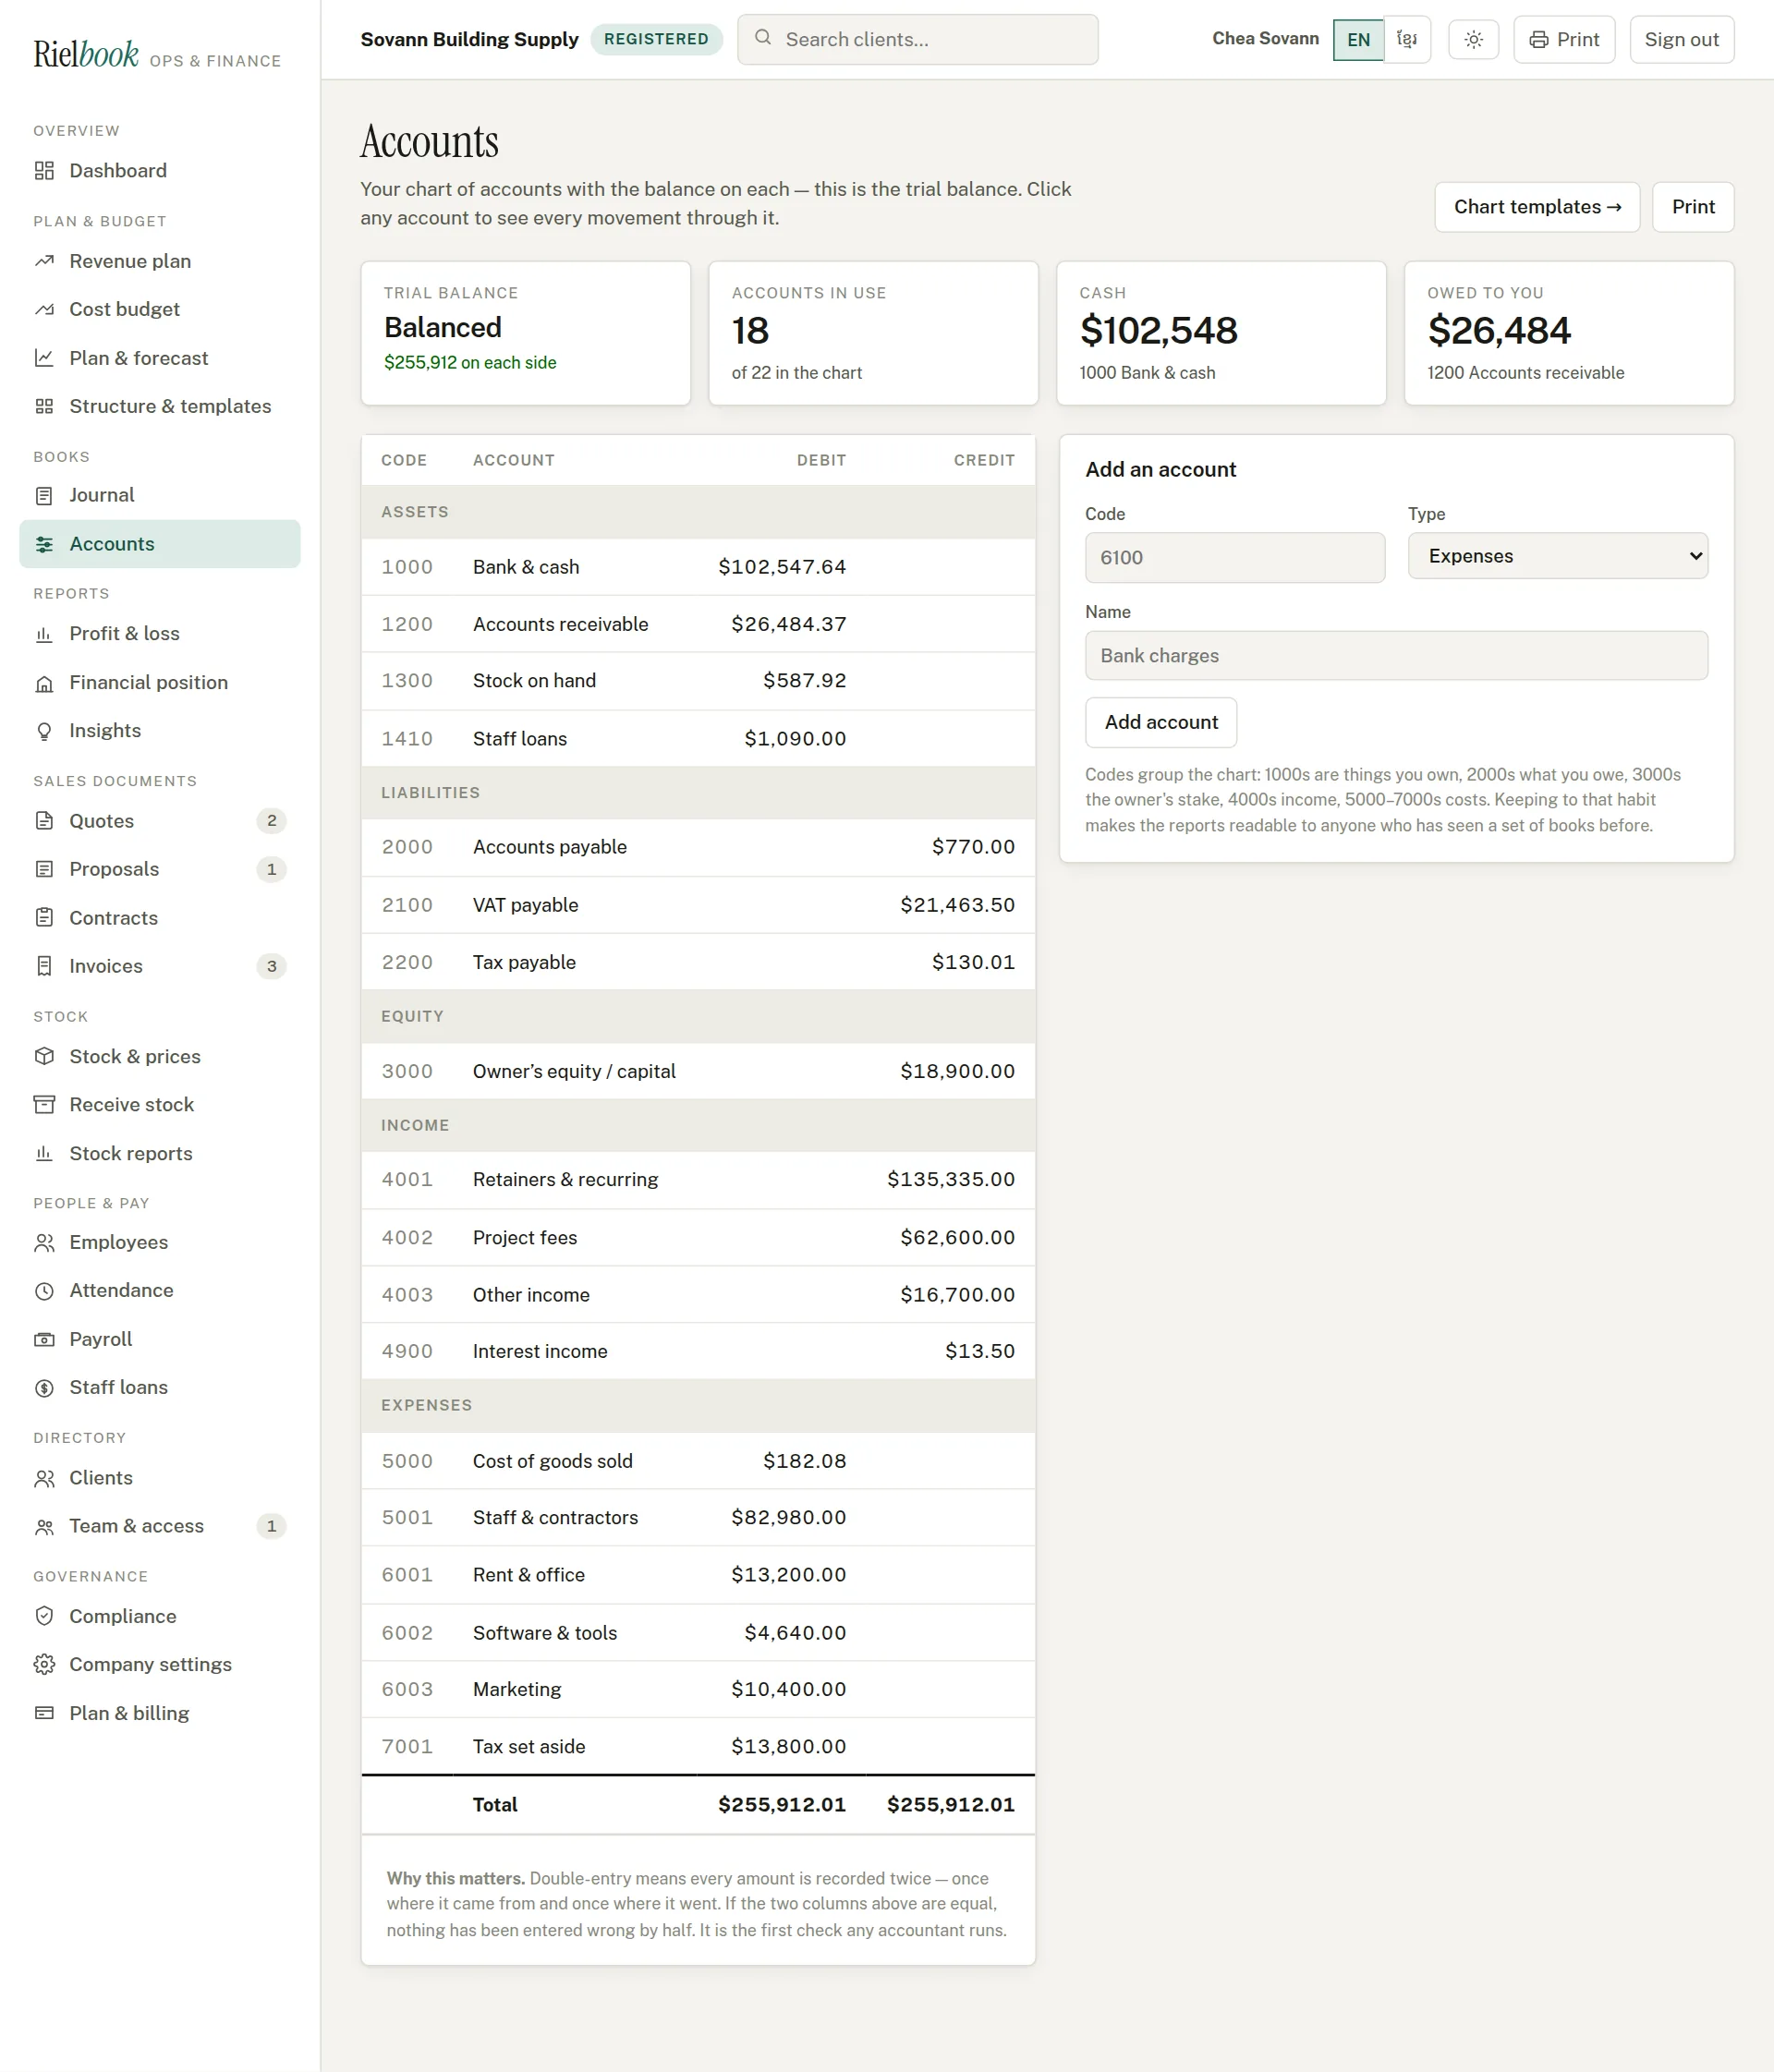
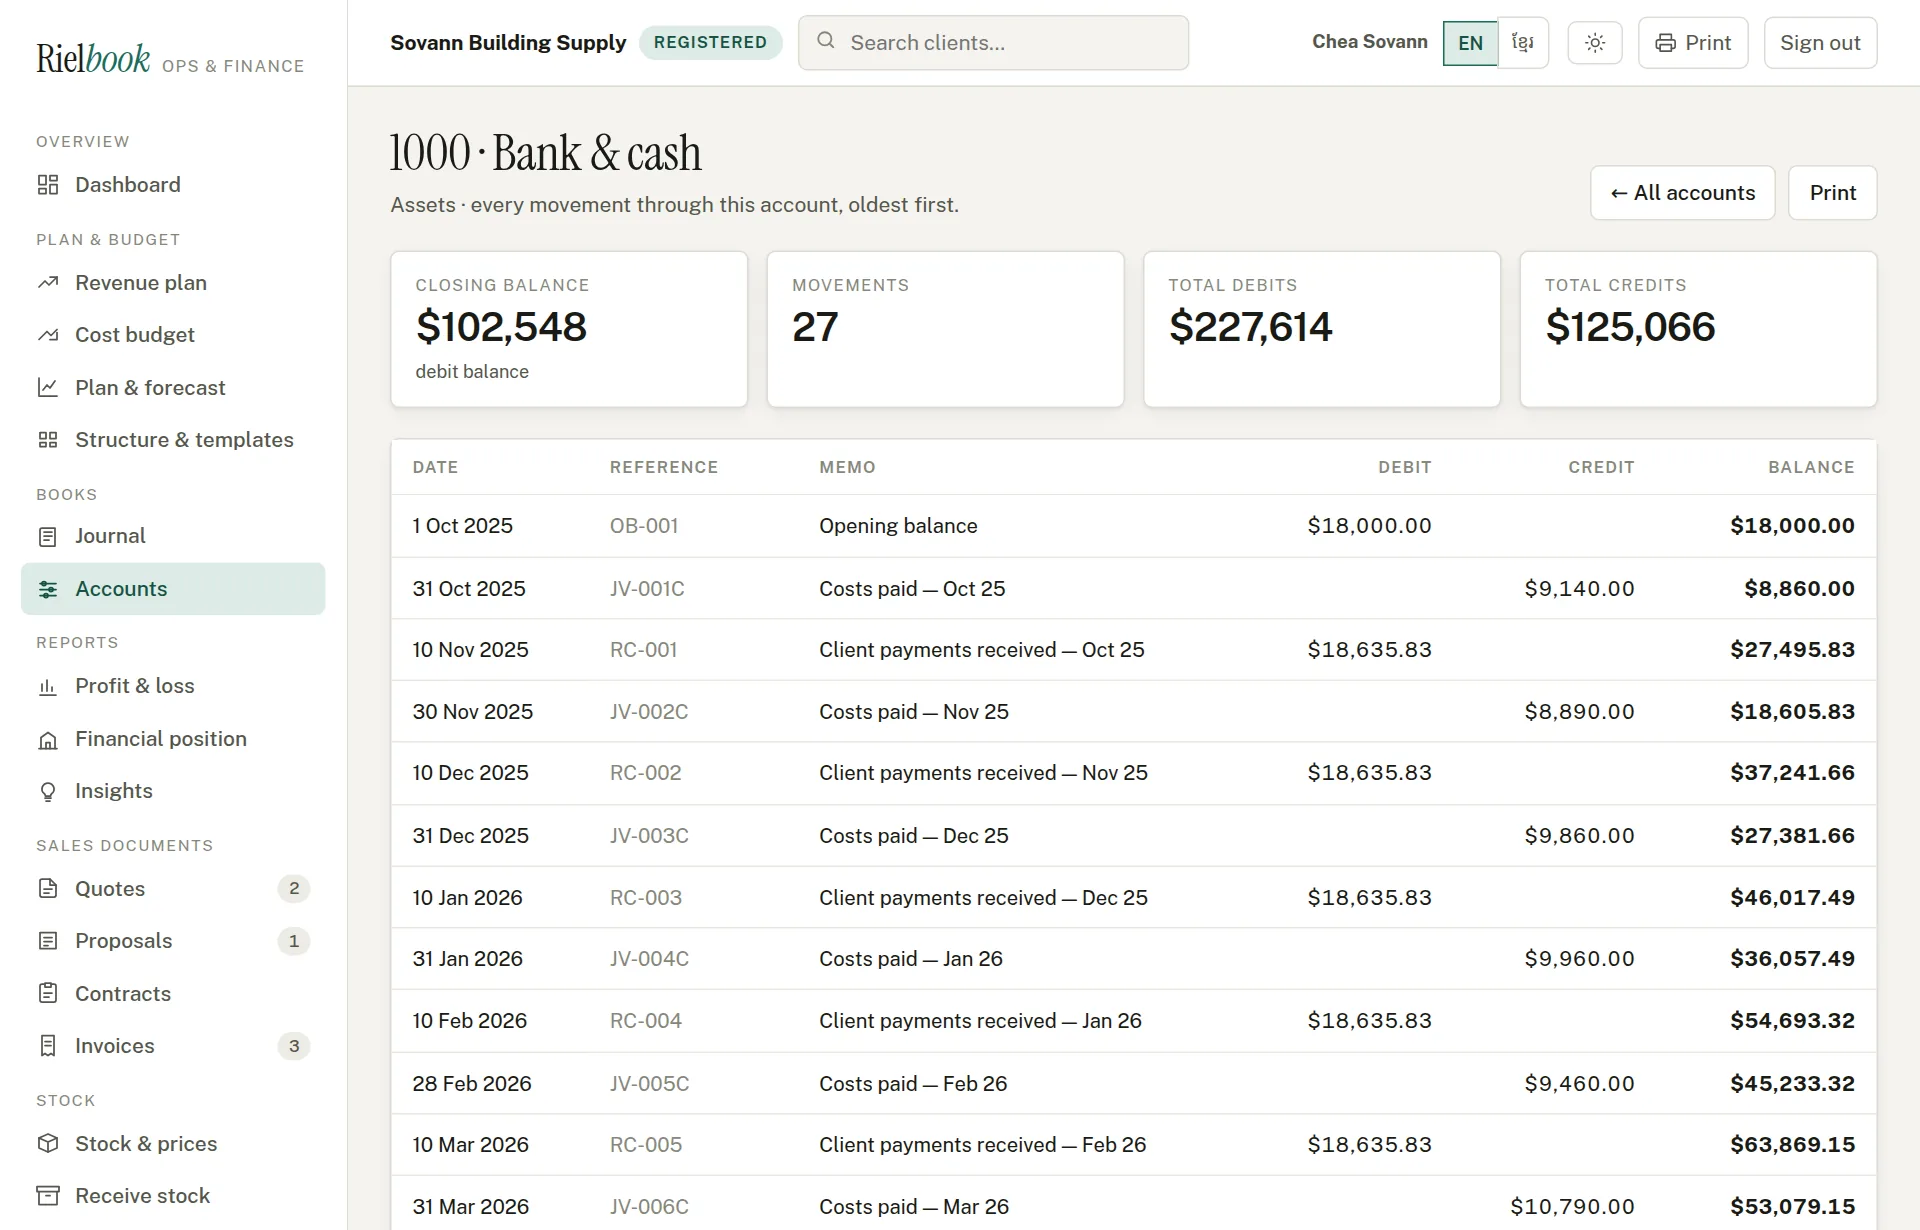
- Press any account to see every movement through it, with a running balance — the account's own statement.
- To add one, type a code, choose the type, type a name and press Add account.
- Some accounts appear on their own when you start using a feature: Stock on hand and Cost of goods sold with the stock add-on; Staff loans and Interest income with the loans add-on. Leave them as they are.
Bring in your own chart of accounts
If your accountant already keeps a chart — your own codes, your own names, usually in a spreadsheet — bring it in as it is instead of working with Rielbook's. Press Import a chart → on the Accounts page.
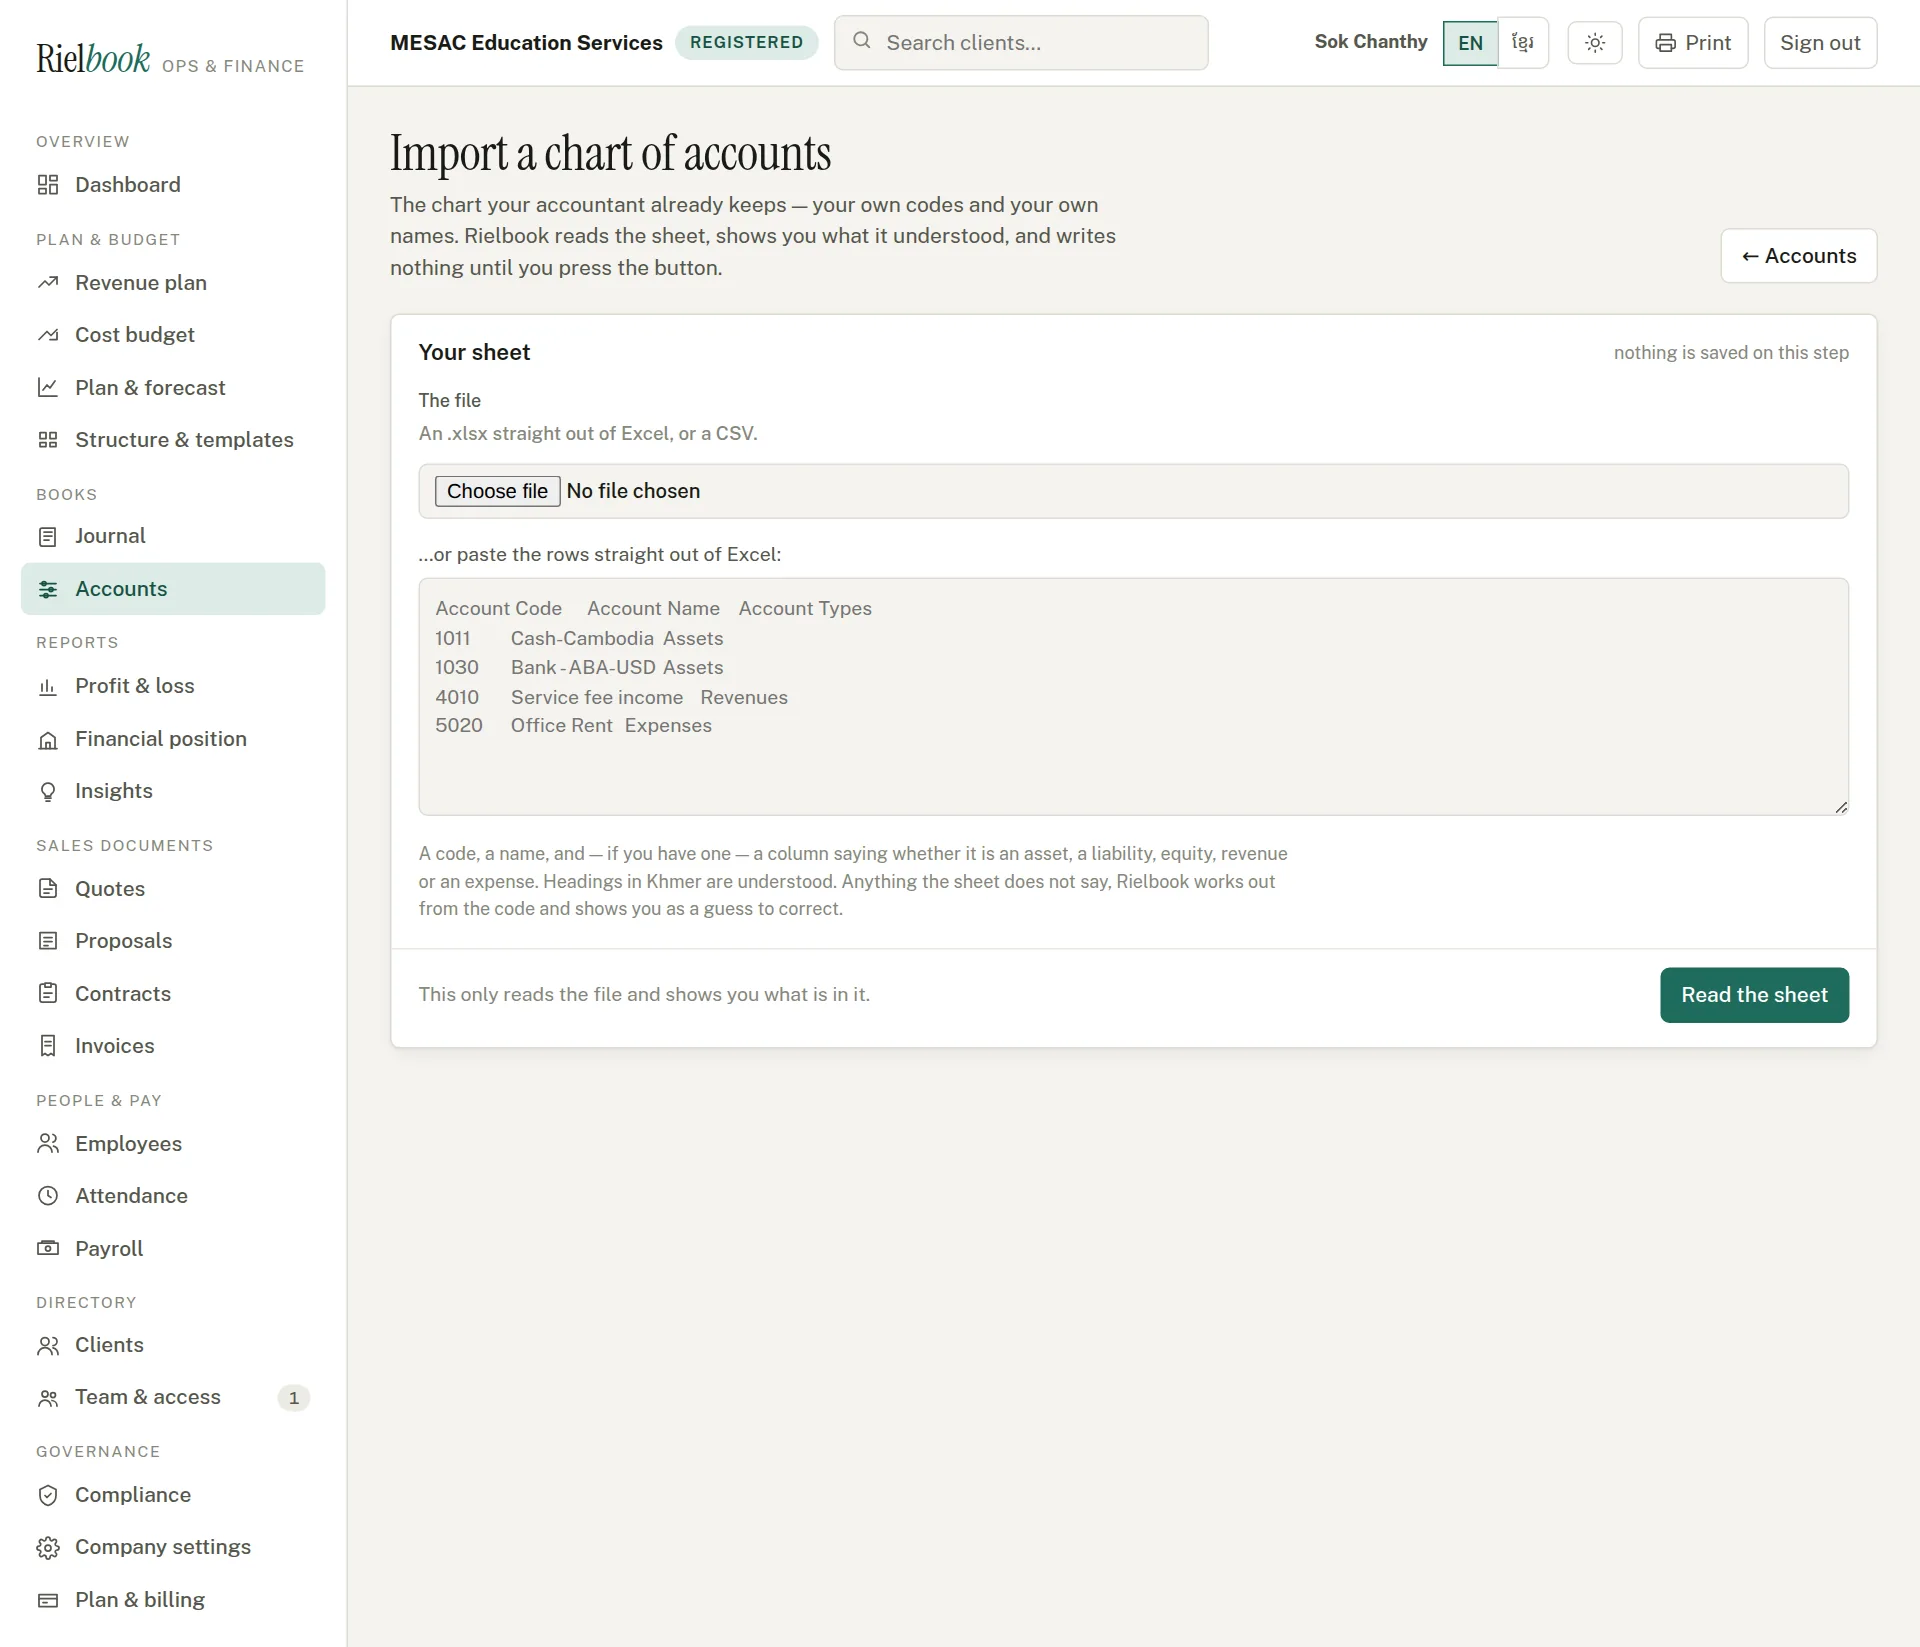
- Choose the file — an .xlsx out of Excel or a CSV — or paste the rows, and press Read the sheet. Nothing is written yet.
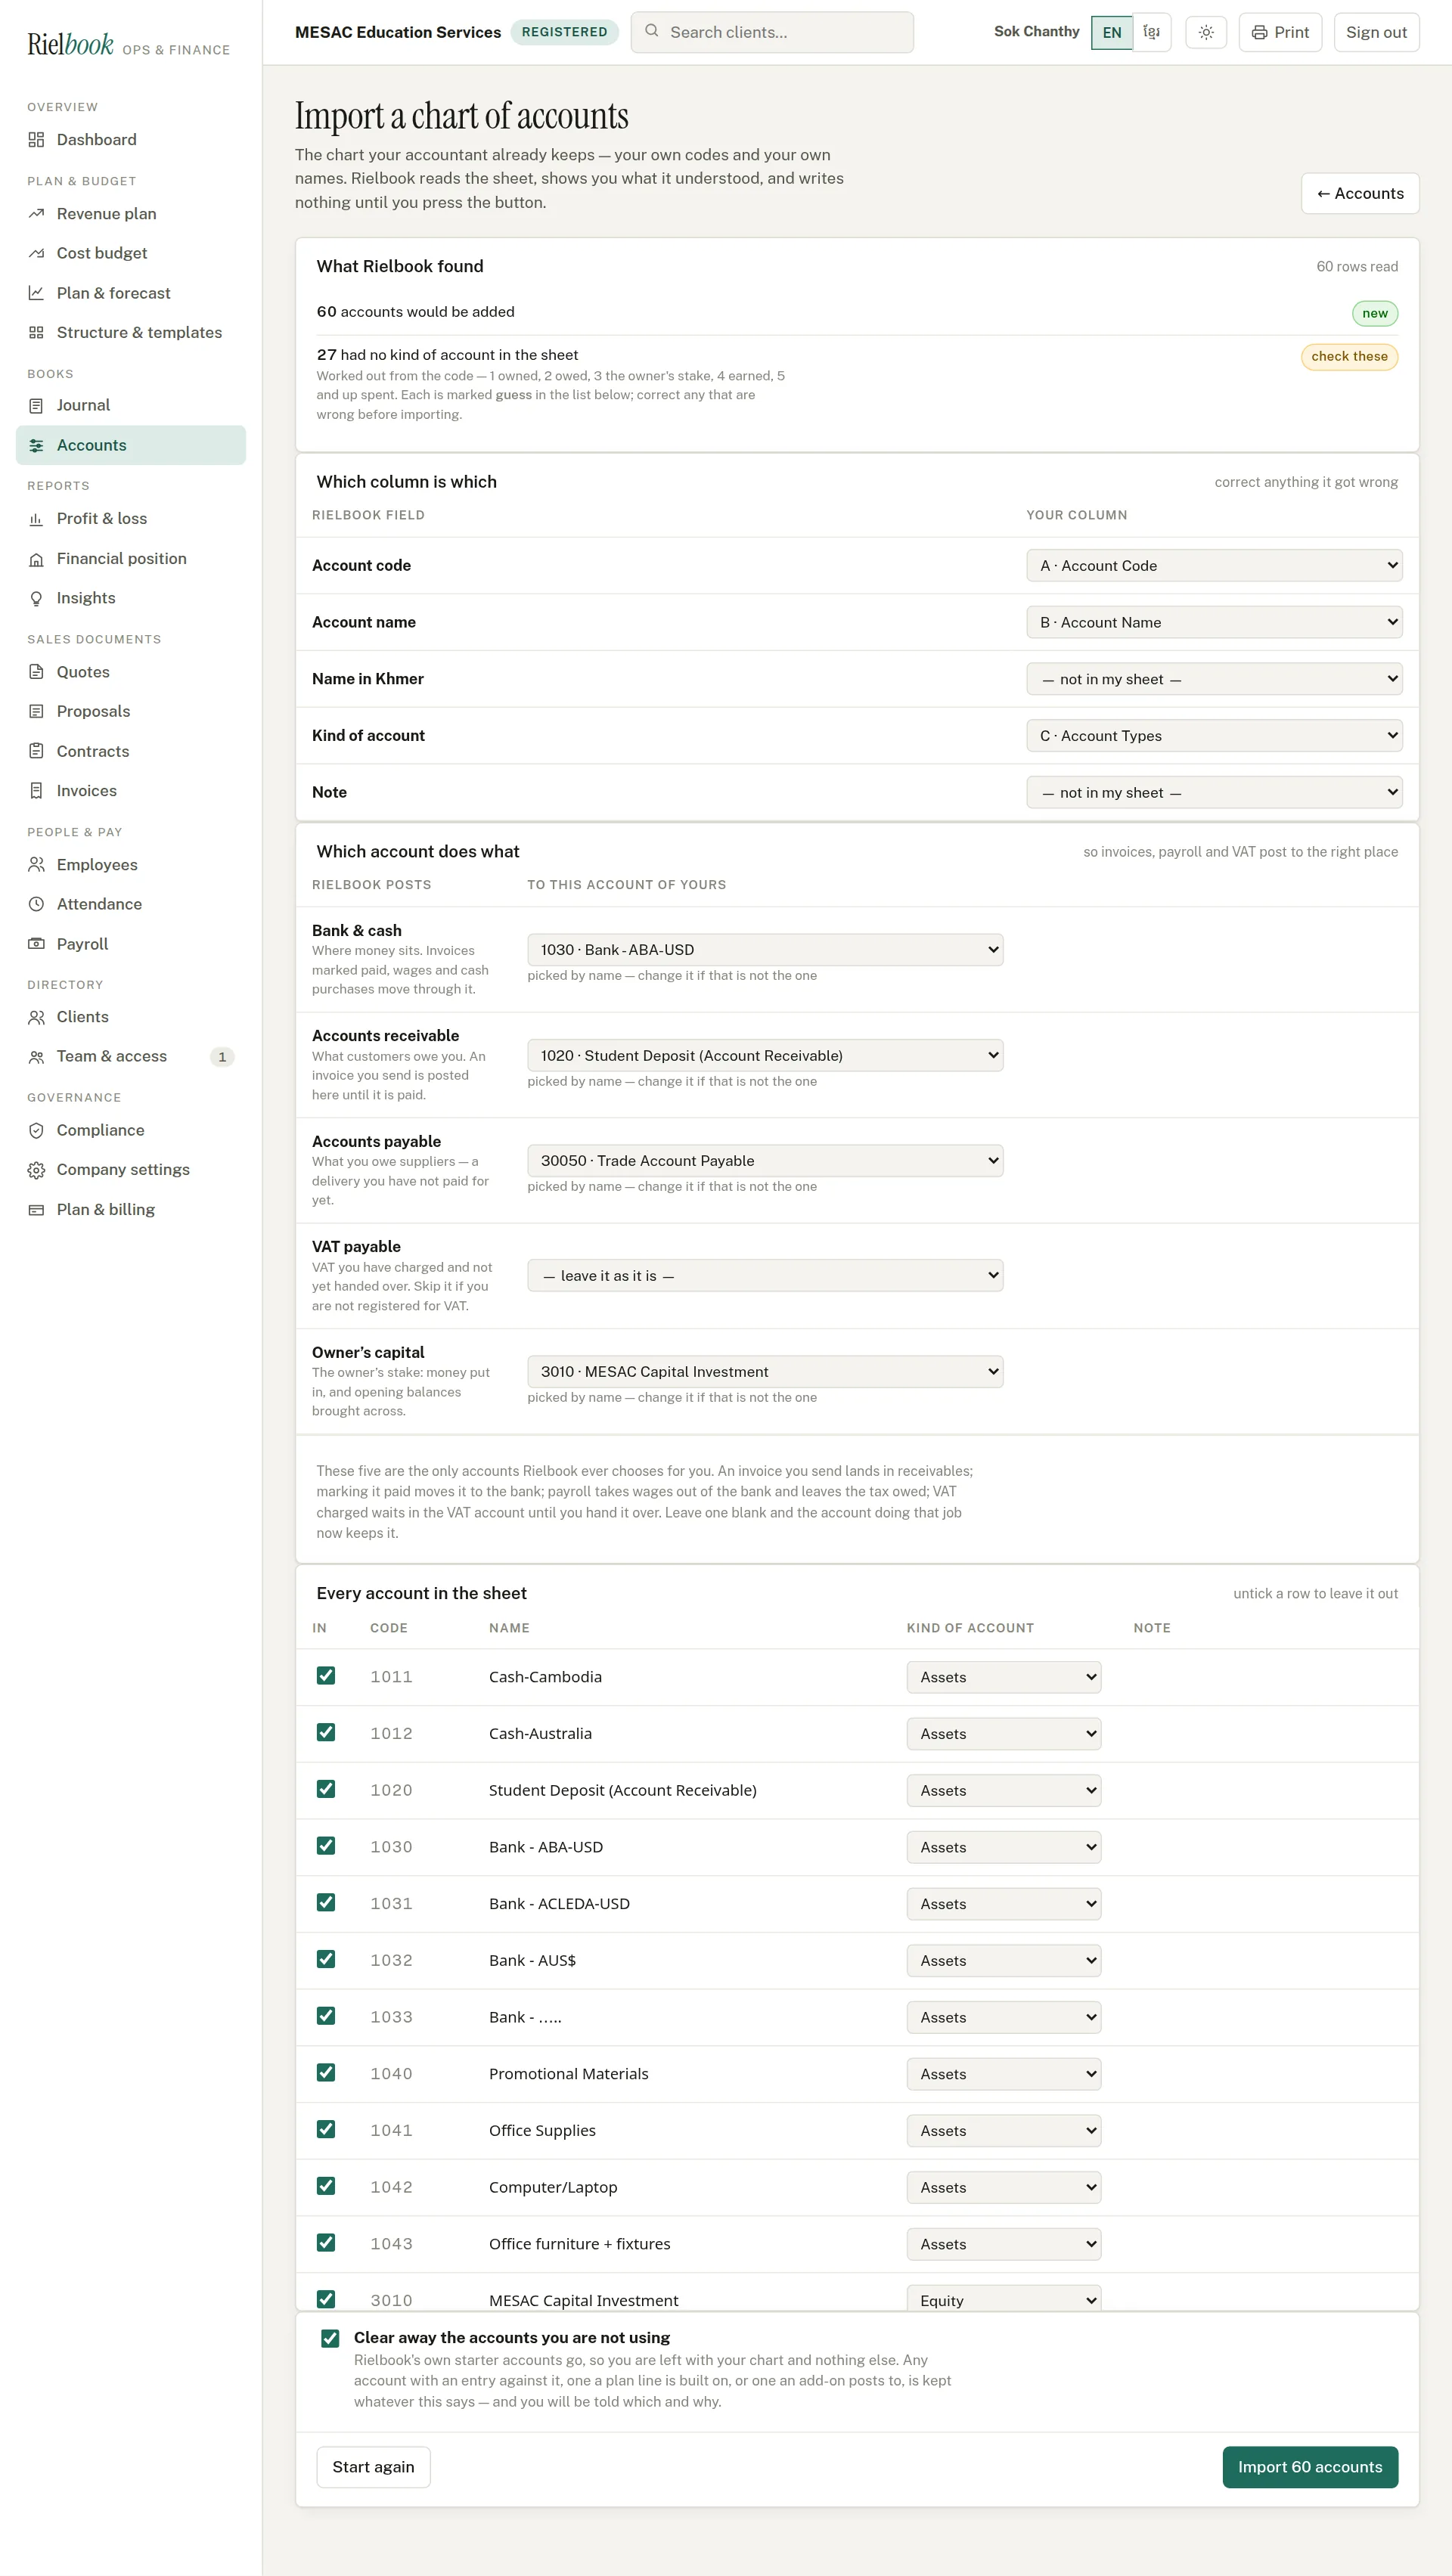
- Check what Rielbook found: how many accounts would be added, which rows repeat a code, and how many had no kind of account in the sheet. Those are worked out from the name and the code and marked guess.
- Check which column is which, and correct any it read wrongly.
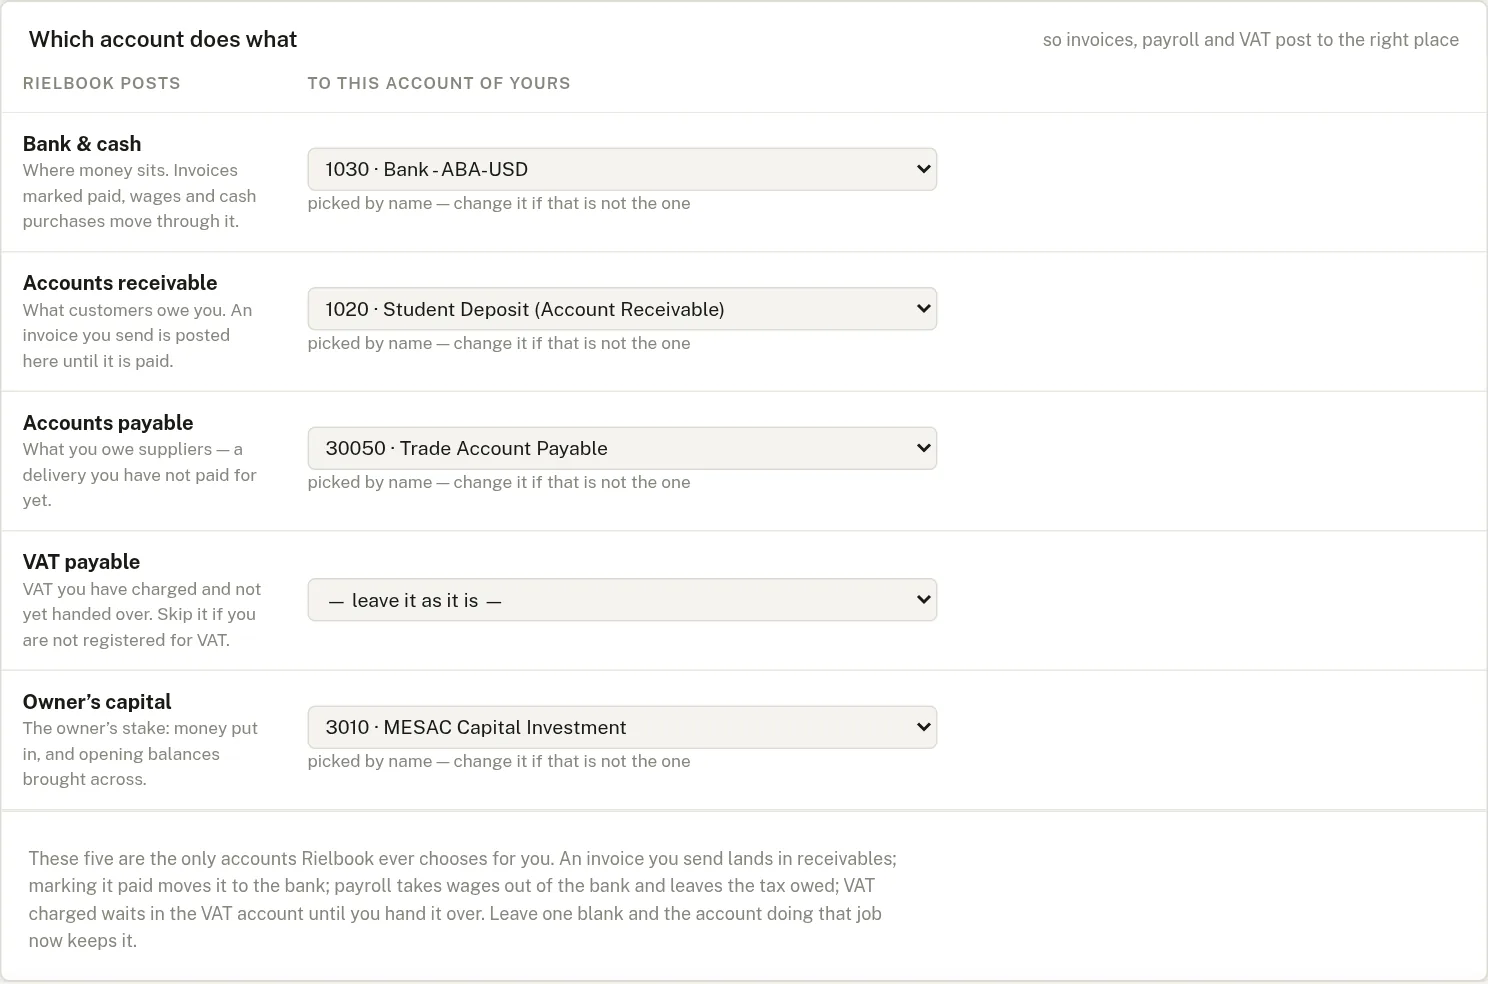
- Answer which account does what — which of your accounts is the bank, which one customers owe into, which one suppliers are owed from, which is VAT, which is the owner's capital. Rielbook suggests one for each from the names; change any that is not right. This is what makes invoices and payroll post into your chart from the first day.
- Run down every account in the sheet. Correct any kind of account that is wrong, and untick anything you do not want.
- Leave clear away the accounts you are not using ticked to end up with only your own chart, and press Import.
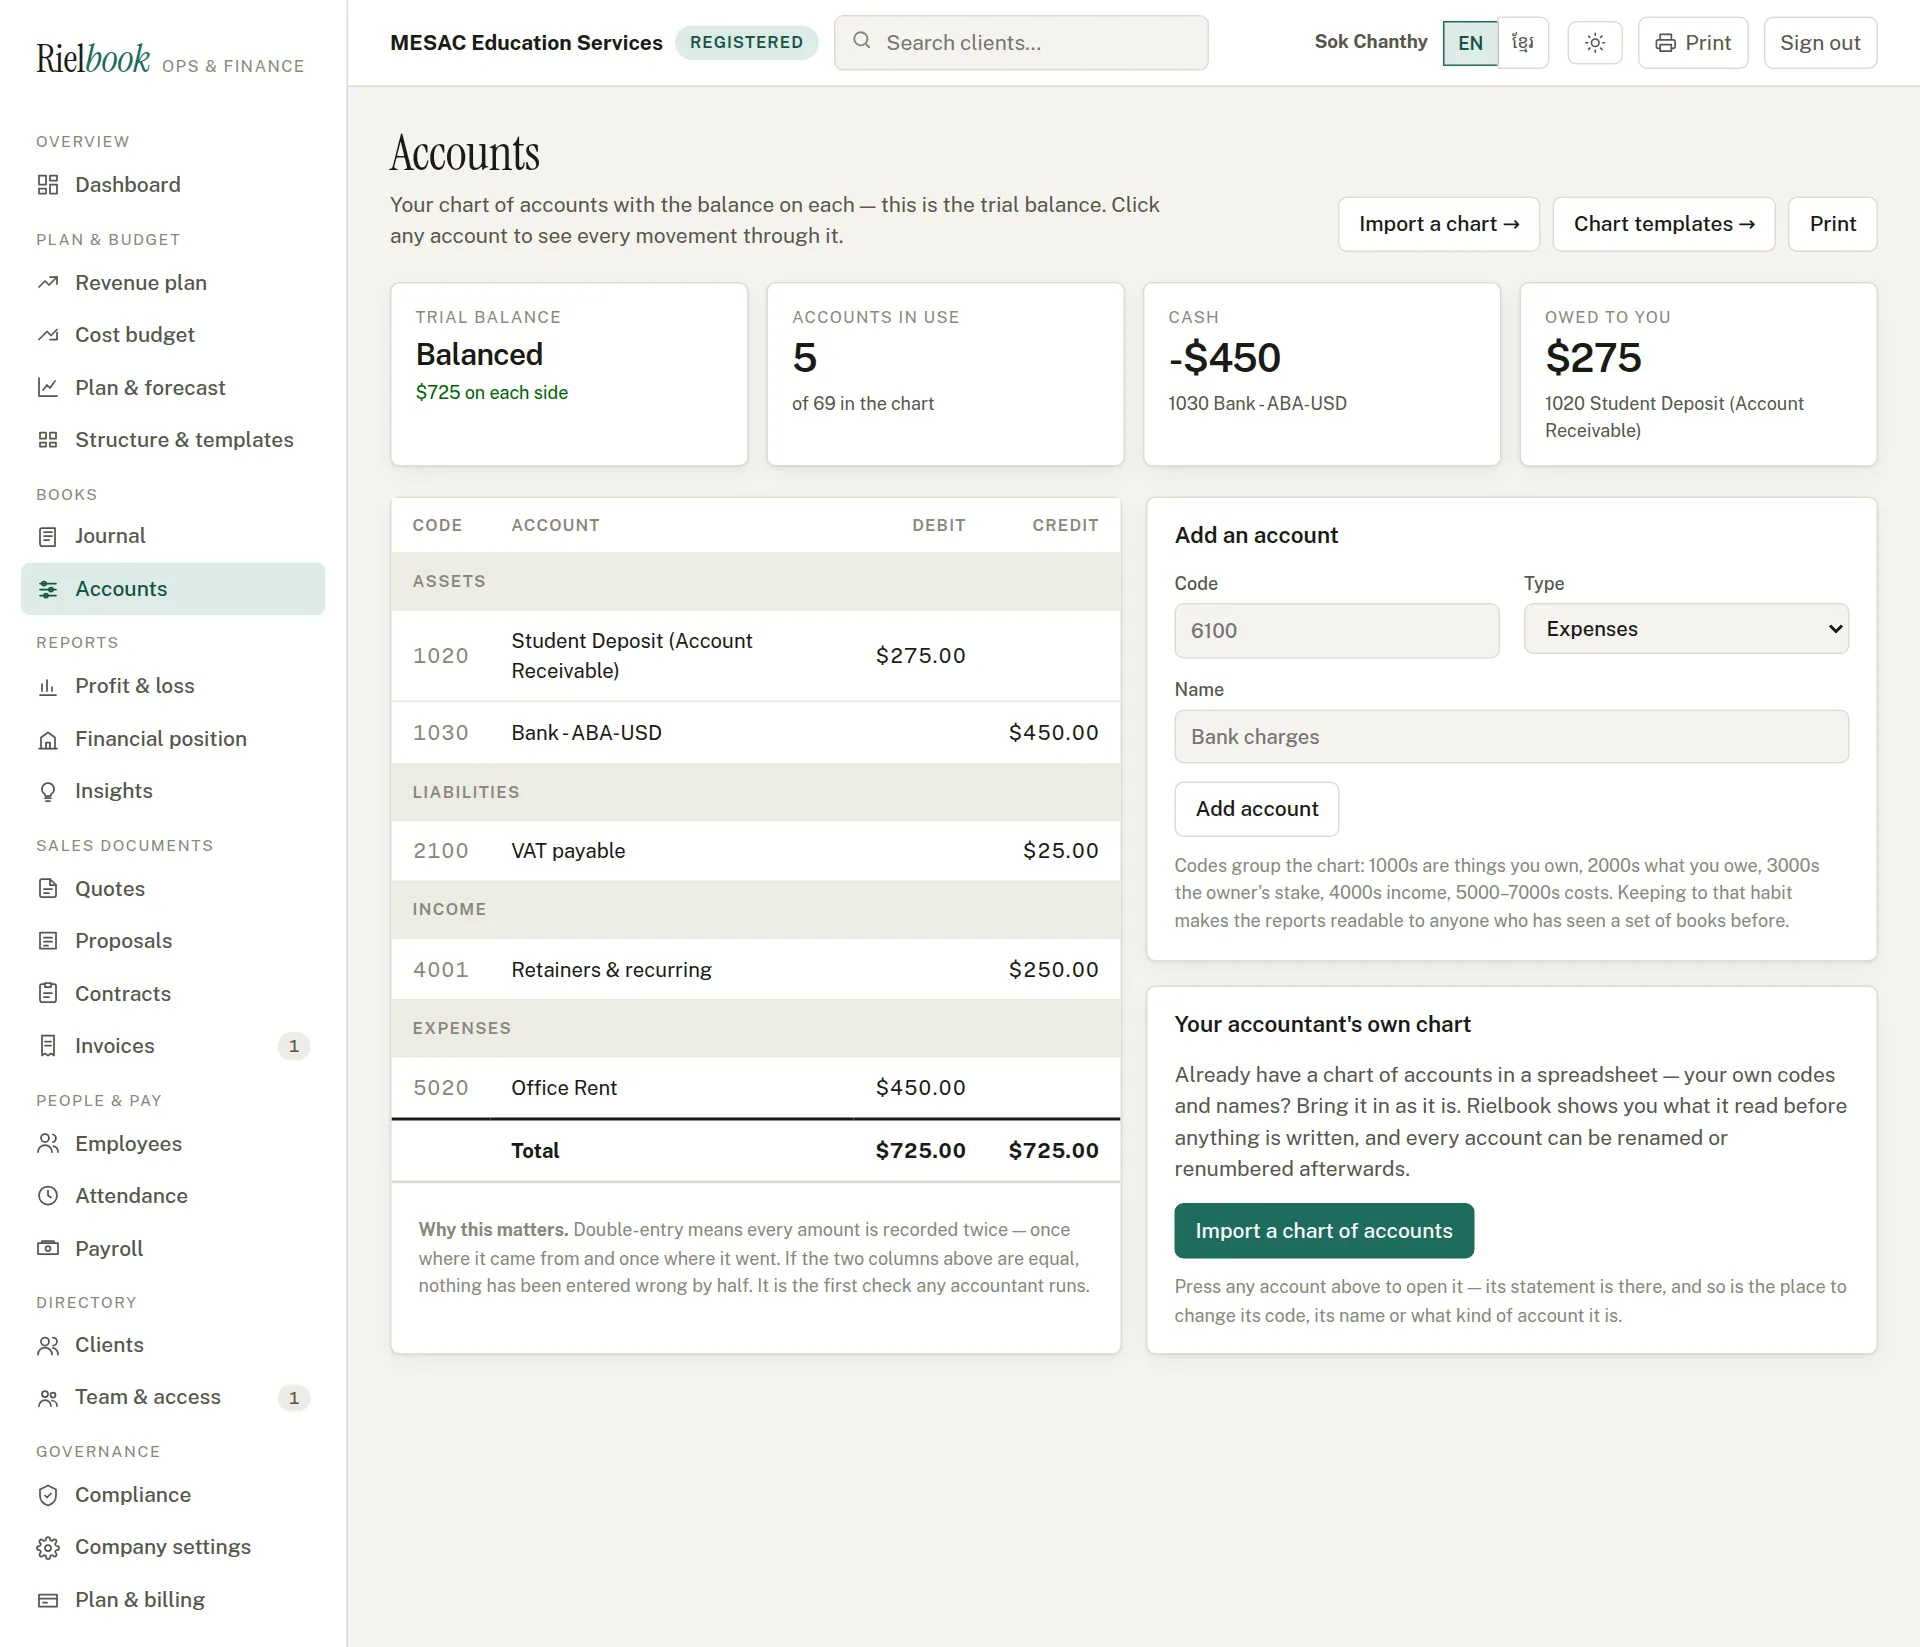
Changing an account
Open any account and you can change its code, its name, its Khmer name and what it is used for. Once money has moved through an account its kind is fixed — changing an expense into an asset would rewrite what has already been reported — but the names and the code can still change, everywhere at once. An account nothing has been posted to can be removed altogether.
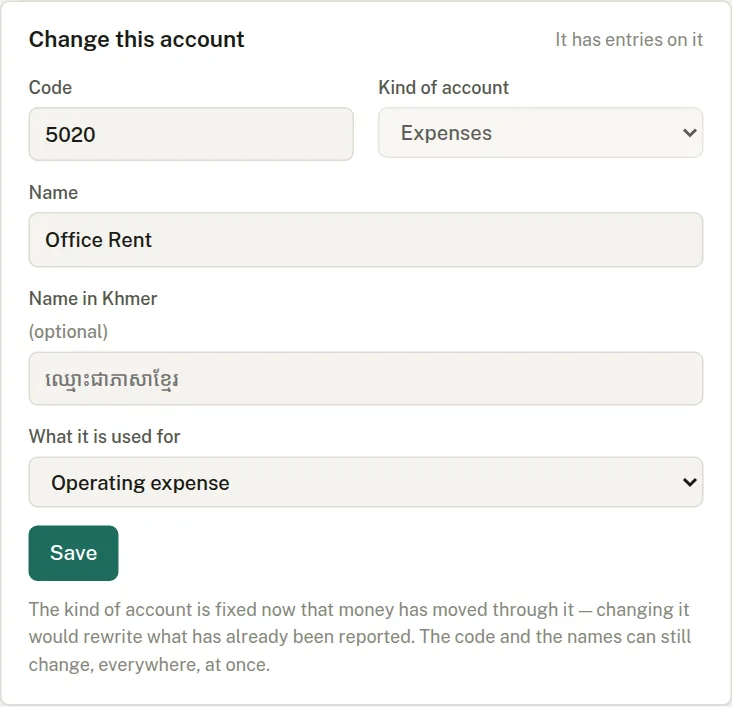
Two readings of one book
Plenty of businesses here keep management accounts as well as the ones they file, and the reason is a decent one: the two answer different questions. The filed accounts say what the company is prepared to stand behind to the tax administration. The management accounts say what the owner believes actually happened — the cash top-up that never went through the bank, the stock written off that nobody wanted to claim, the provision taken for tax that management does not count as a cost at all.
The usual way people do this is two separate sets of books. Do not. Two sets cannot be reconciled to each other, drift apart over a year, and end up with nobody — including the owner — able to say which is true. Rielbook does what a real accounting system does instead:
- There is one book. Every invoice, payment, payroll run and delivery goes into it, once.
- Some entries carry a mark saying which readings they belong in.
- A report is a reading of that one book, and says on its own face which reading it is.
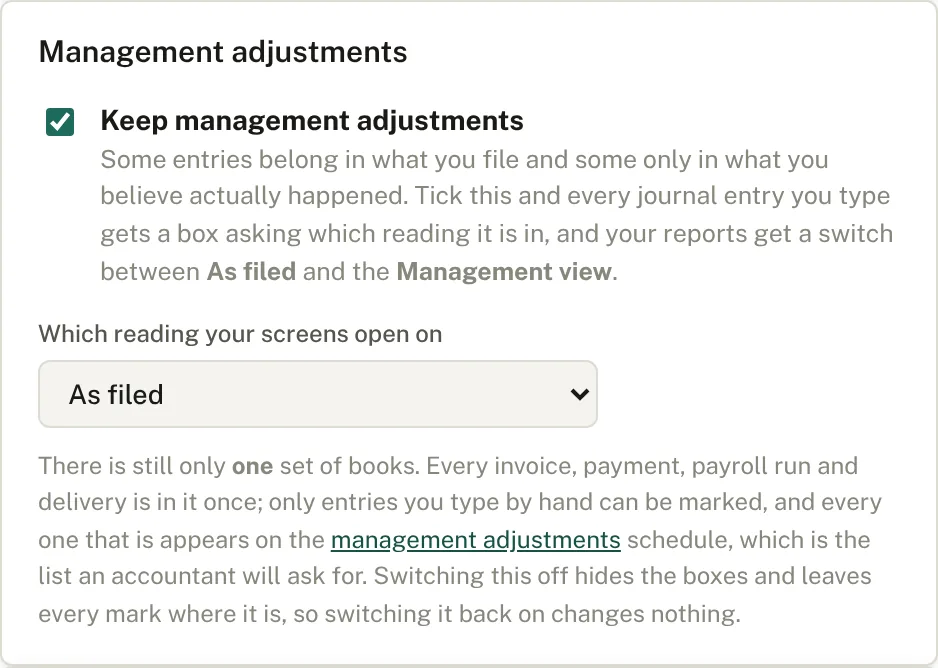
1. Mark an entry
Every journal entry you type now has one extra question on it.
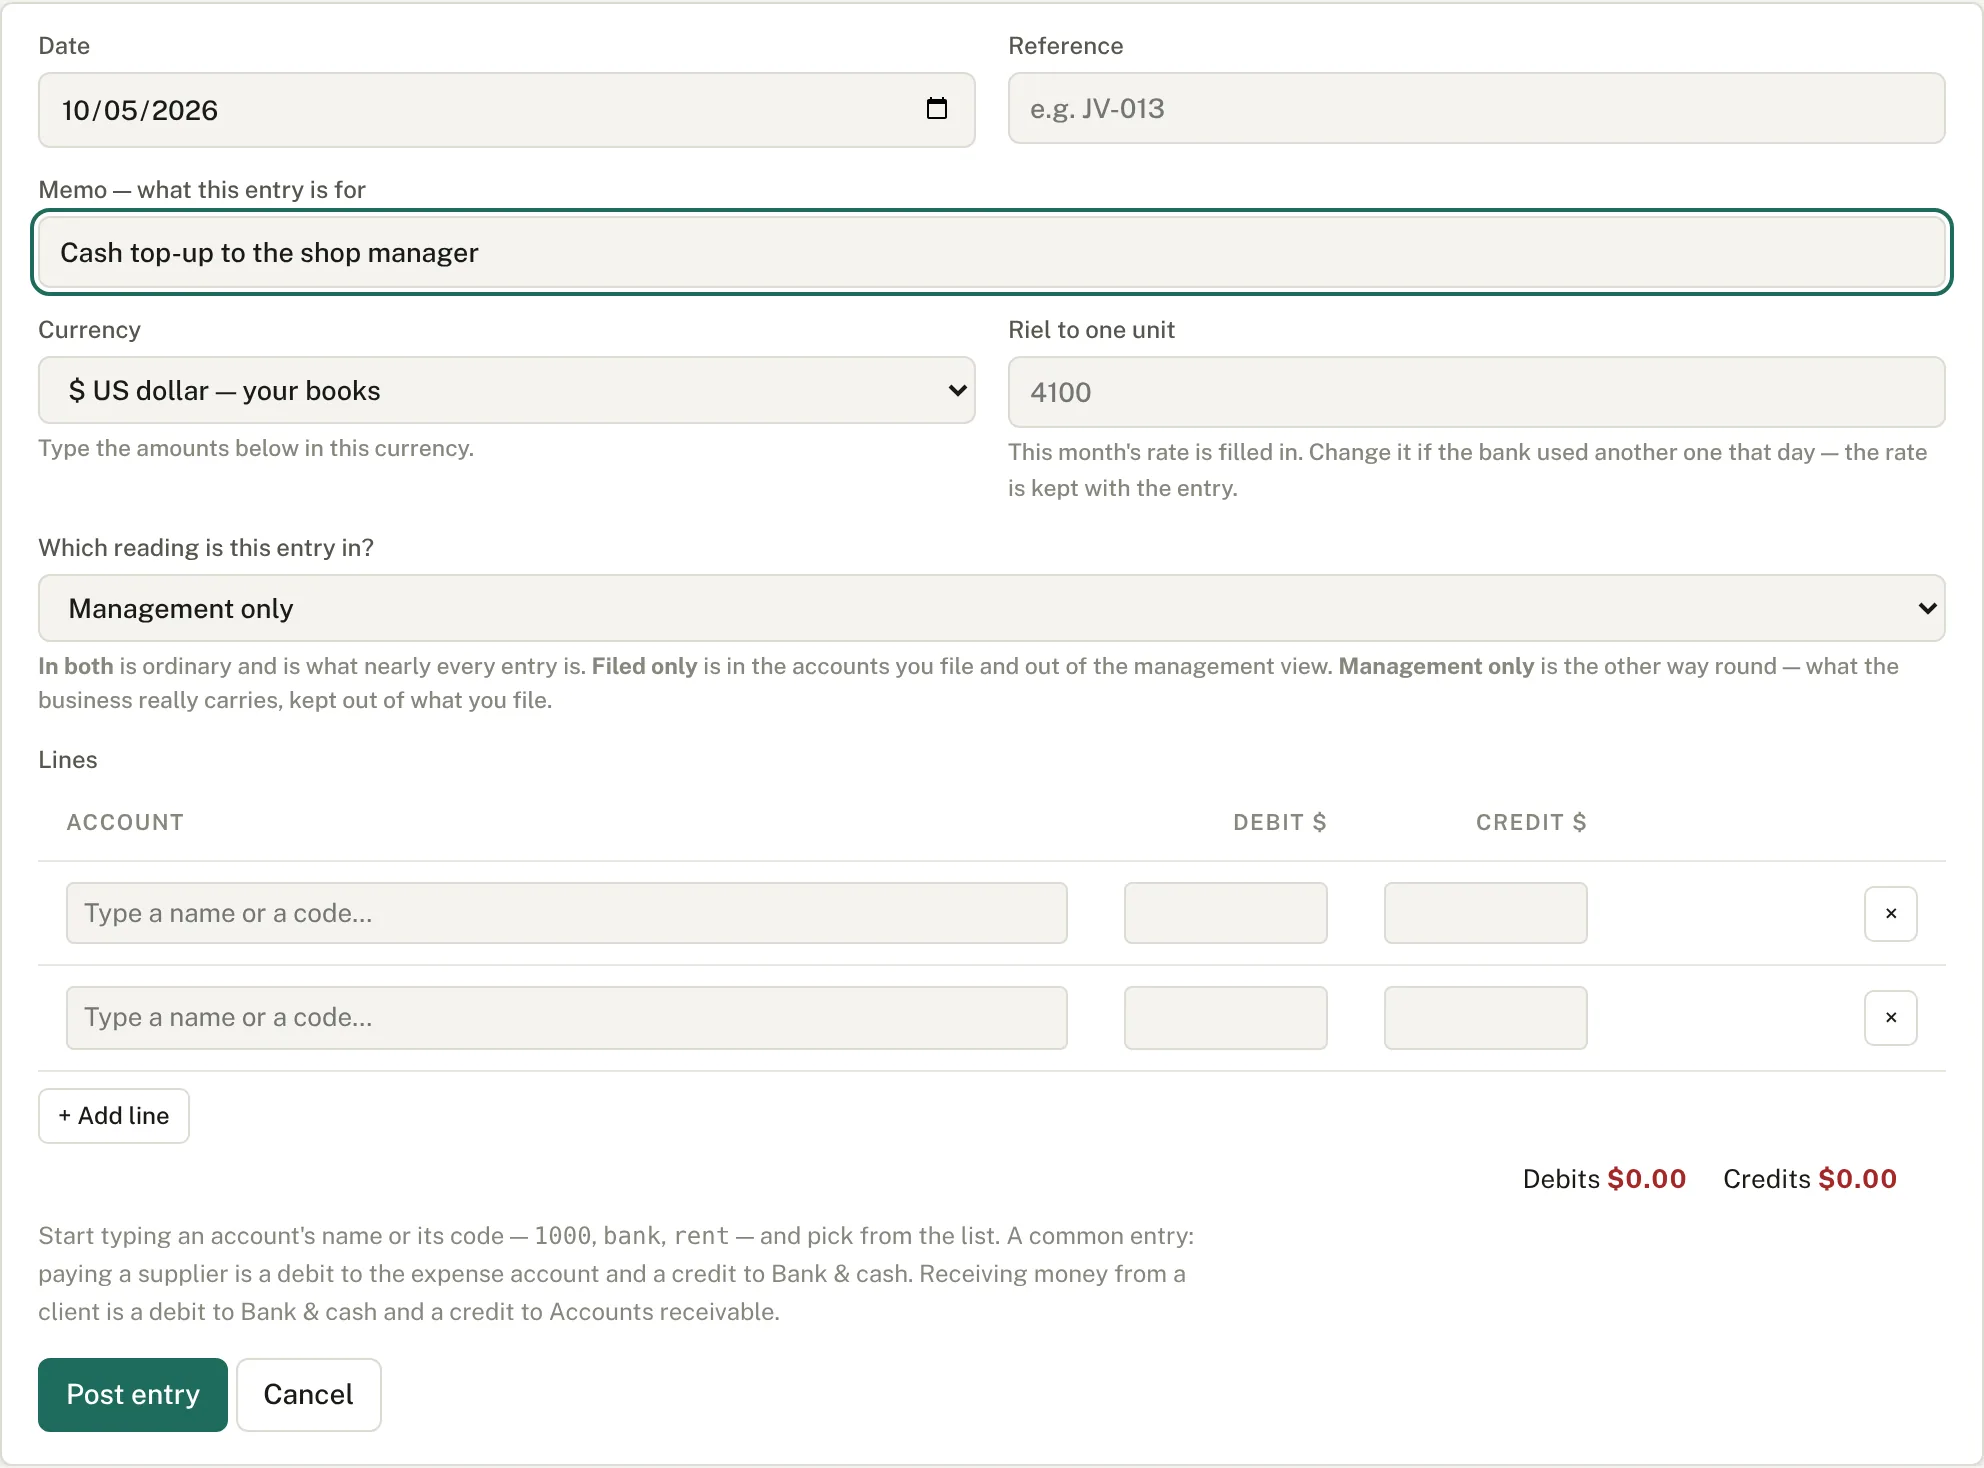
2. Switch between the two readings
A bar appears at the top of the journal, the accounts, the profit & loss and the statement of position. It says which reading you are looking at, in words, every time.


Every figure on the screen moves together: the trial balance, the profit & loss, the statement of position and each account's own statement. They cannot disagree, because they are all the same ledger read the same way.
3. The journal still shows everything
One page does not change with the switch: the journal itself. It is the complete record, so it lists every entry whichever reading is on and labels the ones that are not in both. Hiding them there would mean the one page that is supposed to be the whole truth was not.
4. The schedule your accountant will ask for
Books›Journal›Management adjustments, or the link on the journal's toolbar.
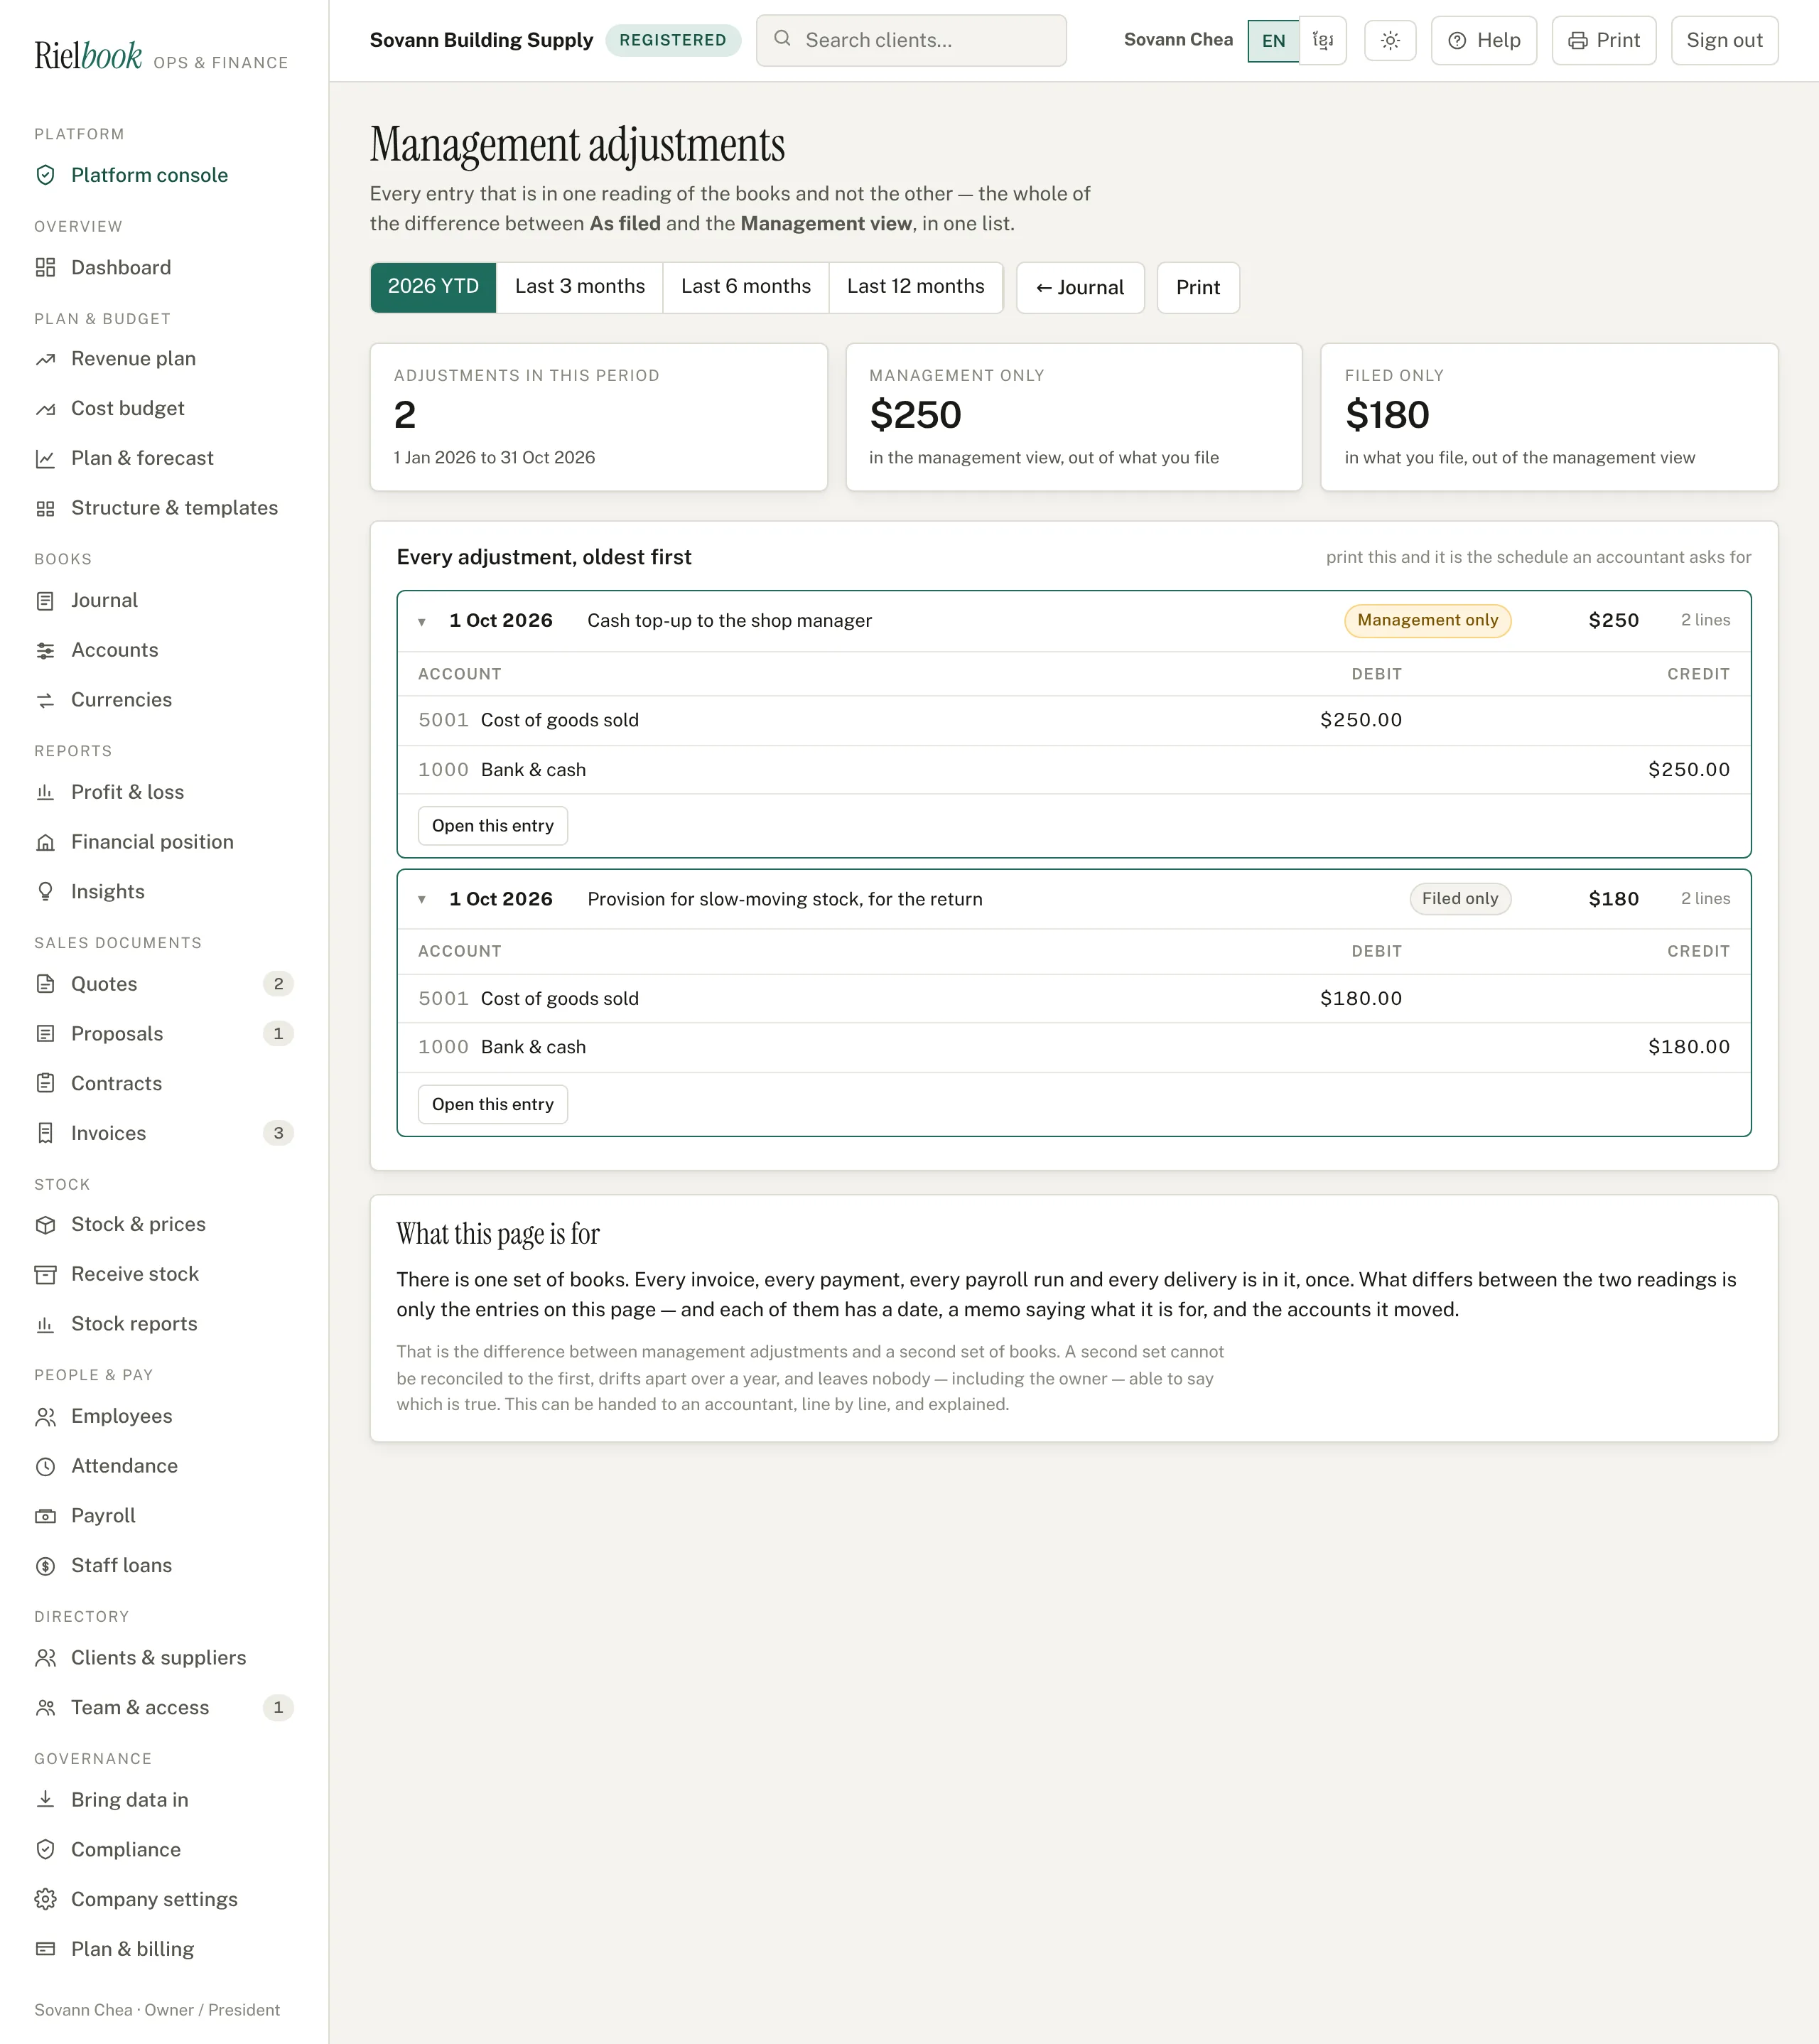
Print that page and you have handed over the entire reconciliation between your two sets of figures, line by line, each with a reason beside it. That is what makes this management adjustments rather than a second set of books, and it is the difference between a conversation with an accountant and an argument.
If something looks wrong
- The mark box is not on the entry. Either the company has not ticked Keep management adjustments in Company settings, or your plan does not include it — it is on Company and up.
- An entry cannot be marked. It was posted by a document. Open the invoice, the payroll run or the delivery; the entry follows it.
- A report shows a figure you did not expect. Look at the bar at the top of it and see which reading you are in.
- You switched the feature off and the figures changed. With it off there is one reading — the whole book, every entry — so a management-only entry is now in your reports. Nothing was lost: the marks are all still on the entries, and ticking the box again puts every figure back exactly where it was.
- The two readings differ by more than you thought. The adjustments page is the list of exactly why, and nothing else contributes to it.
Working in more than one currency
Cambodia runs on two currencies at once, and plenty of businesses here run on three. A building-materials shop buys its cement in riel and sells over the counter in dollars. A consultancy with Australian clients invoices some of them in Australian dollars and holds an account in Sydney. Both need the same thing: money recorded in the currency it really was, converted into the books at a rate that is written down beside it and never quietly changed afterwards.
That is what this chapter is about. Nothing in it appears until you add a currency, so a company that only ever works in dollars will not find a single currency box anywhere.
1. Add the currencies you deal in
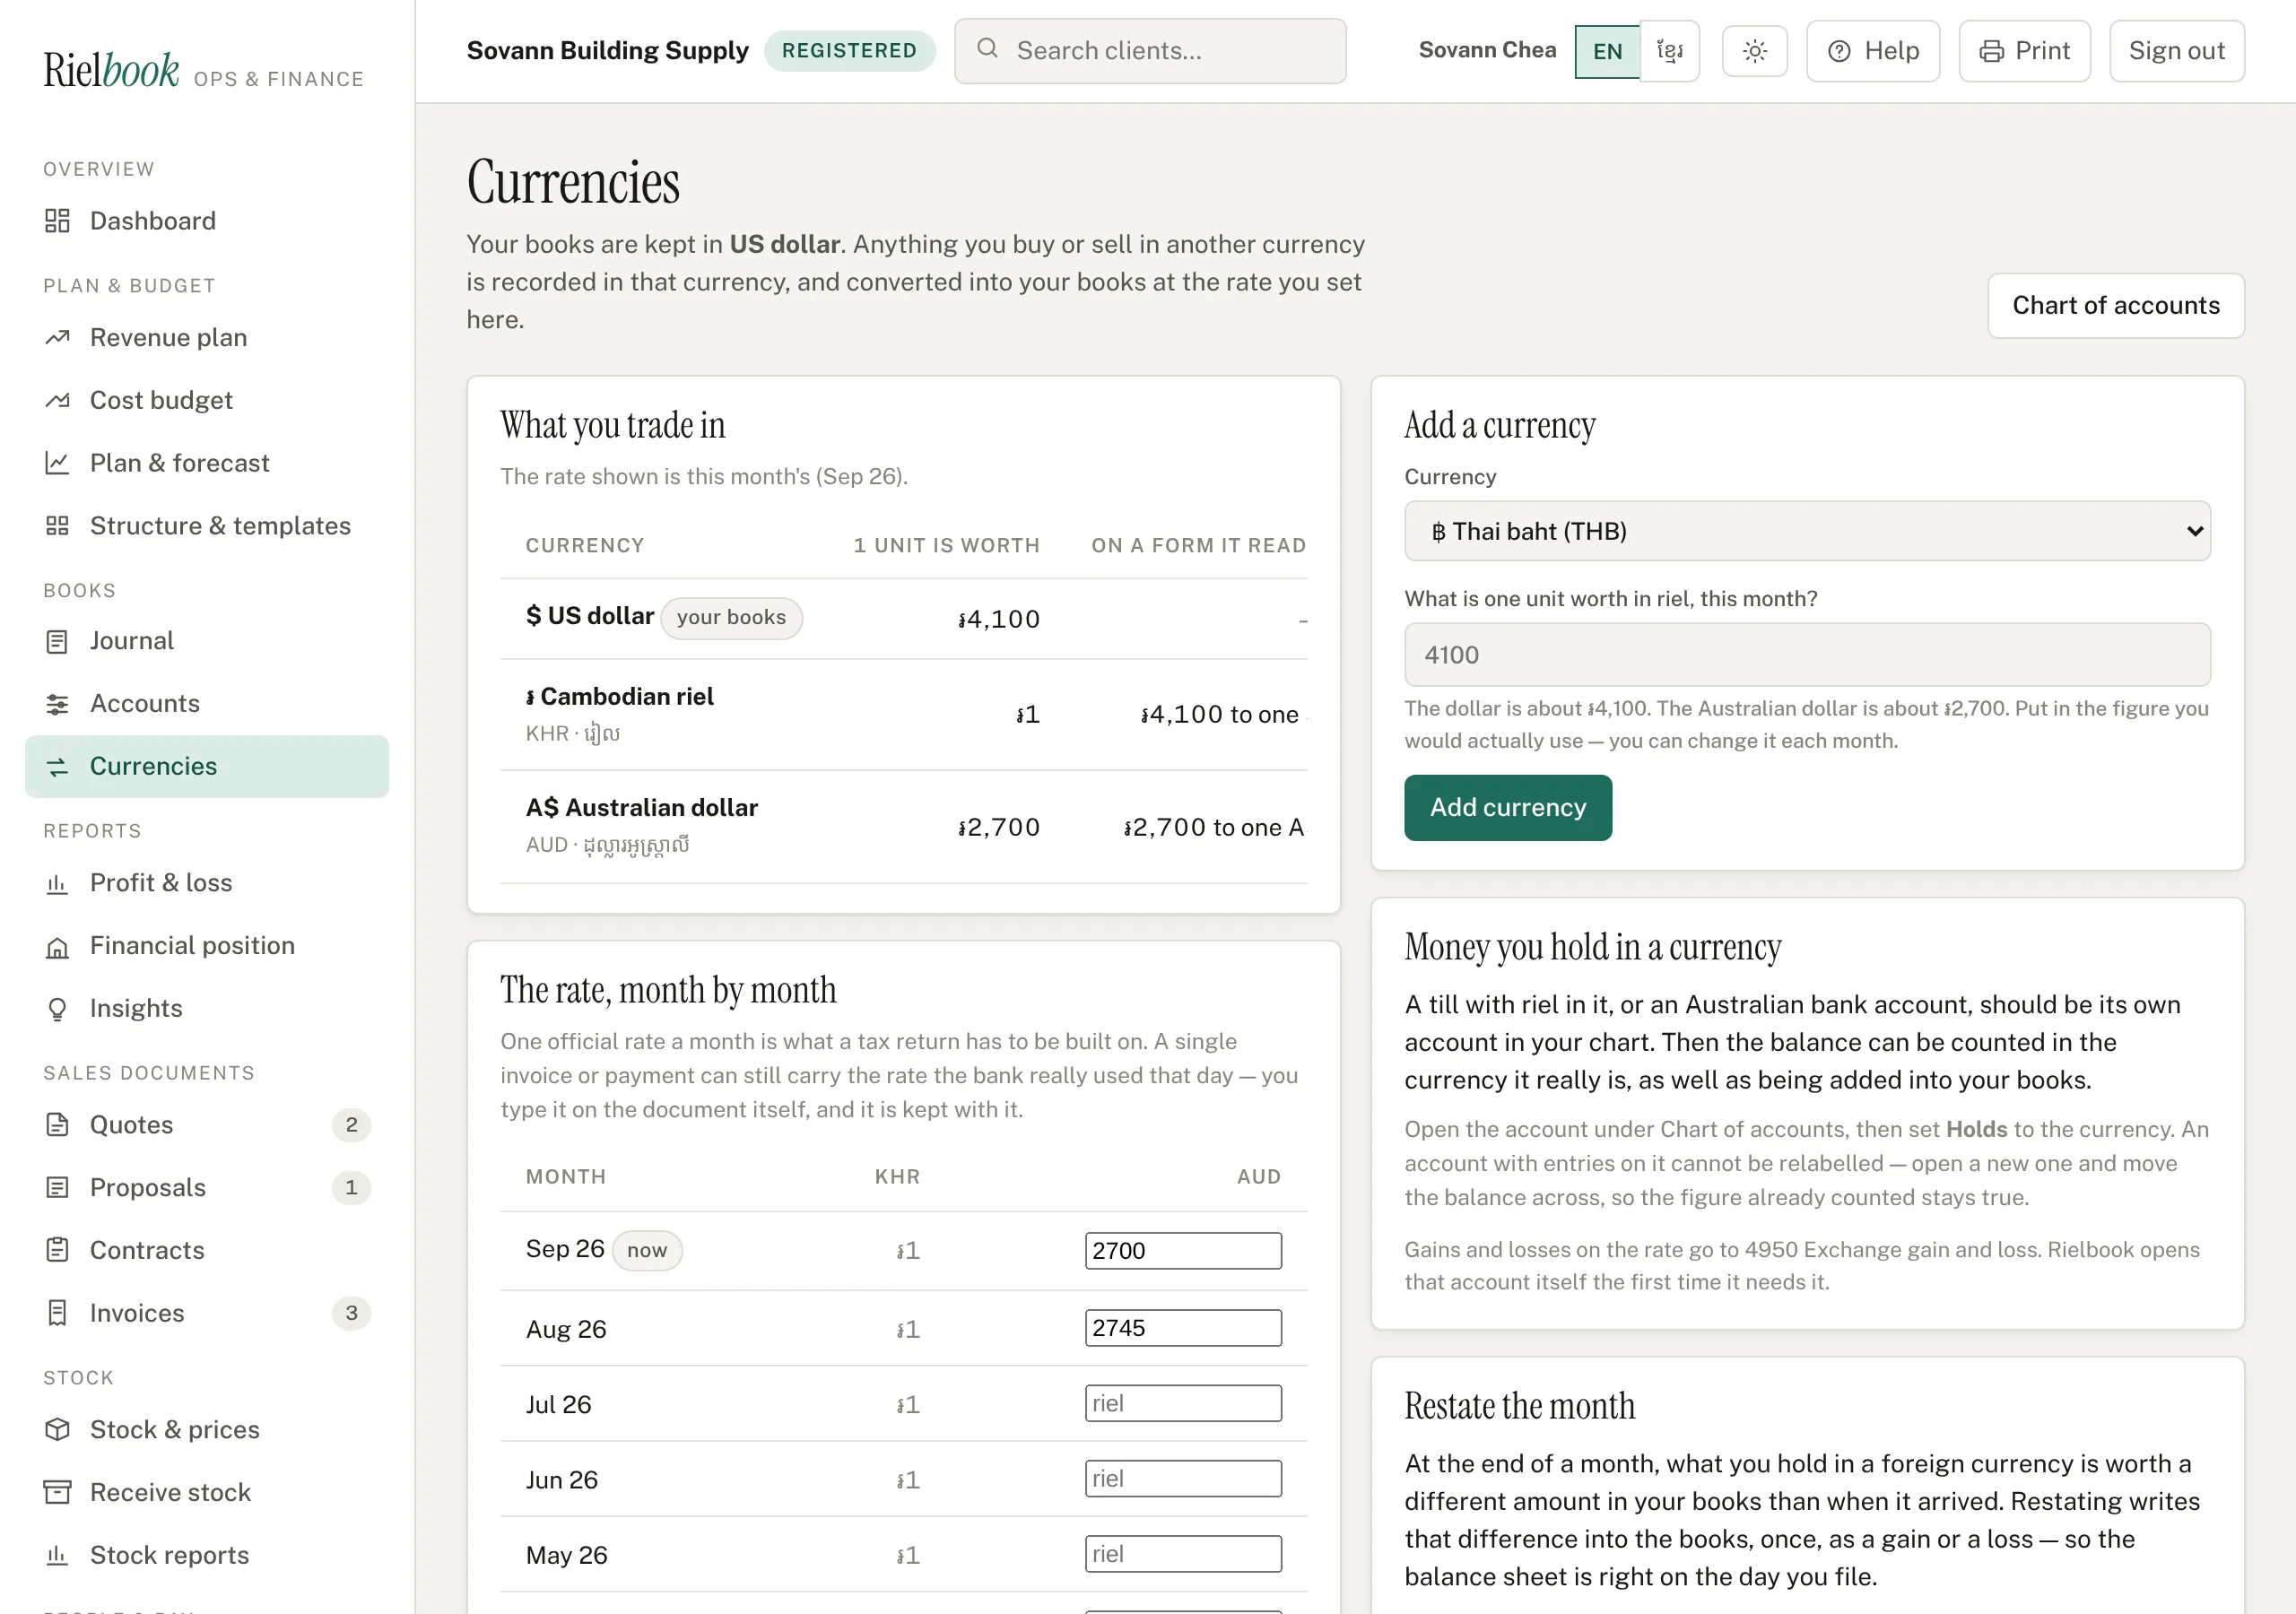
Go to Books›Currencies. The first thing you see is your own book currency, which is not yours to change here, and an empty list underneath it.
- On the right, under Add a currency, choose the currency — Cambodian riel for a shop that buys in riel, Australian dollar for a client who pays in Australian dollars.
- Type what one unit of it is worth in riel, this month. The dollar is about ៛4,100. The Australian dollar is about ៛2,700. Put in the figure you would actually use.
- Press Add currency.
2. Set the rate each month
Underneath the list is a grid: one row a month, one column a currency. One official rate a month is what a tax return has to be built on, so that is what the grid holds. Type the figures and press Save rates.
- Leave a month empty and Rielbook uses the nearest month you have set, and says so on the screen where it matters.
- A single invoice, delivery or entry can still carry a different rate — the one the bank really used that day. You type it on the document itself and it is kept with it for good.
- Riel against riel is always one, and the riel rate of your own book currency lives in Settings, so there is only ever one of it. Payroll, the tax bands and this screen all read the same number.
3. Give the money its own account
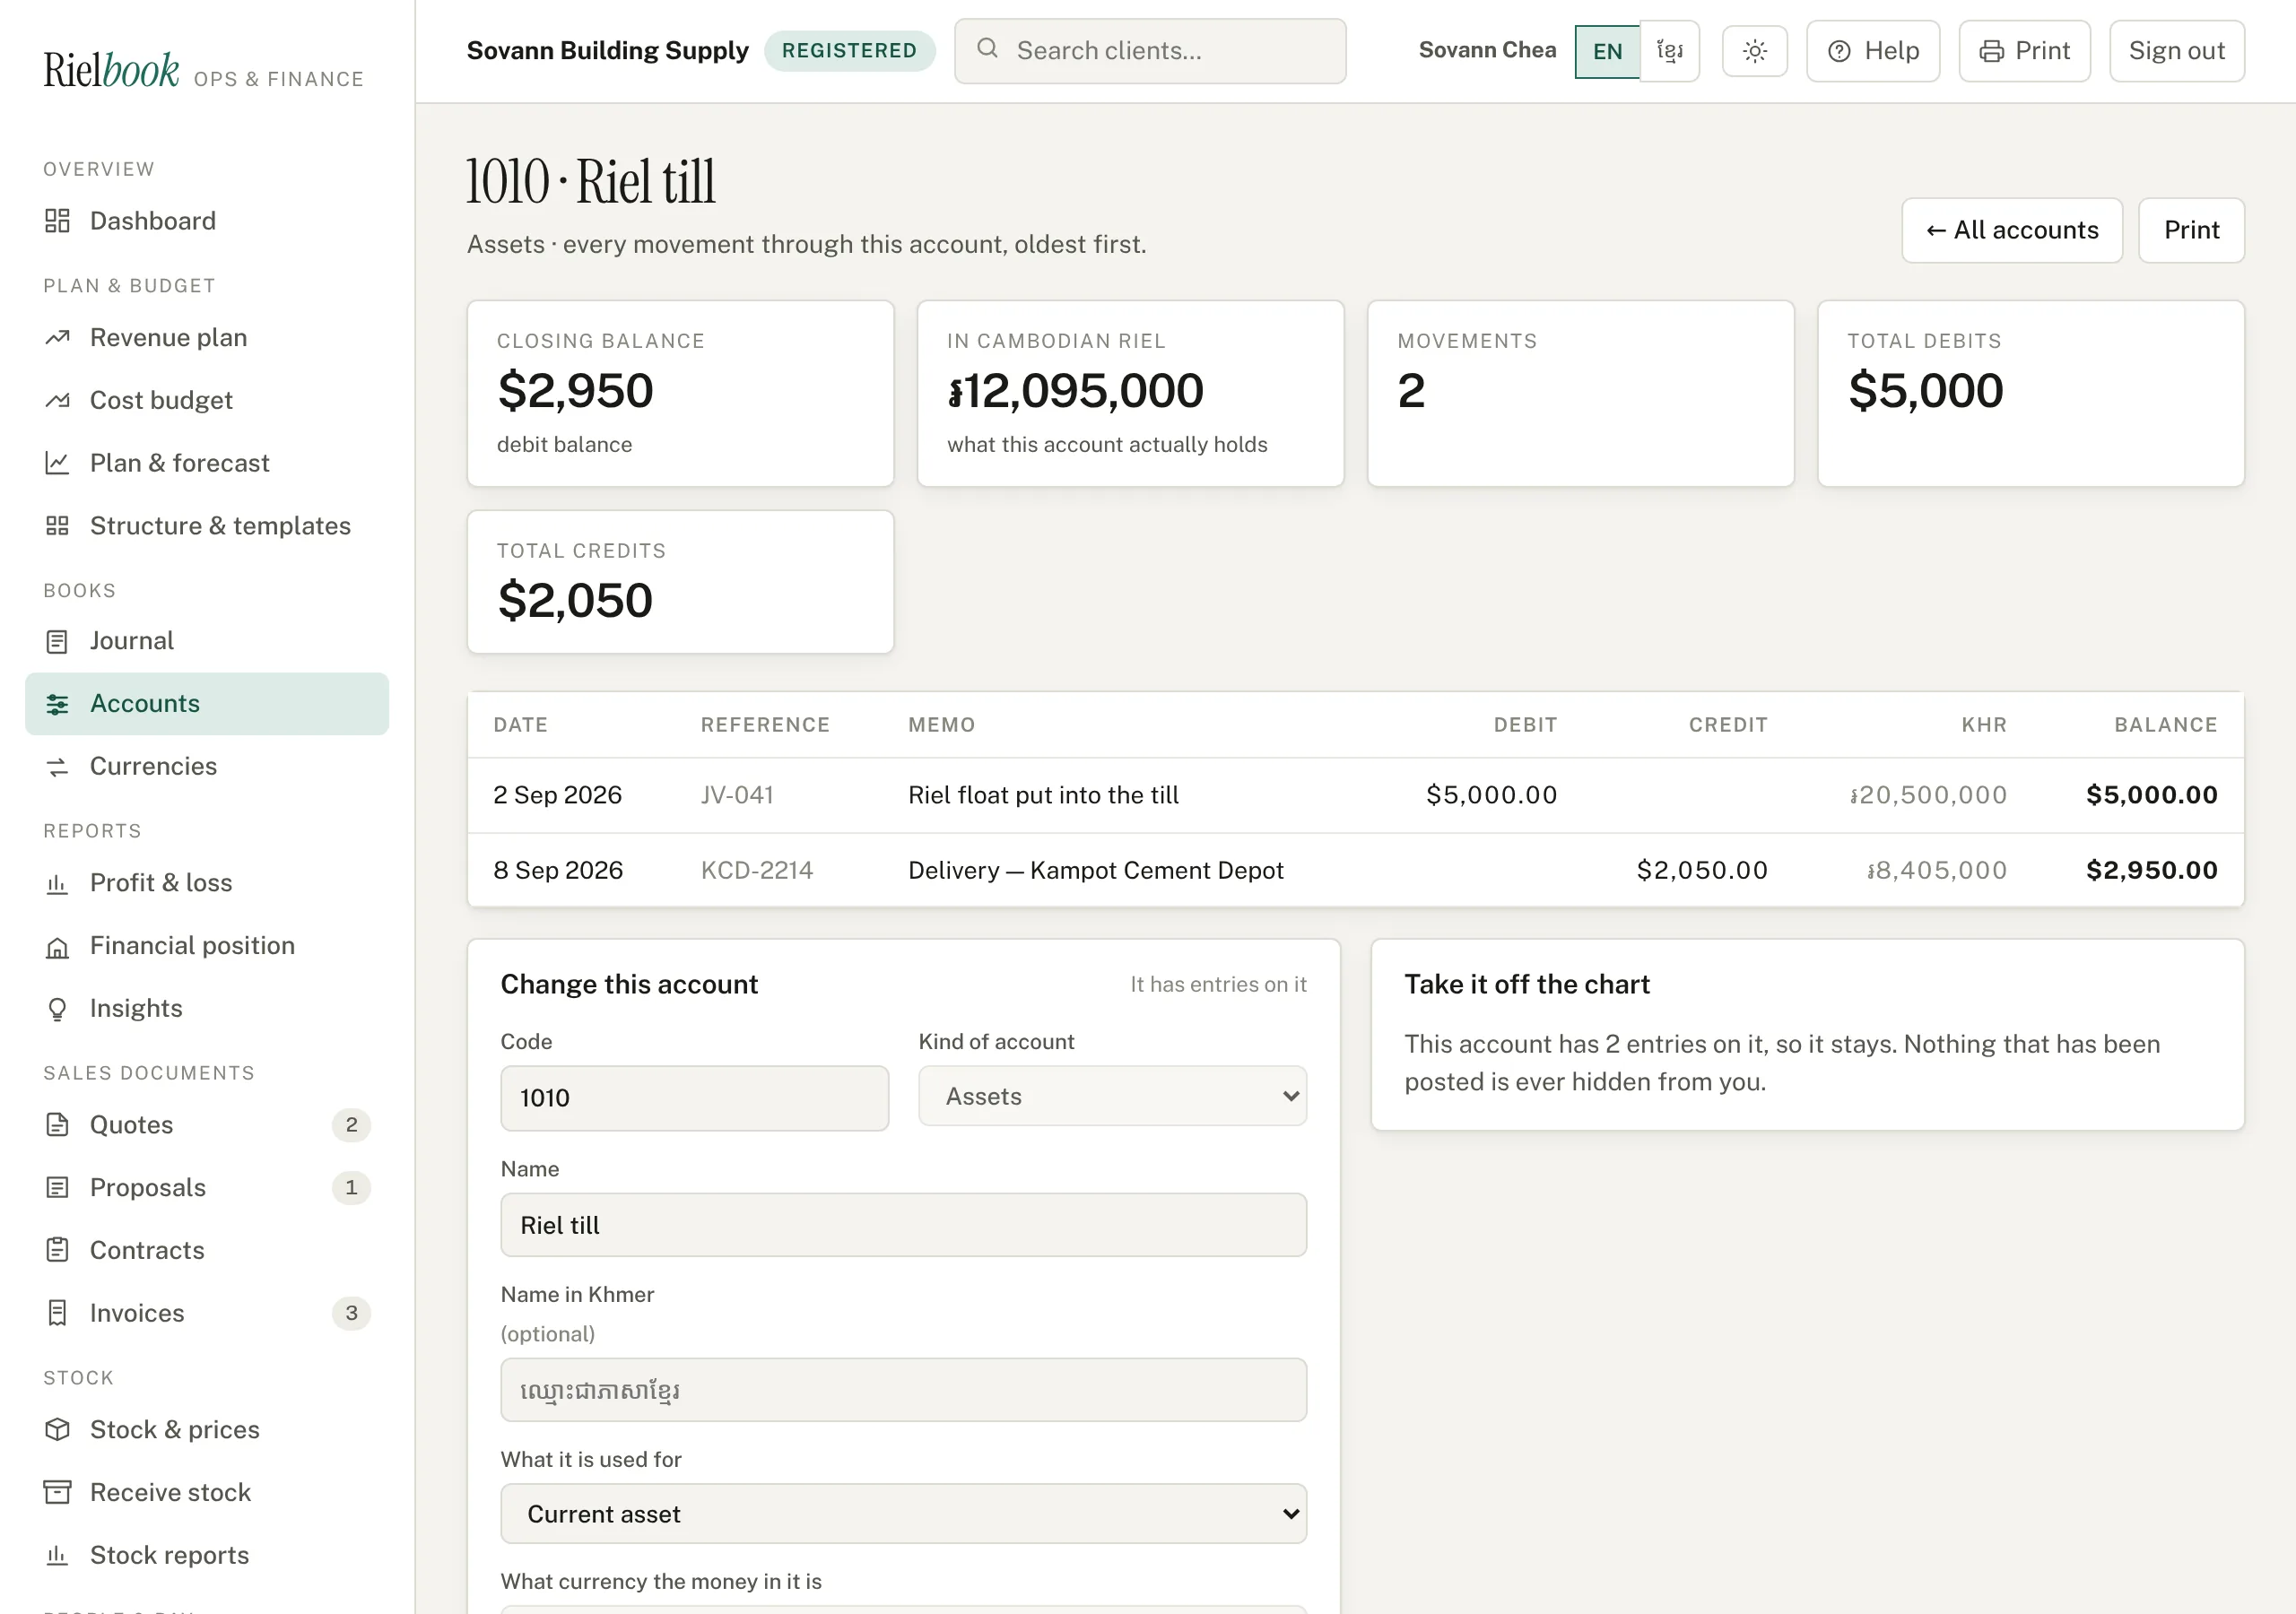
A till with riel in it, or a bank account in Australia, should be its own account in your chart. Then the balance can be counted in the notes that are actually in the drawer, as well as being added into your books.
- Go to Books›Accounts and add an account — a code of your own, a name like Riel till, and Asset as the kind.
- Open it, and in What currency the money in it is choose the currency. Press Save.
4. An entry typed in another currency
On Books›Journal›New journal entry there is now a Currency box. Choose one and two things change: the rate box appears beside it, already filled in with this month's rate, and a third column appears on the lines showing what each one comes to in your books.
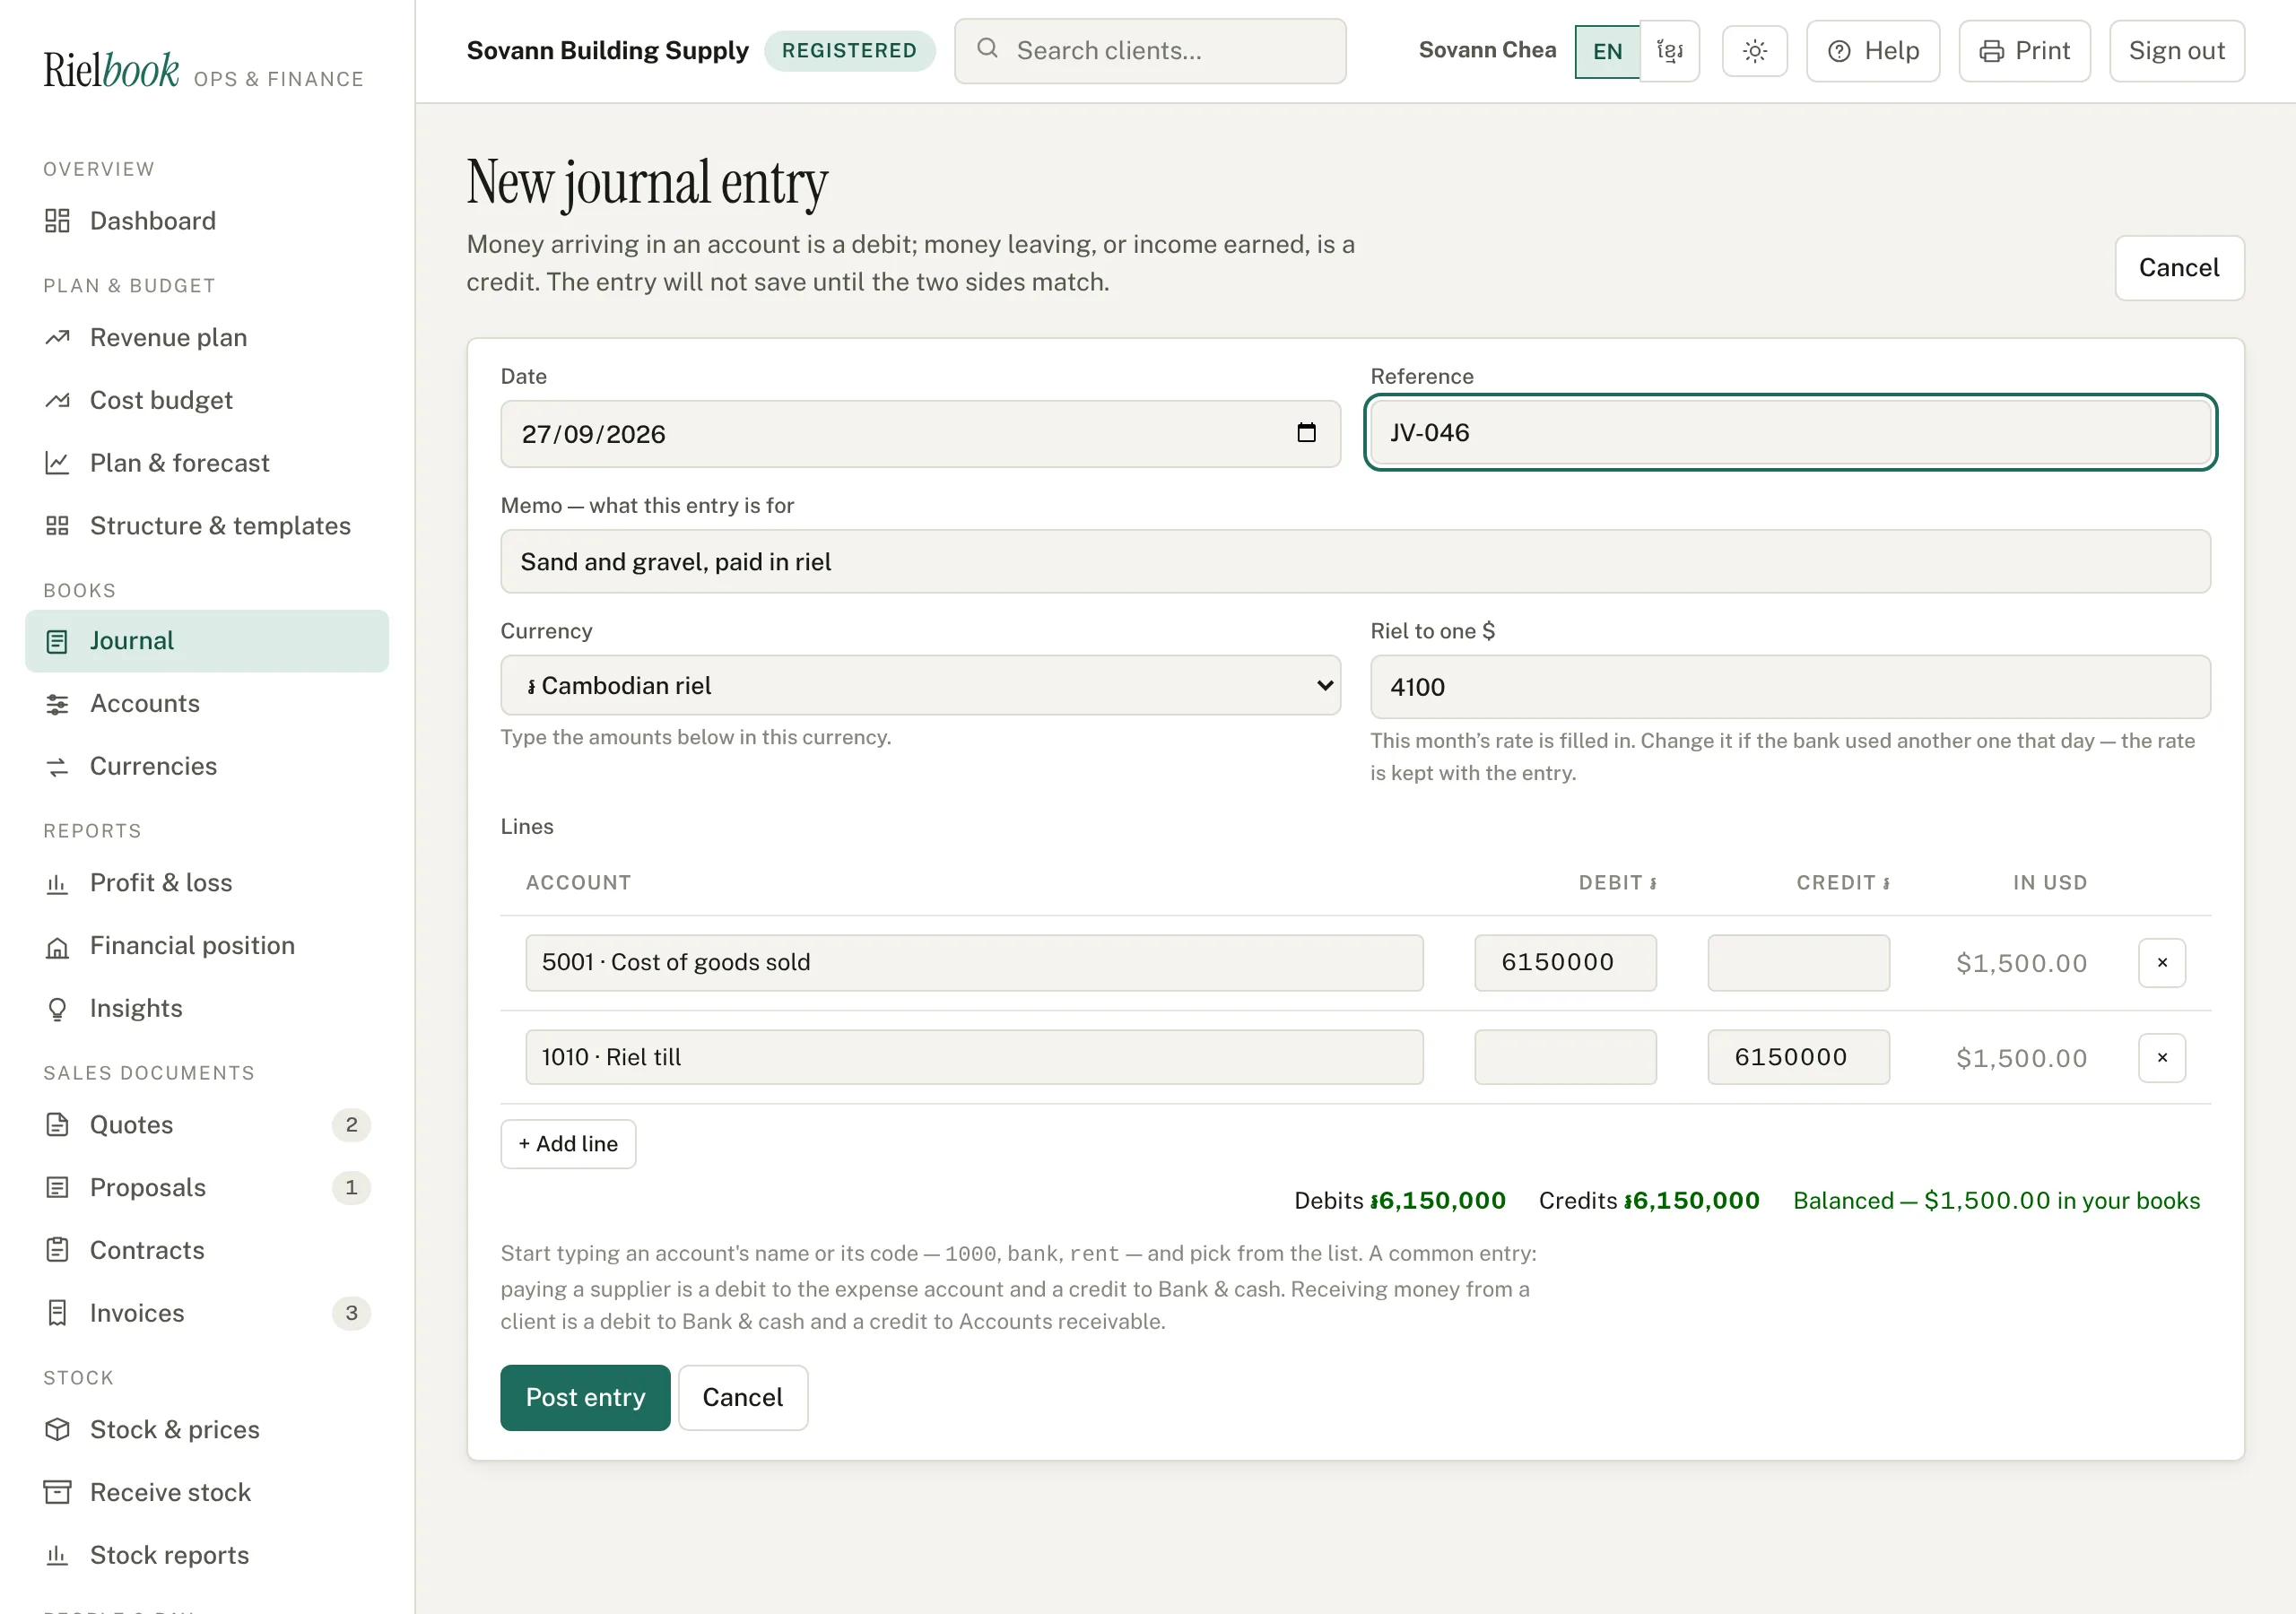
- The entry balances in the currency you typed. ៛6,150,000 against ៛6,150,000 is a balanced entry, and that is what Rielbook checks — telling you it is out by a fraction of a cent in dollars would be no help to anyone.
- The cent or two that converting can leave between the two sides goes to Exchange gain and loss, which is exactly what it is.
- Correcting the entry later shows it back to you in riel, not in the converted dollars.
5. A delivery bought in riel
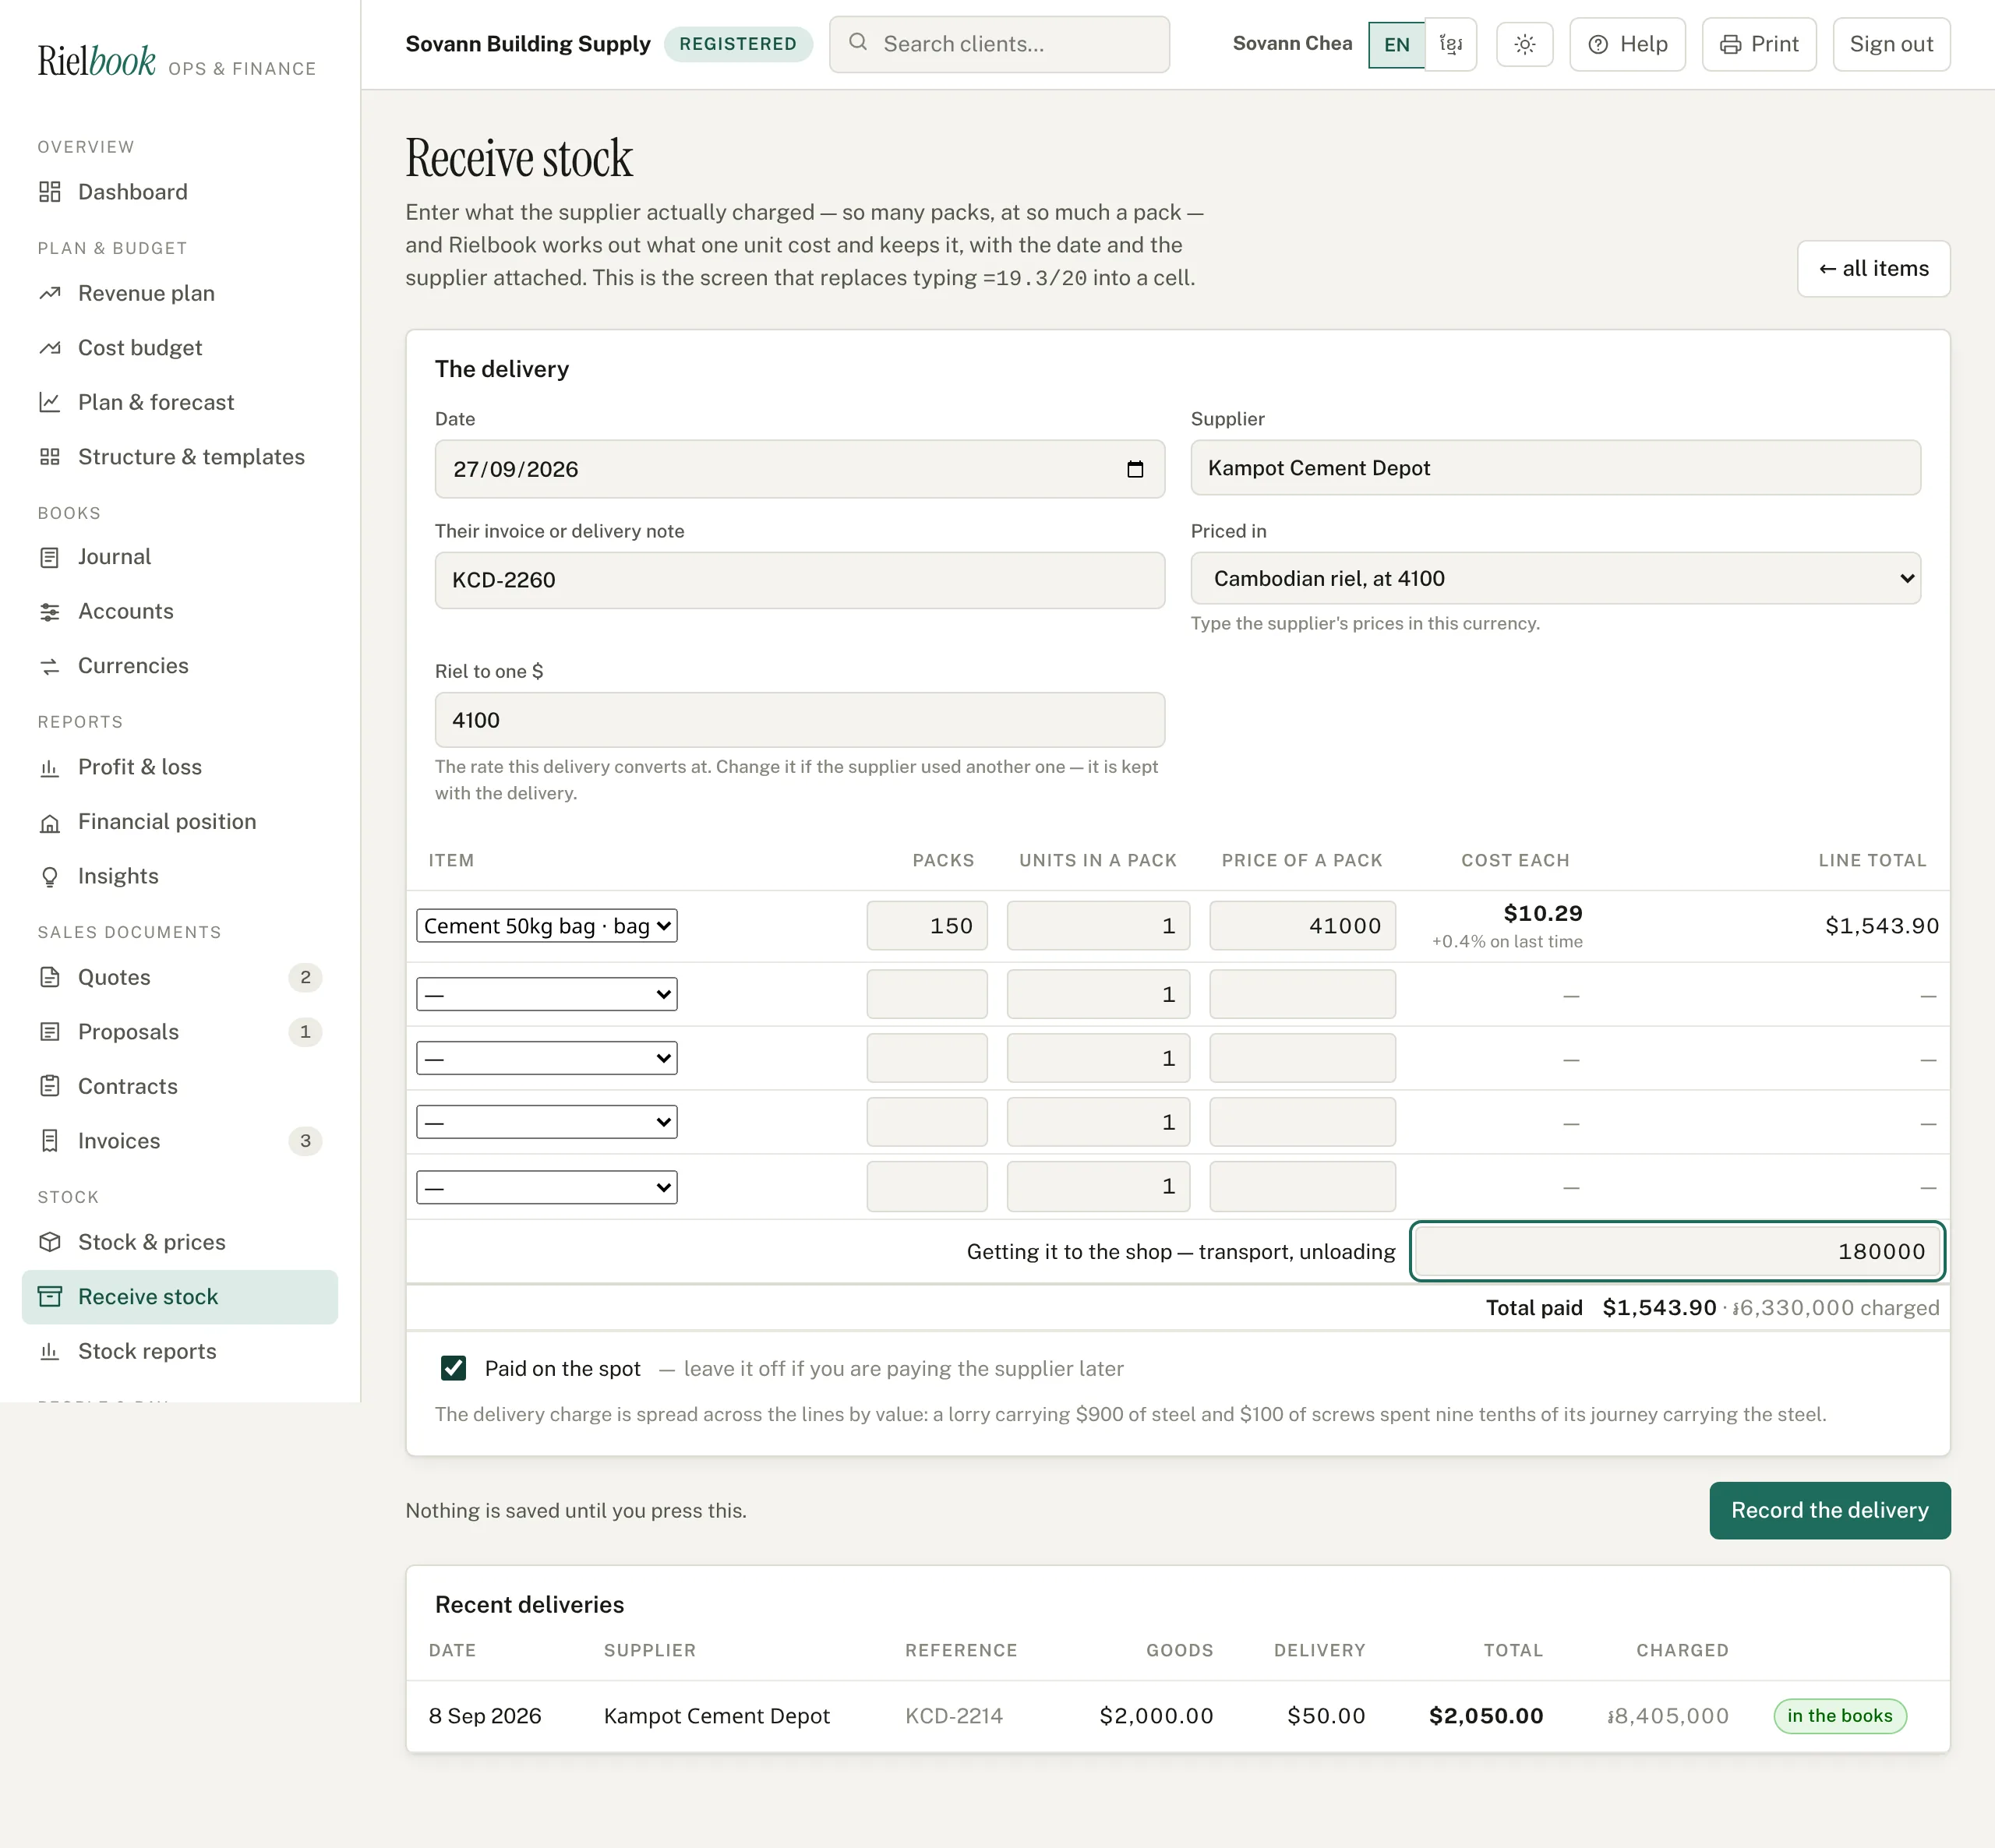
This is the shop's real day. On Stock›Receive stock, set Priced in to the supplier's currency and type the prices exactly as they are written on the delivery note. Rielbook converts while you type.
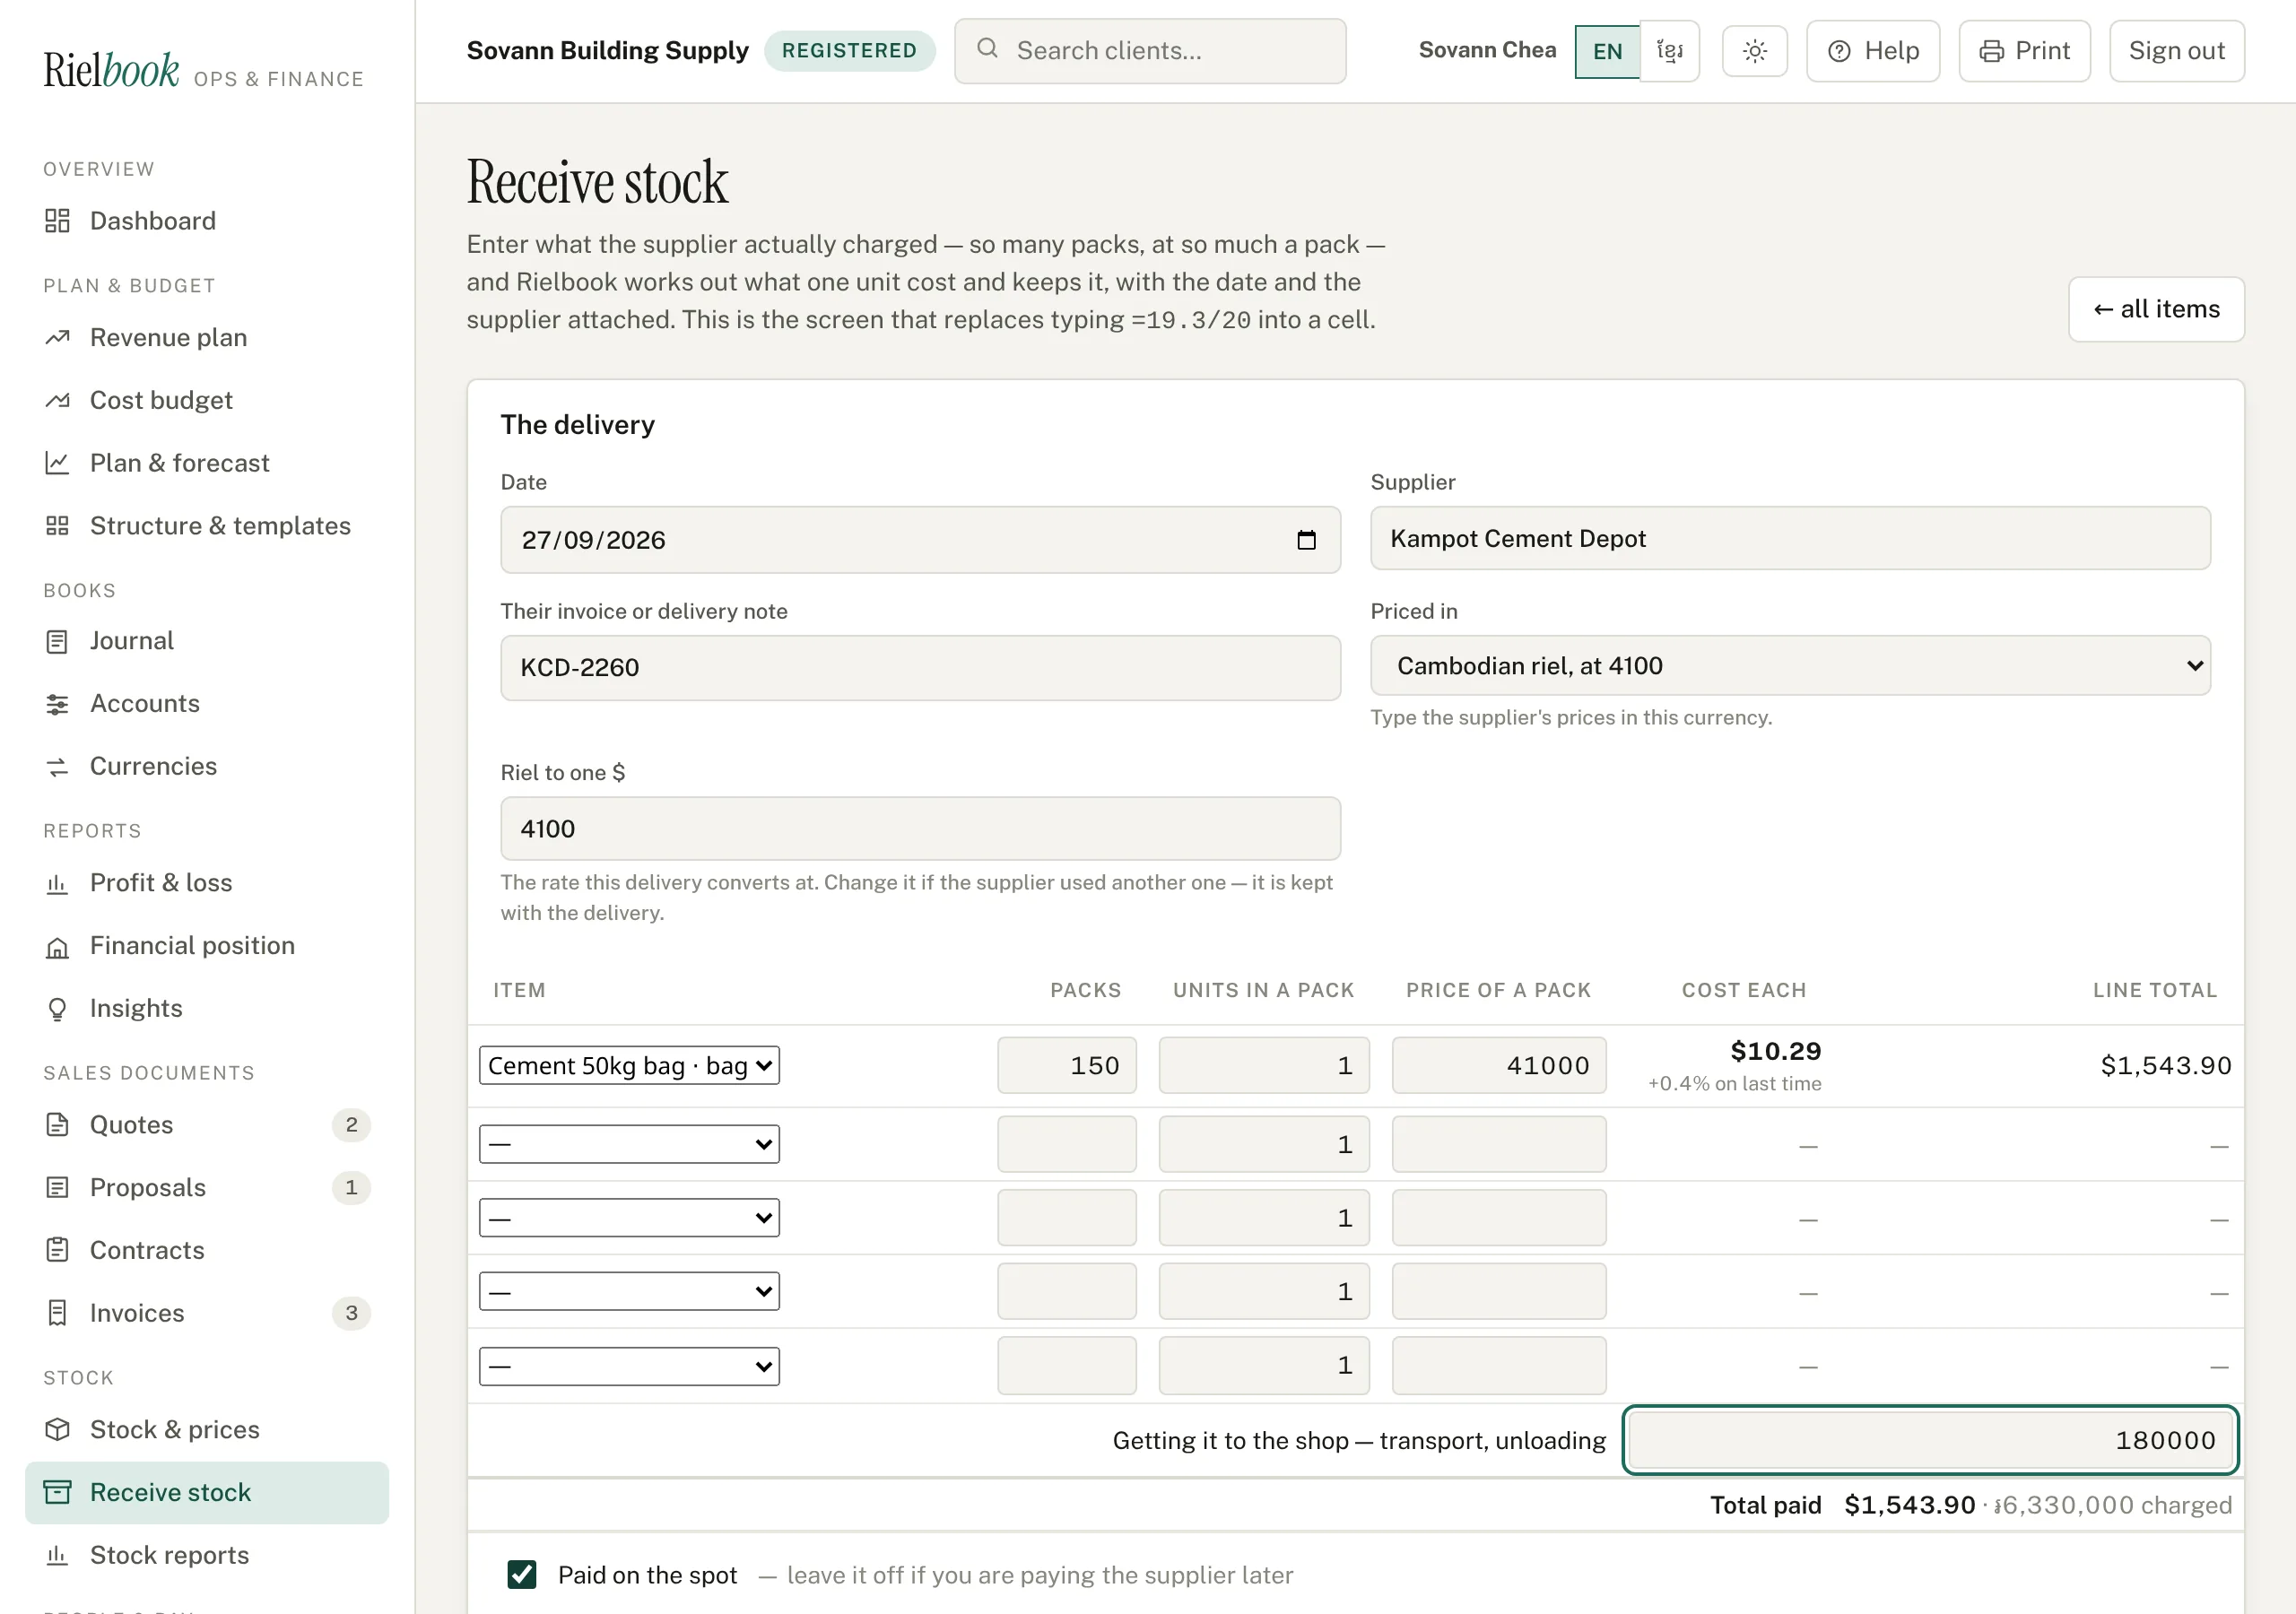
The delivery keeps both figures. The list of recent deliveries shows what went into the books and, beside it, what the supplier actually charged. If the delivery was paid for on the spot, the money comes out of the account that holds that currency — the riel till, not the general bank account.
6. An invoice in another currency
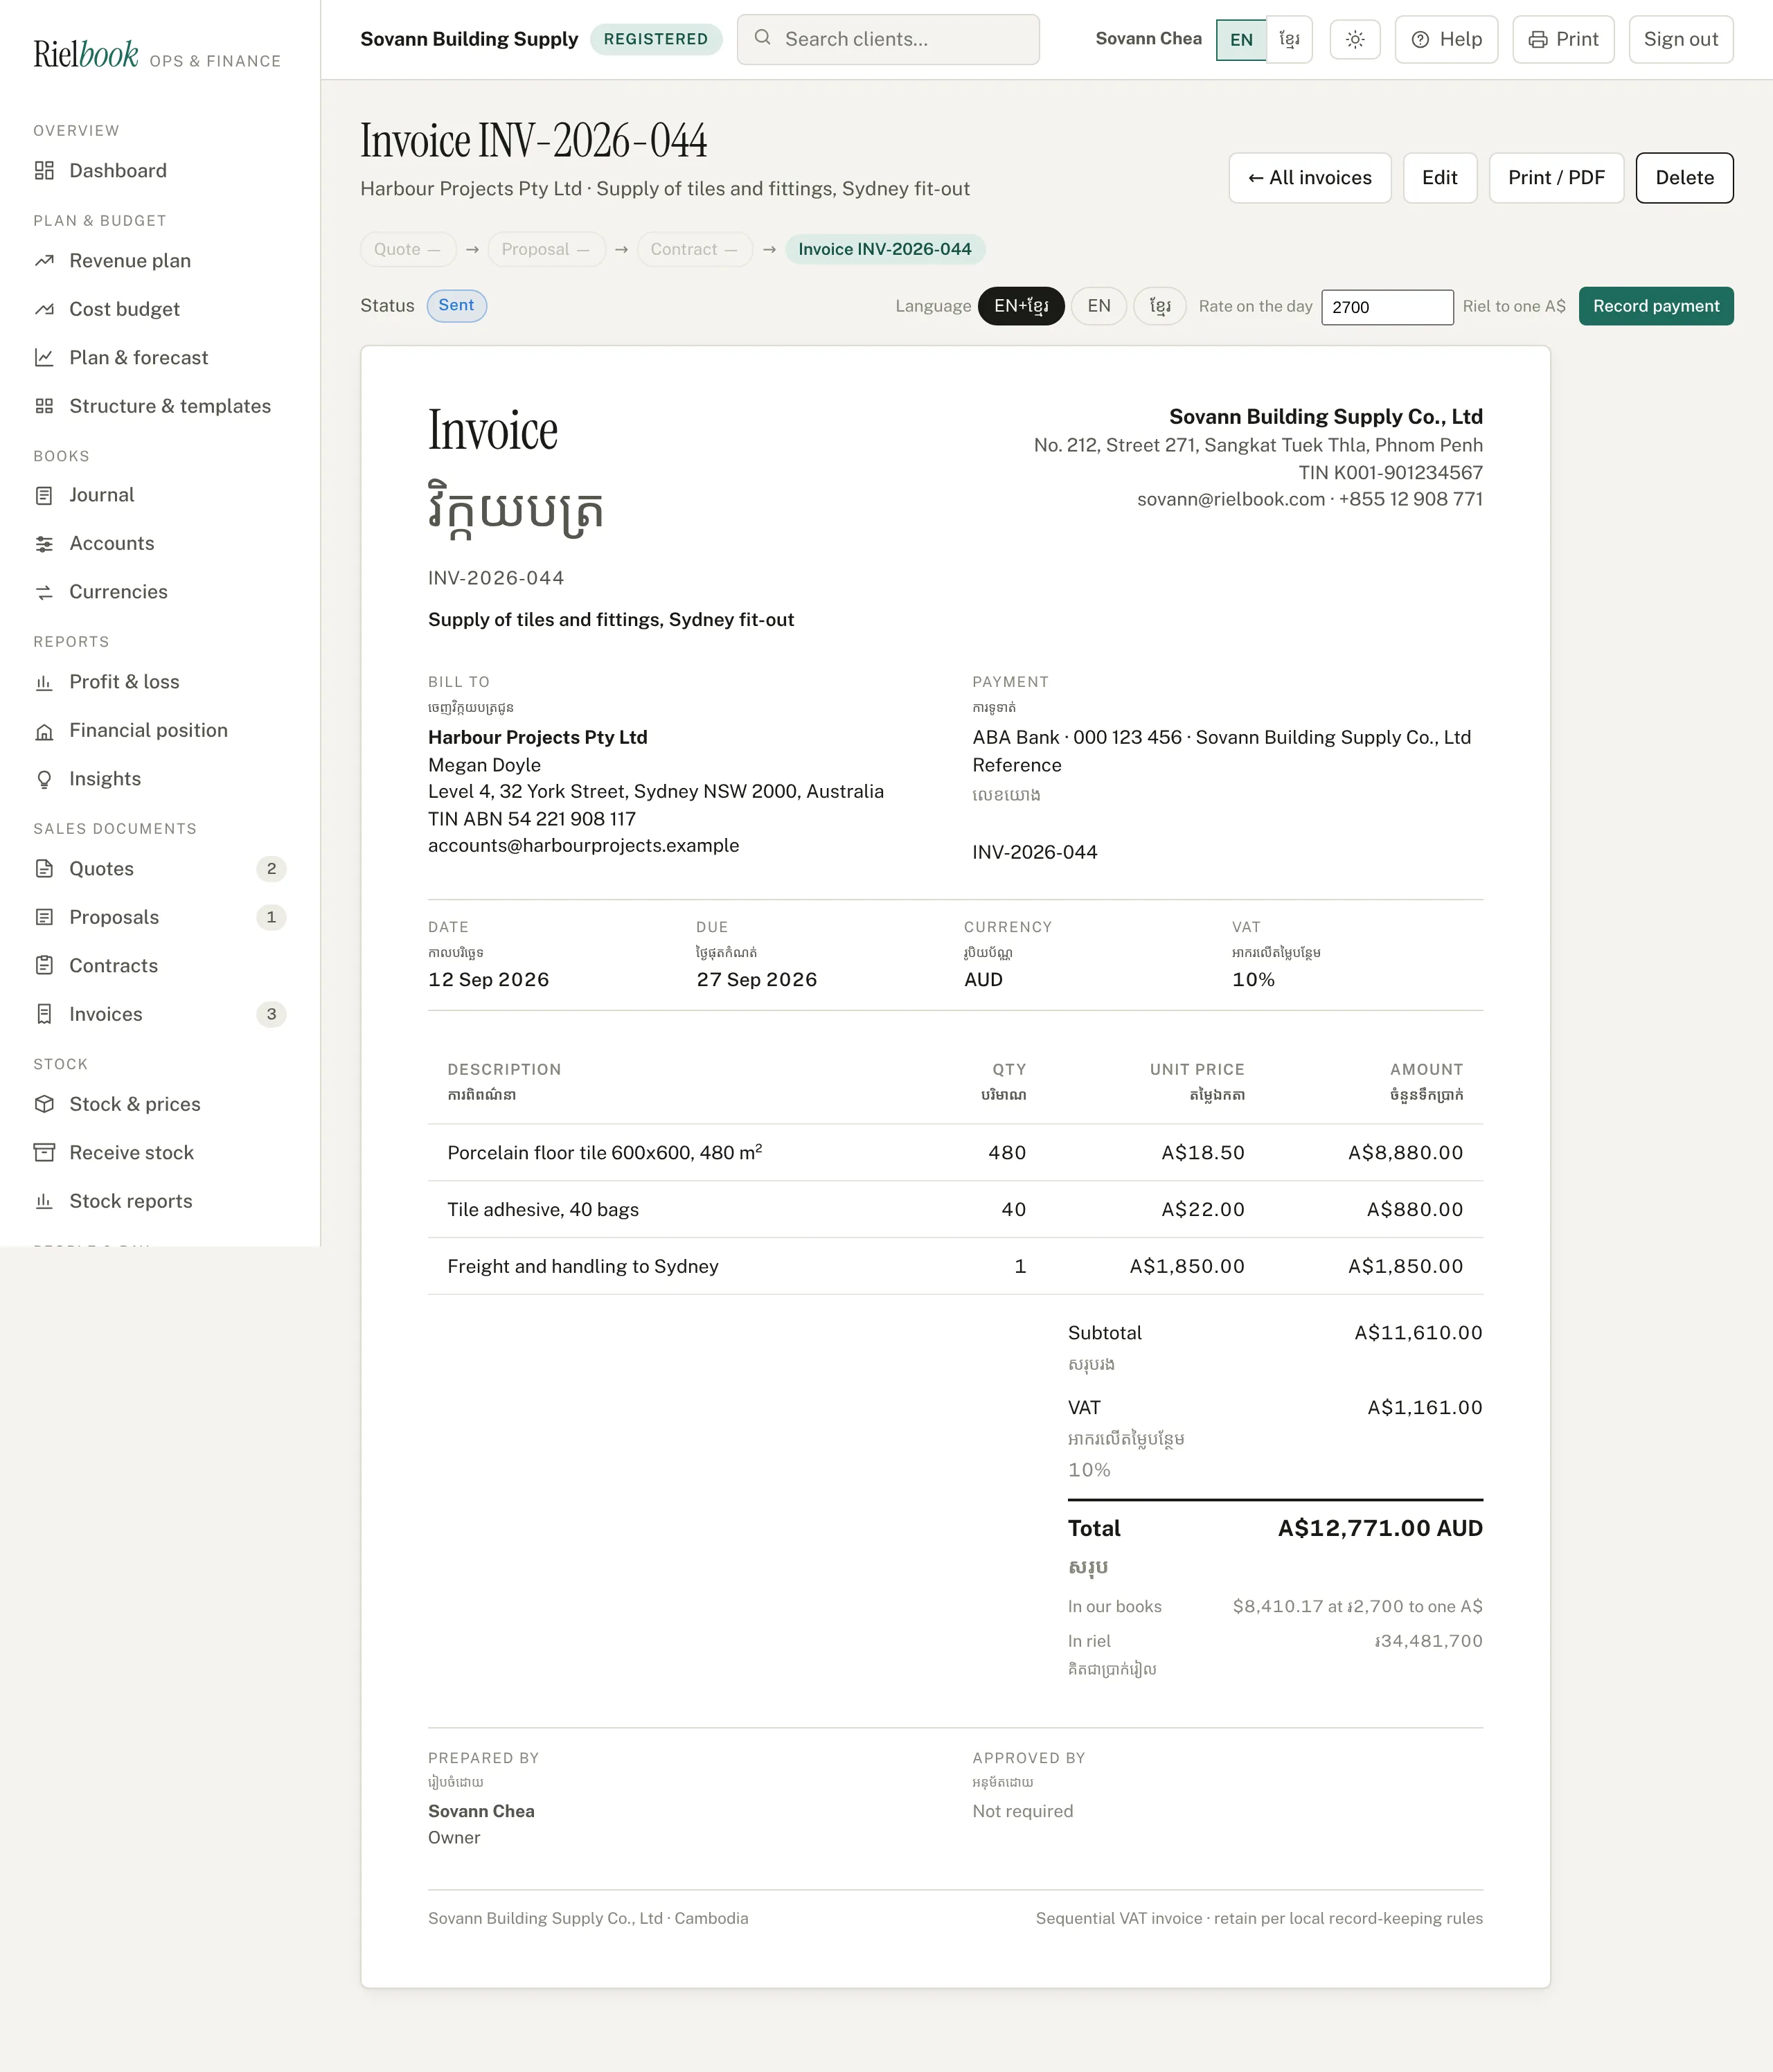
On a new invoice there is a Priced in box. Choose the client's currency and every price on the invoice is in it — including the VAT, because a VAT invoice in a foreign currency is still a VAT invoice.
What the client receives is in their own money, with no conversion in front of them. Underneath the total, for you and for the tax officer, Rielbook prints what it comes to in our books and in riel, with the rate spelled out so either figure can be checked.
7. Payment, and the difference between two rates
Money almost never arrives at the rate the invoice was raised at. When you press Record payment on an invoice in another currency, there is a rate on the day box beside the button, filled in with this month's rate. Change it to whatever the bank actually gave you.

Rielbook then does three things in one entry: it clears what the client owed at the rate the invoice carried, it puts into the bank what actually arrived at the rate on the day, and it writes the difference between the two to Exchange gain and loss. That difference is not revenue from the work — it is a gain or a loss on holding a foreign balance, and it belongs on its own line where you can see it.
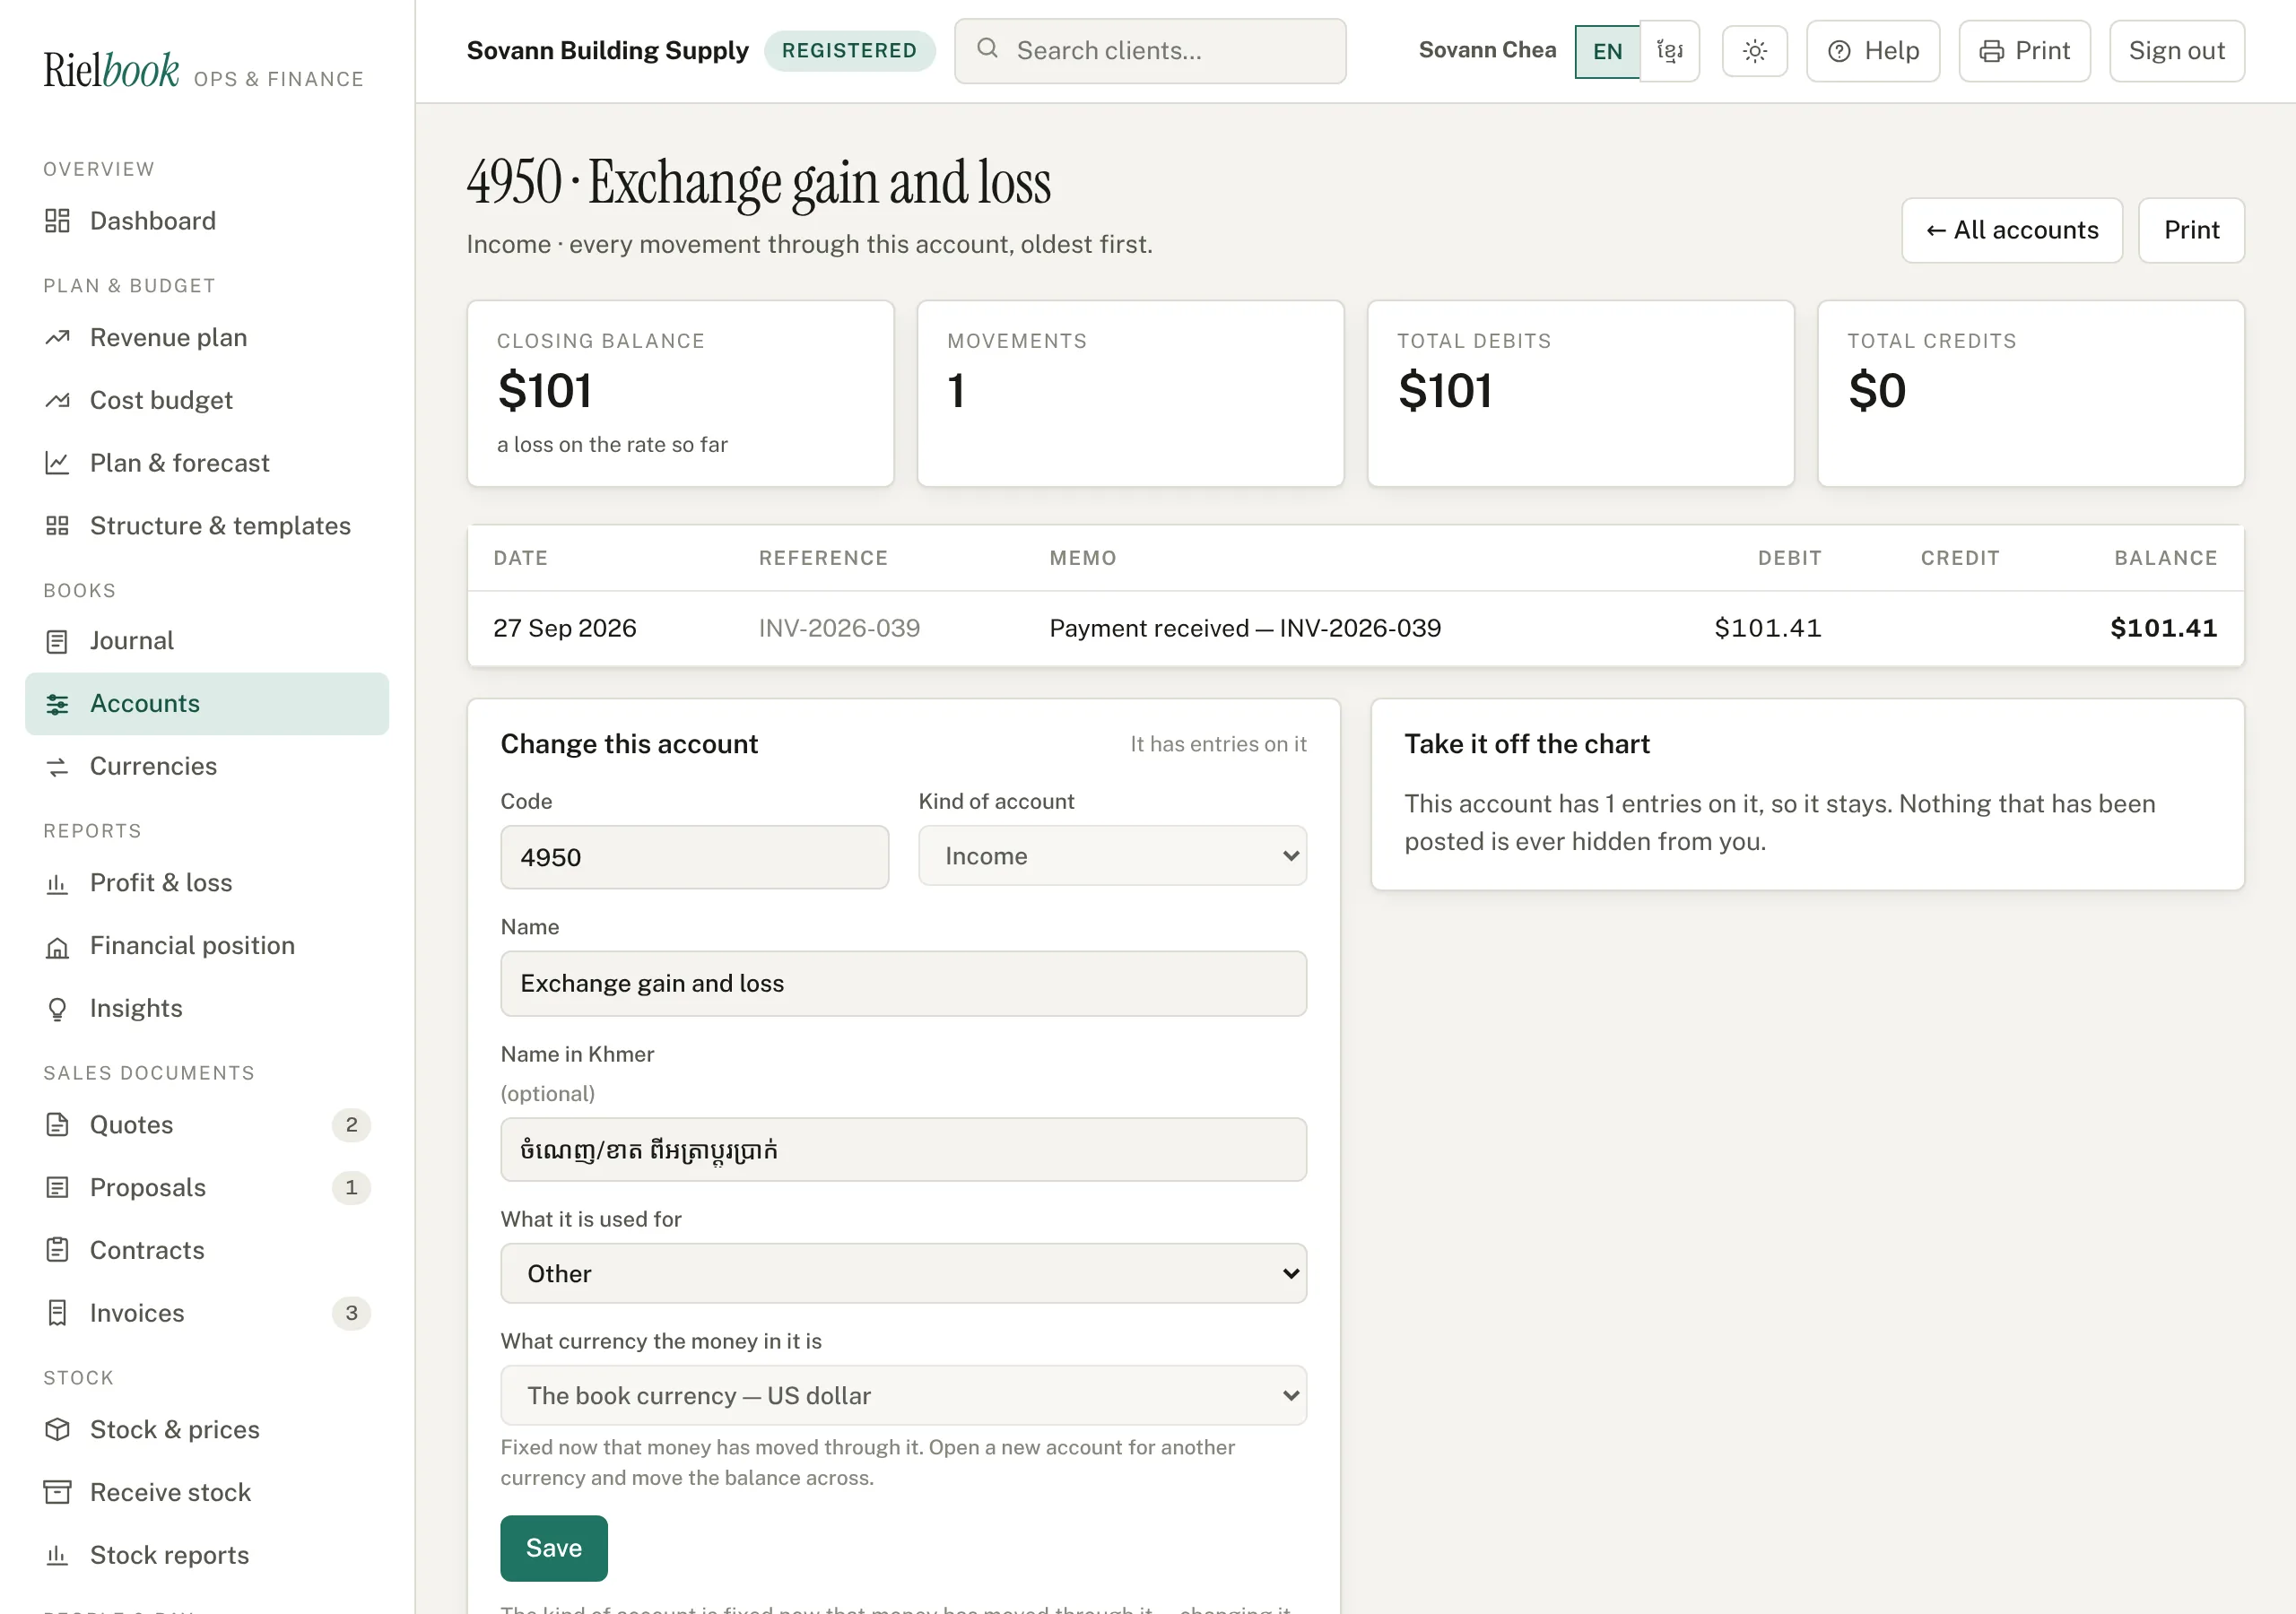
8. Restating at the end of the month
៛12,095,000 in the till is ៛12,095,000 whatever the rate does — but what it is worth in dollar books changes, and the balance sheet has to say what it was worth on the day it was drawn up.
- Go to Books›Currencies and find Restate the month on the right.
- Choose the month and press Restate at month-end rates.
Rielbook works out, for every account that holds a currency, what its own-currency balance is worth at that month's rate, compares it with what the books already say, and writes the difference to Exchange gain and loss. No currency moves — the till still holds the same riel afterwards. Running it twice for the same month replaces the first entry rather than adding to it, so there is no way to double it by accident.
What stays in one currency
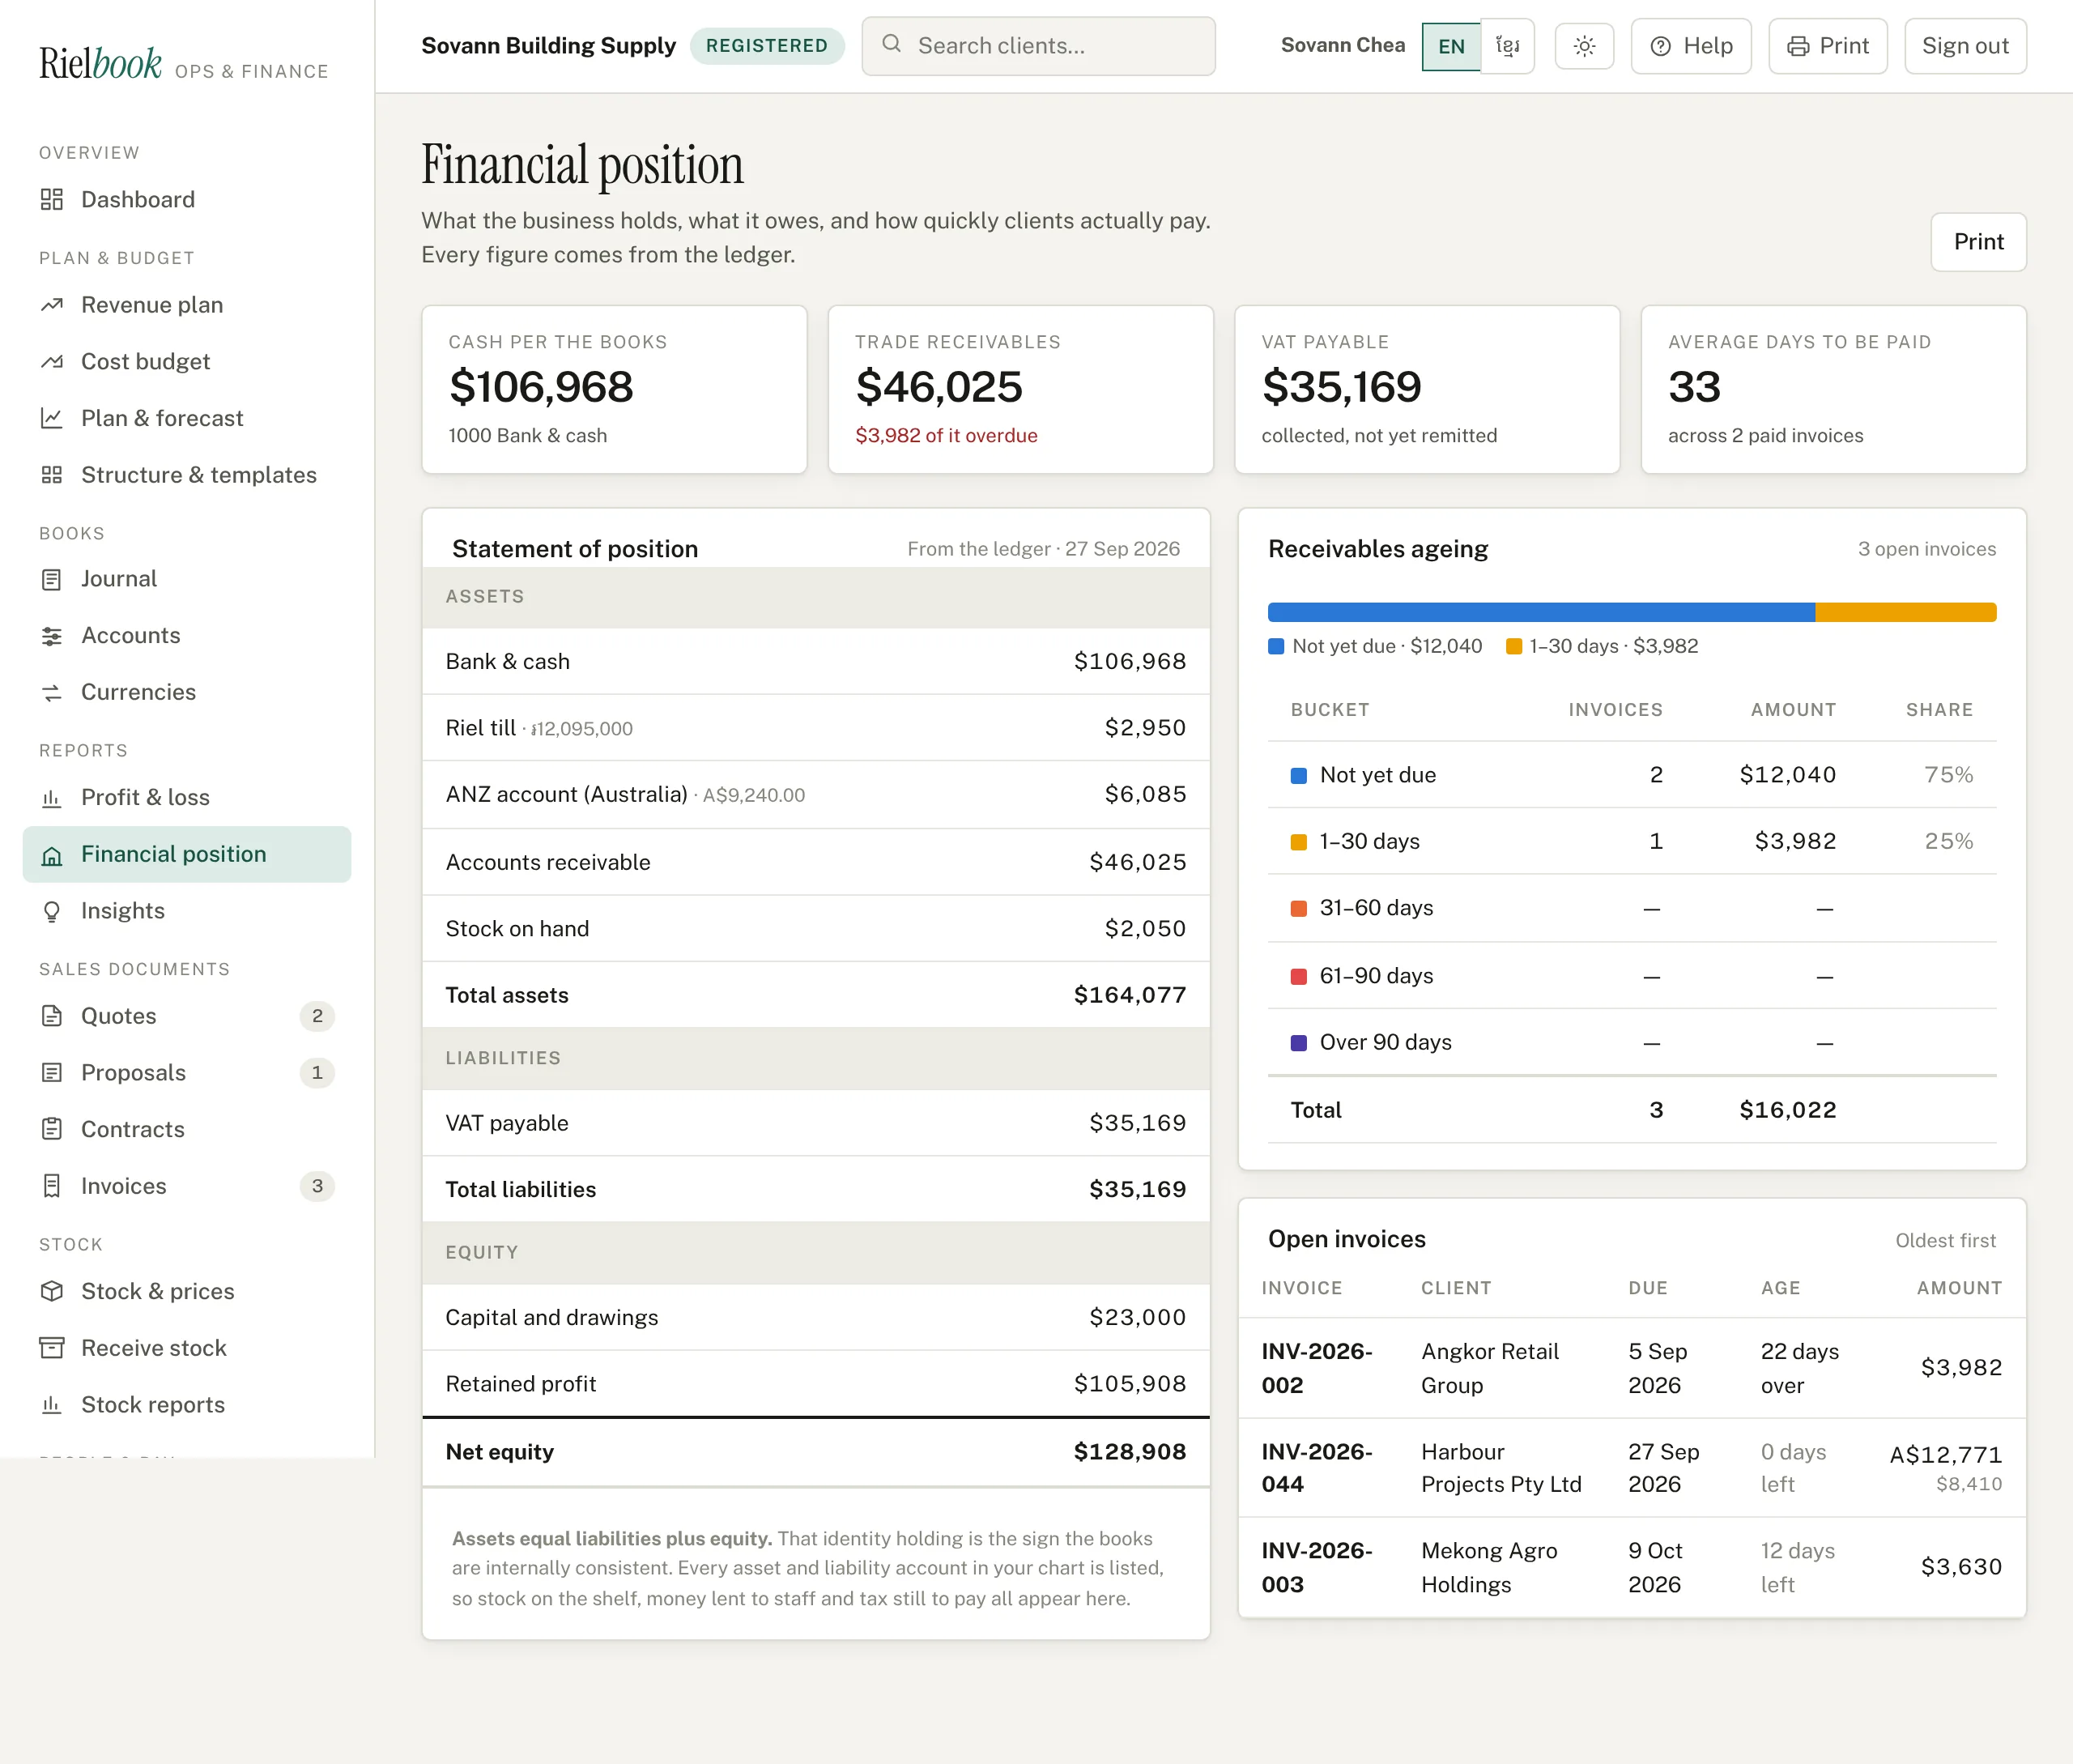
Everything that gets added up. Your profit & loss, your financial position, the receivables ageing, the dashboard and the approval limit are all in your book currency, because adding Australian dollars to US dollars produces a number that is not true in either. What the statement adds is a note beside each account that holds a currency, saying what is actually in it.
If something looks wrong
- "1050 ANZ account holds Australian dollars, so an entry that touches it has to be recorded in Australian dollars too." An account set aside for one currency has to be told how much of that currency moved — $600 landing in an Australian account is not "A$911 because that is today's rate". Choose that currency at the top of the entry, or use an account kept in your book currency.
- An account Rielbook posts to cannot be tied to one currency. Receivables take invoices in every currency you bill in, and the general bank account takes every payment; tying either to one would make its balance a mixture pretending to be one thing. Open a separate account for the money you hold.
- "Set what one … is worth before you use it." The currency has no rate for that month or any month near it. Put one in on Books›Currencies.
- The currency box is not on the invoice or the entry. Either your plan does not include this — it is on Team and up — or no currency has been added yet.
- "There are 3 records in Cambodian riel." A currency cannot be removed while anything is recorded in it, or those figures would have no rate behind them. The rates you have already set are kept either way, so adding a currency back changes nothing about your history.
- A figure looks converted at the wrong rate. Open the entry or the document: the rate it used is on it, in writing. A rate you change on the Currencies screen applies from then on and never reaches back into something already recorded — which is the point.
Profit & loss, financial position, insights
All three read straight from the books, so they are only ever as up to date as your invoices and entries.
Profit & loss
Reports›Profit & loss
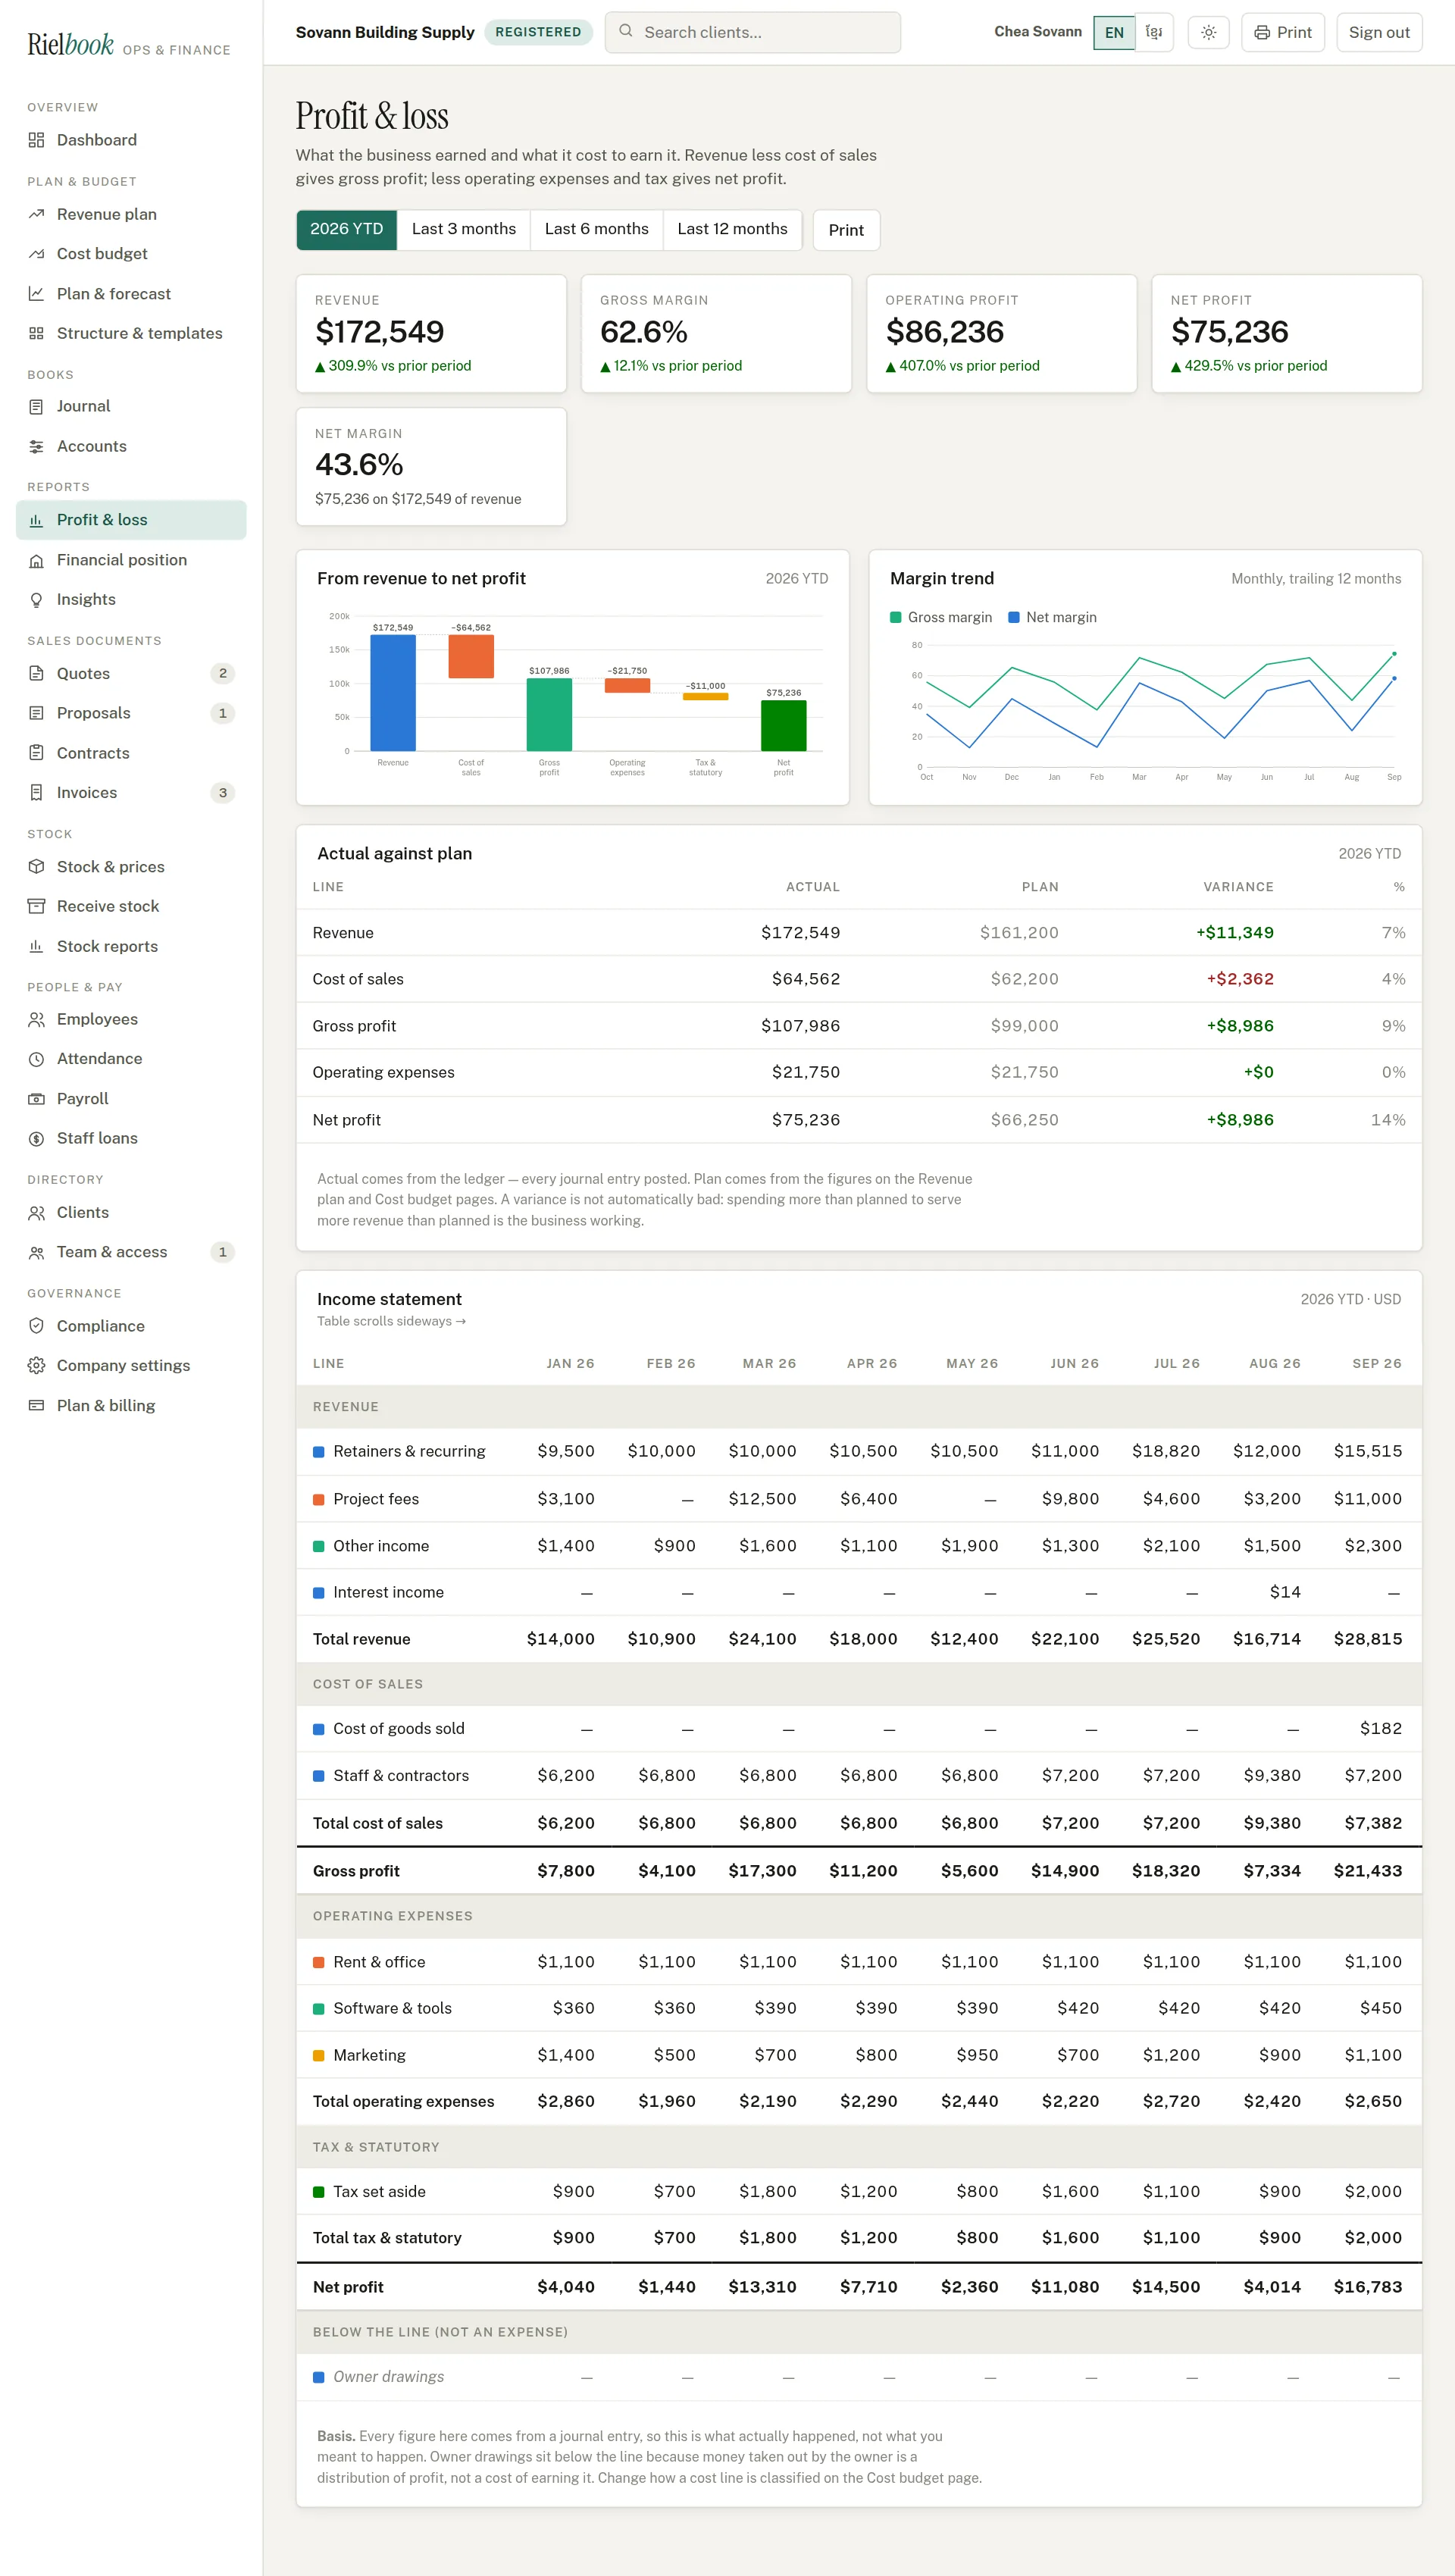
Choose the period across the top — year to date, the last 3, 6 or 12 months. You get revenue, gross margin, operating profit and net profit, each compared with the period before; a chart from revenue down to net profit; Actual against plan, which compares what happened with your revenue plan and cost budget; and the full income statement month by month.
Financial position
Reports›Financial position
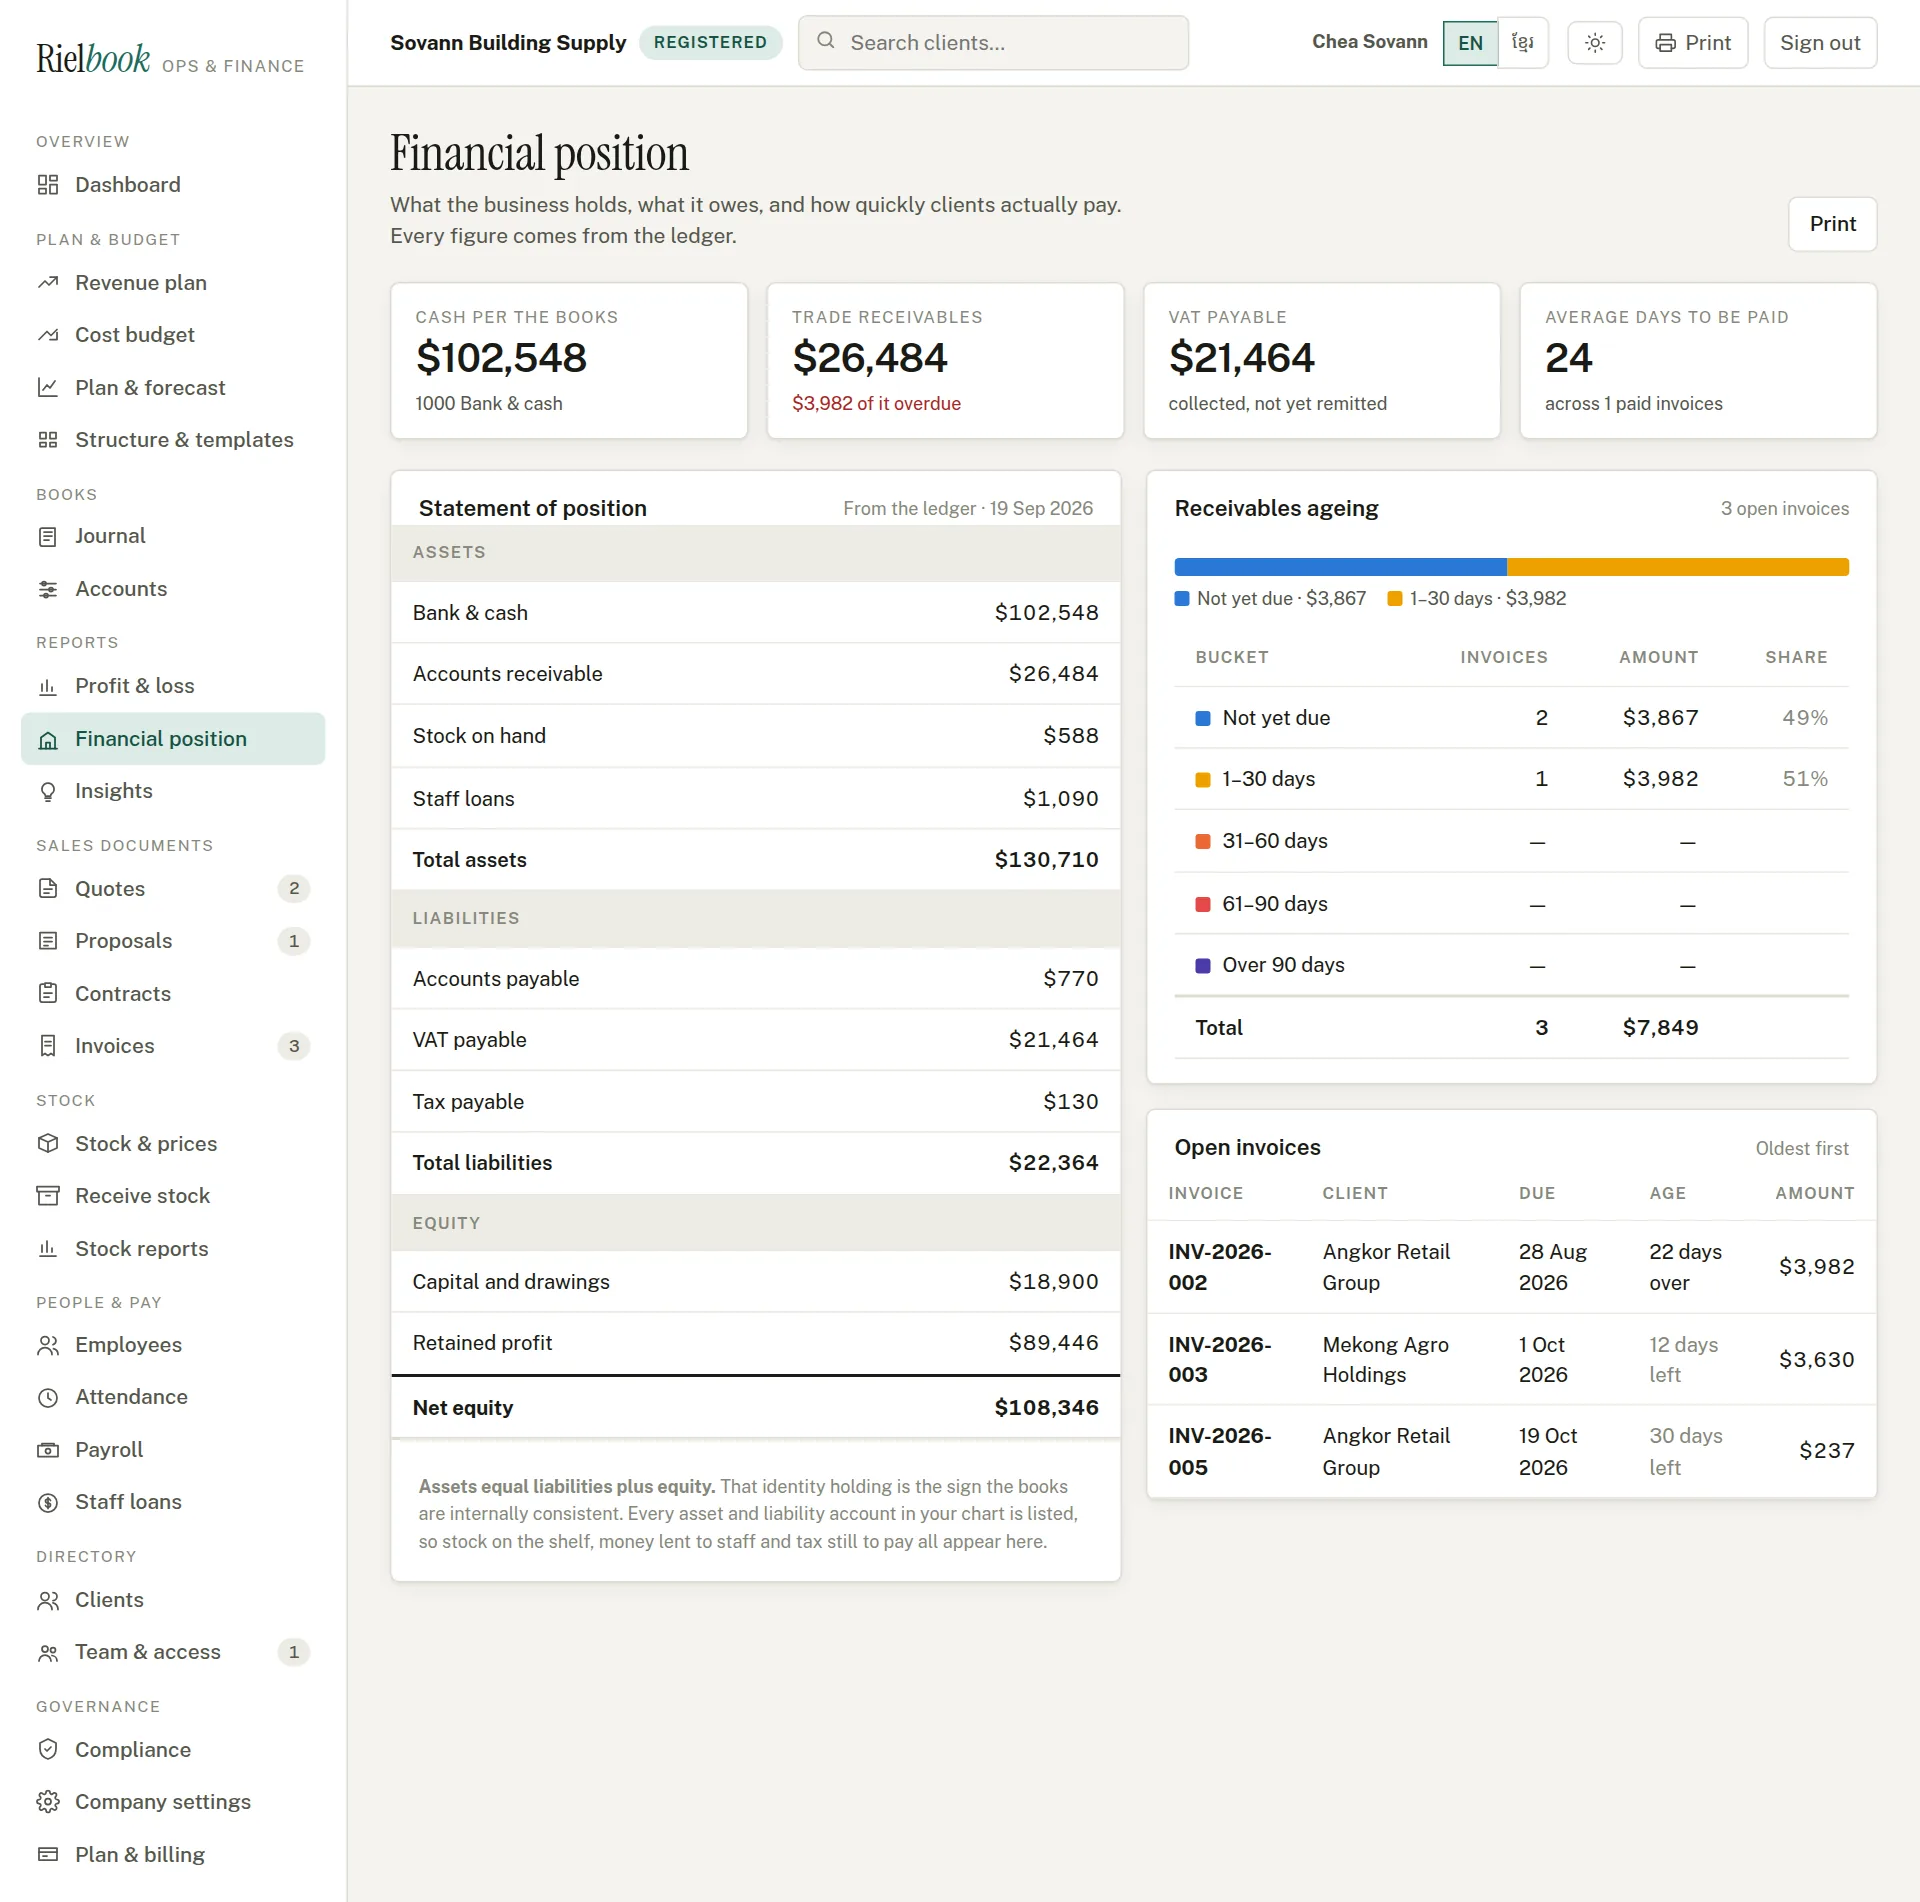
What the business holds and what it owes today: cash, what clients owe, stock on the shelf, money lent to staff; and against that, suppliers owed, VAT collected but not yet paid, tax withheld from salaries. The line underneath should read Assets equal liabilities plus equity. On the right, Receivables ageing sorts what clients owe by how late it is, and Open invoices lists them oldest first — the list to work down when chasing money.
Insights
Reports›Insights
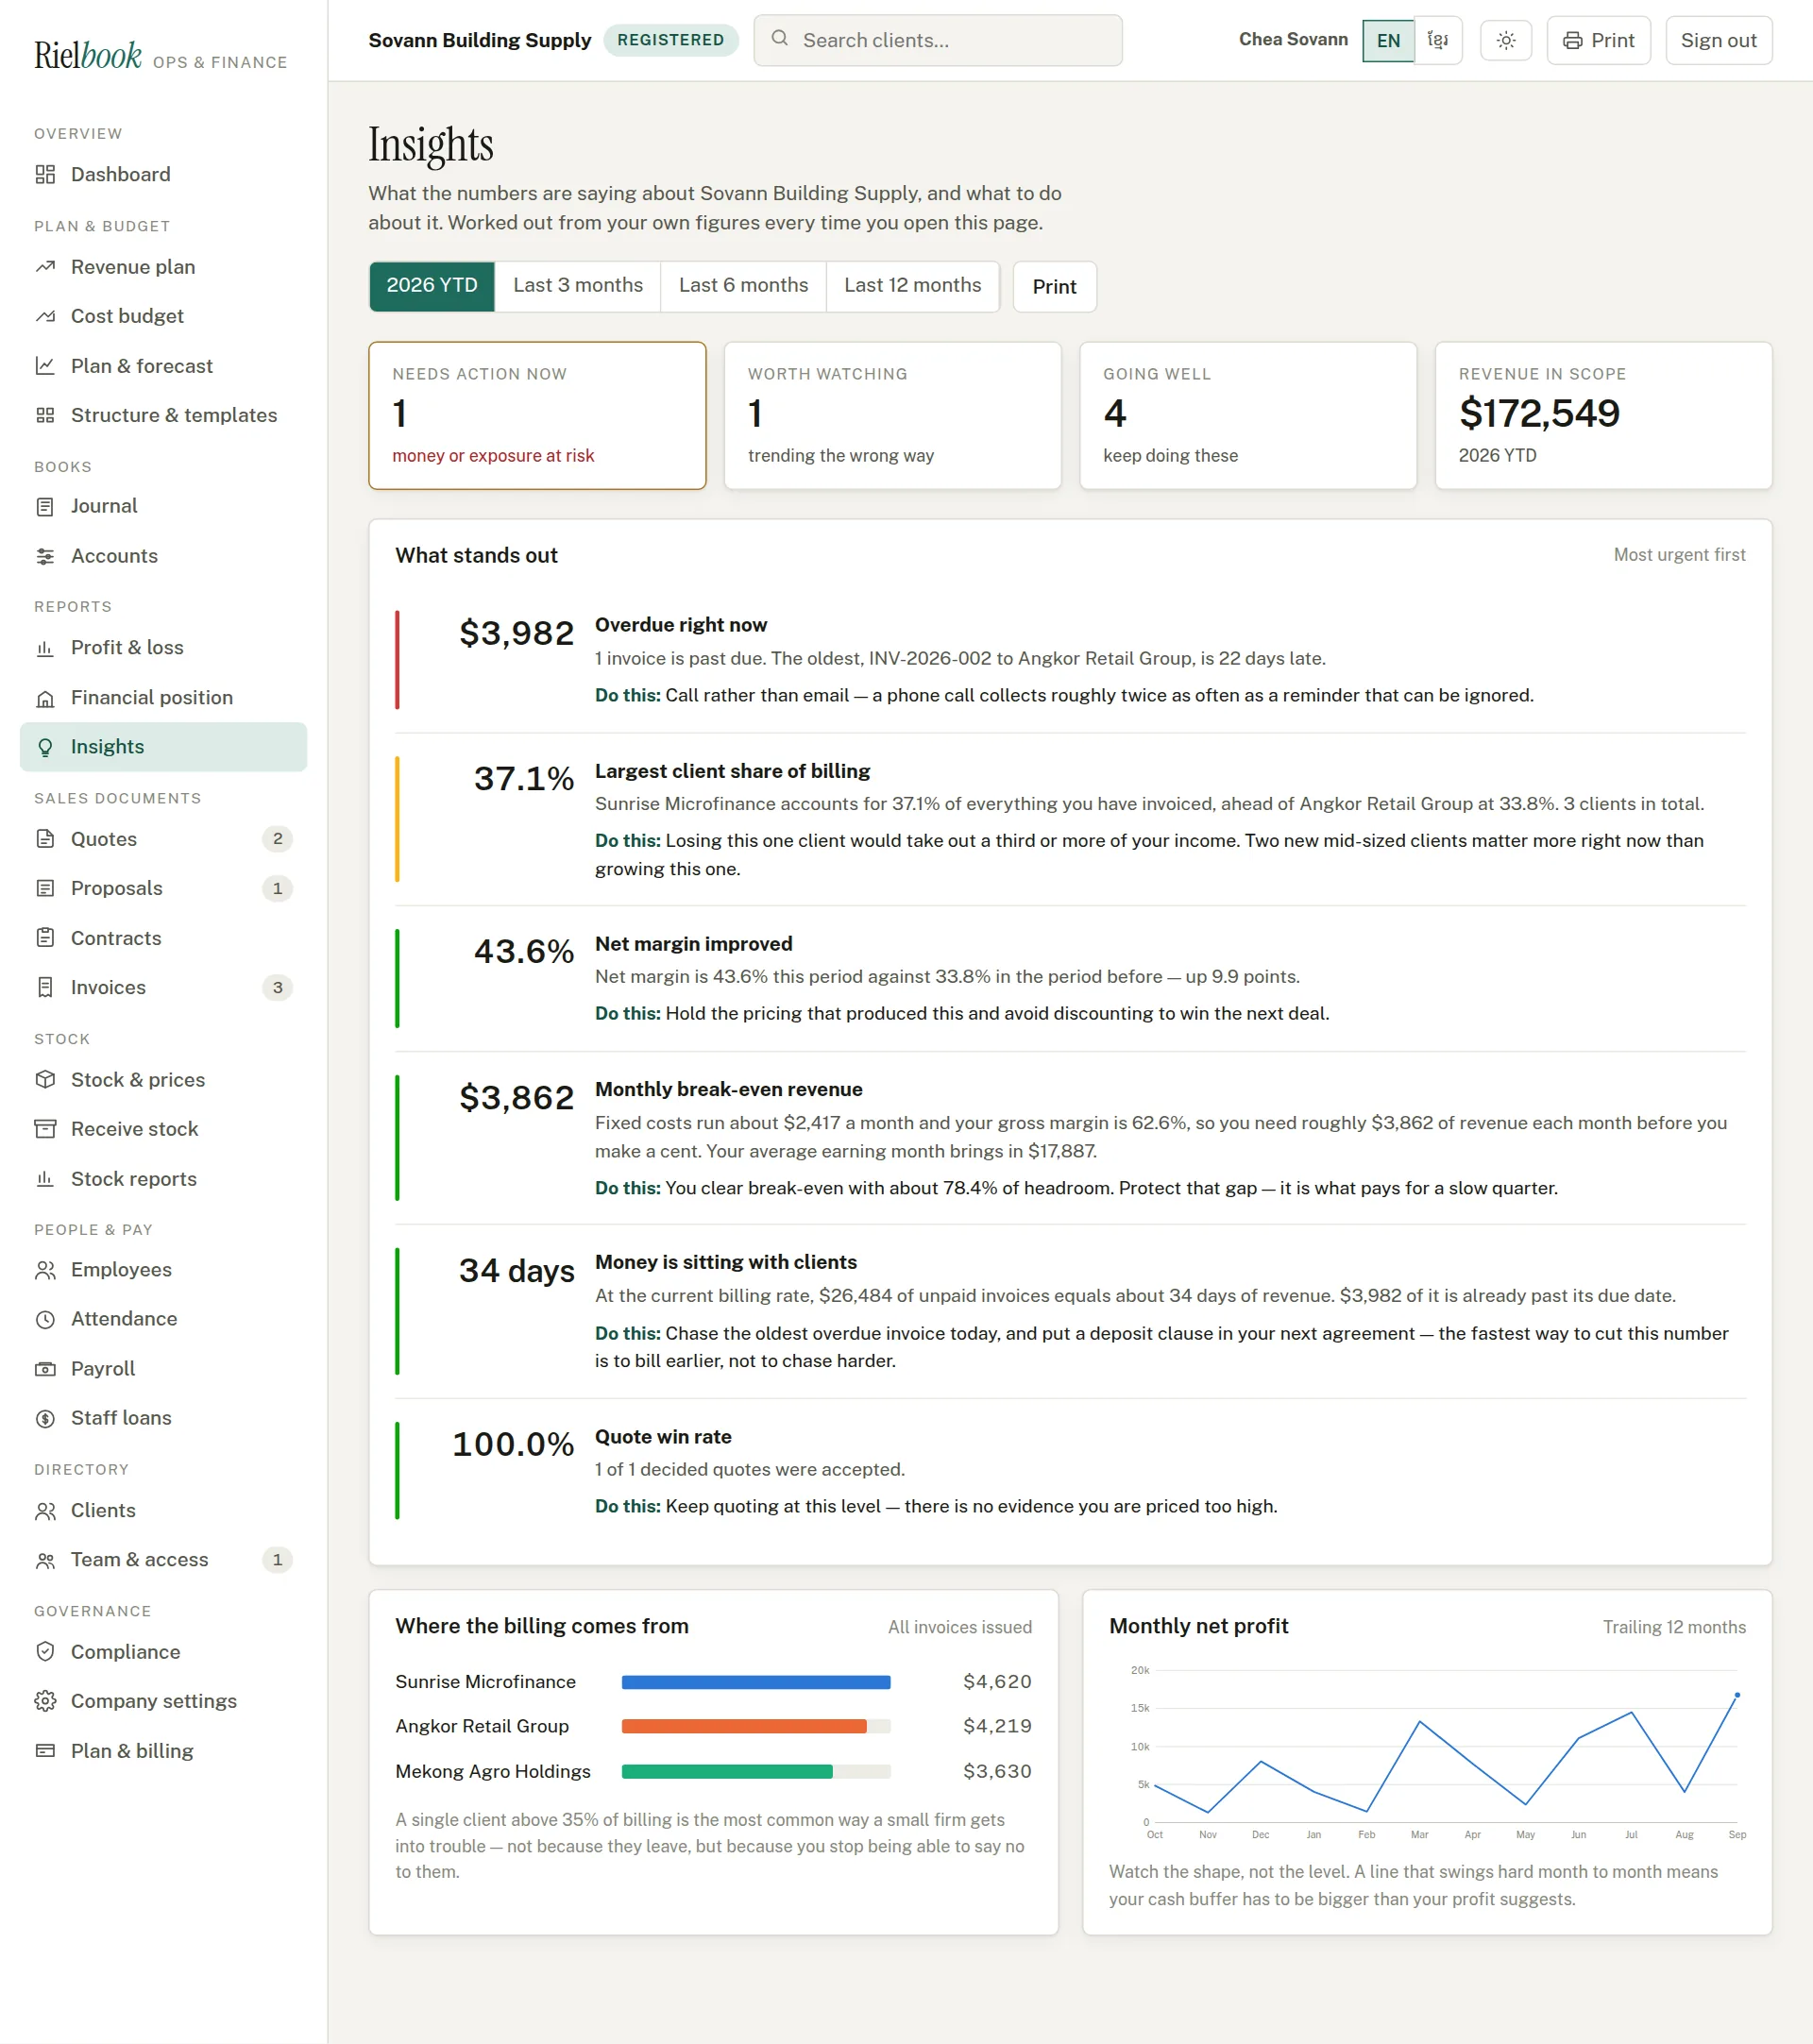
Rielbook reads your own figures and writes down what stands out — an overdue invoice, a client who has become too large a share of your billing, the revenue you need each month to break even — each with a plain Do this suggestion. It is worked out fresh every time you open it.
Planning
A plan is what you expect; the books are what happened. Rielbook keeps both, and every report can put them side by side.
Revenue plan, cost budget and forecast
Revenue plan and cost budget
Plan & budget›Revenue plan
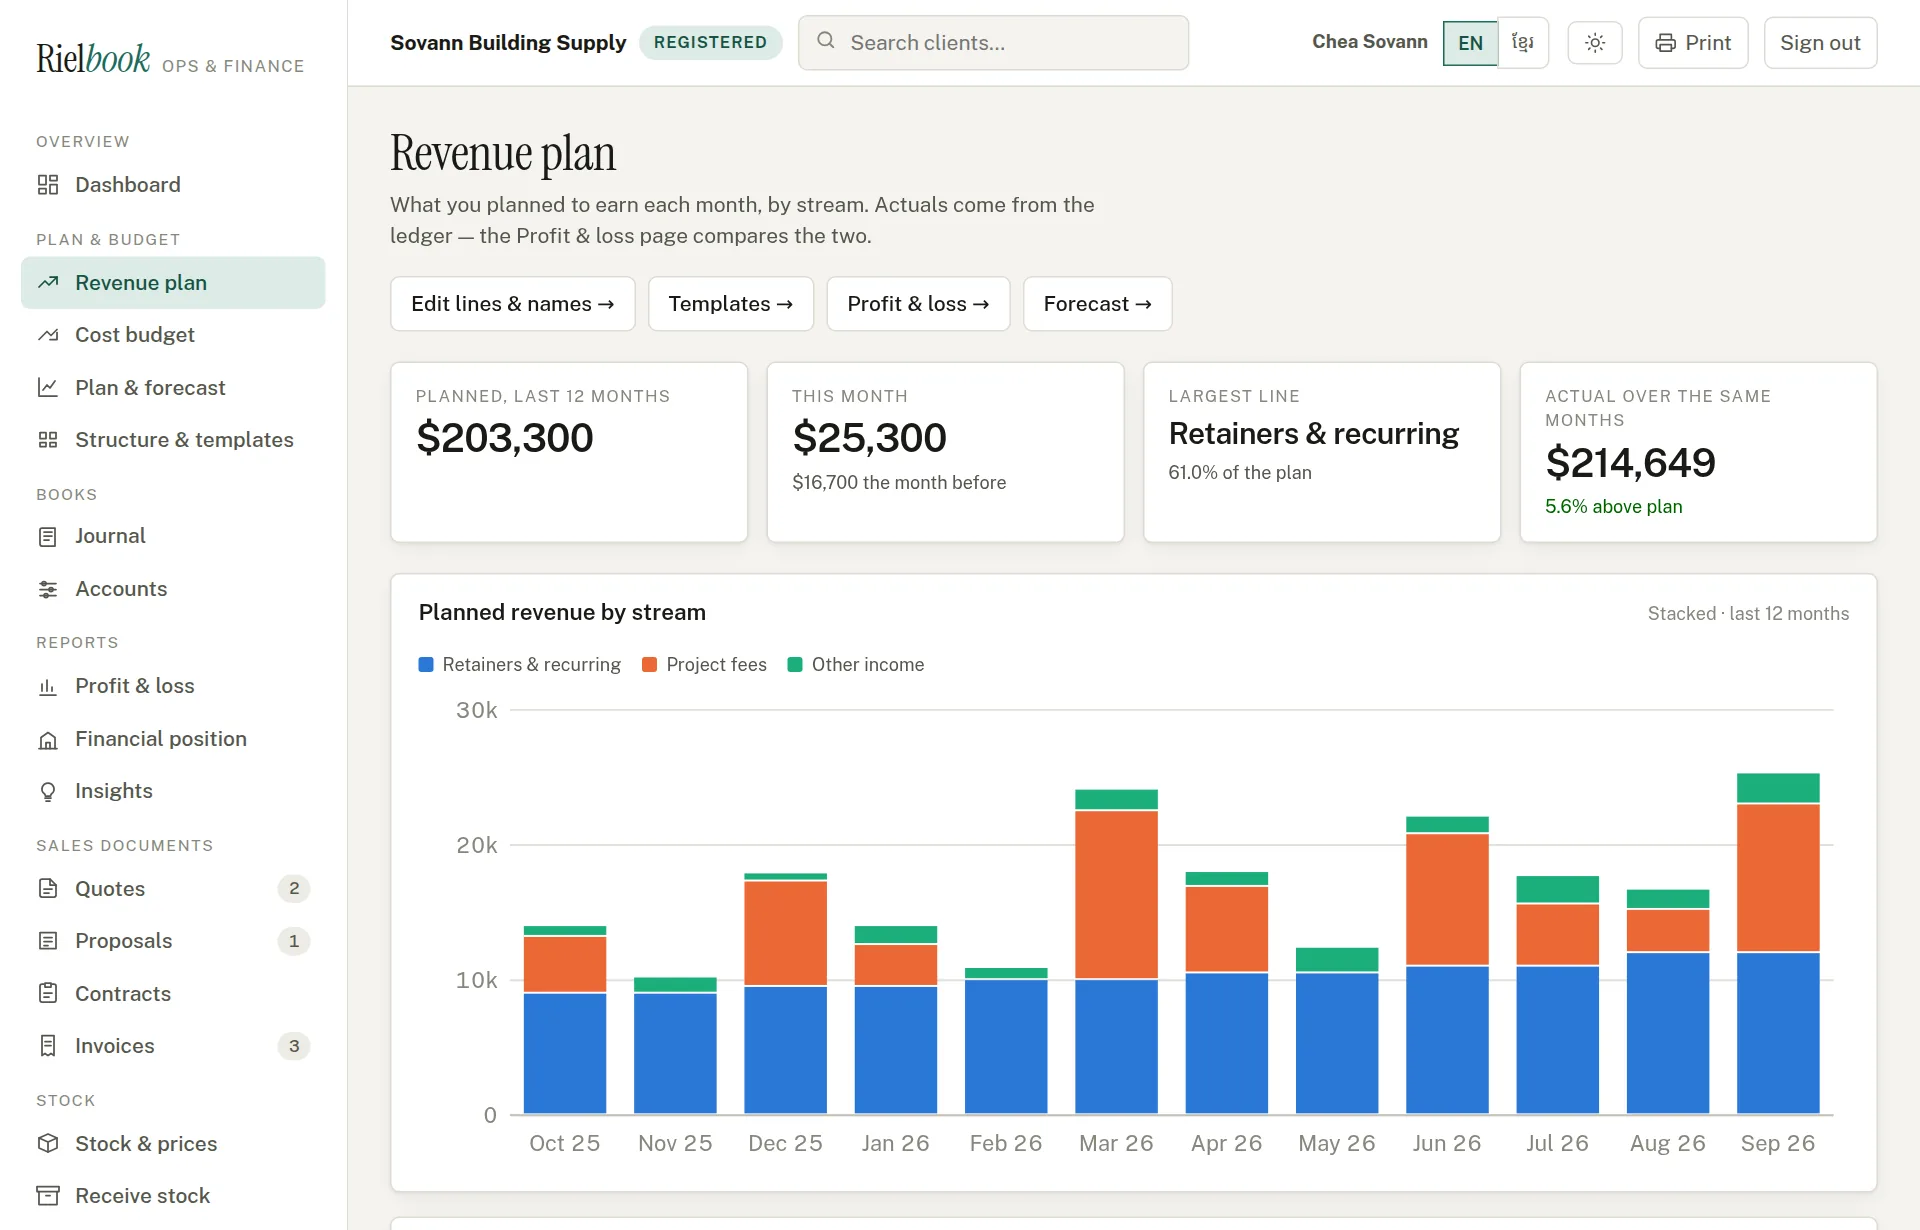
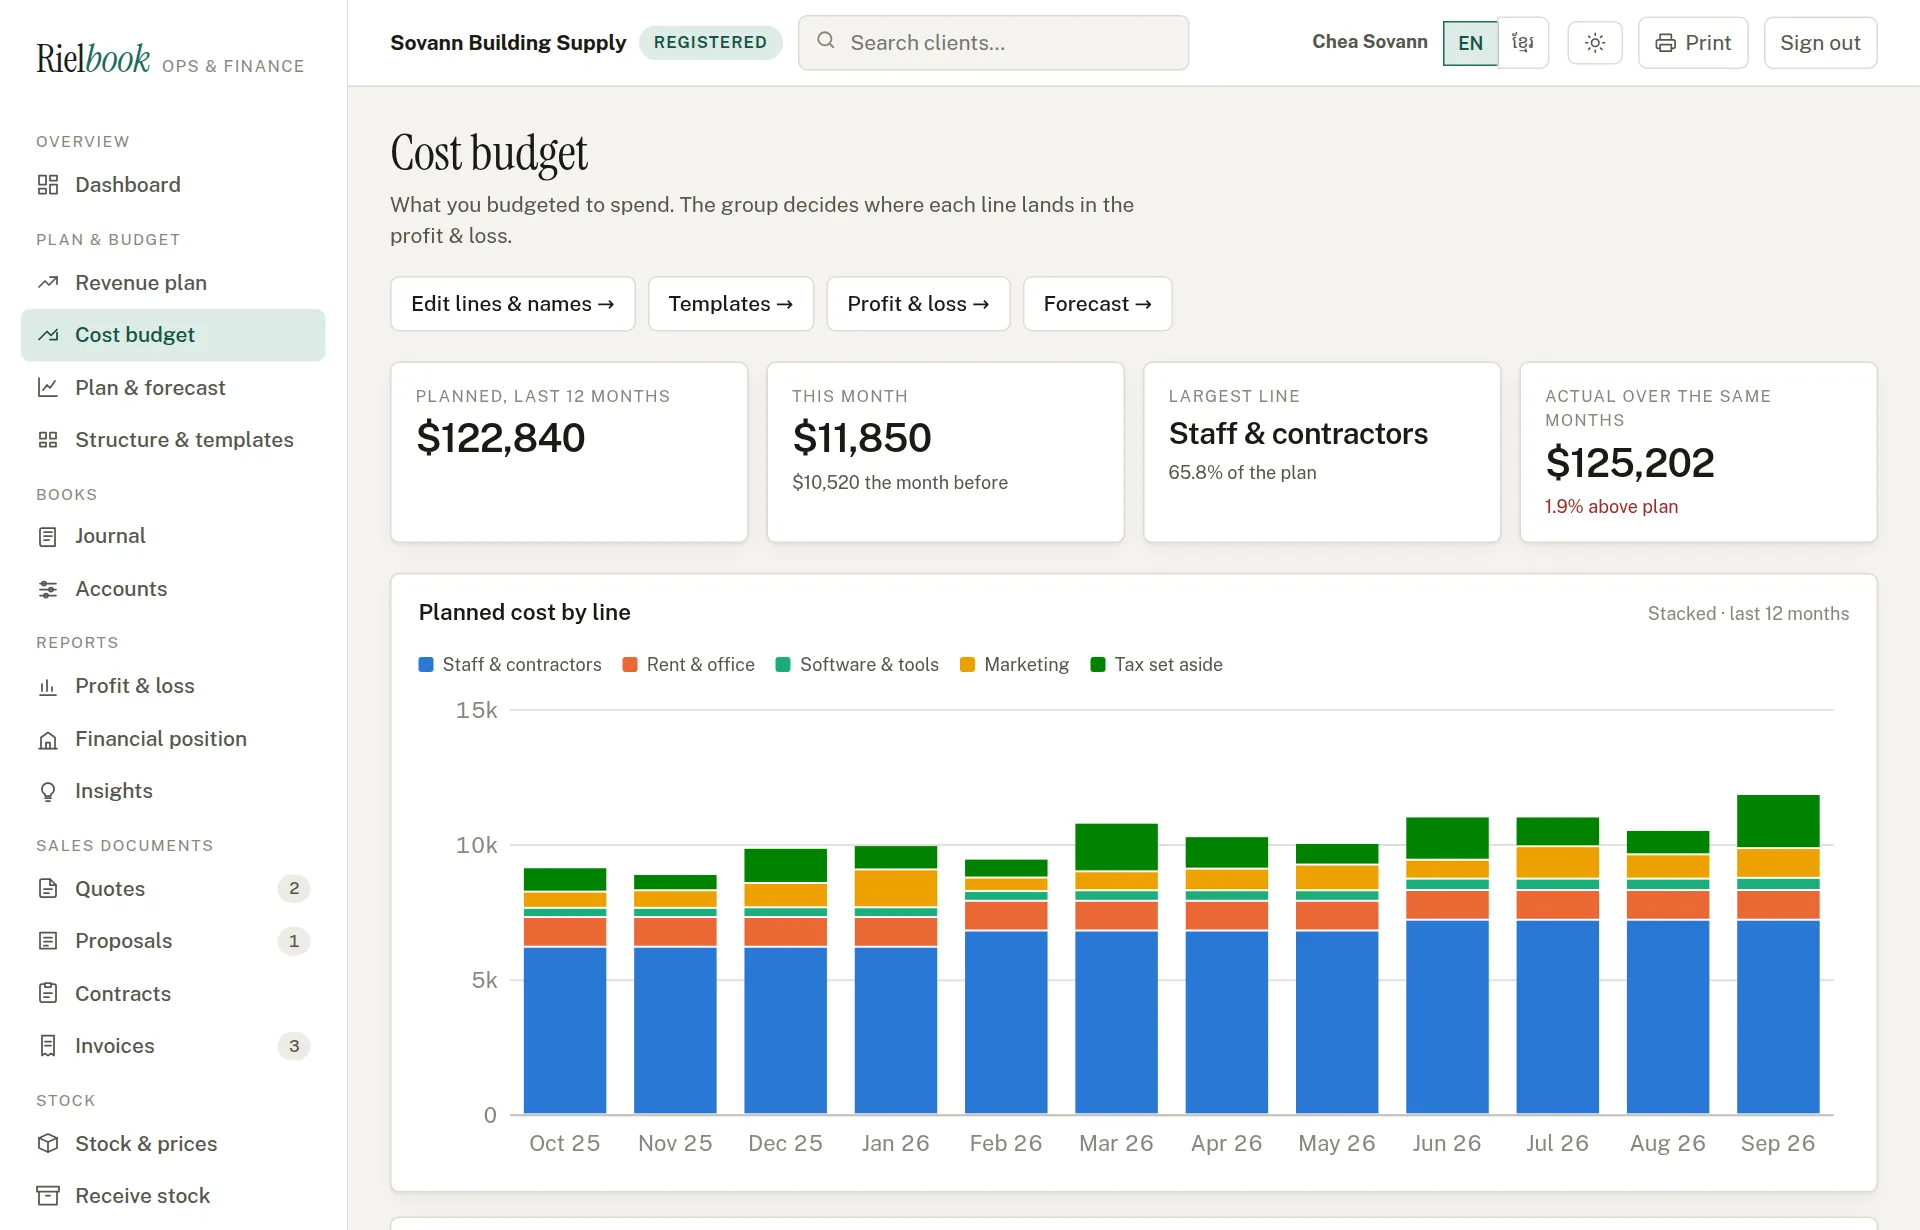
One row for each revenue stream, one column for each month. Type what you expect to earn into each box; it saves as soon as you leave the box. The Cost budget works the same way for each cost line. The tiles at the top compare the plan with what actually came in over the same months.
Plan & forecast — the next twelve months
Plan & budget›Plan & forecast
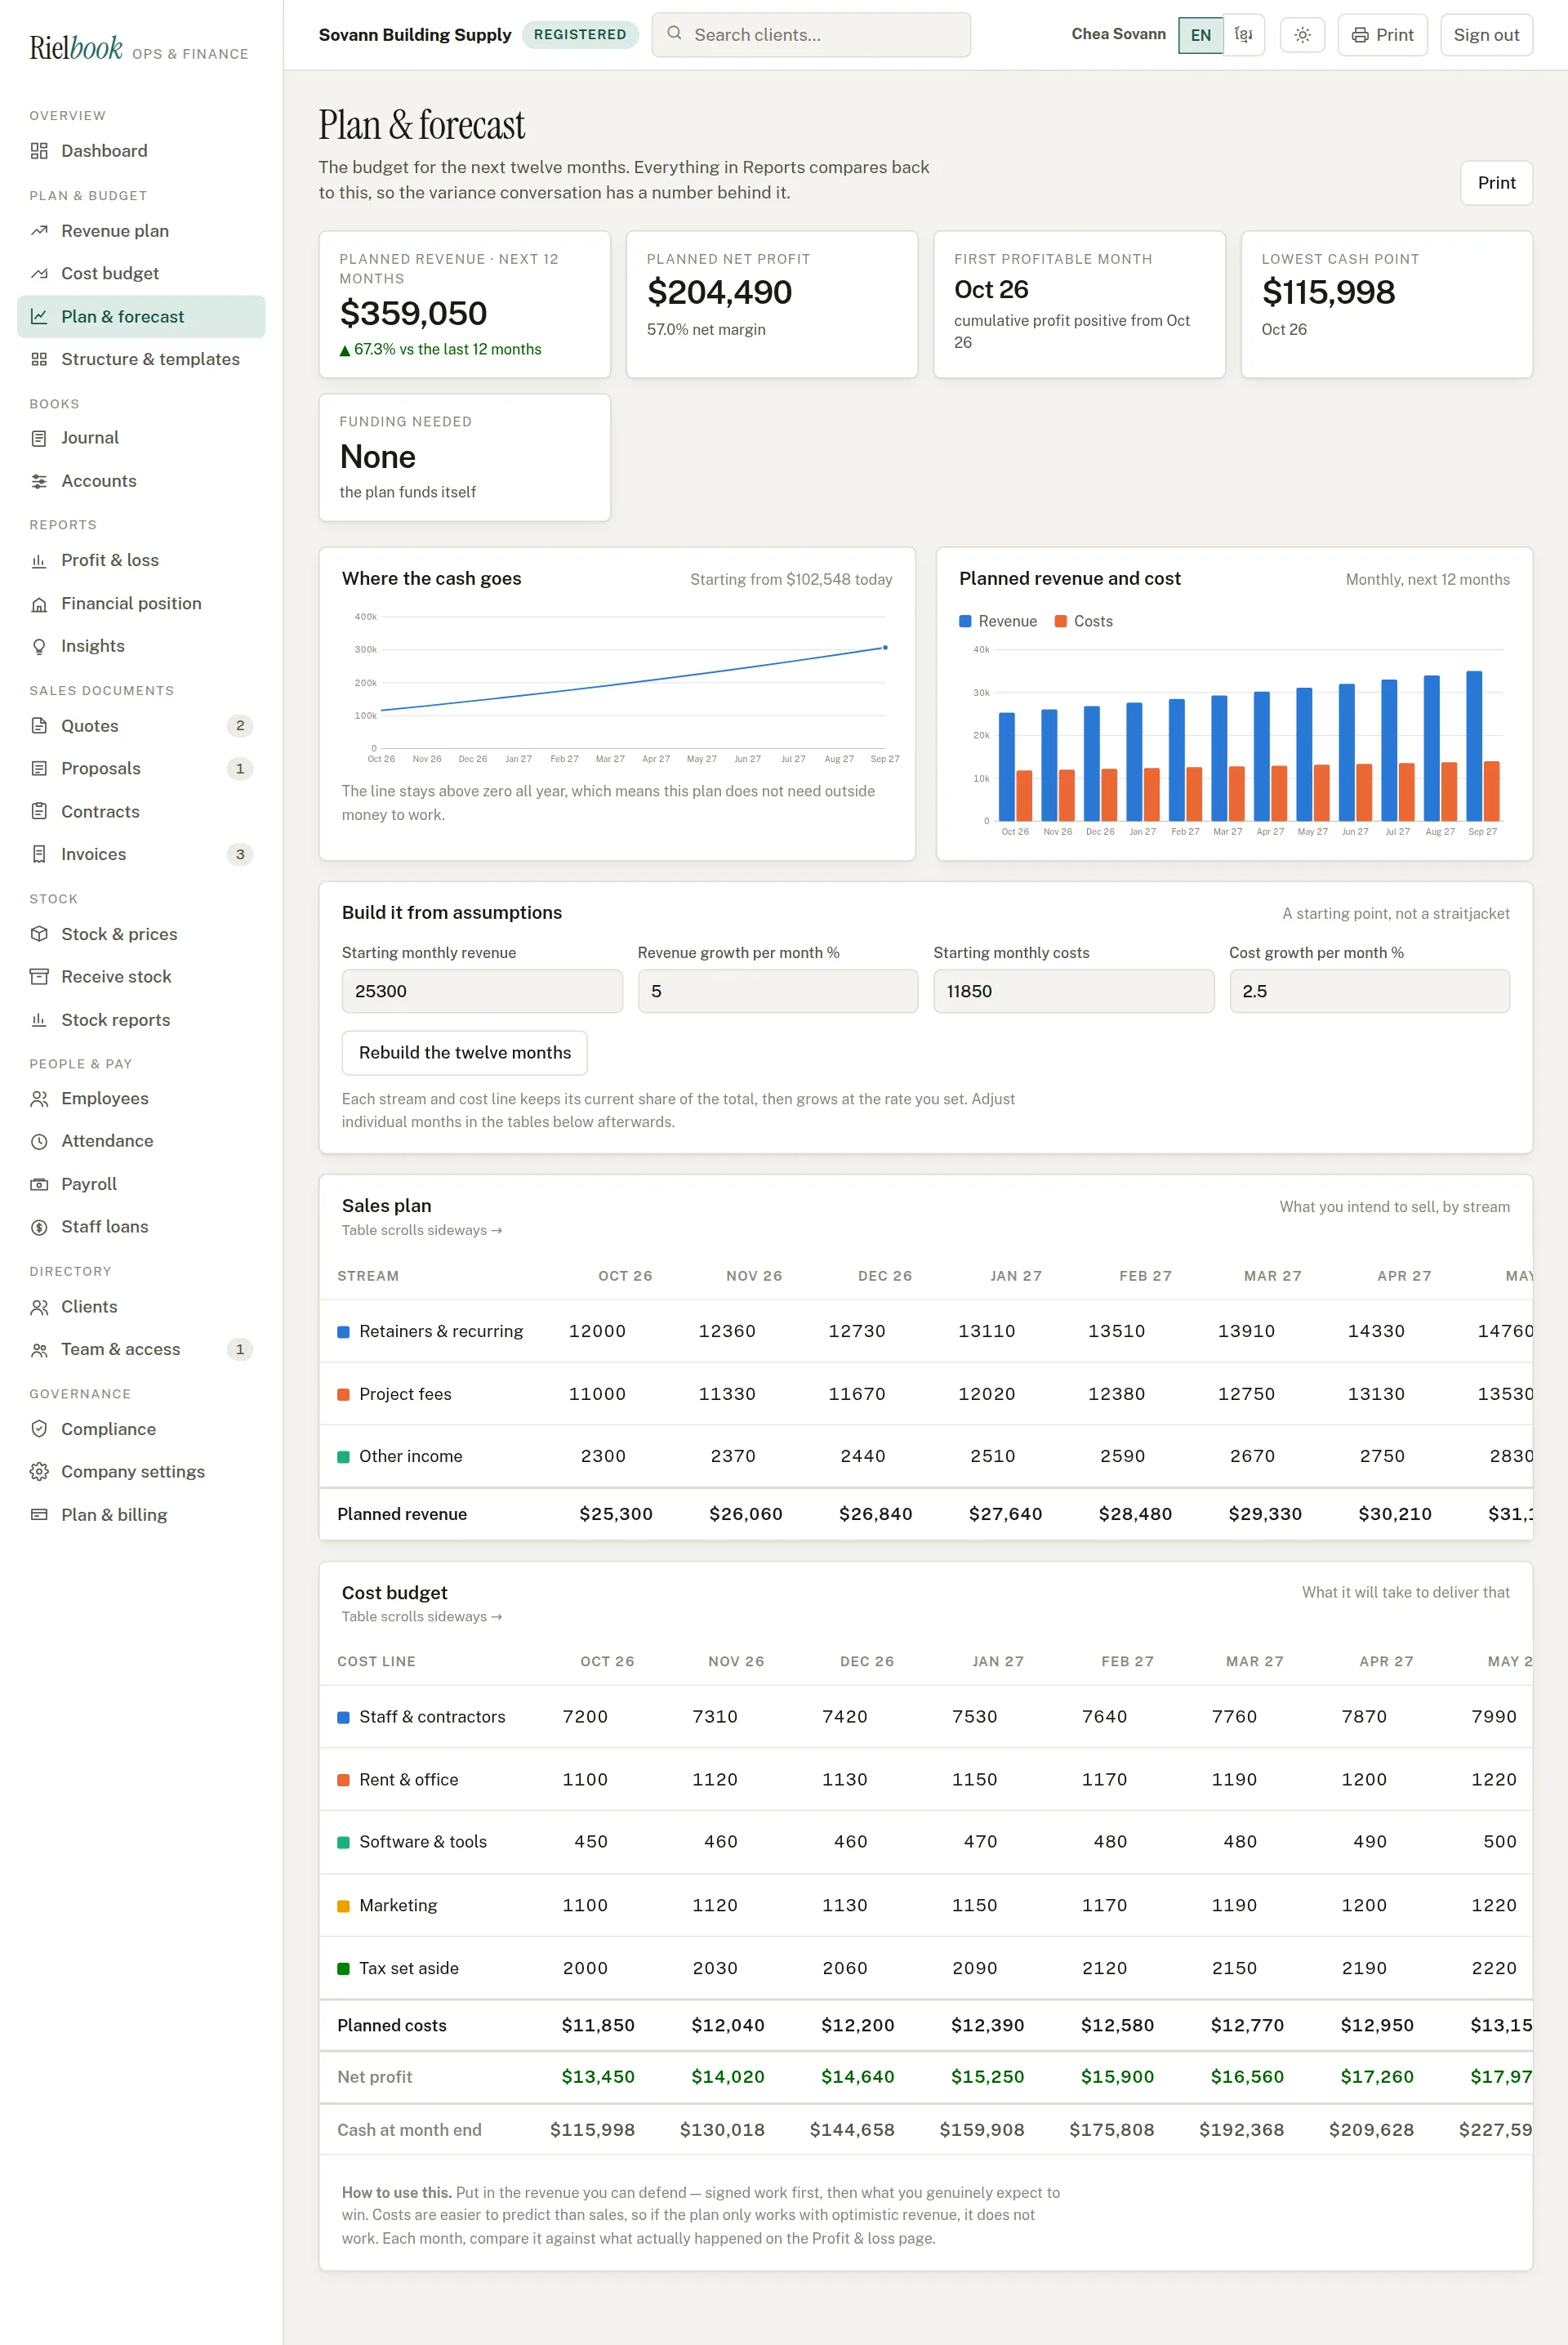
- Under Build it from assumptions, type a starting monthly revenue, how fast you expect it to grow each month, your starting monthly costs and how fast they grow.
- Press Rebuild the twelve months. Rielbook fills the sales plan and cost budget below, keeping each stream's current share.
- Adjust any single month by hand in the tables. Read the result in the tiles: planned revenue, planned net profit, the first profitable month, the lowest cash point — and whether any funding is needed to get through it.
Structure & templates
Plan & budget›Structure & templates
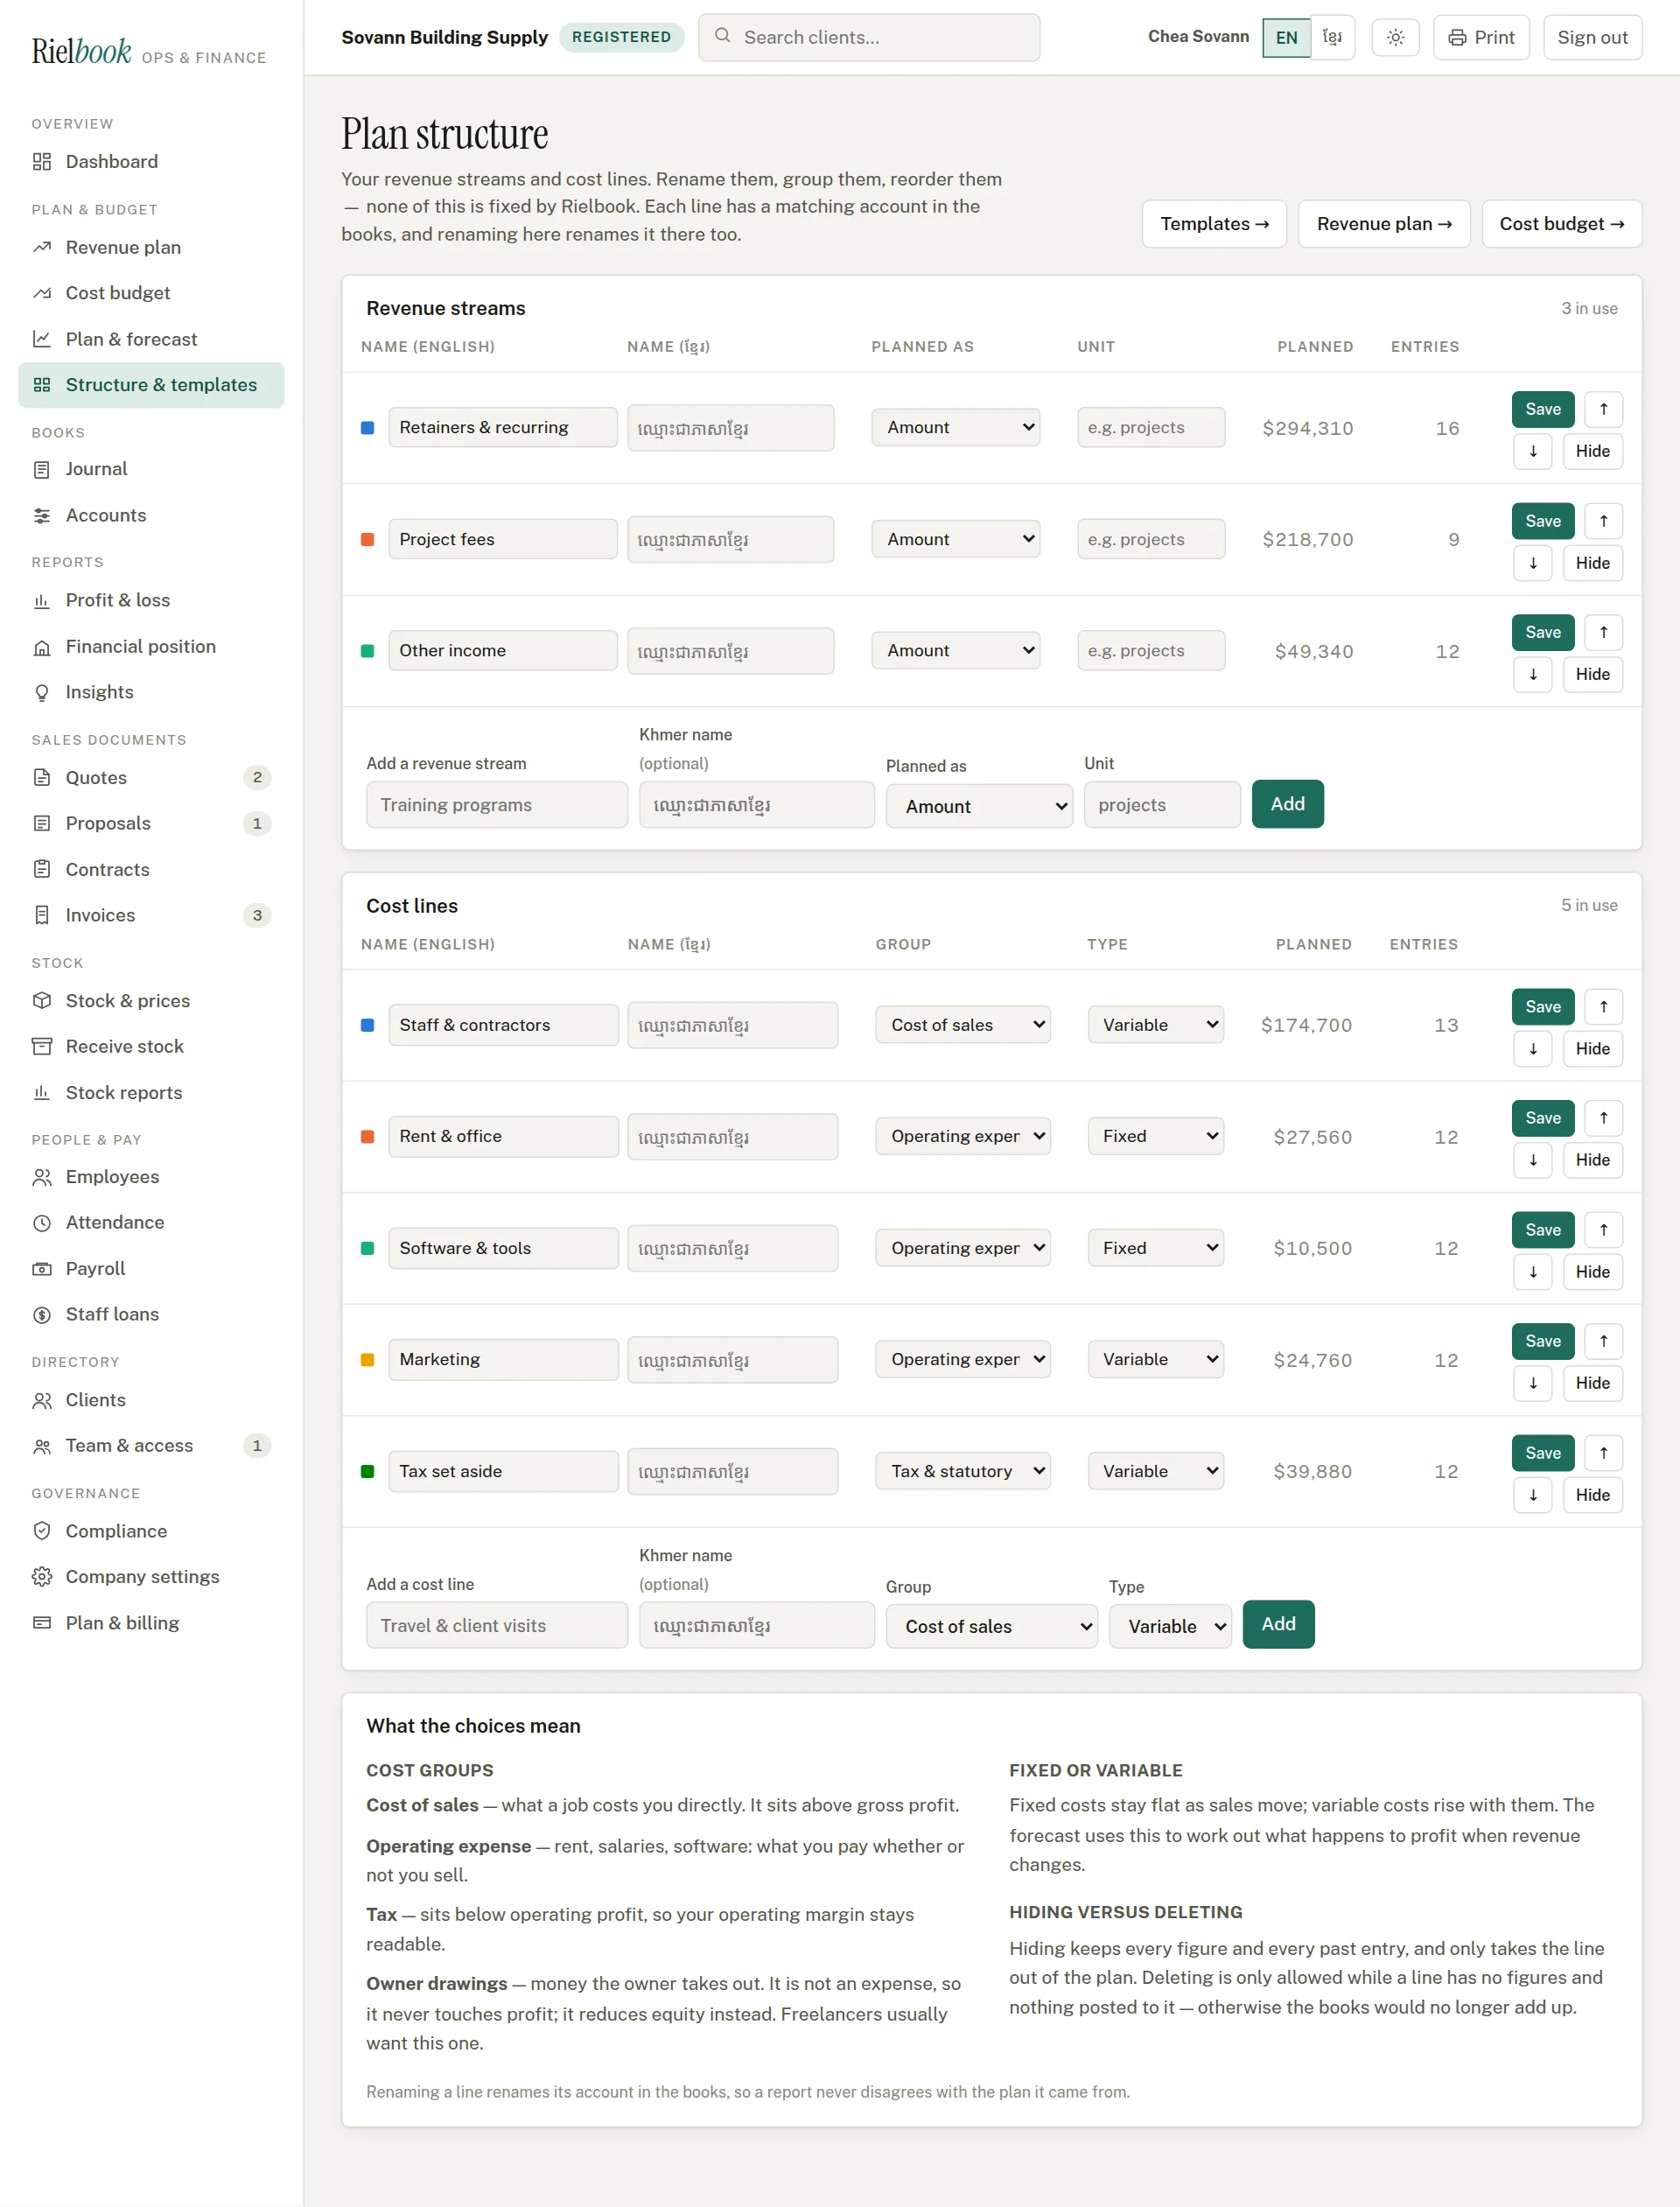
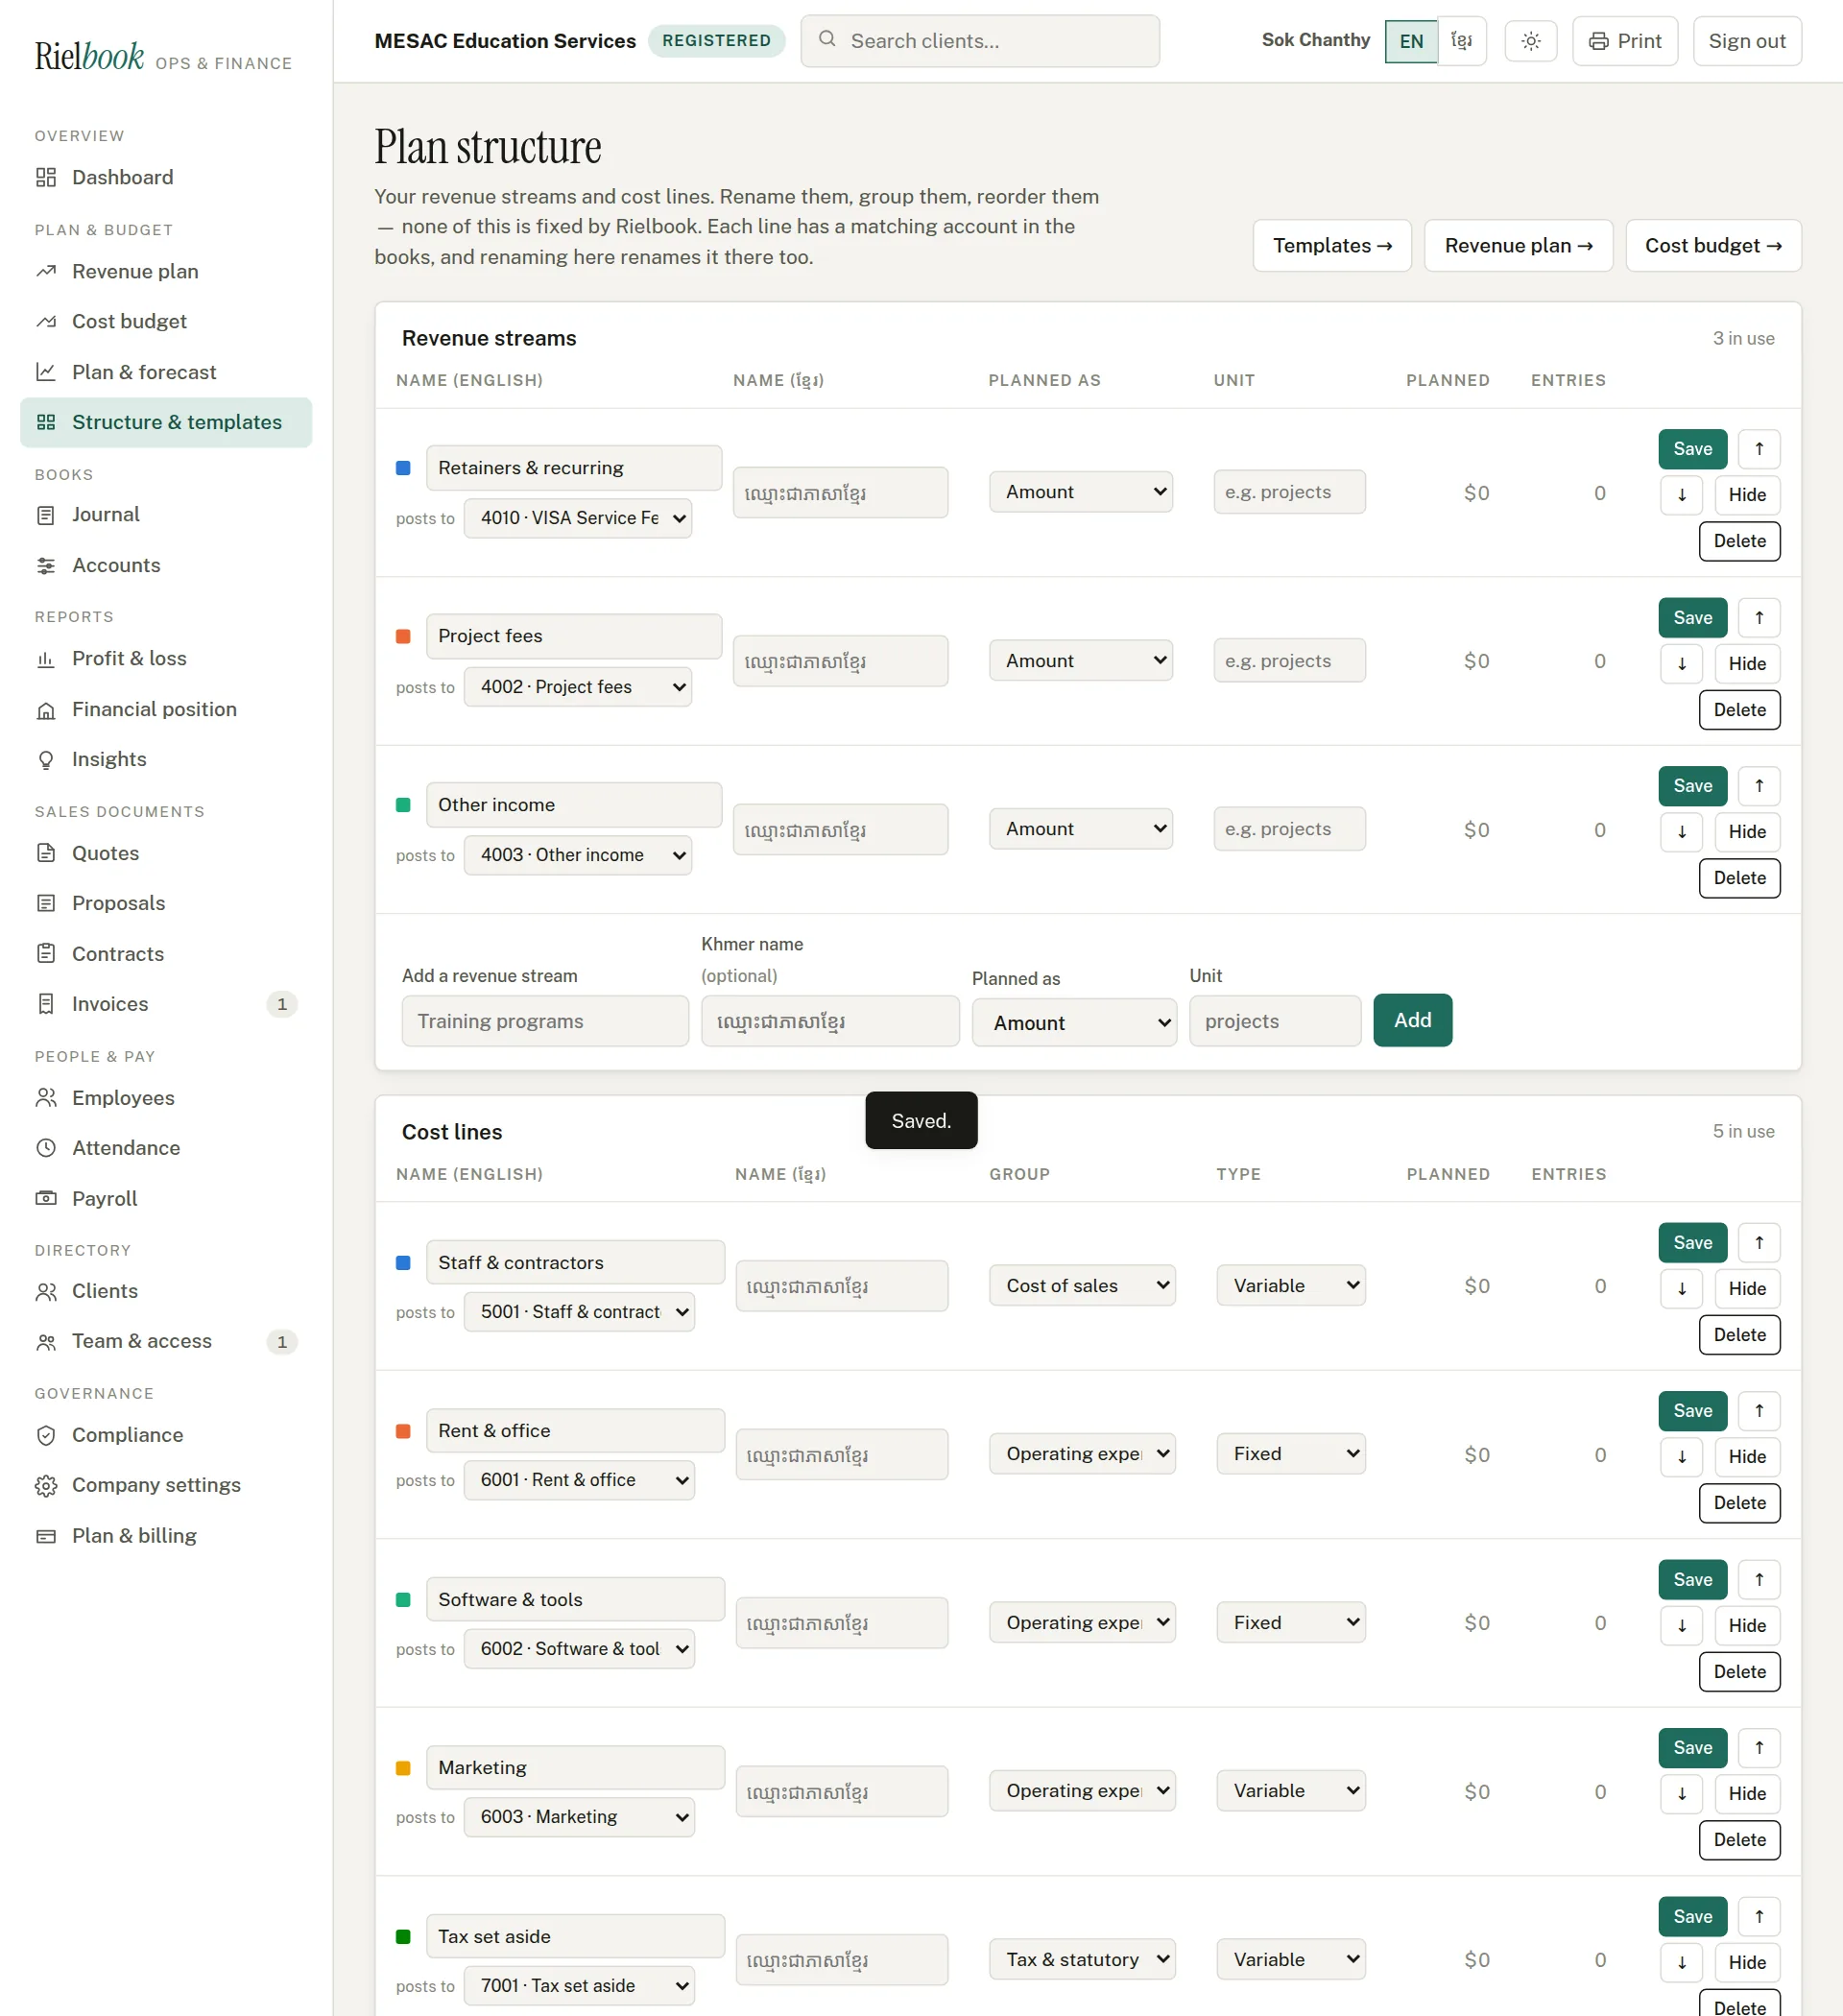
Rename your revenue streams and cost lines, give them Khmer names, reorder them with the arrows, or Hide one you no longer use — its figures and past entries are kept. If you have imported your own chart, each line also shows posts to: choose which of your own accounts that stream or cost line should land in, so an invoice reaches "Service Income" rather than an account Rielbook made up. For each cost line choose its group, which decides where it falls in the Profit & loss: cost of sales (what a job or a sale costs you directly), operating expense (rent, salaries, software), tax, or owner drawings. Renaming a line here renames its account in the books too, so a report never disagrees with the plan.
People and pay
Employees, the days they worked, the leave they took, and the monthly payroll with NSSF and salary tax — ending in a payslip for each person and one entry in the books.
Employees
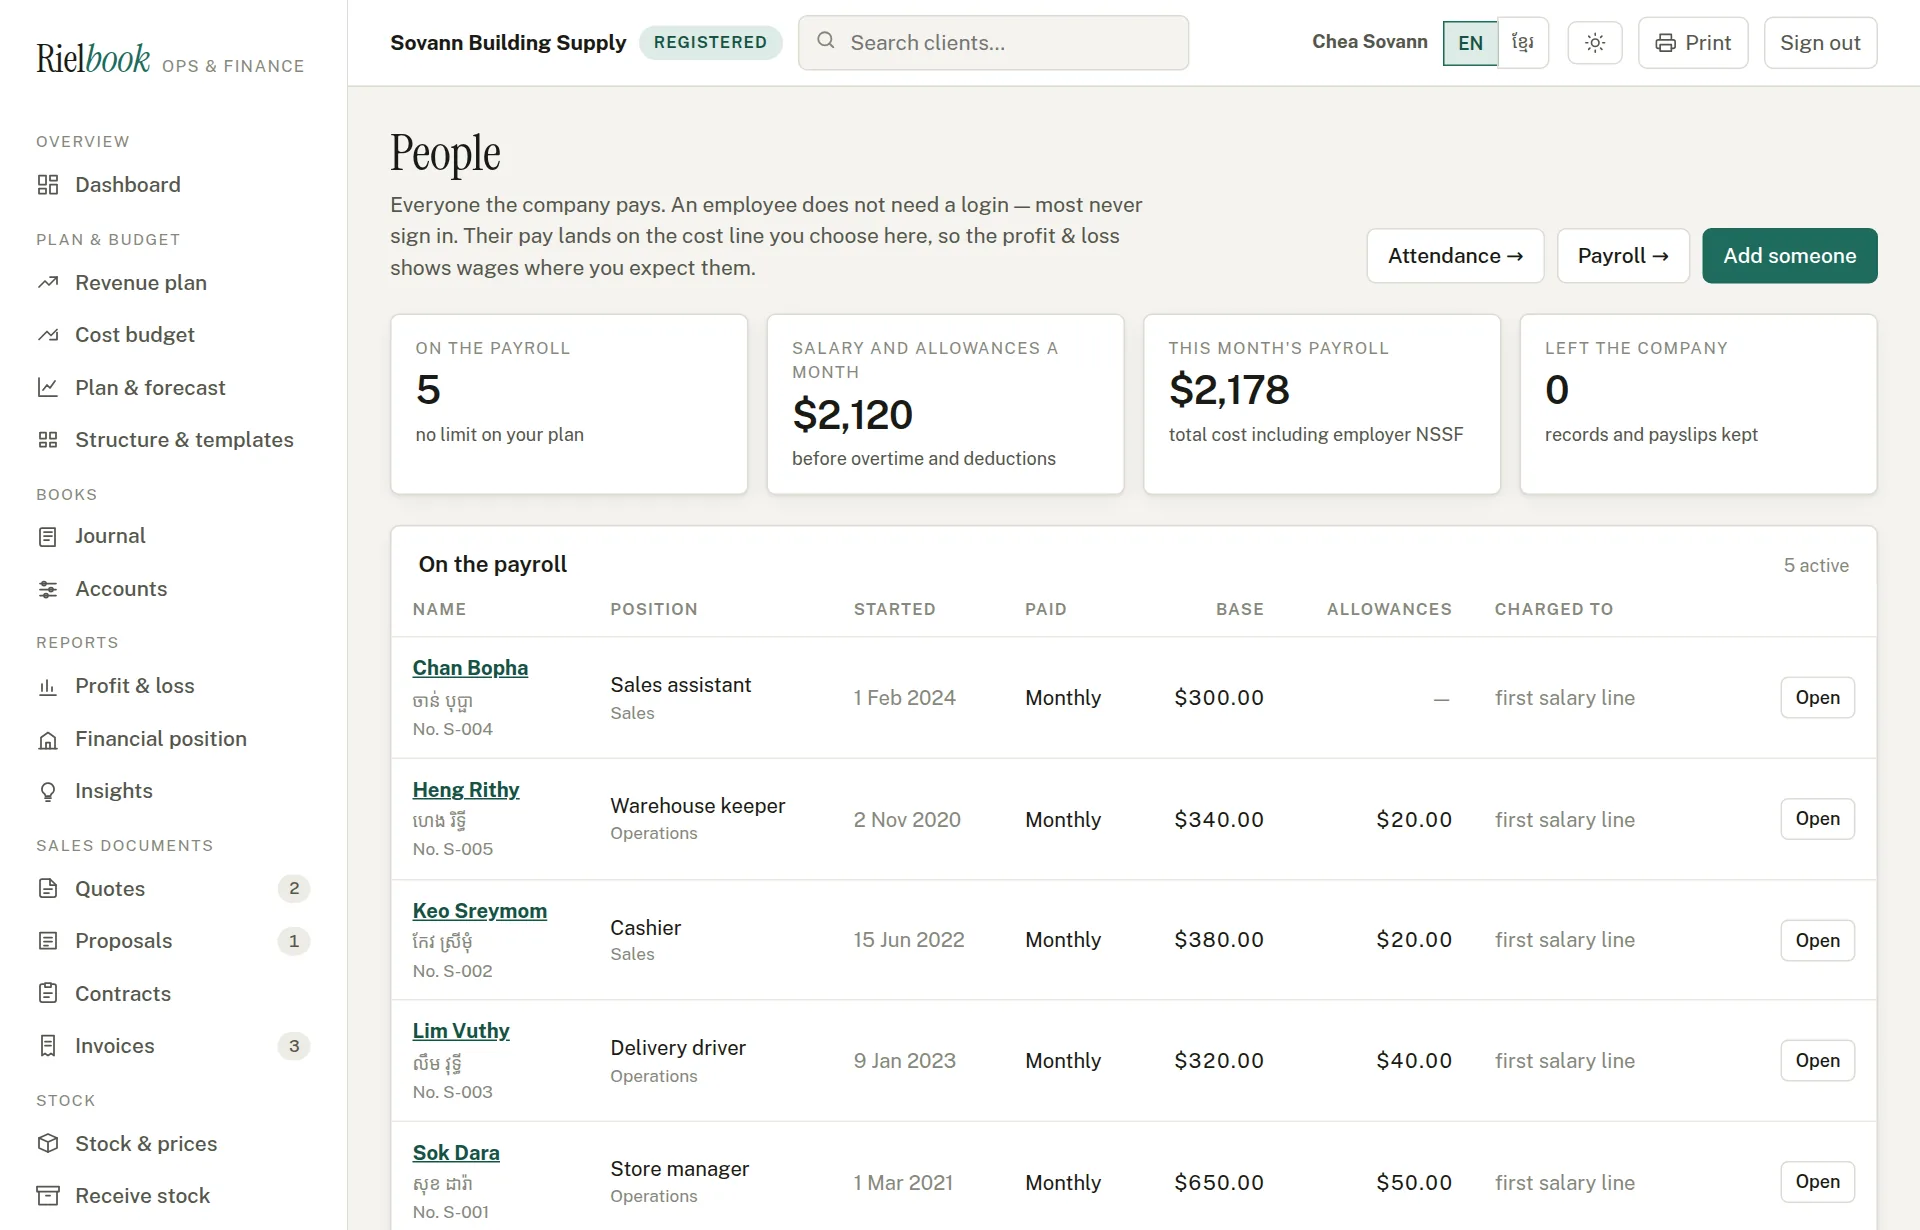
An employee is somebody the company pays. They do not need a Rielbook login — most never sign in.
People & pay›Employees
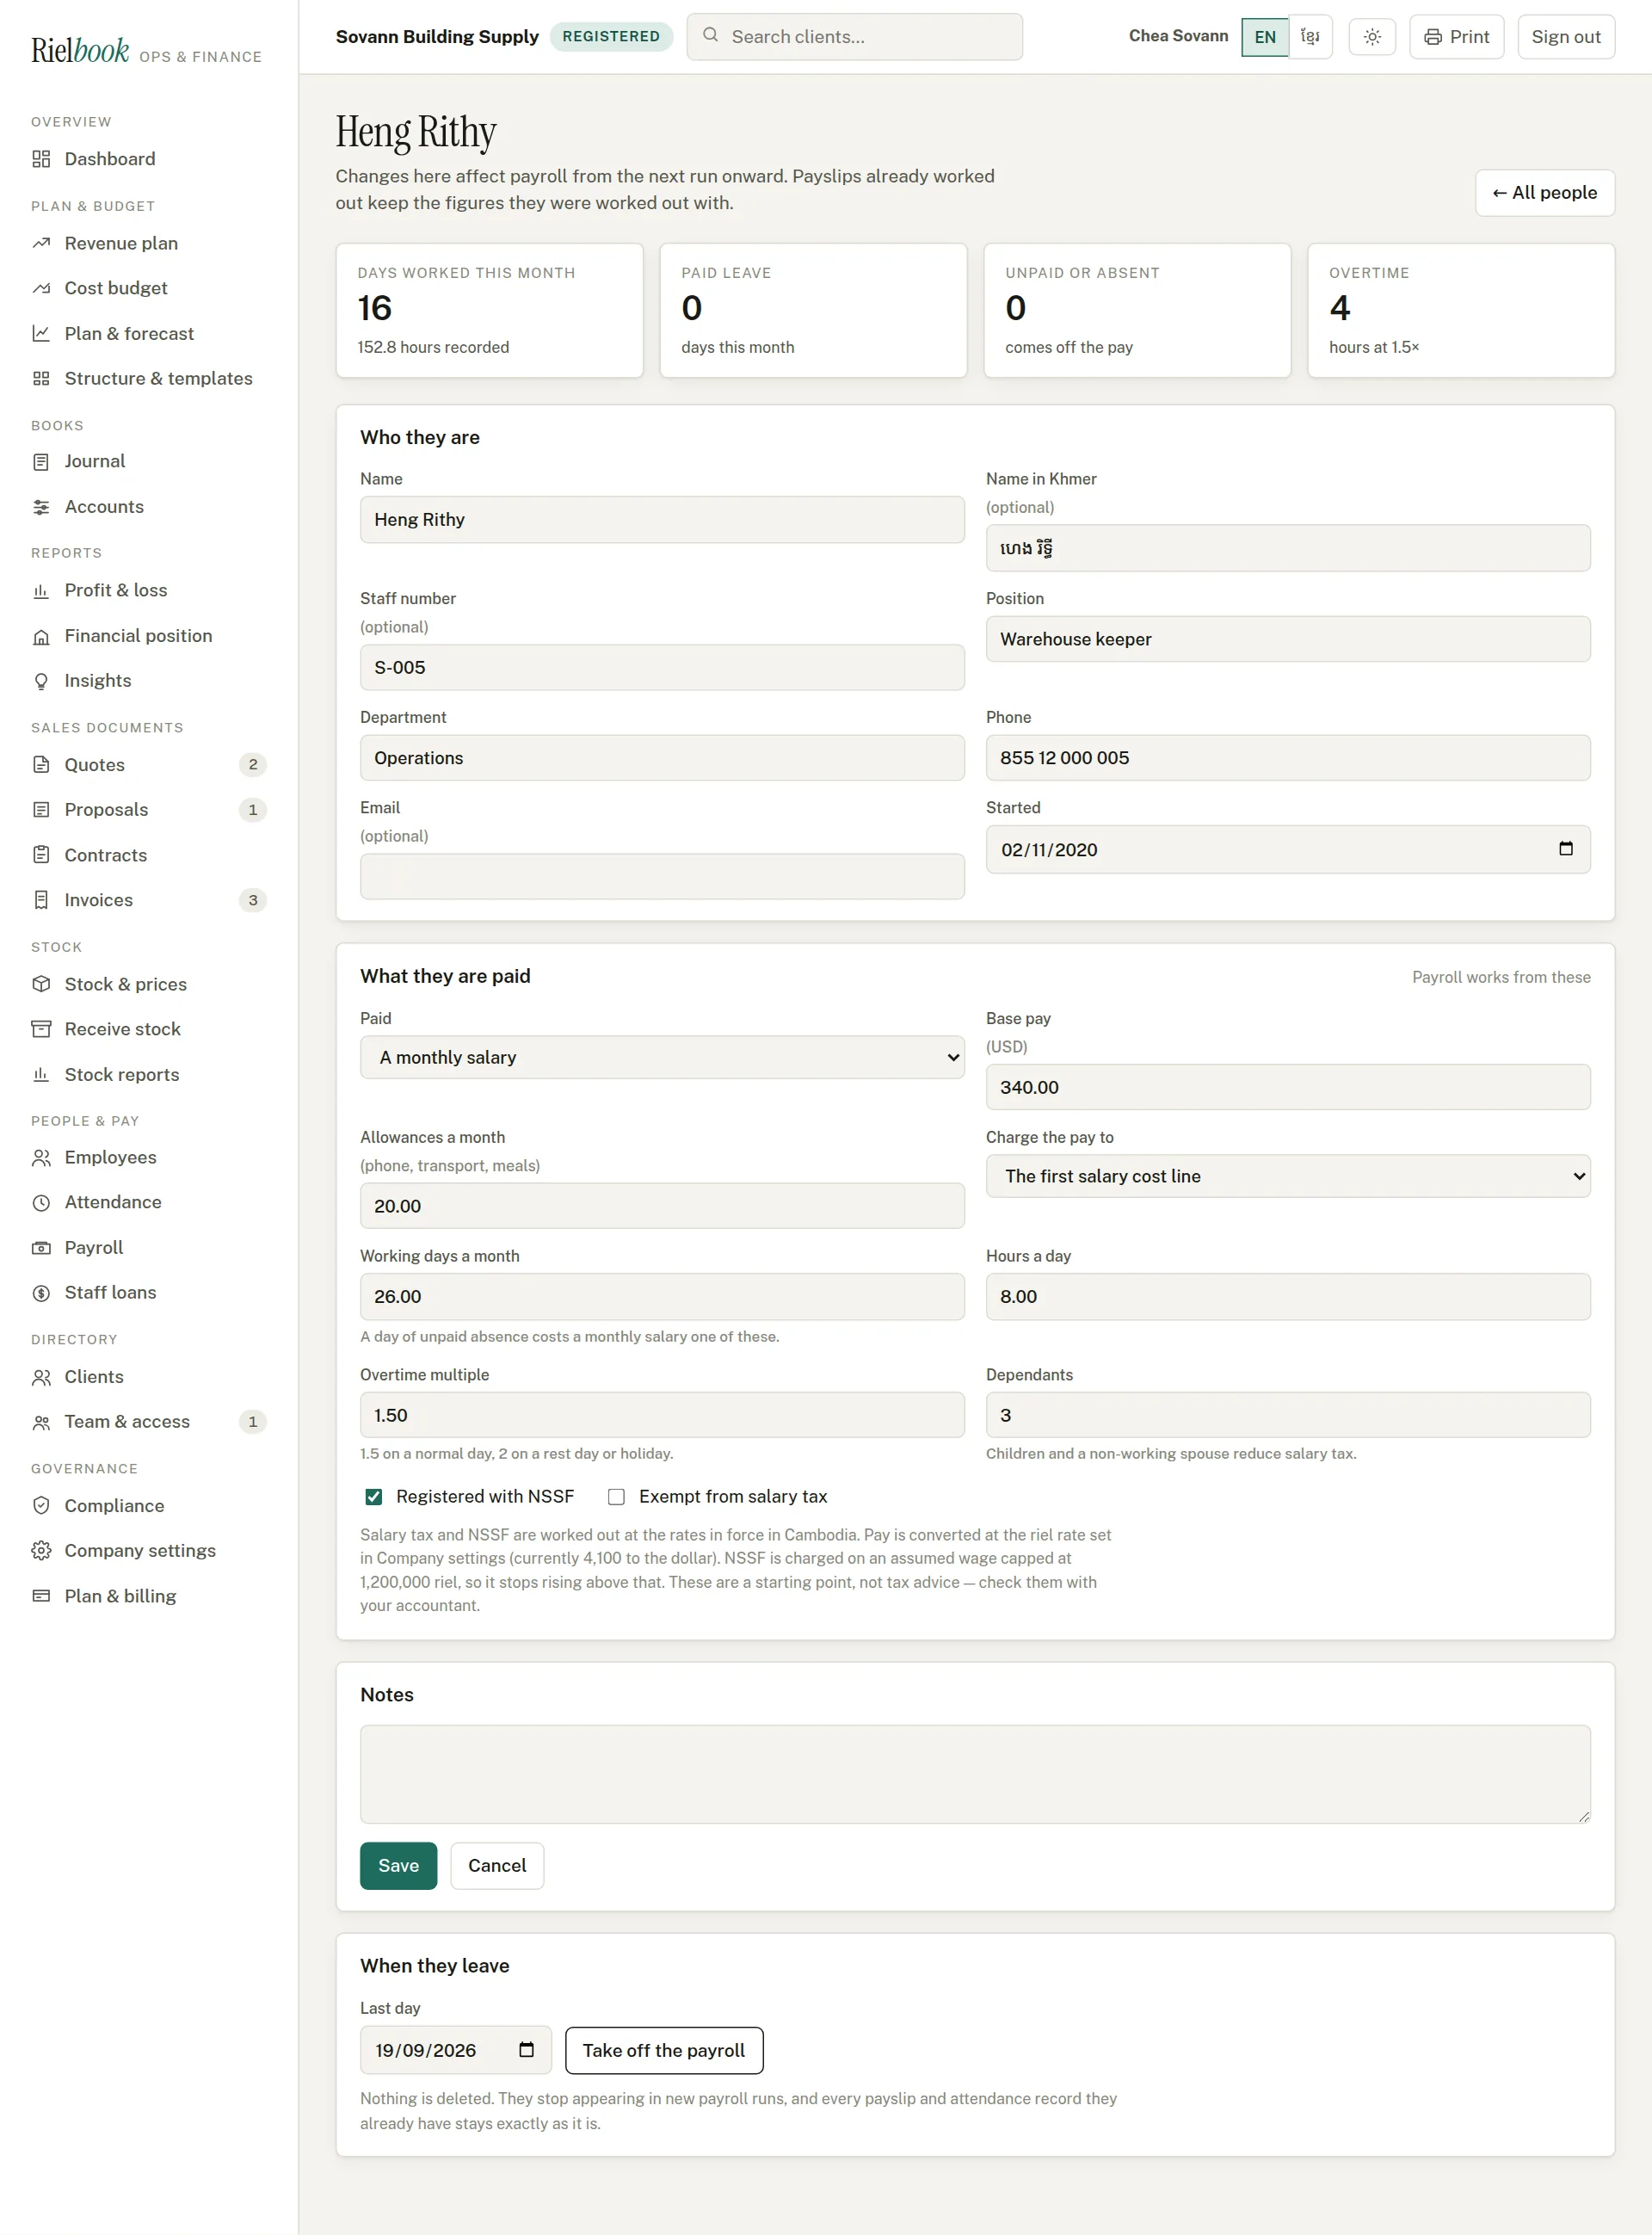
Add an employee
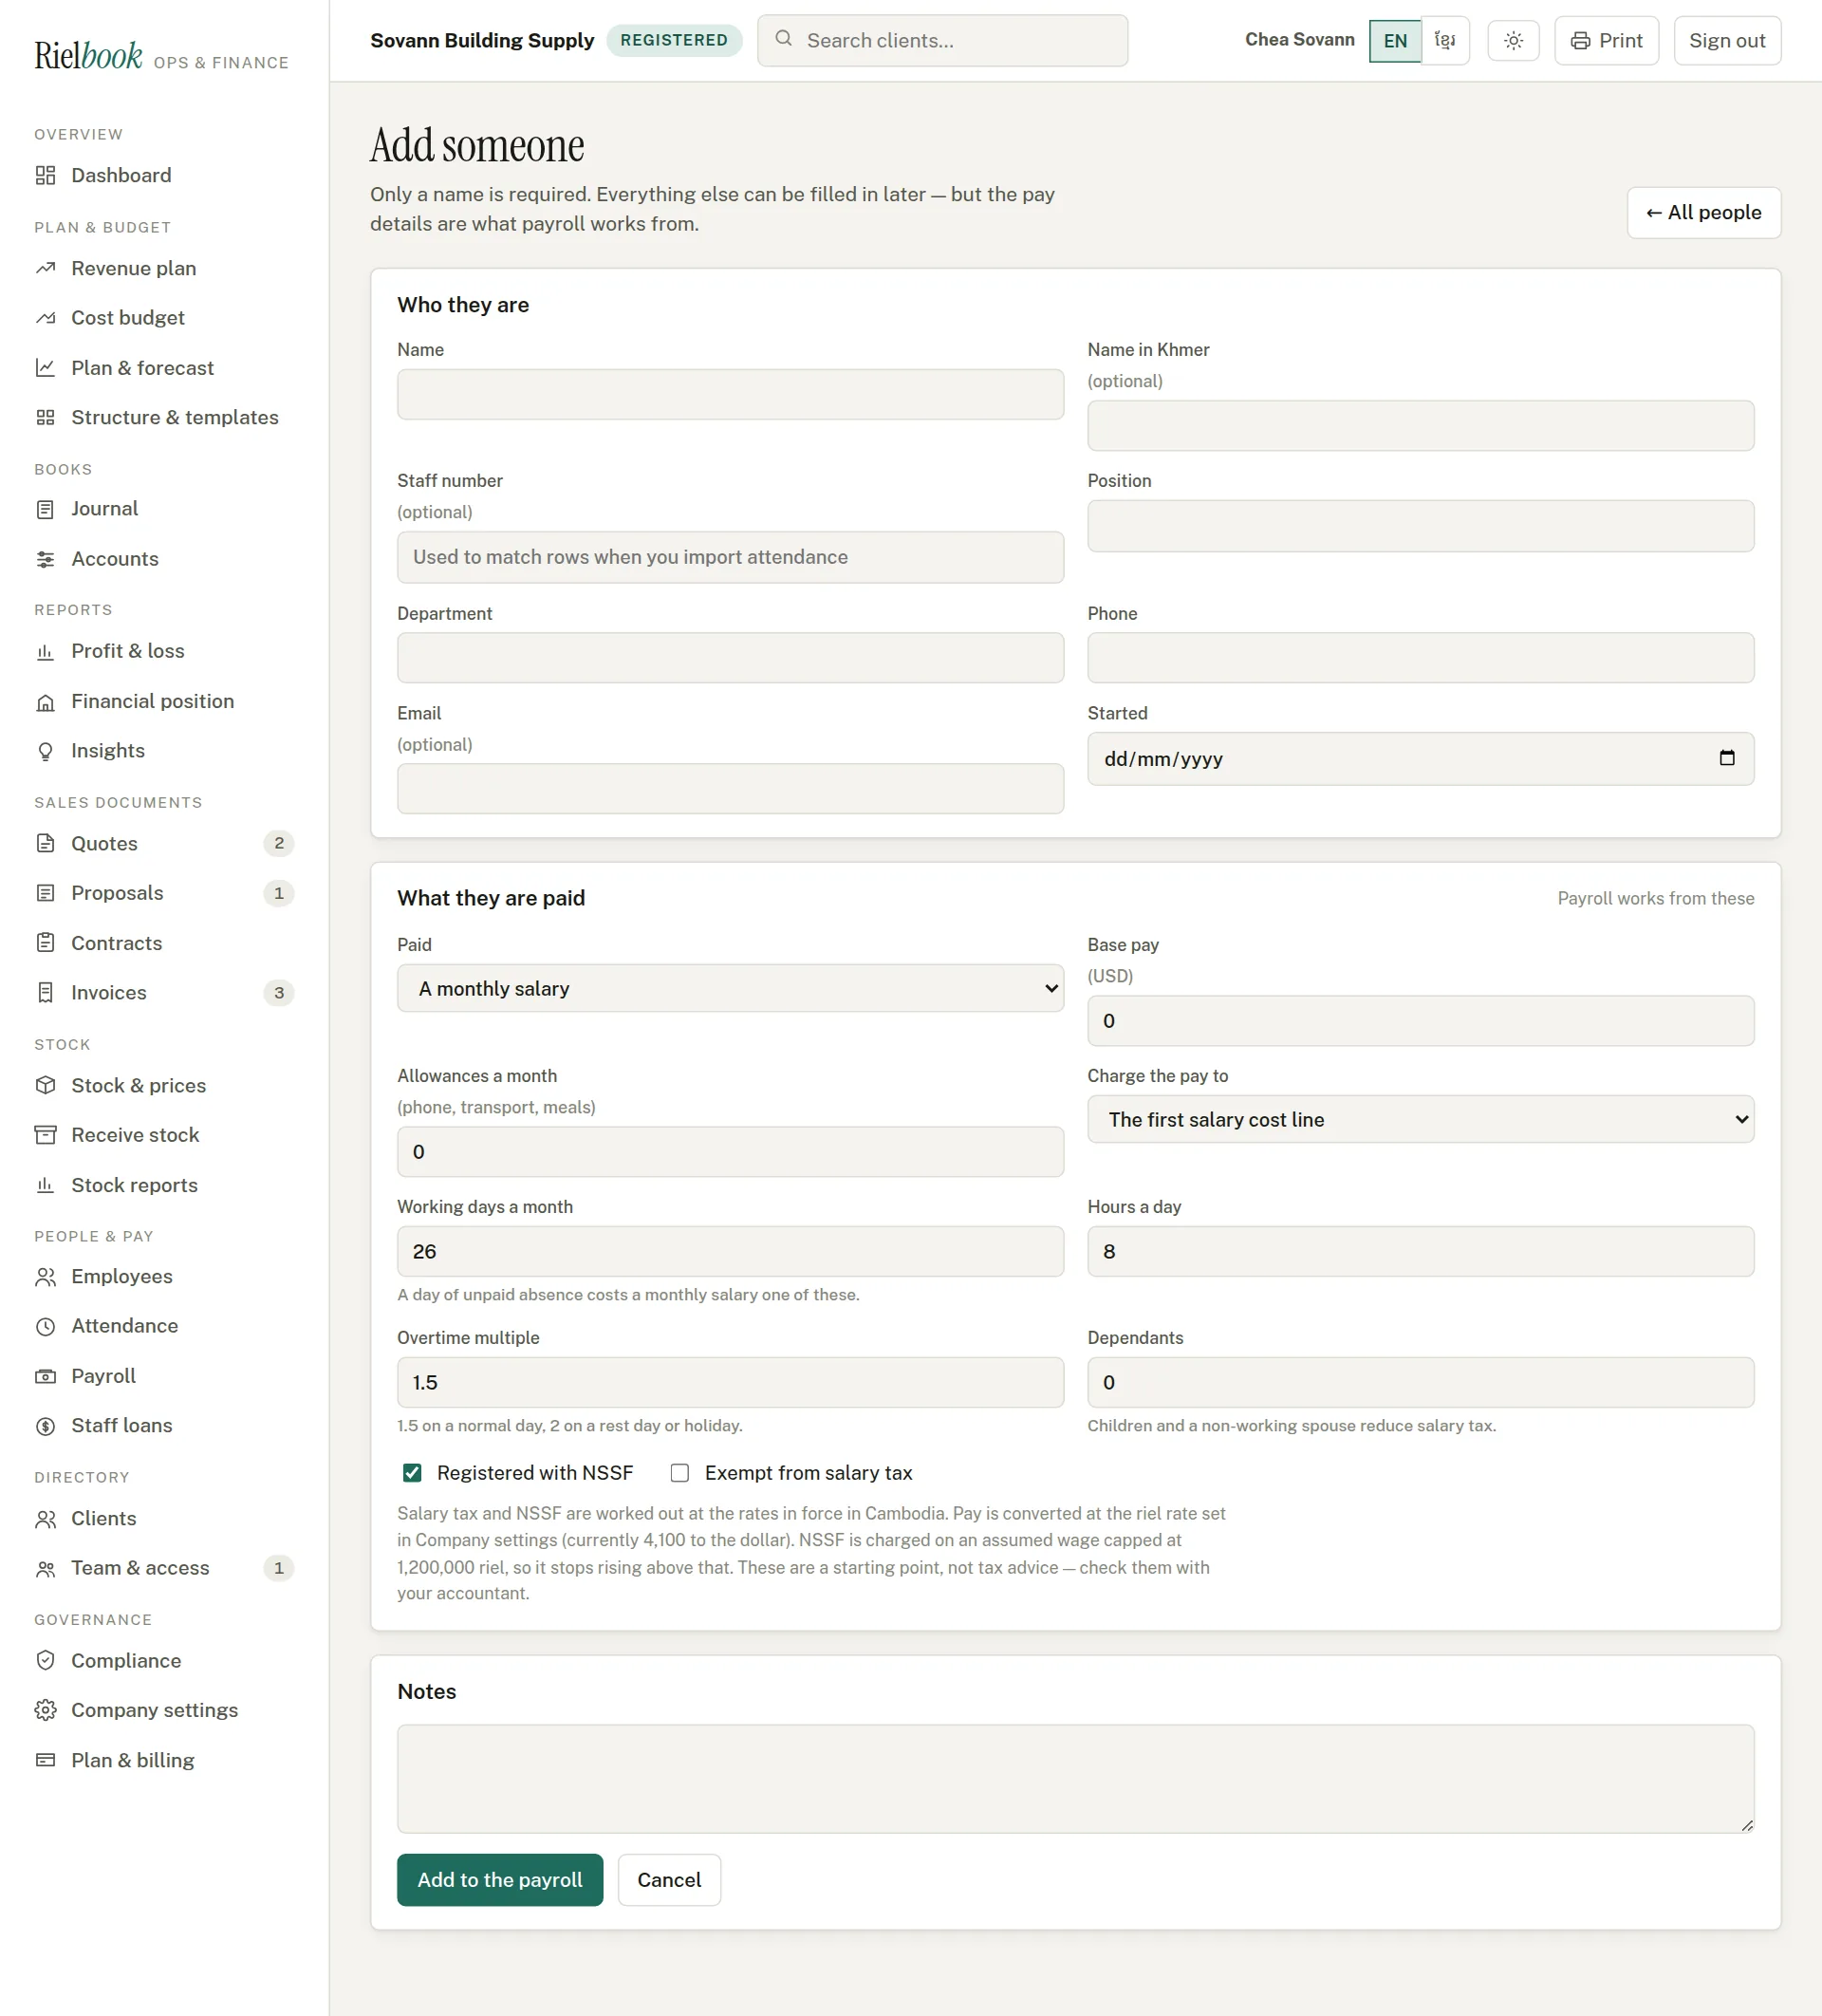
- Press Add someone.
- Who they are: name, name in Khmer, staff number, position, department, phone, email and start date. Only the name is required, but the staff number is how attendance you import is matched to the right person.
- What they are paid: choose a monthly salary, per day or per hour, and type the base pay and any allowances a month (phone, transport, meals).
- Check working days a month (26 is usual — a day of unpaid absence costs one twenty-sixth of a monthly salary), hours a day, and the overtime multiple — usually 1.5. Each person has one multiple, used for all their overtime; Rielbook does not raise it on its own for rest days or holidays, so if you pay double on those, record the extra as overtime hours.
- Type the number of dependants — children and a non-working spouse — which reduce salary tax.
- Tick Registered with NSSF if they are. Tick Exempt from salary tax only if they truly are.
- Choose which cost line to charge the pay to, so wages land where you expect in the Profit & loss, and press Add to the payroll.
Open an employee any time to change their pay — changes affect payroll from the next run onward, never payslips already worked out. When someone leaves, set their last day under When they leave and press Take off the payroll. Nothing is deleted: their record, attendance and past payslips stay.
Attendance
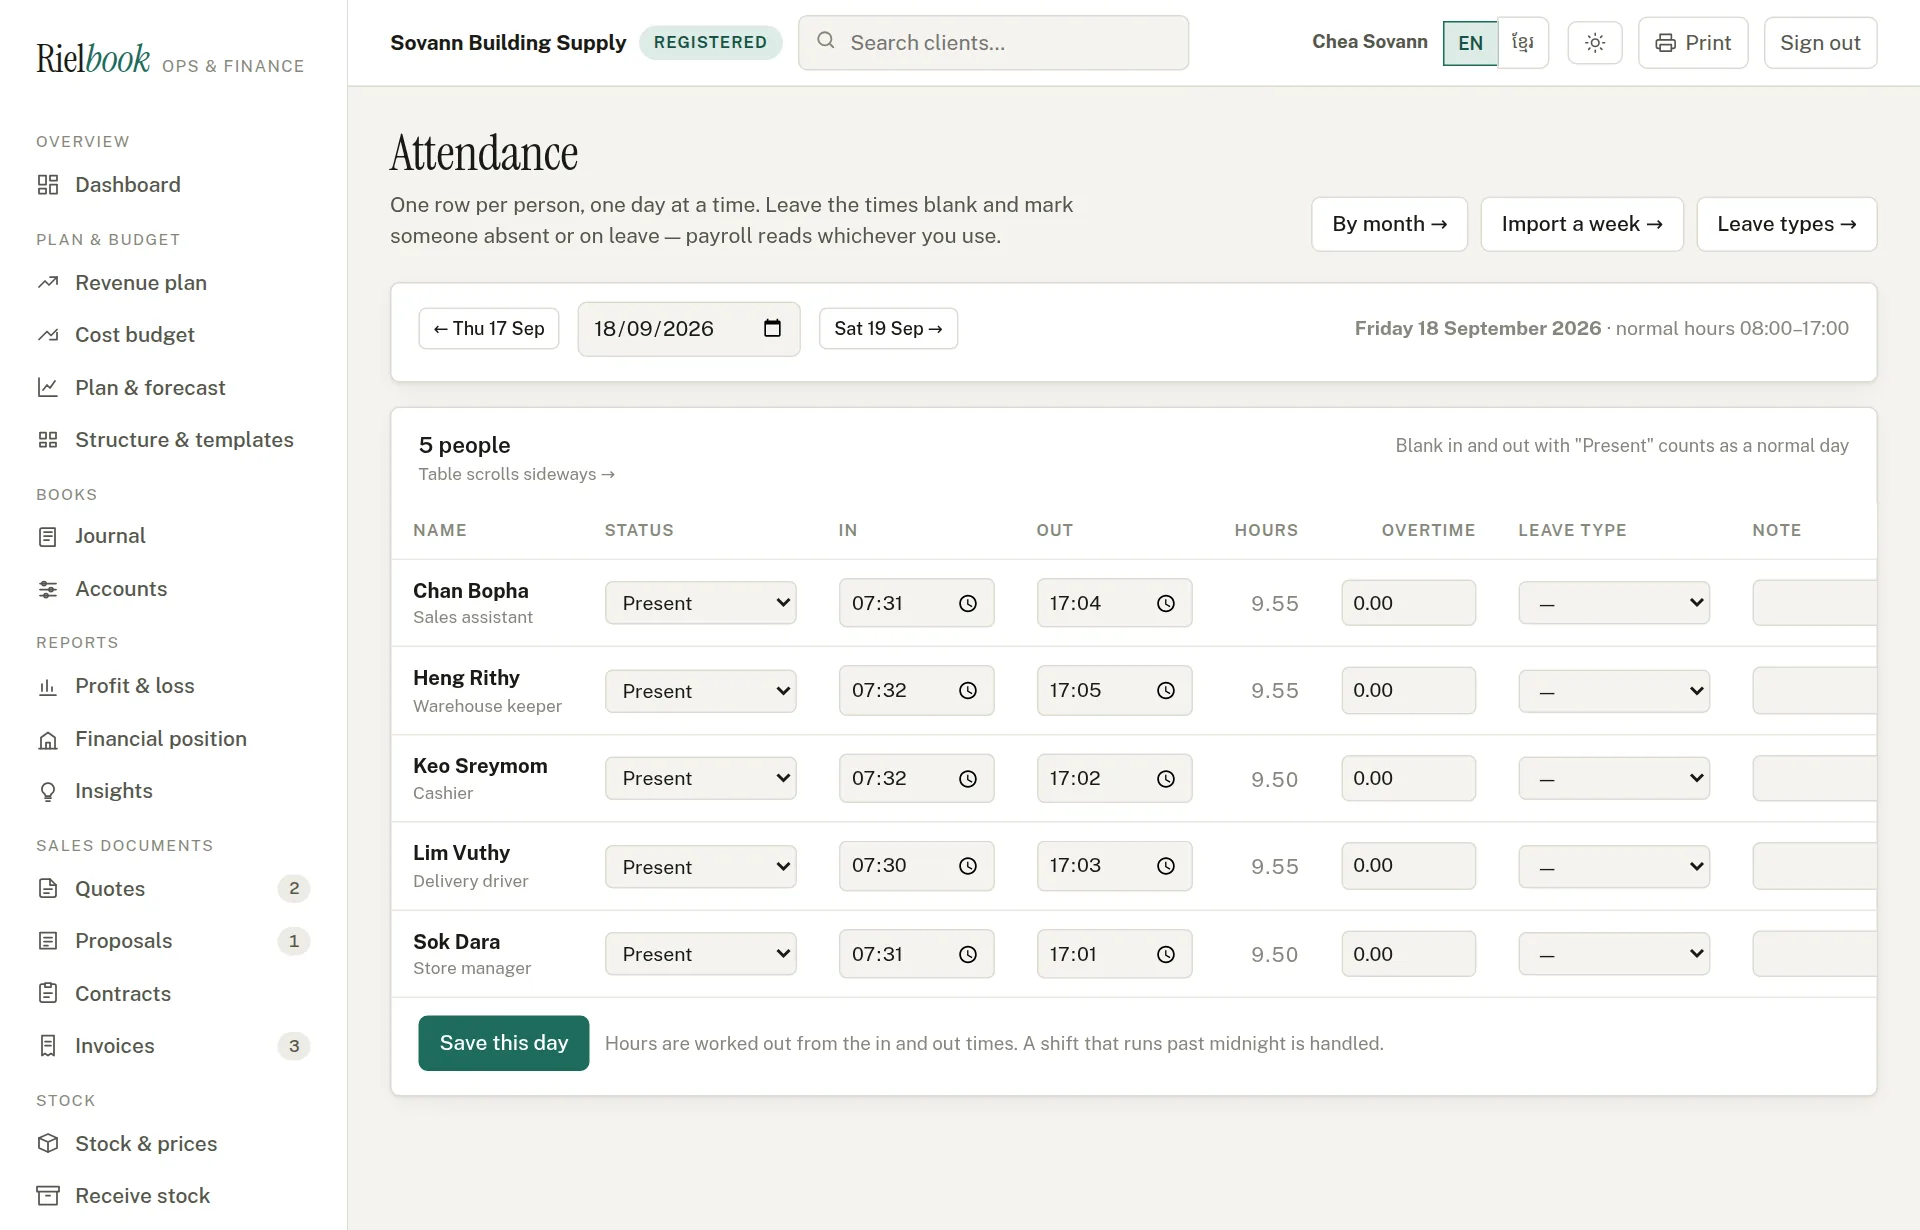
Payroll works from attendance: days worked, unpaid absences and overtime. Record it day by day, or paste in a week at a time.
People & pay›Attendance
Day by day
- Pick the day with the date box, or step a day back or forward with the buttons either side of it.
- For each person choose a status: Present, On leave, Absent, Public holiday or Rest day.
- Type the in and out times if you track them — the hours are worked out, including a shift that runs past midnight. Leave them blank and Present counts as a normal day for monthly and daily staff. Staff paid by the hour need their times, or they are paid nothing for that day.
- Add overtime hours, and for someone on leave choose the leave type. If you leave the type blank, the day is counted as the company's first paid leave type — usually annual leave.
- Press Save this day.
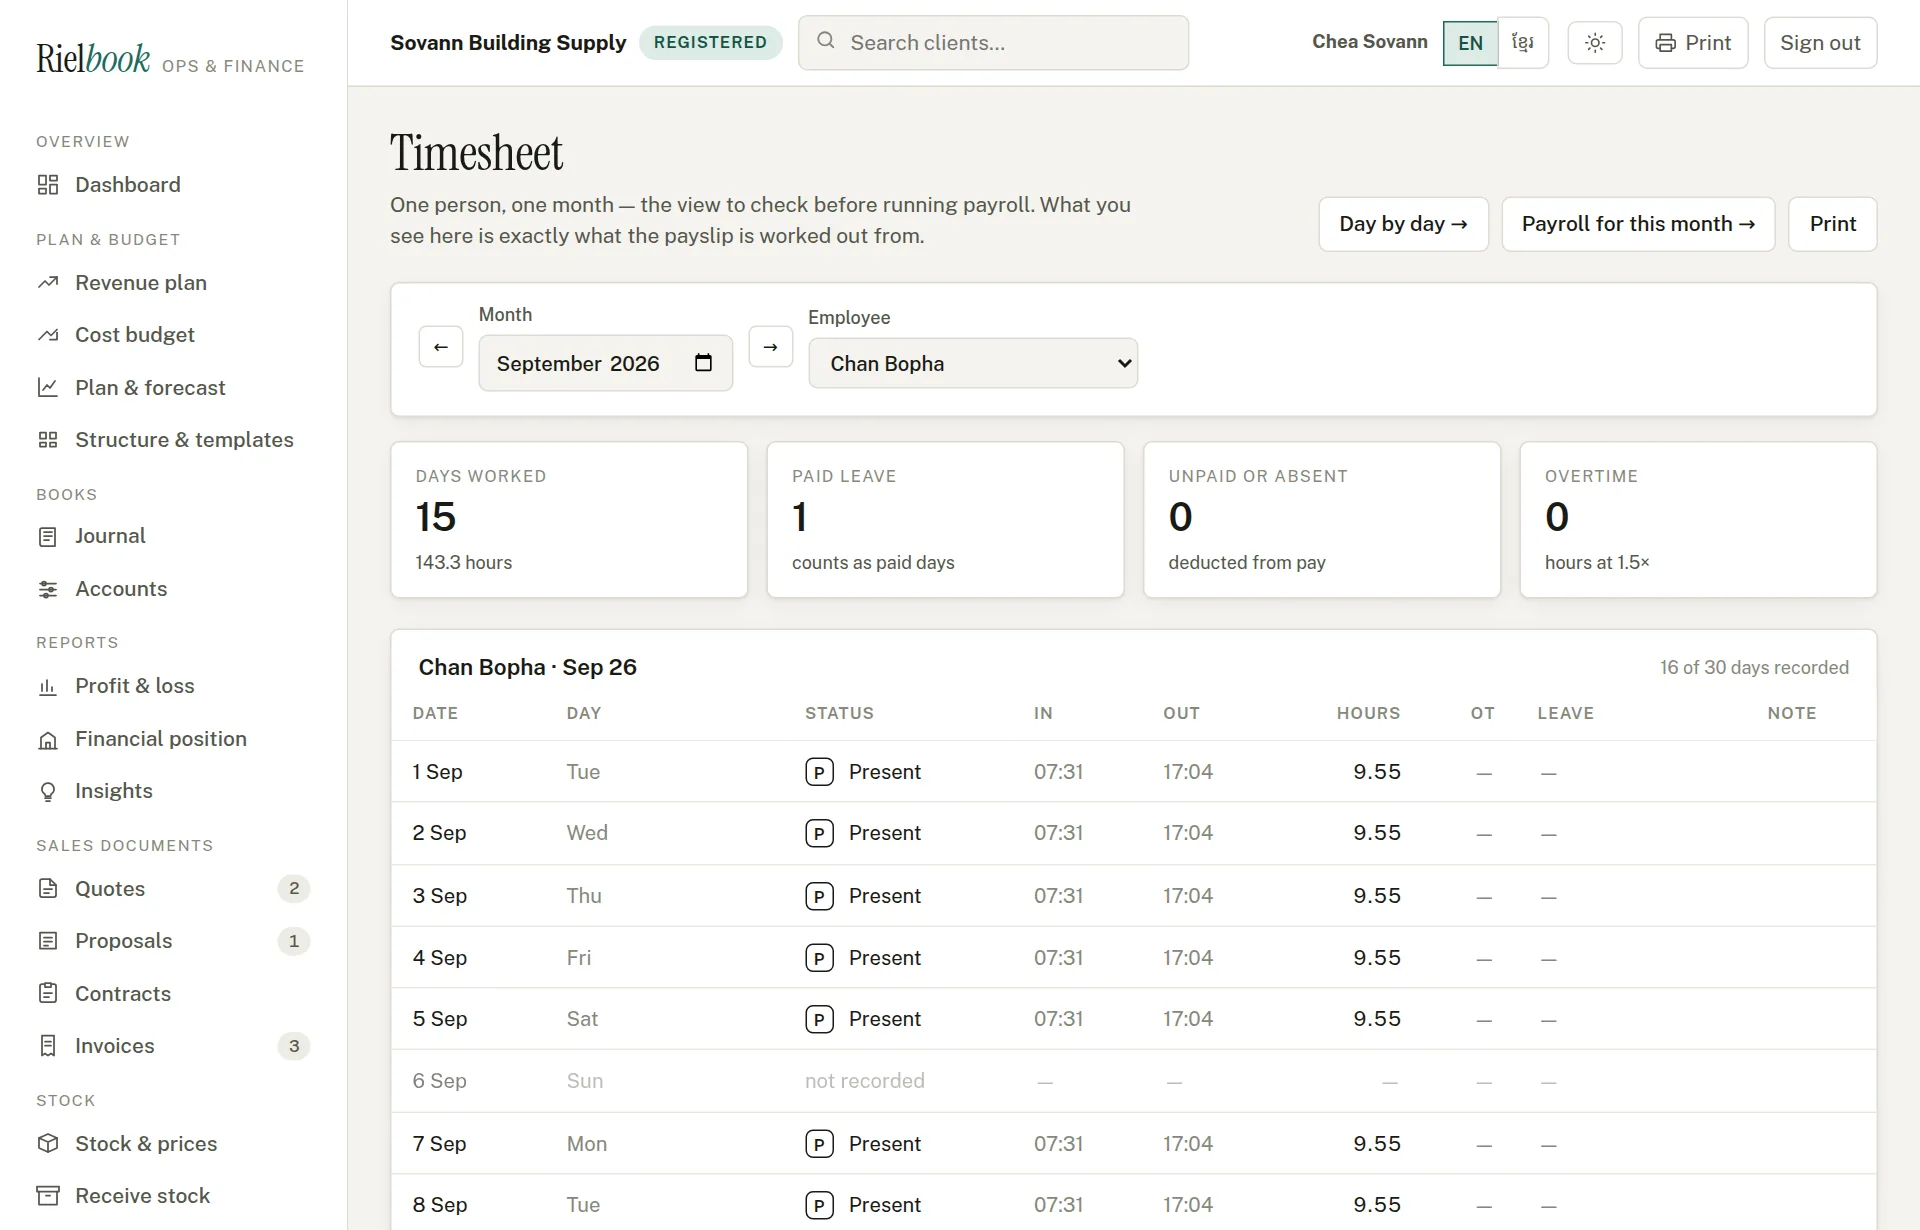
The month for one person — check before payroll
Press By month →. Choose the month and the person: every day with its status and hours, and the totals payroll will use. This is the page to check before you run payroll.
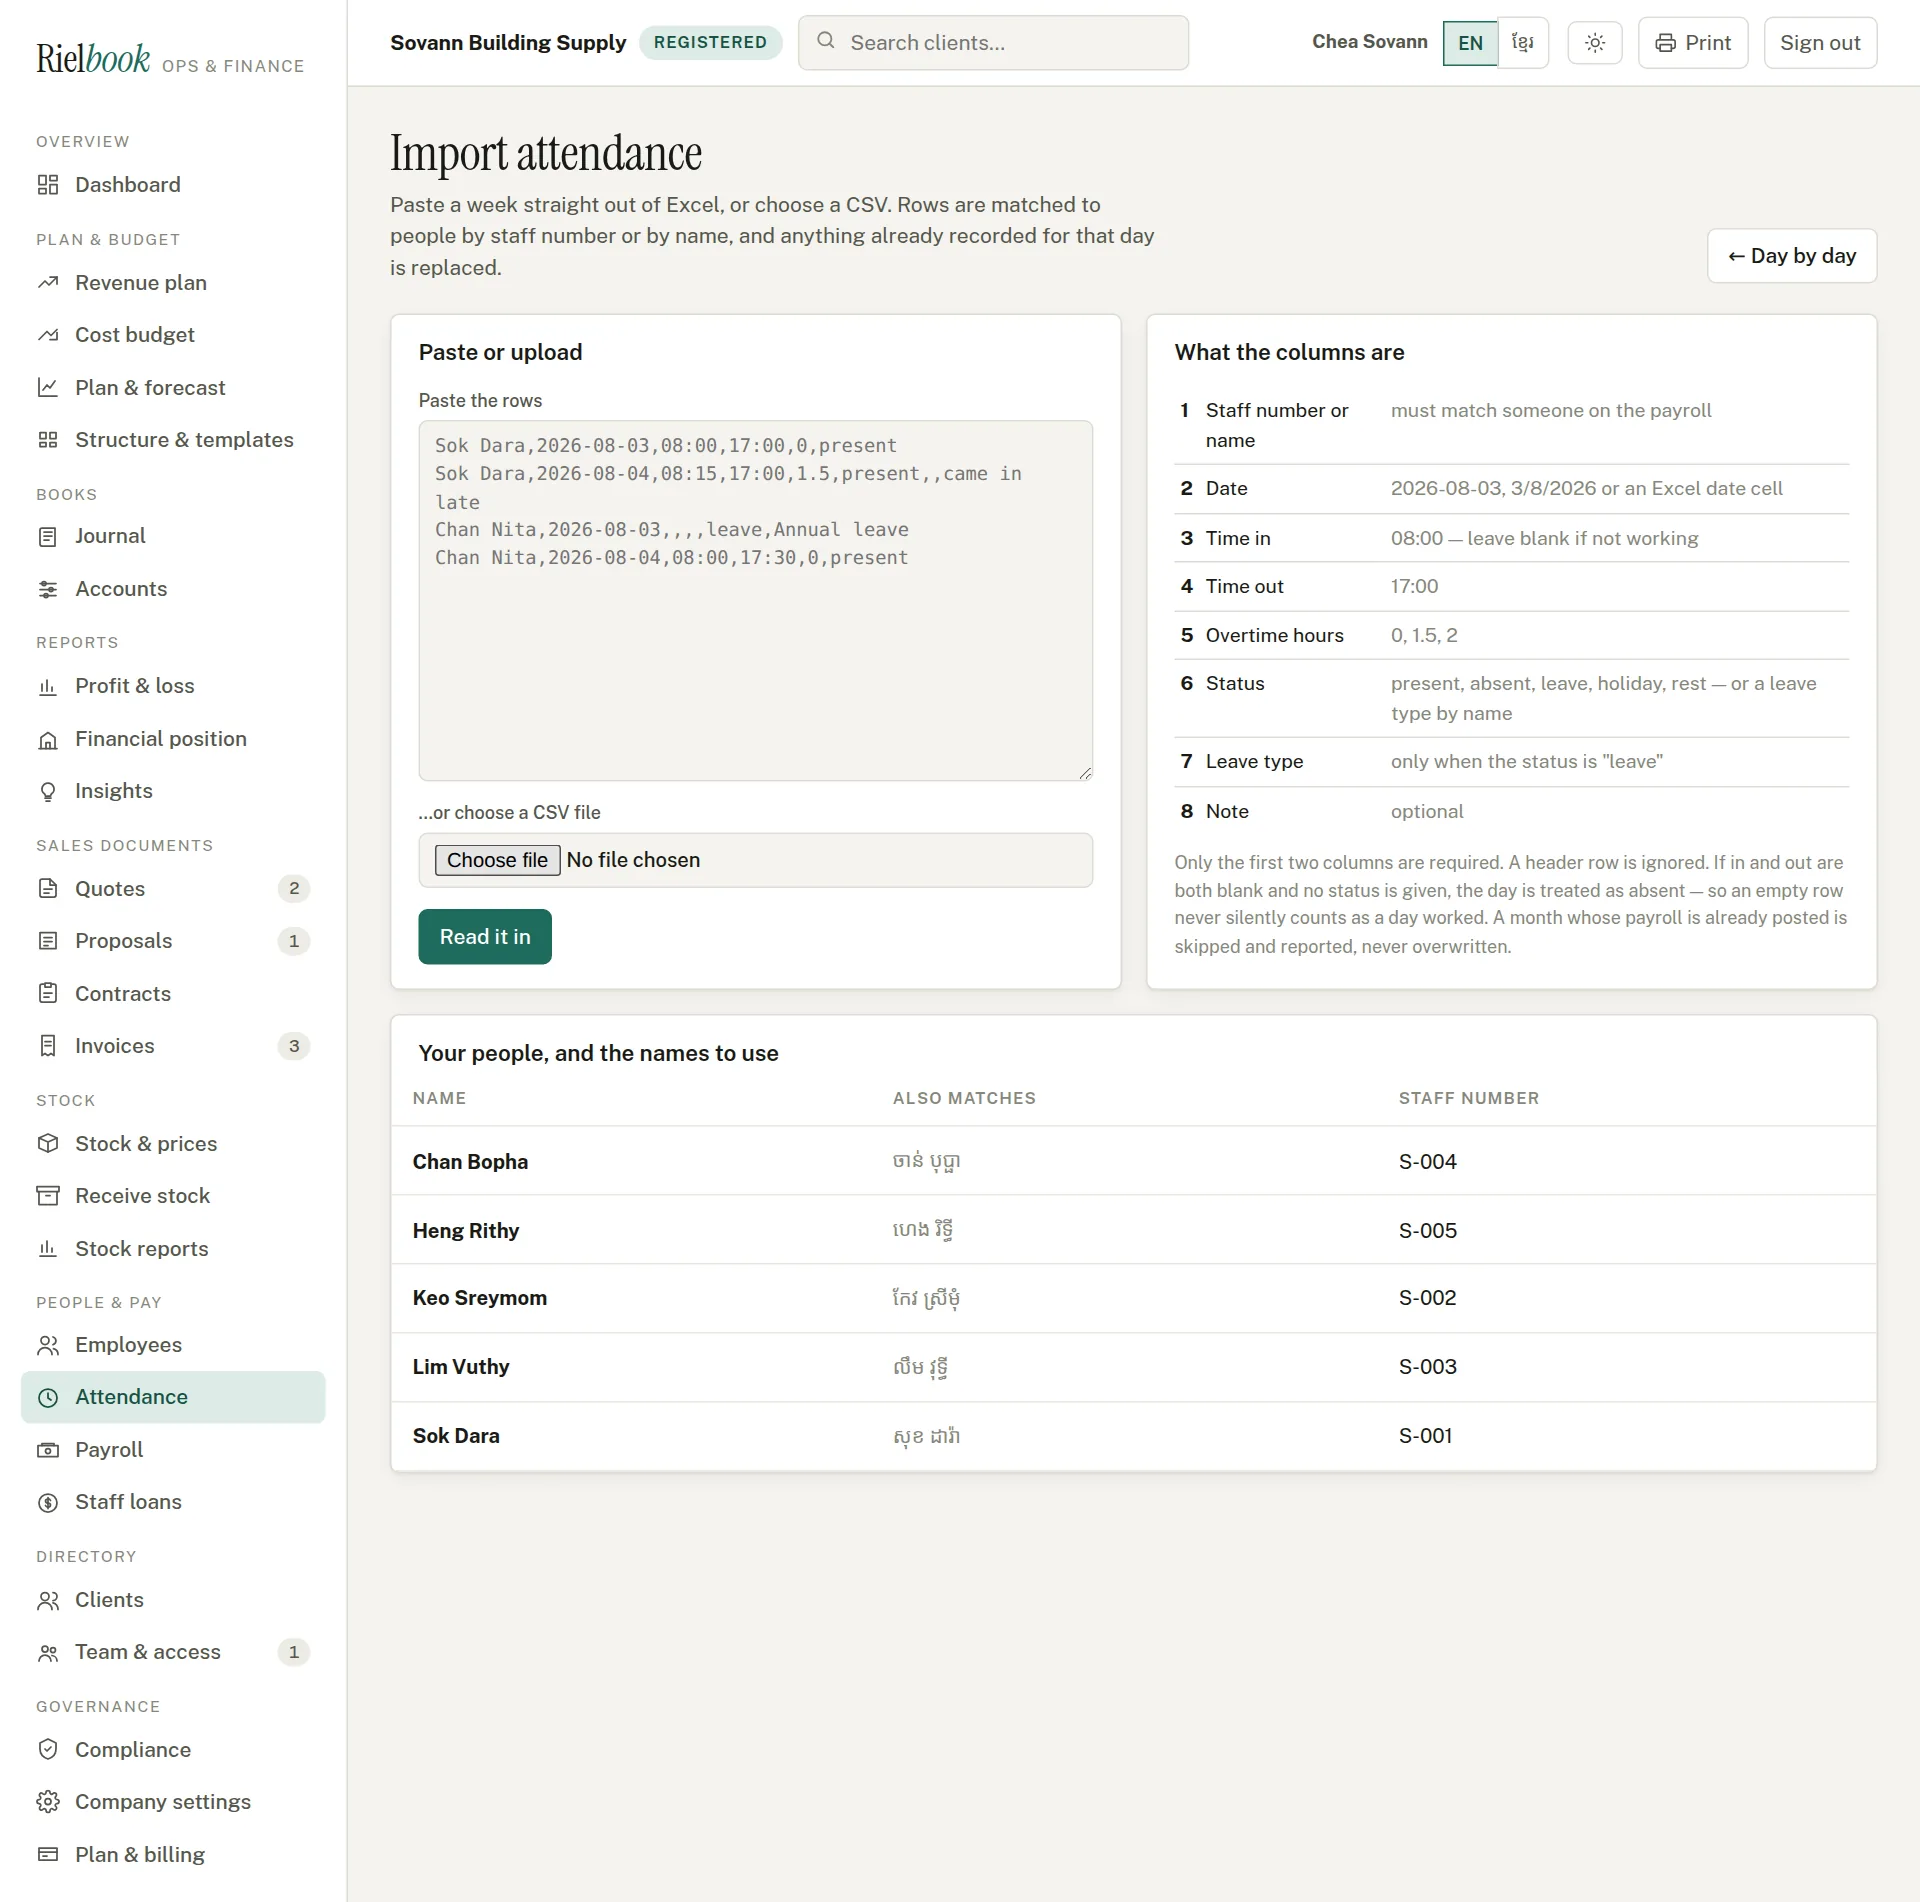
Import a week
Press Import a week →. Paste rows straight out of Excel, or choose a CSV file (for an .xlsx, use Save As › CSV in Excel first), and press Read it in. Only the first two columns — the staff number or name, and the date — are required; the rest are time in, time out, overtime, status, leave type and a note. Rows are matched to people by staff number or name, and anything already recorded for that day is replaced. A row that cannot be read is reported, never silently skipped.
Leave and public holidays
People & pay›Attendance›Leave types
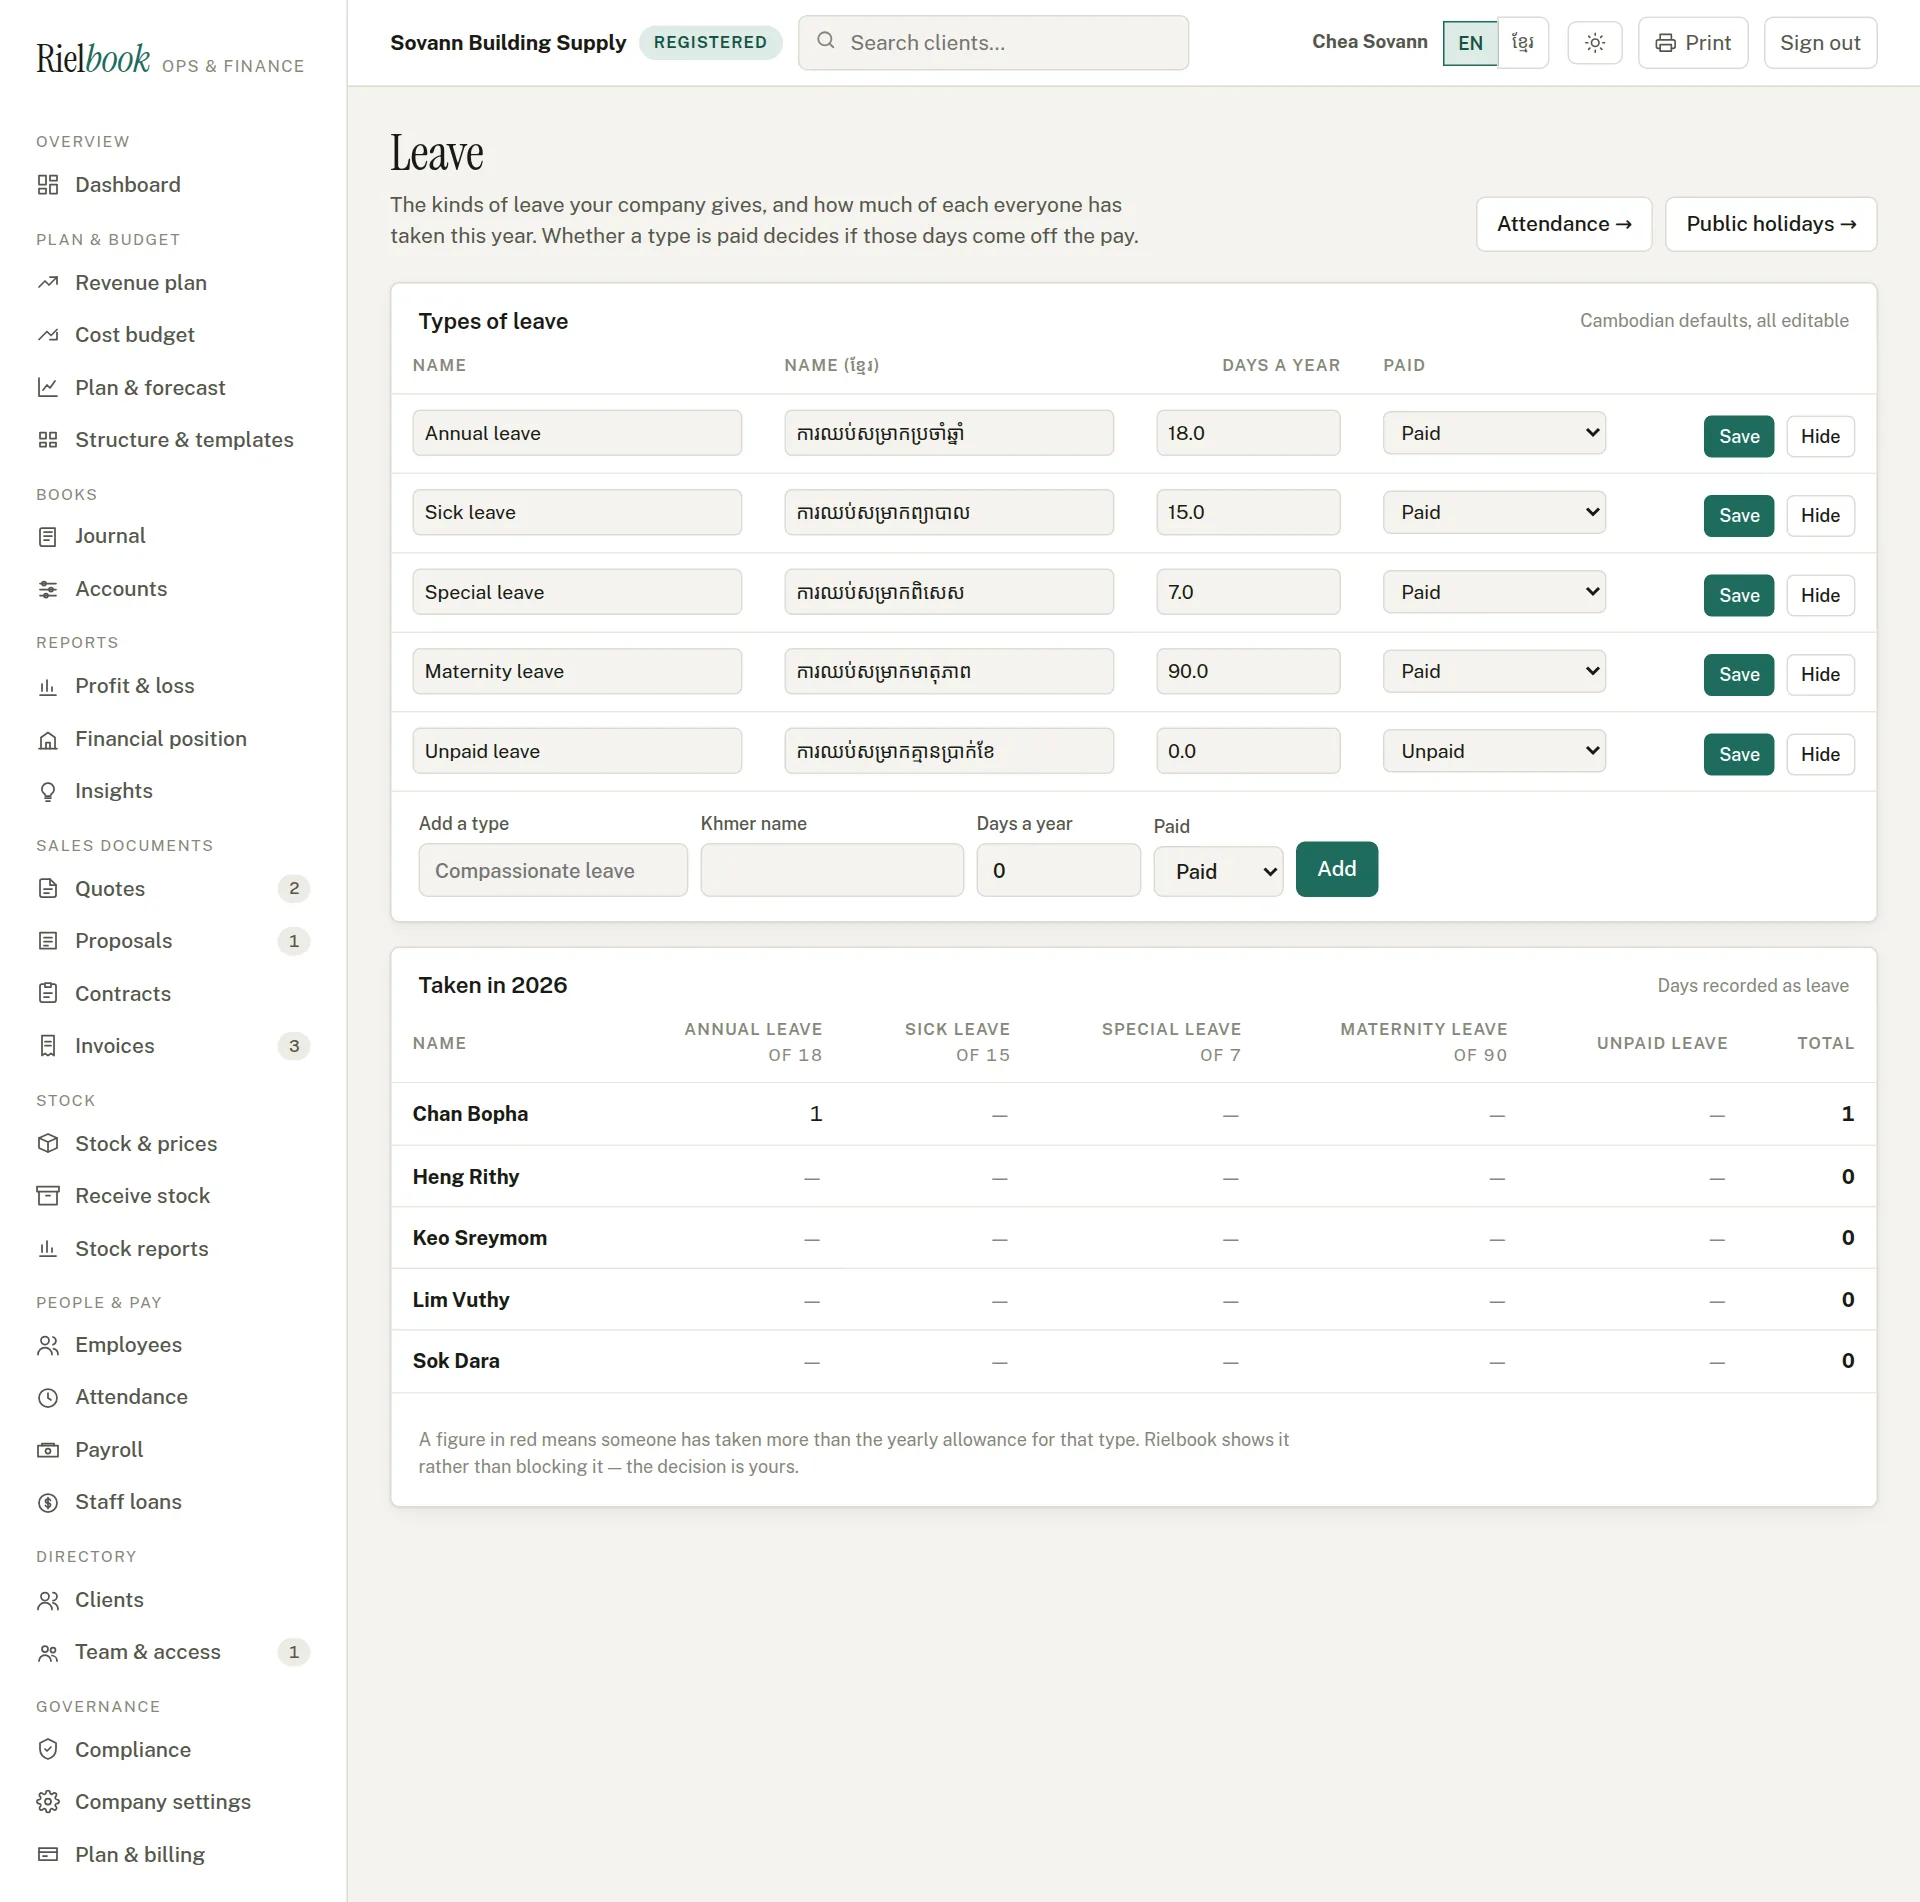
The kinds of leave the company gives, set up with Cambodian defaults — annual, sick, special, maternity and unpaid. For each type set the days a year and whether it is paid; paid leave counts as a day worked, unpaid leave comes off the pay. Taken in 2026 shows how much each person has used; a figure in red means somebody has taken more than the allowance — Rielbook shows it rather than blocking it, because the decision is yours.
Public holidays
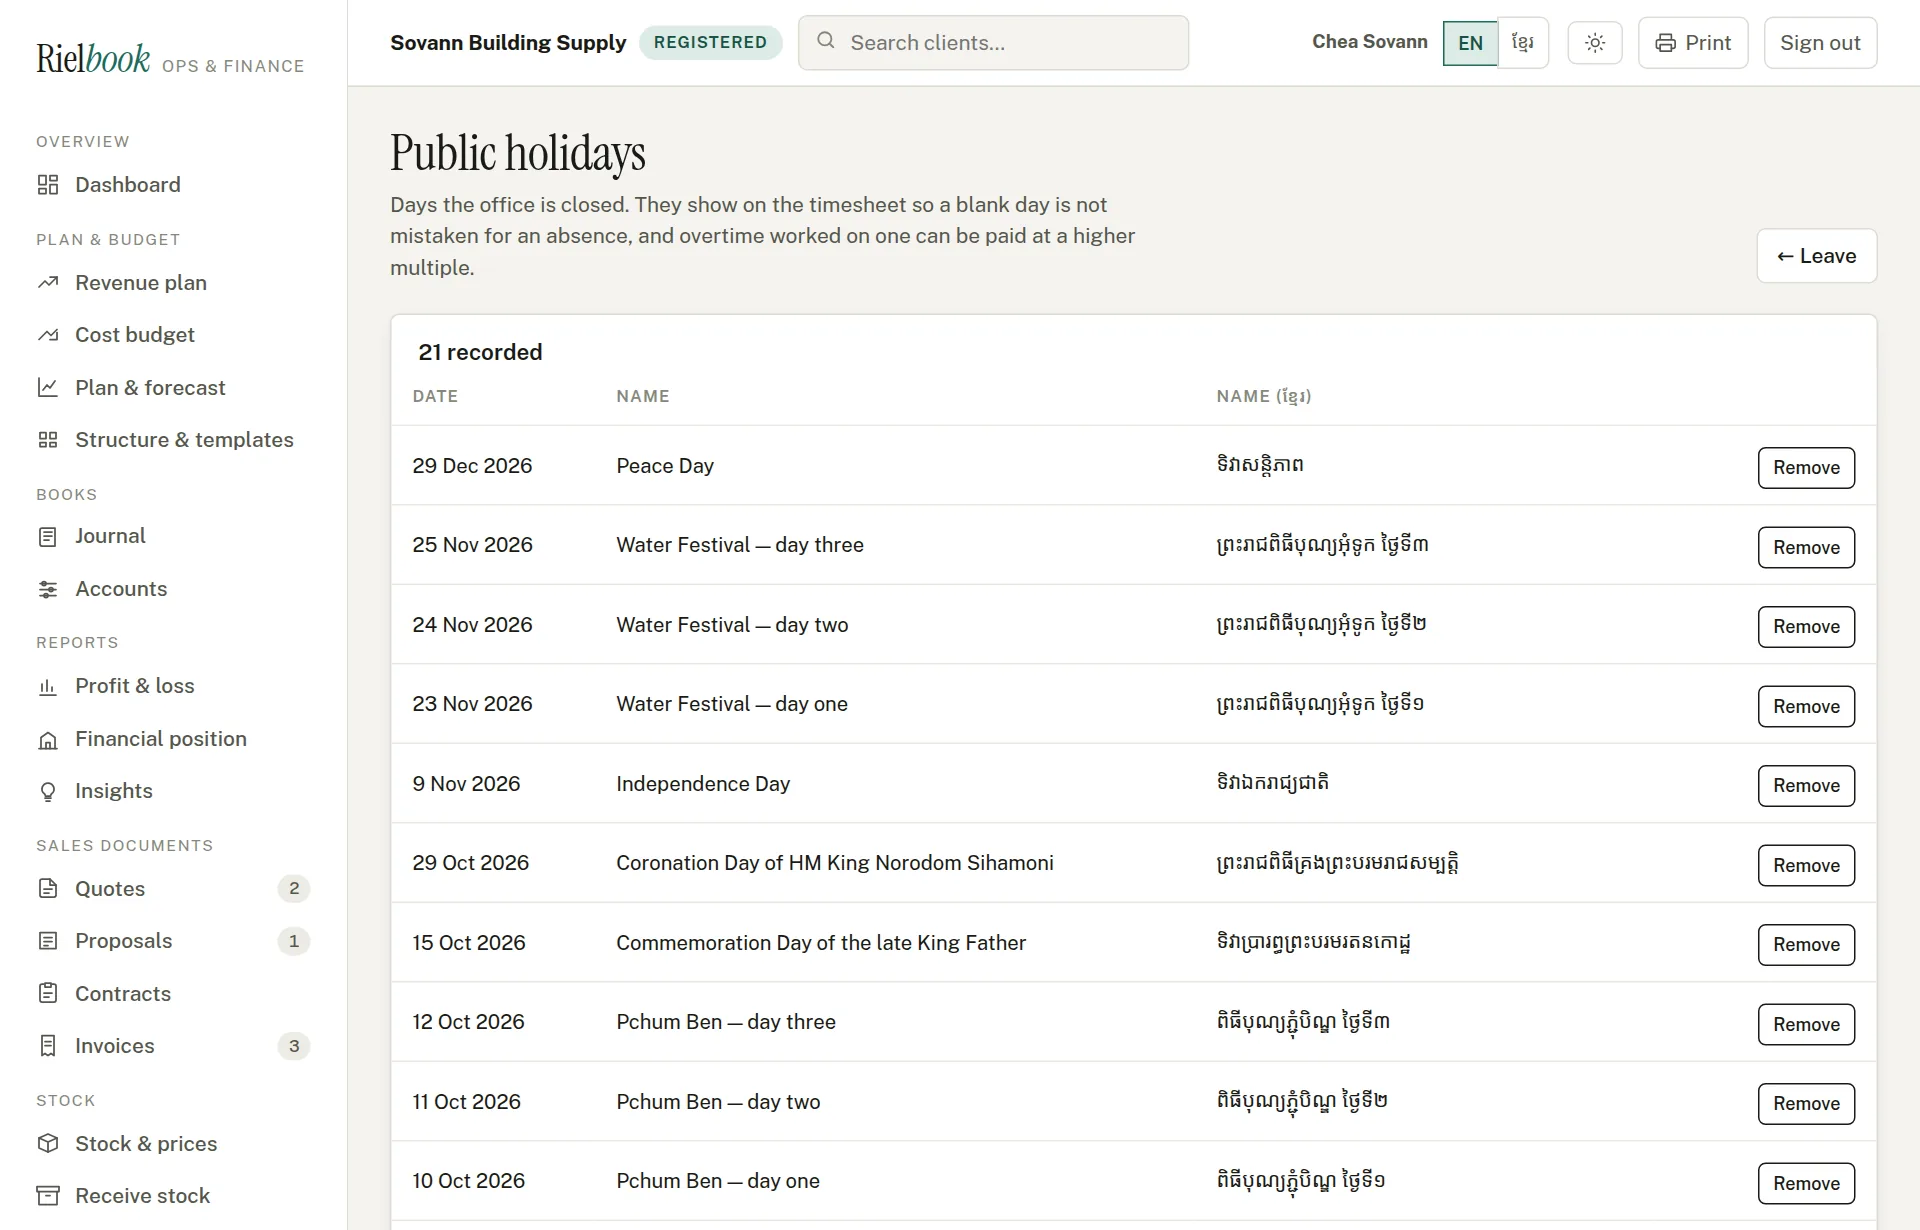
Press Public holidays →, then Add the 2026 public holidays — the year's national holidays, in Khmer and English, in one go. They show on the timesheet so a blank day is not mistaken for an absence. Add any extra day your office closes with the form underneath.
Payroll and payslips
Once a month: work the payroll out from attendance, check it, then post it to the books. Until you post it, it is a draft you can rebuild as often as you like.
People & pay›Payroll
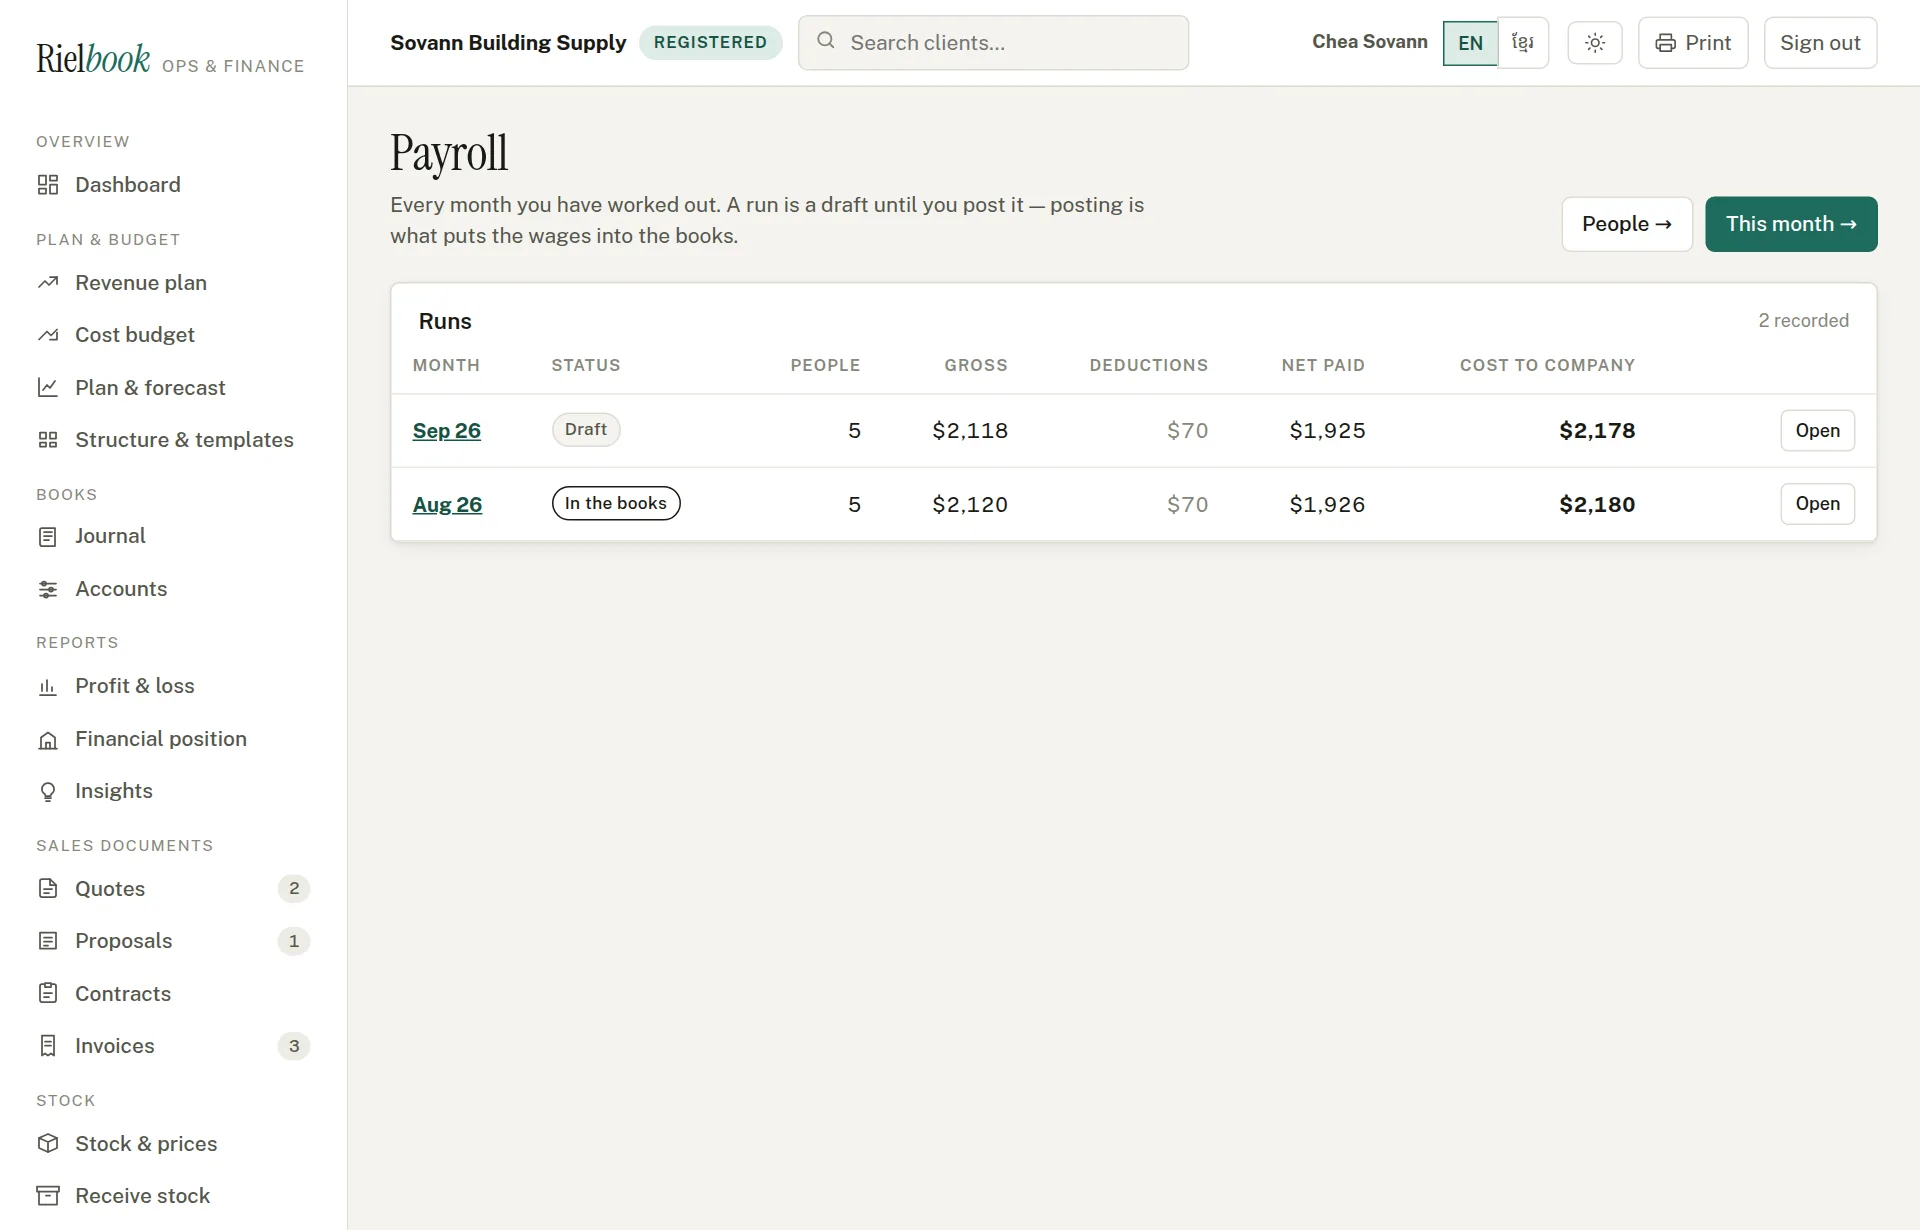
- Record the month's attendance and check each timesheet.
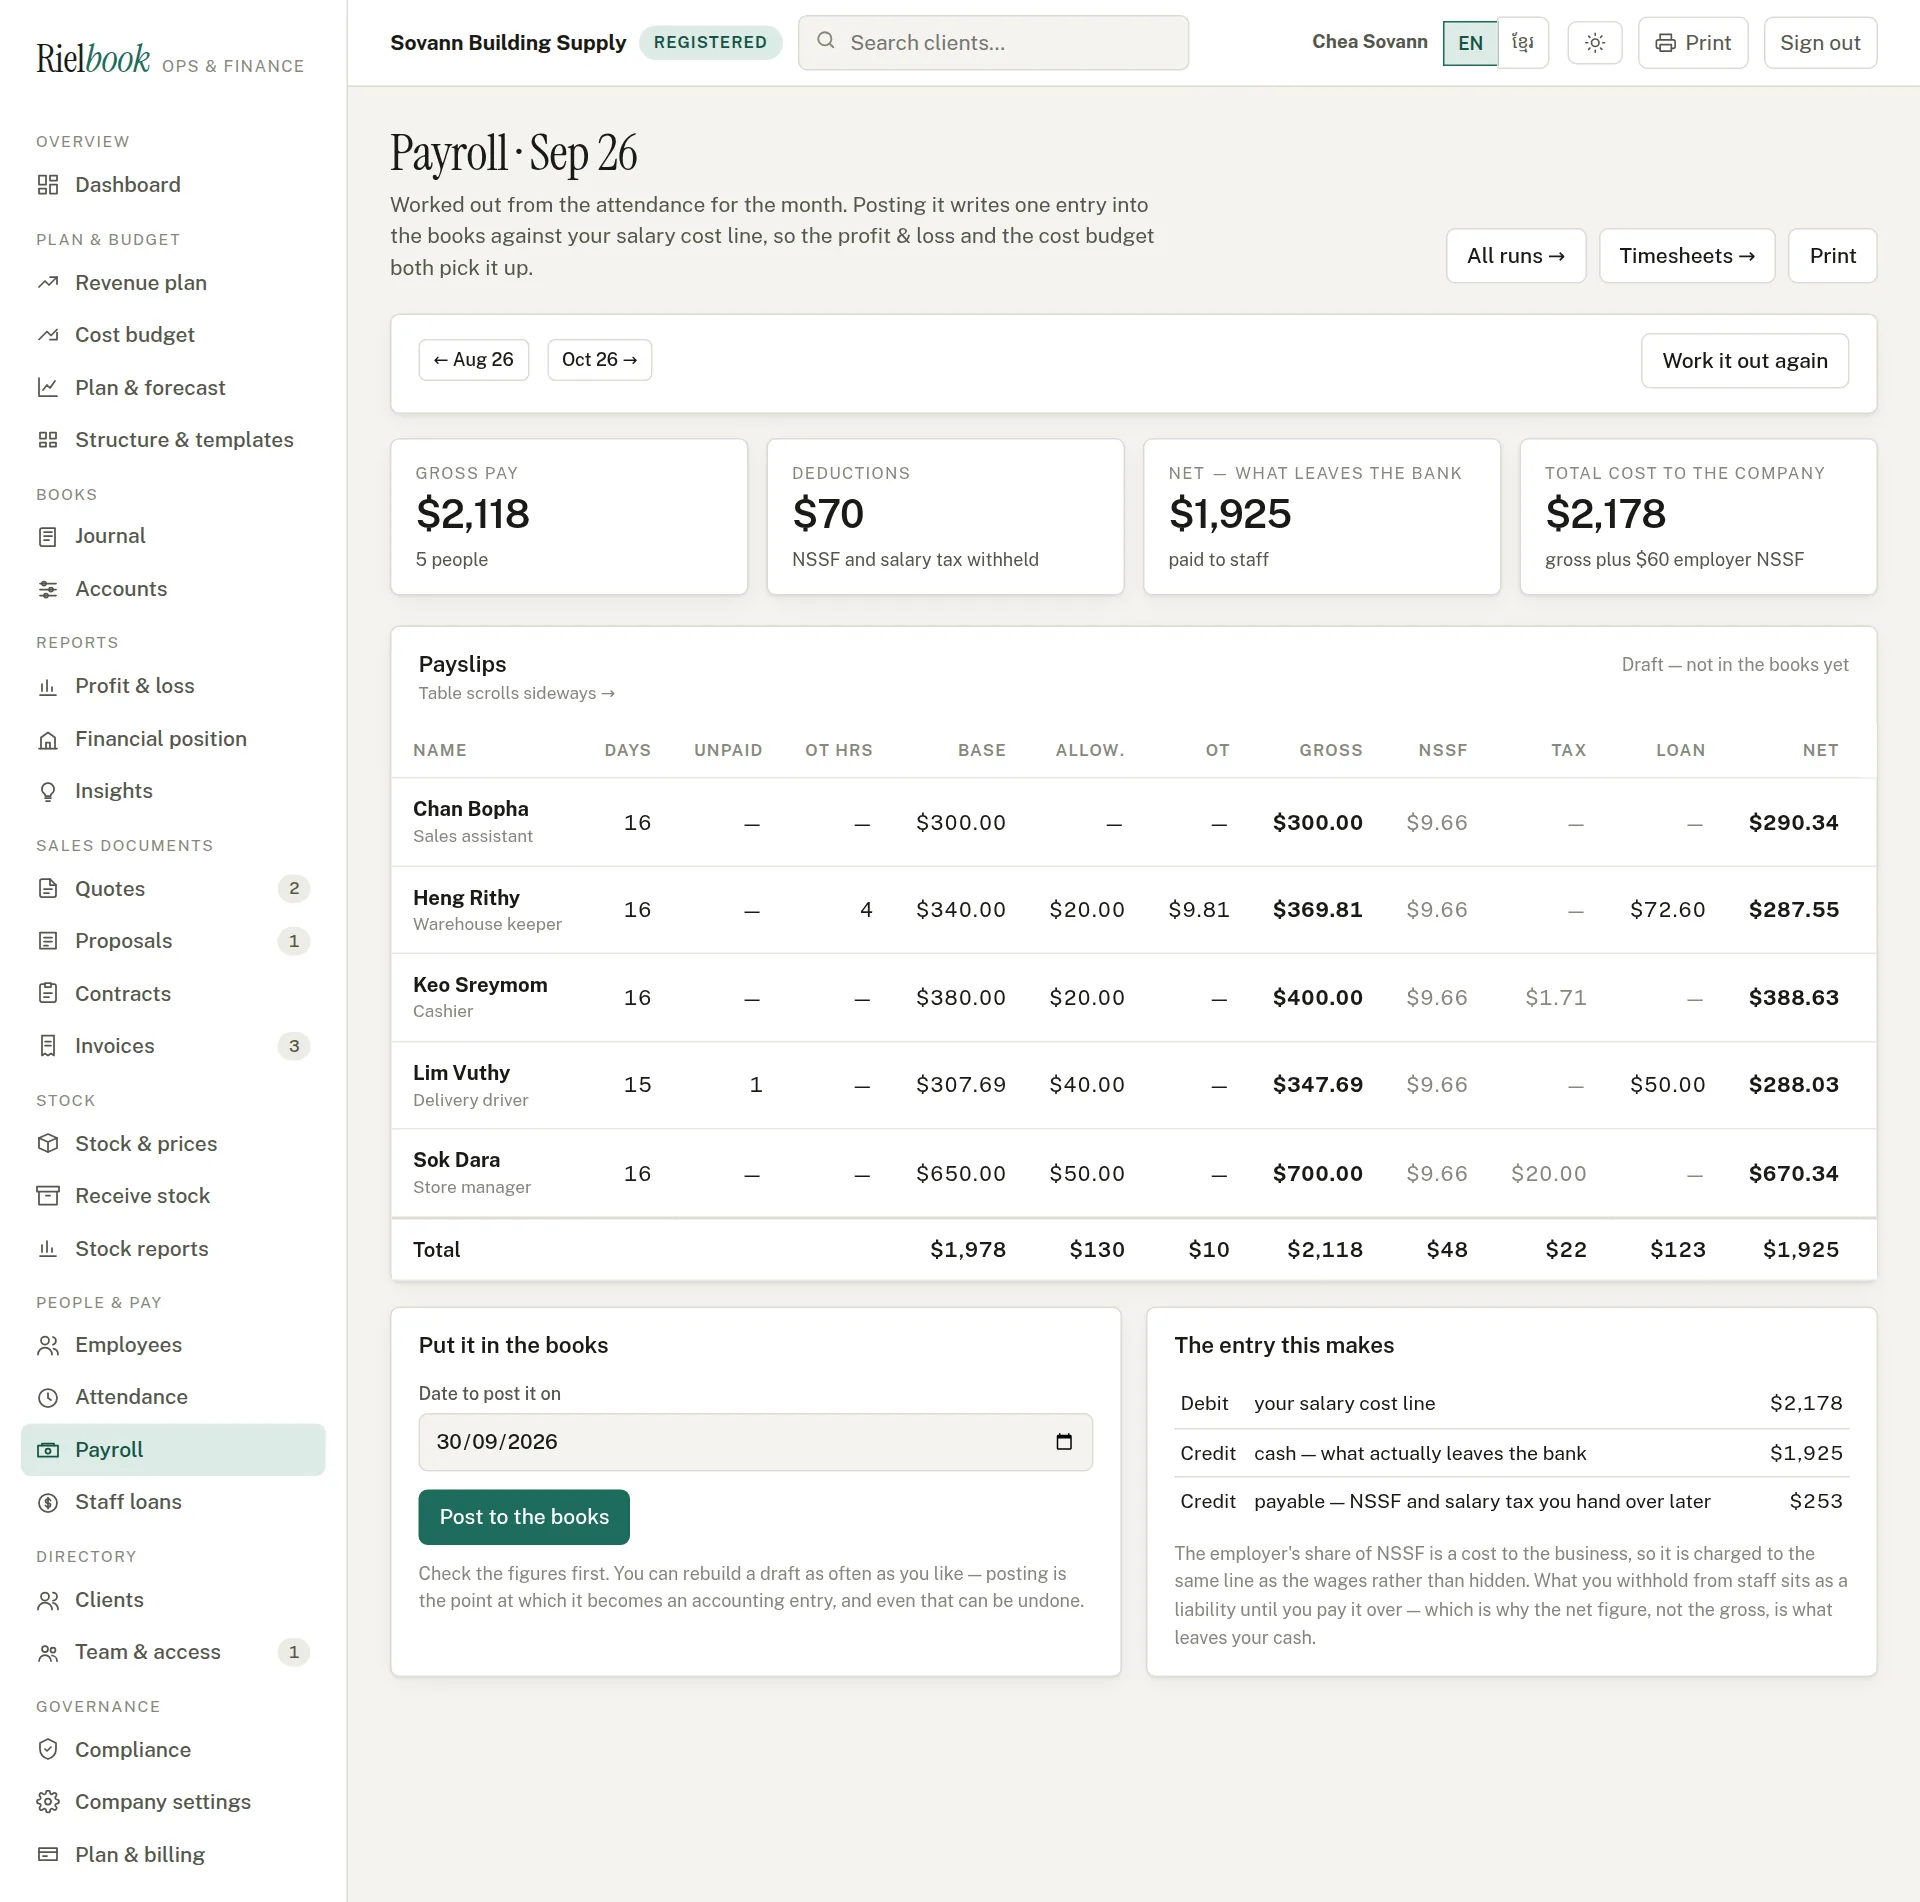
- Press This month →, or open the month from the list. If it has not been worked out yet, or attendance has changed since, press Work it out again.
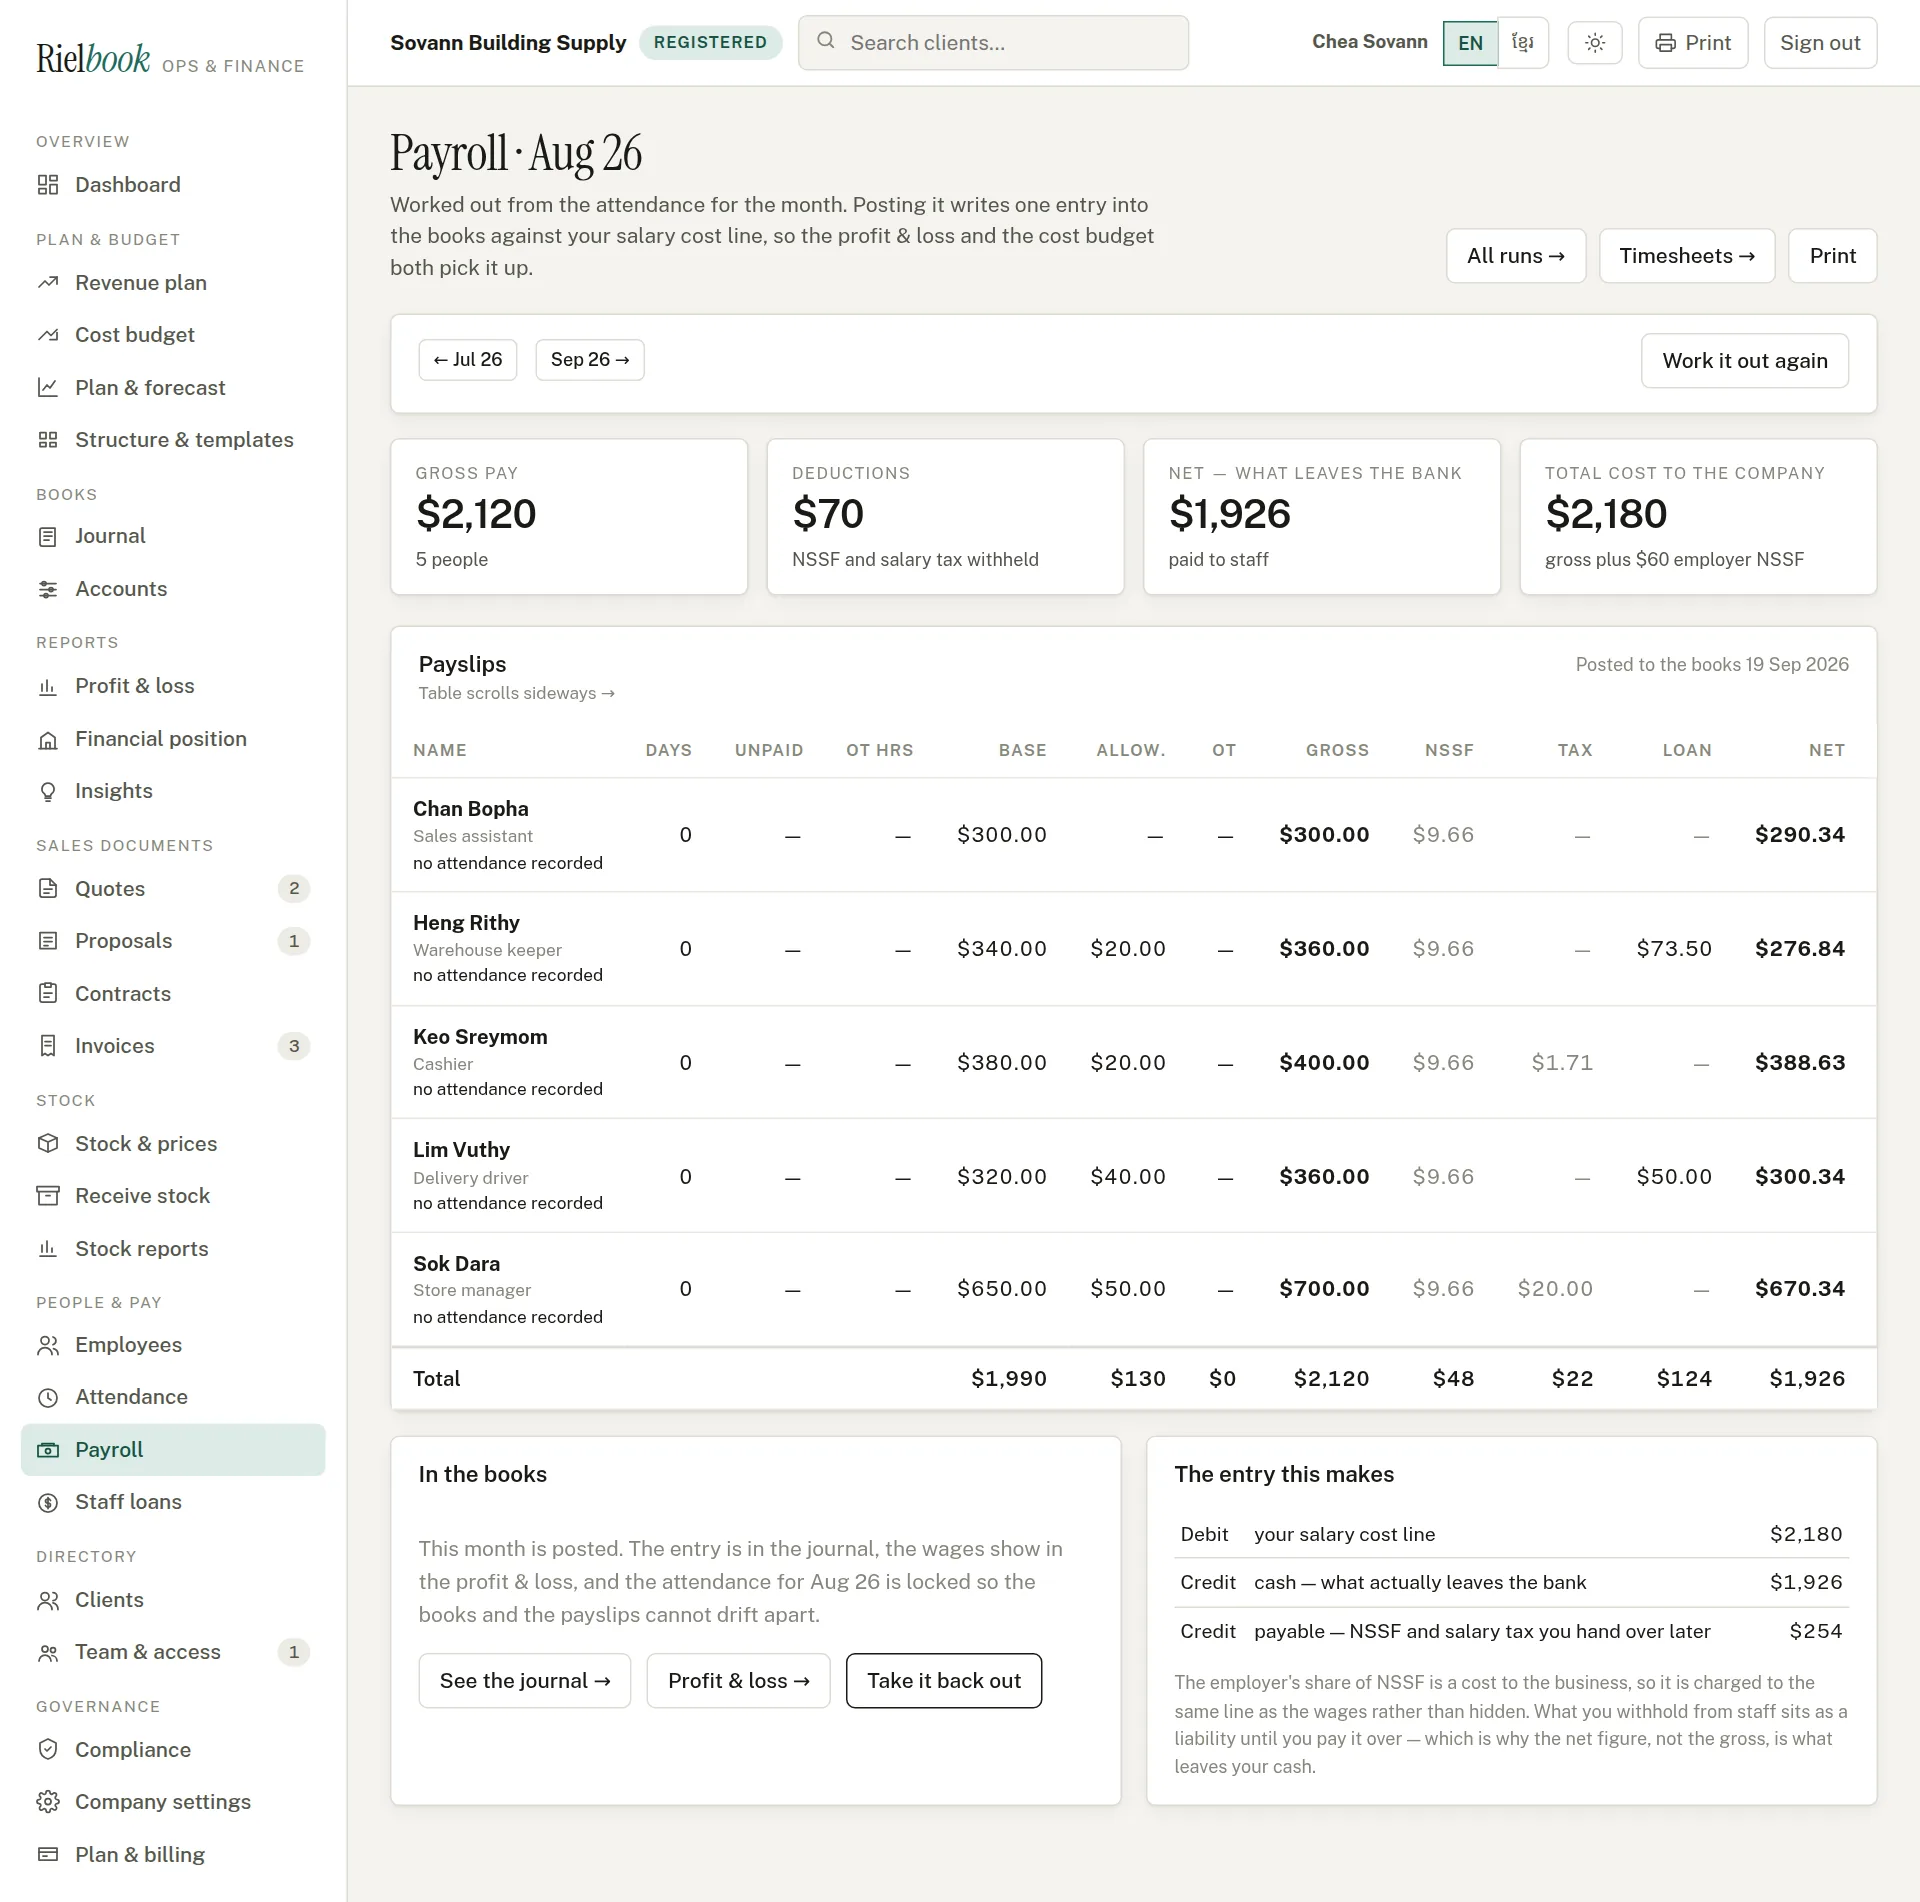
- Read the table: for each person the days, unpaid days, overtime, base, allowances, gross, NSSF, salary tax, any staff loan repayment, and the net that goes to them. The tiles give the gross, the deductions, what leaves the bank, and the total cost to the company including the employer's NSSF.
- Under Put it in the books, choose the date the salaries are paid and press Post to the books. The entry this makes shows exactly what will be written: the salary cost, the cash paid out, and the tax and NSSF you now owe until you pay them over.
A posted month locks that month's attendance. If you find a mistake, open the month and press Take it back out: the entry is removed, attendance unlocks, and you can fix it and post again.
Payslips
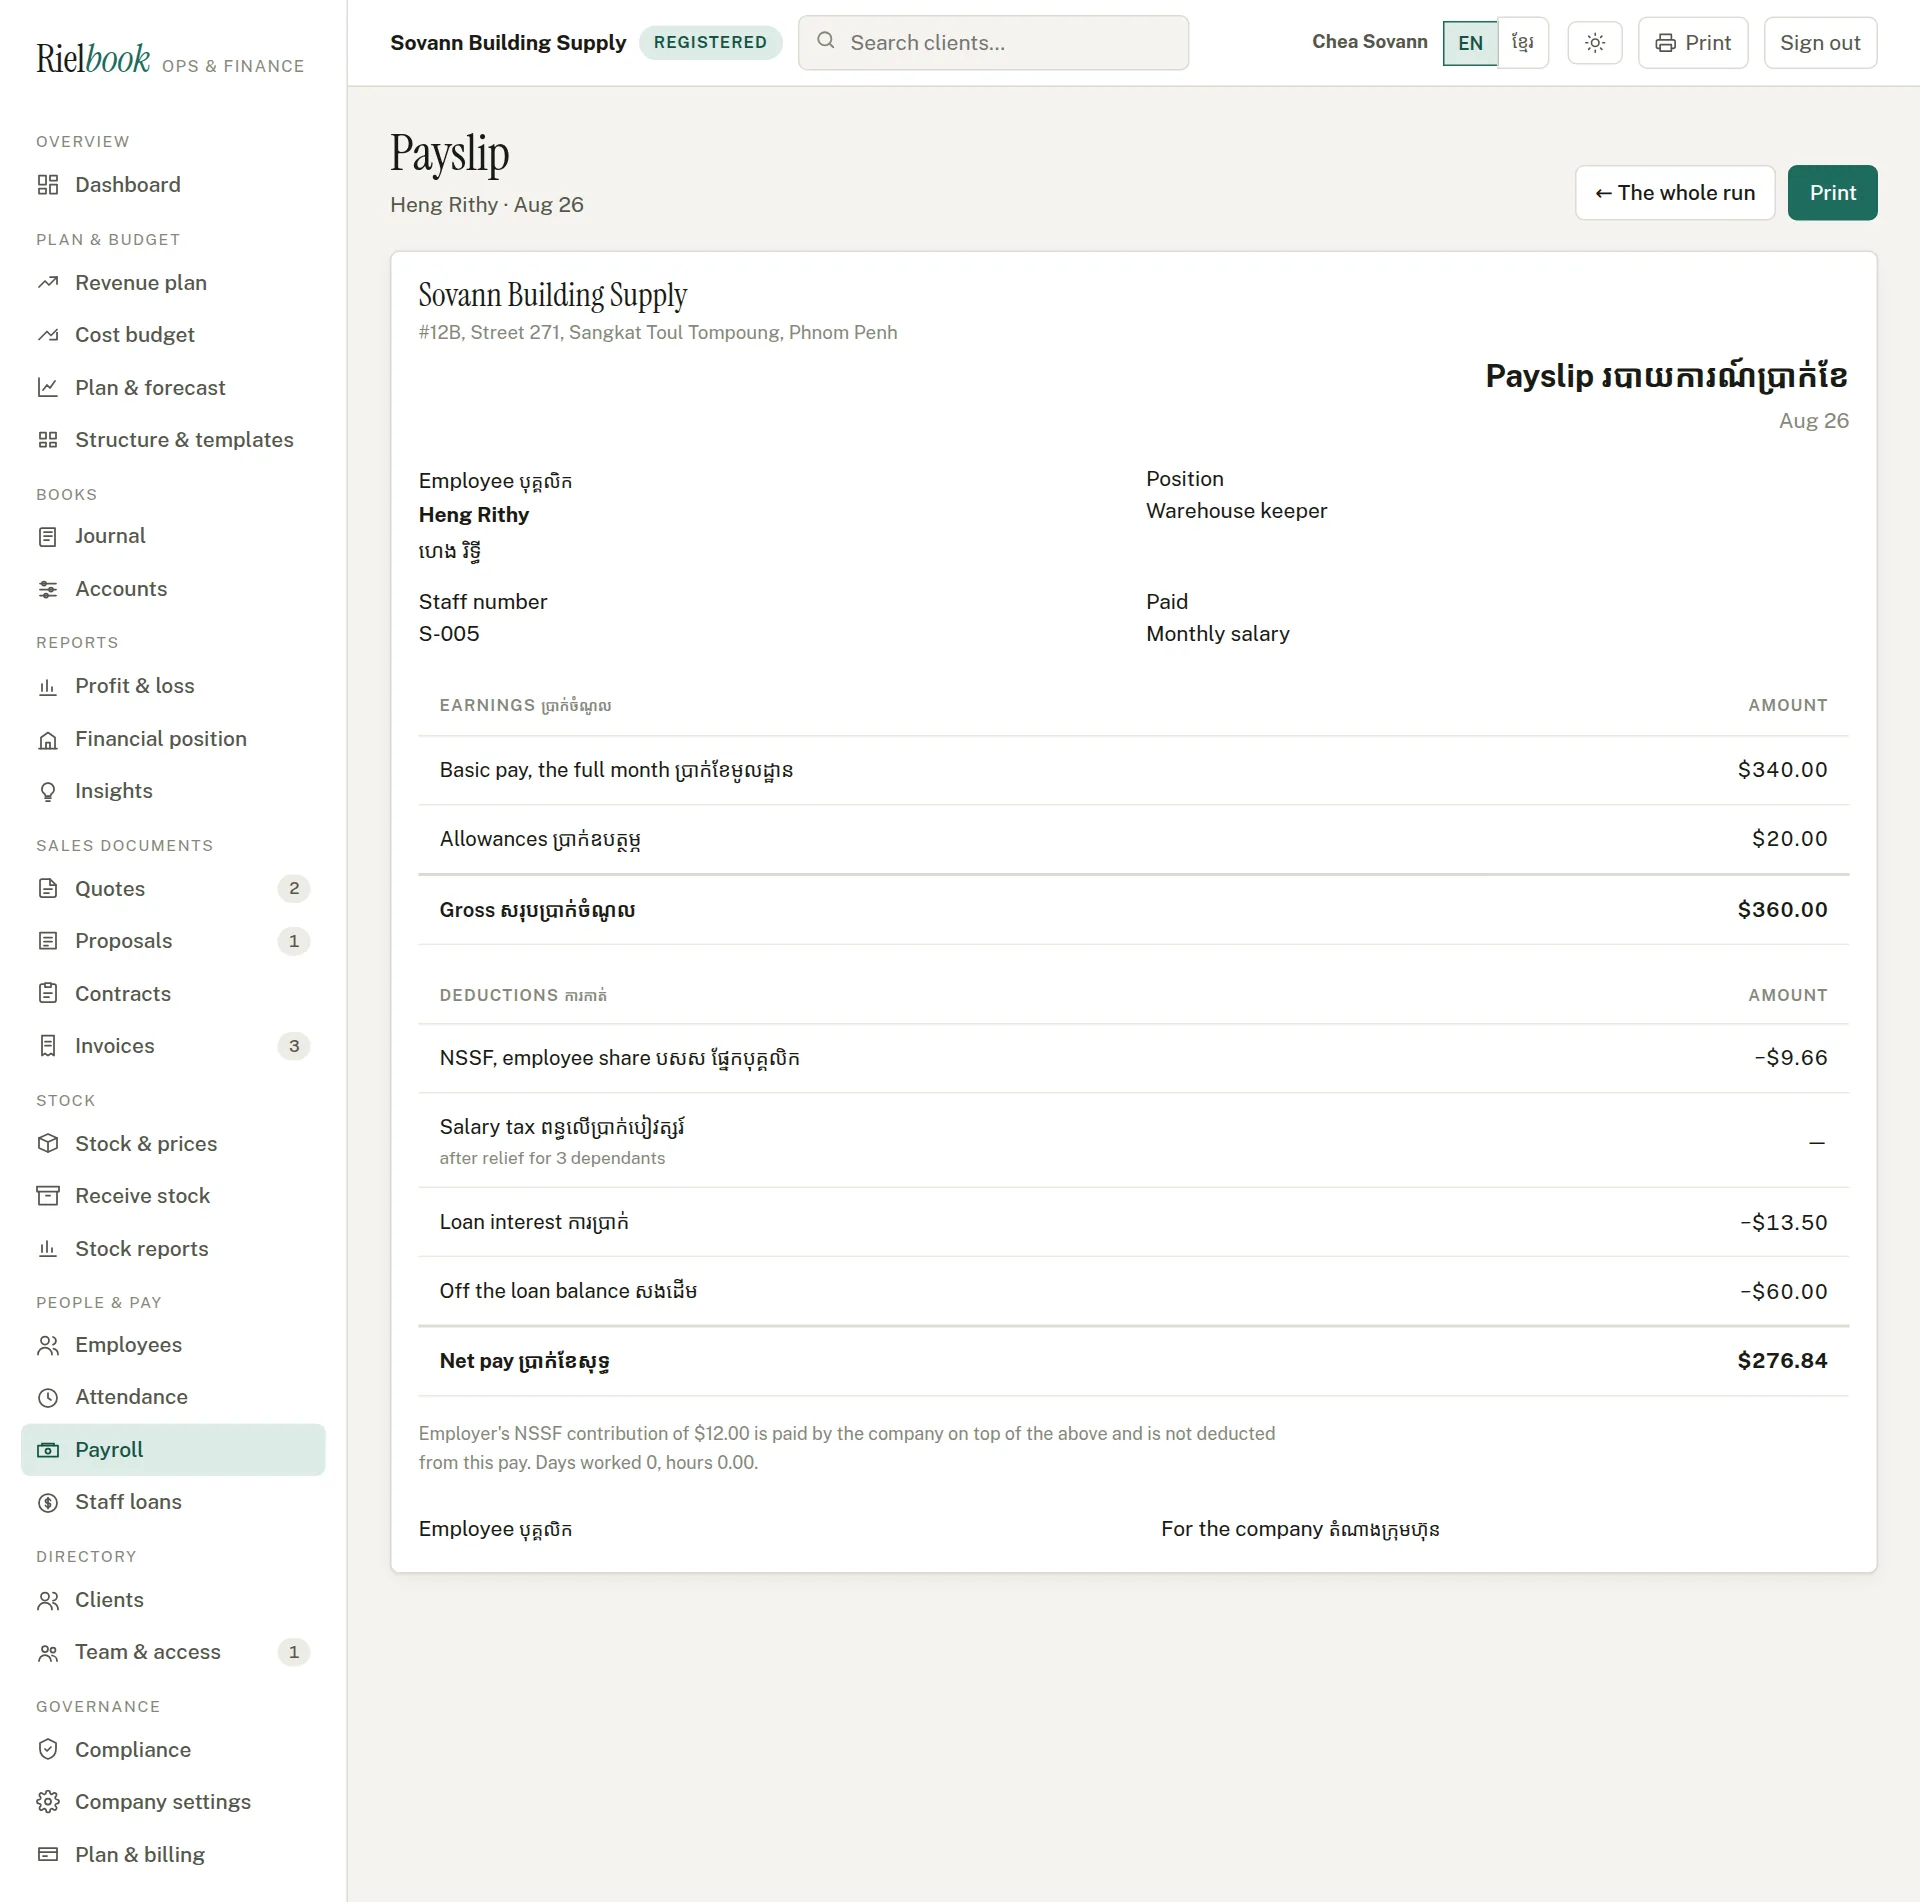
Press Payslip at the end of a person's row to open their payslip — earnings, deductions and net pay, in Khmer and English — then Print. The employer's NSSF share is noted underneath: the company pays it on top, it does not come out of the salary.
The add-ons: stock and staff loans
Two modules a company switches on only if it needs them, each for a small monthly price on top of the plan. If your menu has no Stock group or no Staff loans item, your company does not have that add-on yet — see Switching an add-on on.
Stock: bring in the price list you already have
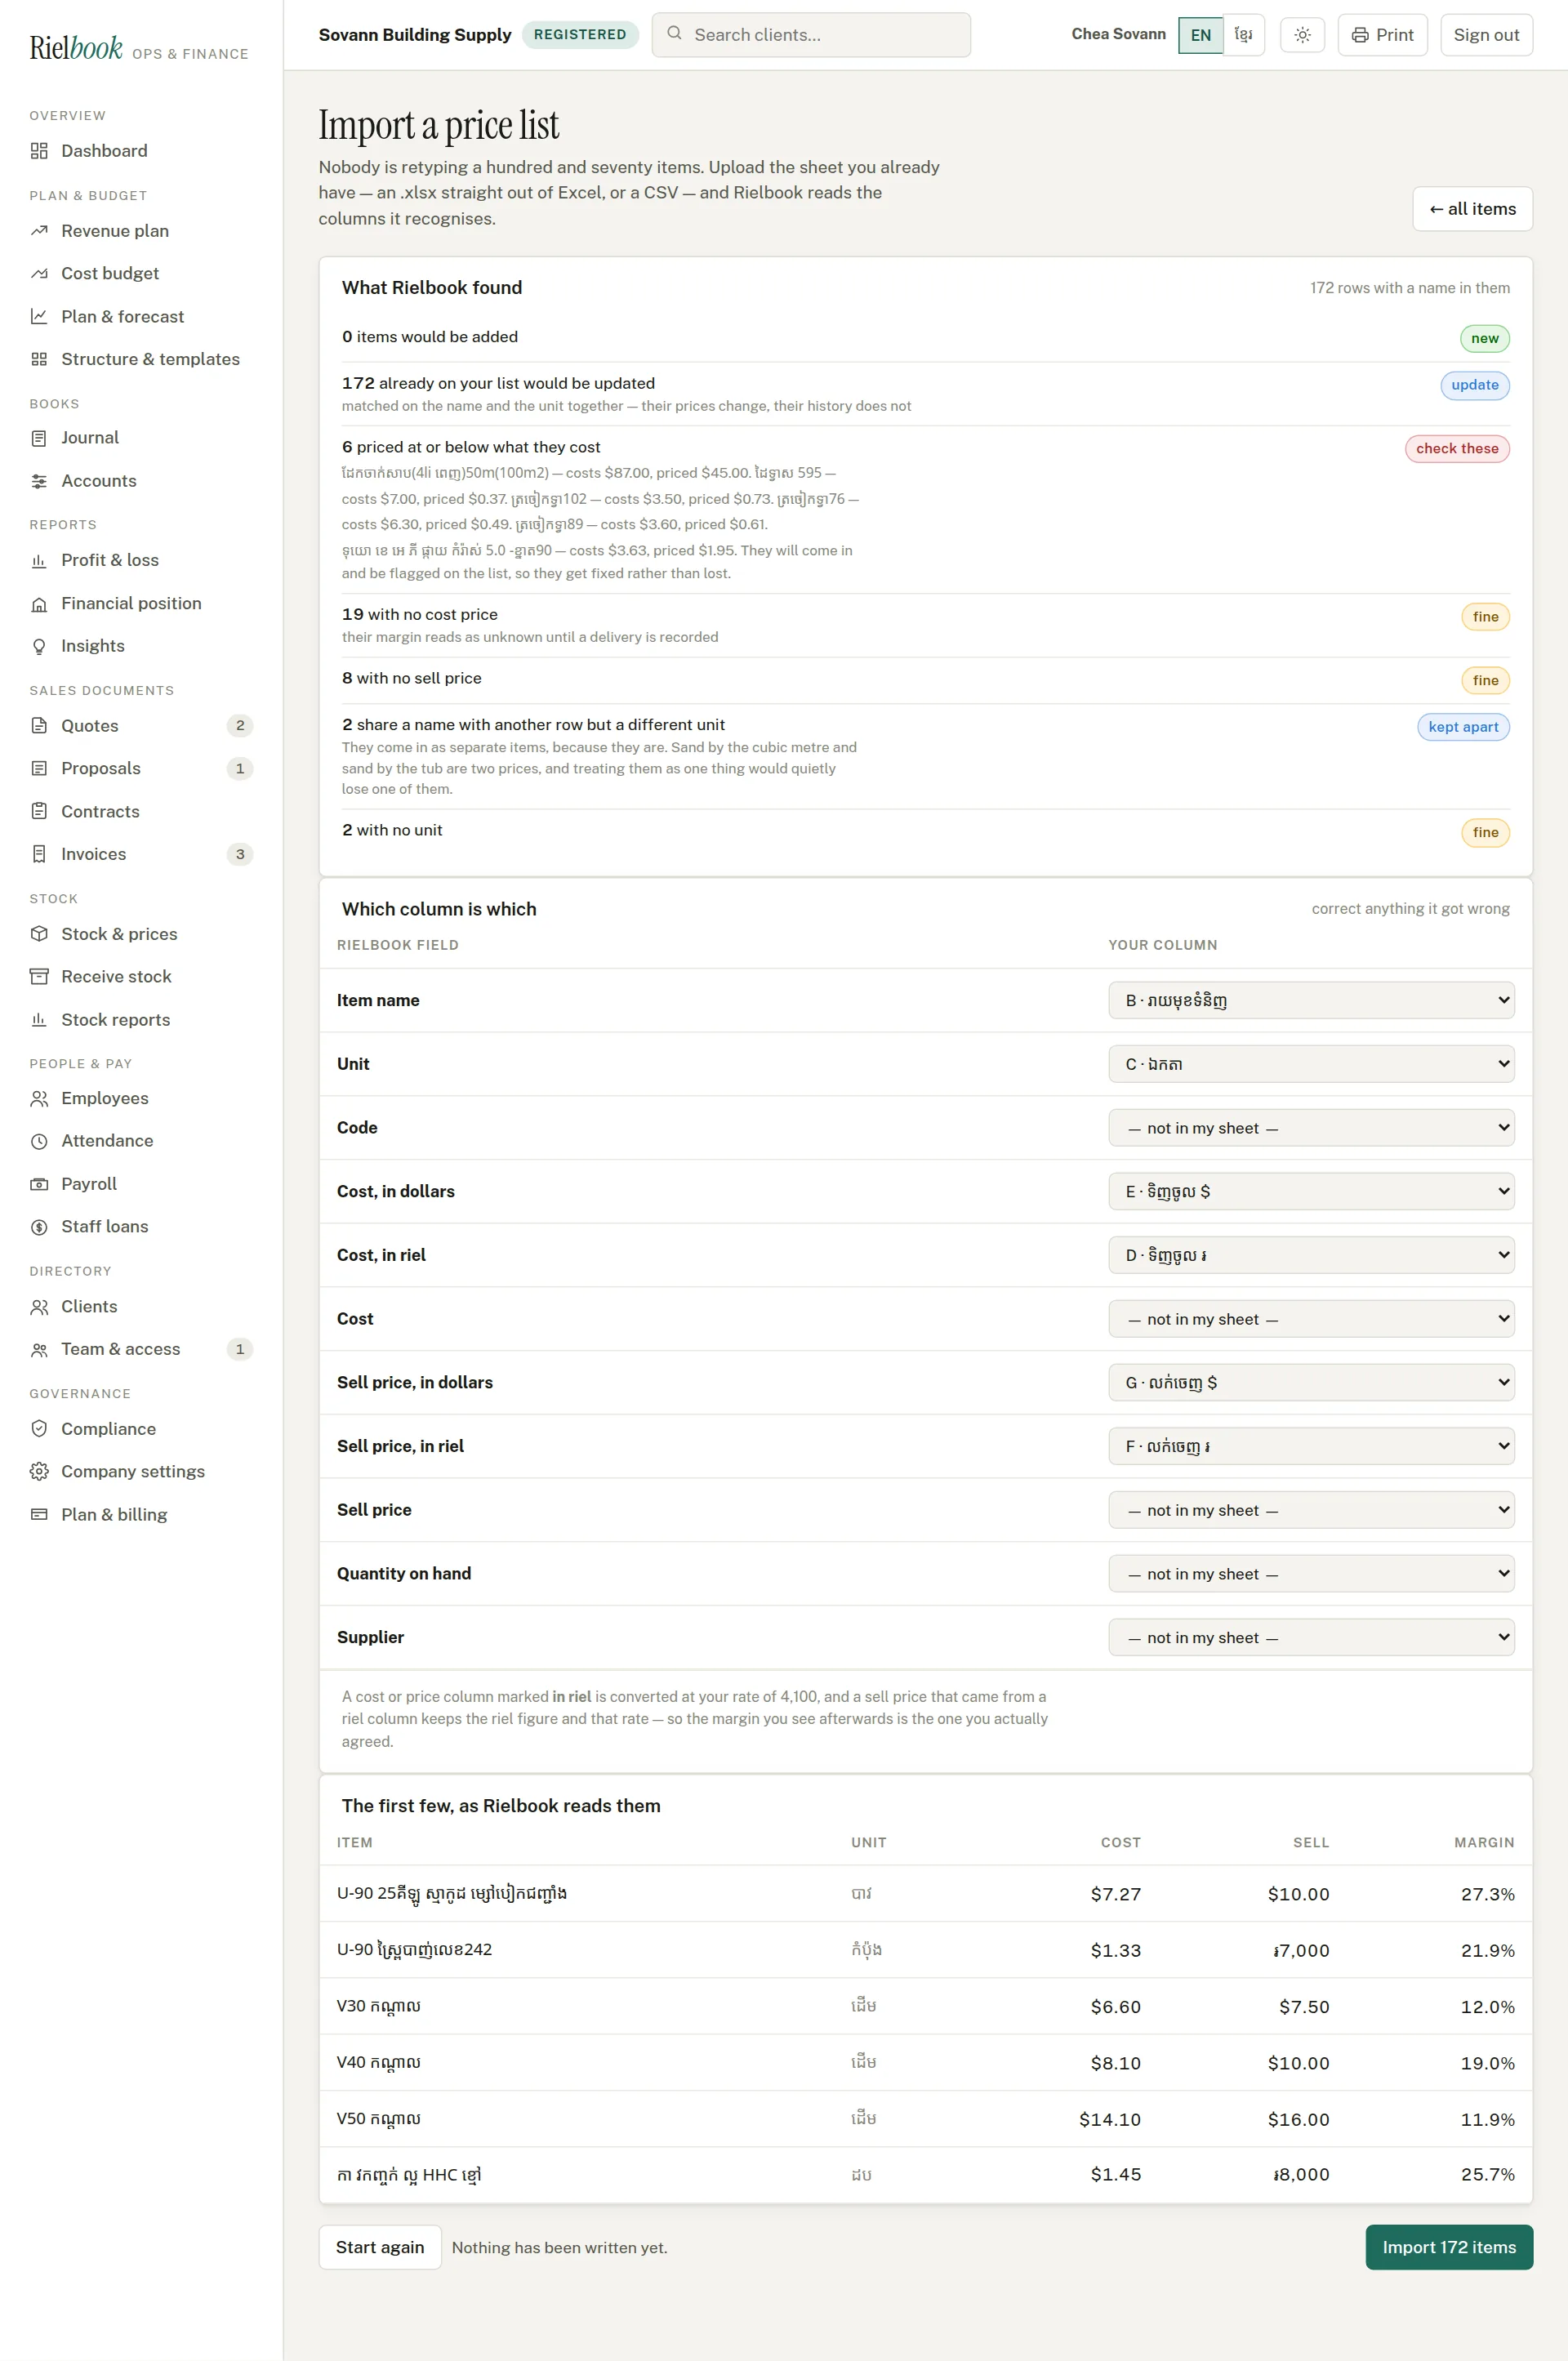
Most shops already keep their prices in an Excel sheet — often with Khmer column headings, a riel column beside a dollar column, and some rows that have gone wrong over the years. Rielbook reads that sheet as it is, shows you what it found, and writes nothing until you press the button.
Stock›Stock & prices›Import a list
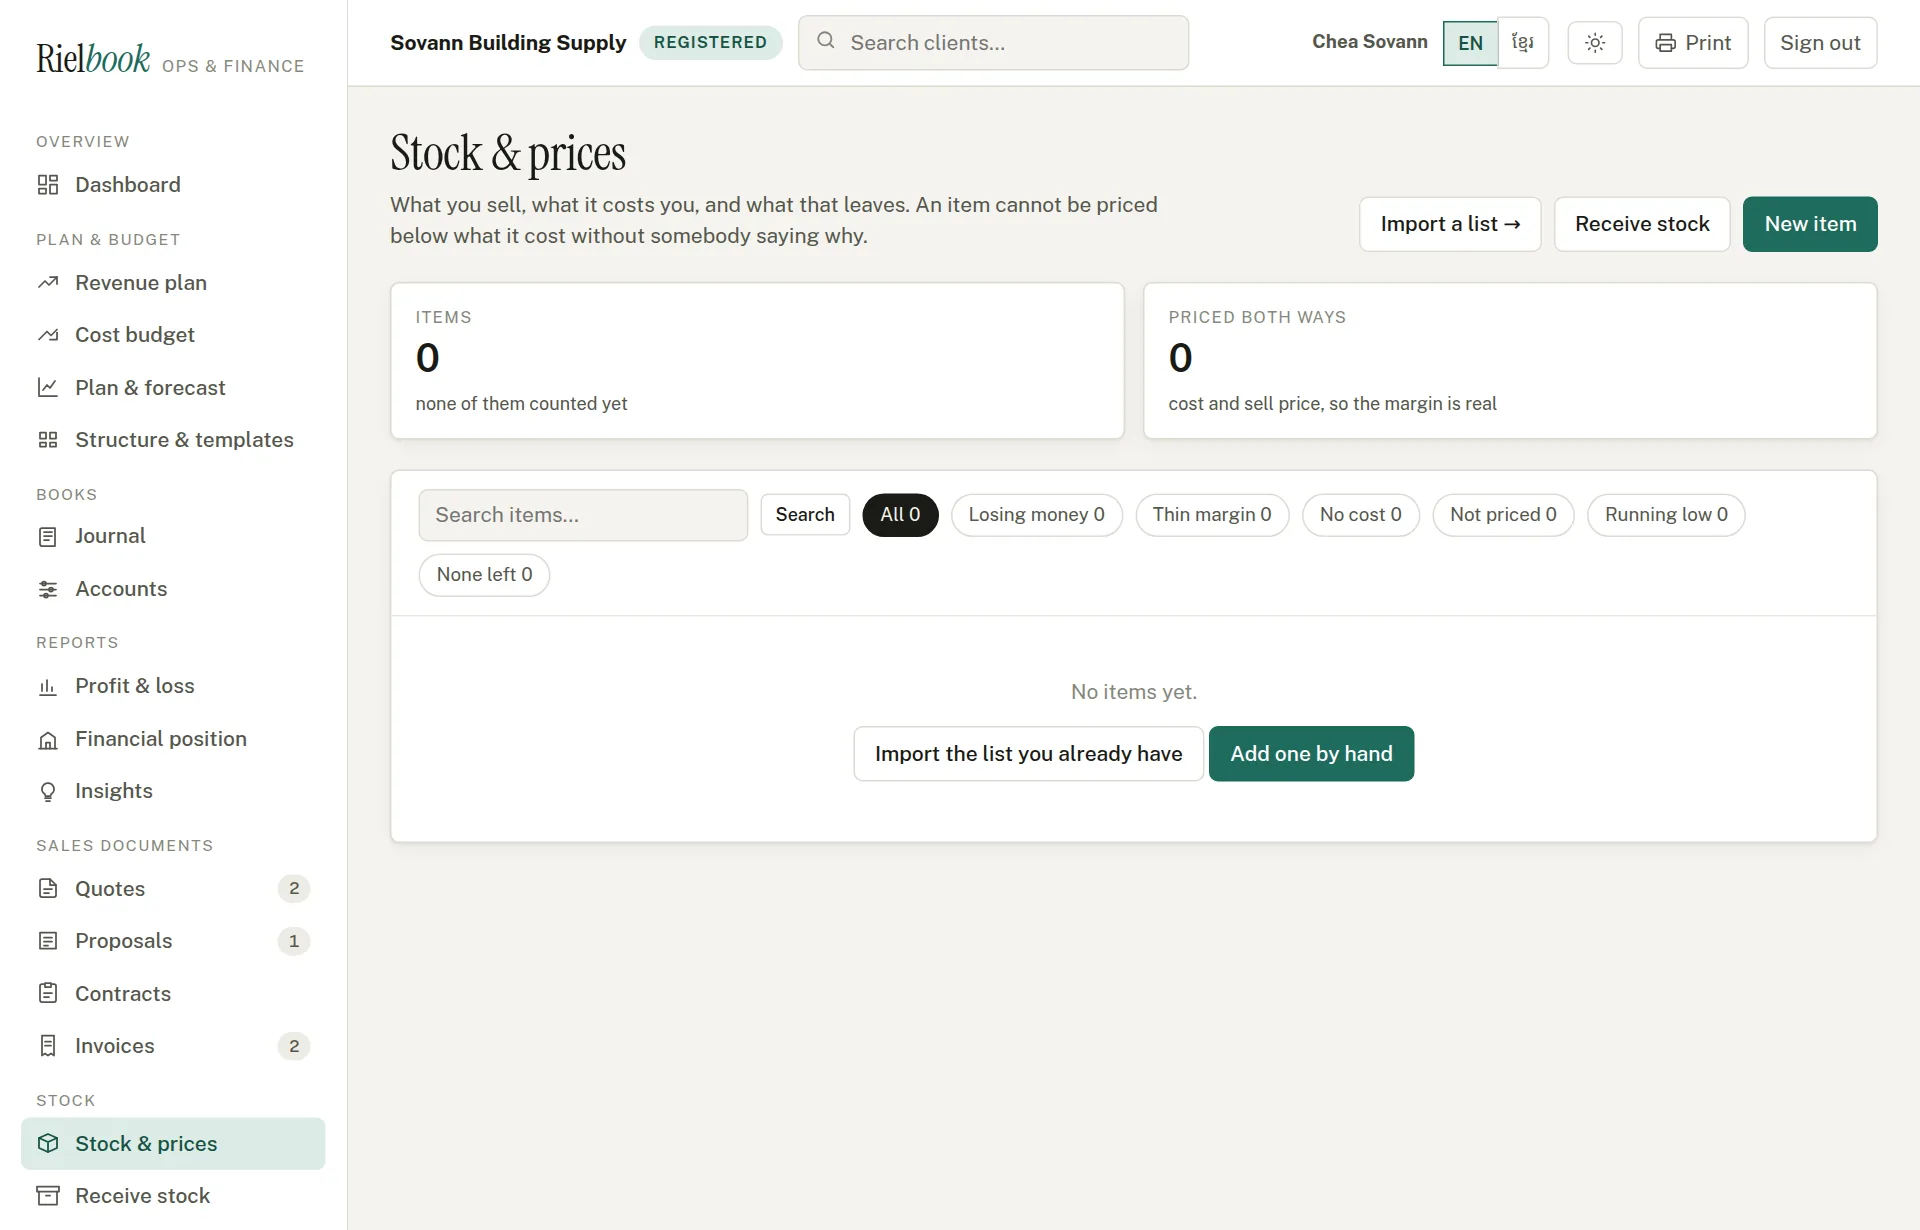
- Under The file, choose your sheet — an .xlsx straight out of Excel or a .csv. Or copy the rows in Excel and paste them into the box underneath.
- Press Read the sheet. Nothing is saved yet.
- Read What Rielbook found: how many items would be added or updated, which are priced at or below what they cost (listed by name), which have no cost or no sell price, and which share a name but have a different unit — sand by the cubic metre and sand by the tub are kept as two items, because they are two prices.
- Check Which column is which. Rielbook guesses from your headings, in Khmer or English, including a riel column and a dollar column side by side. Correct any it got wrong from the drop-downs.
- Look at The first few, as Rielbook reads them — cost, sell price and margin. If they look right, press Import 172 items (the number is your own). If not, press Start again.
The price list, and what is worth looking at
Stock›Stock & prices
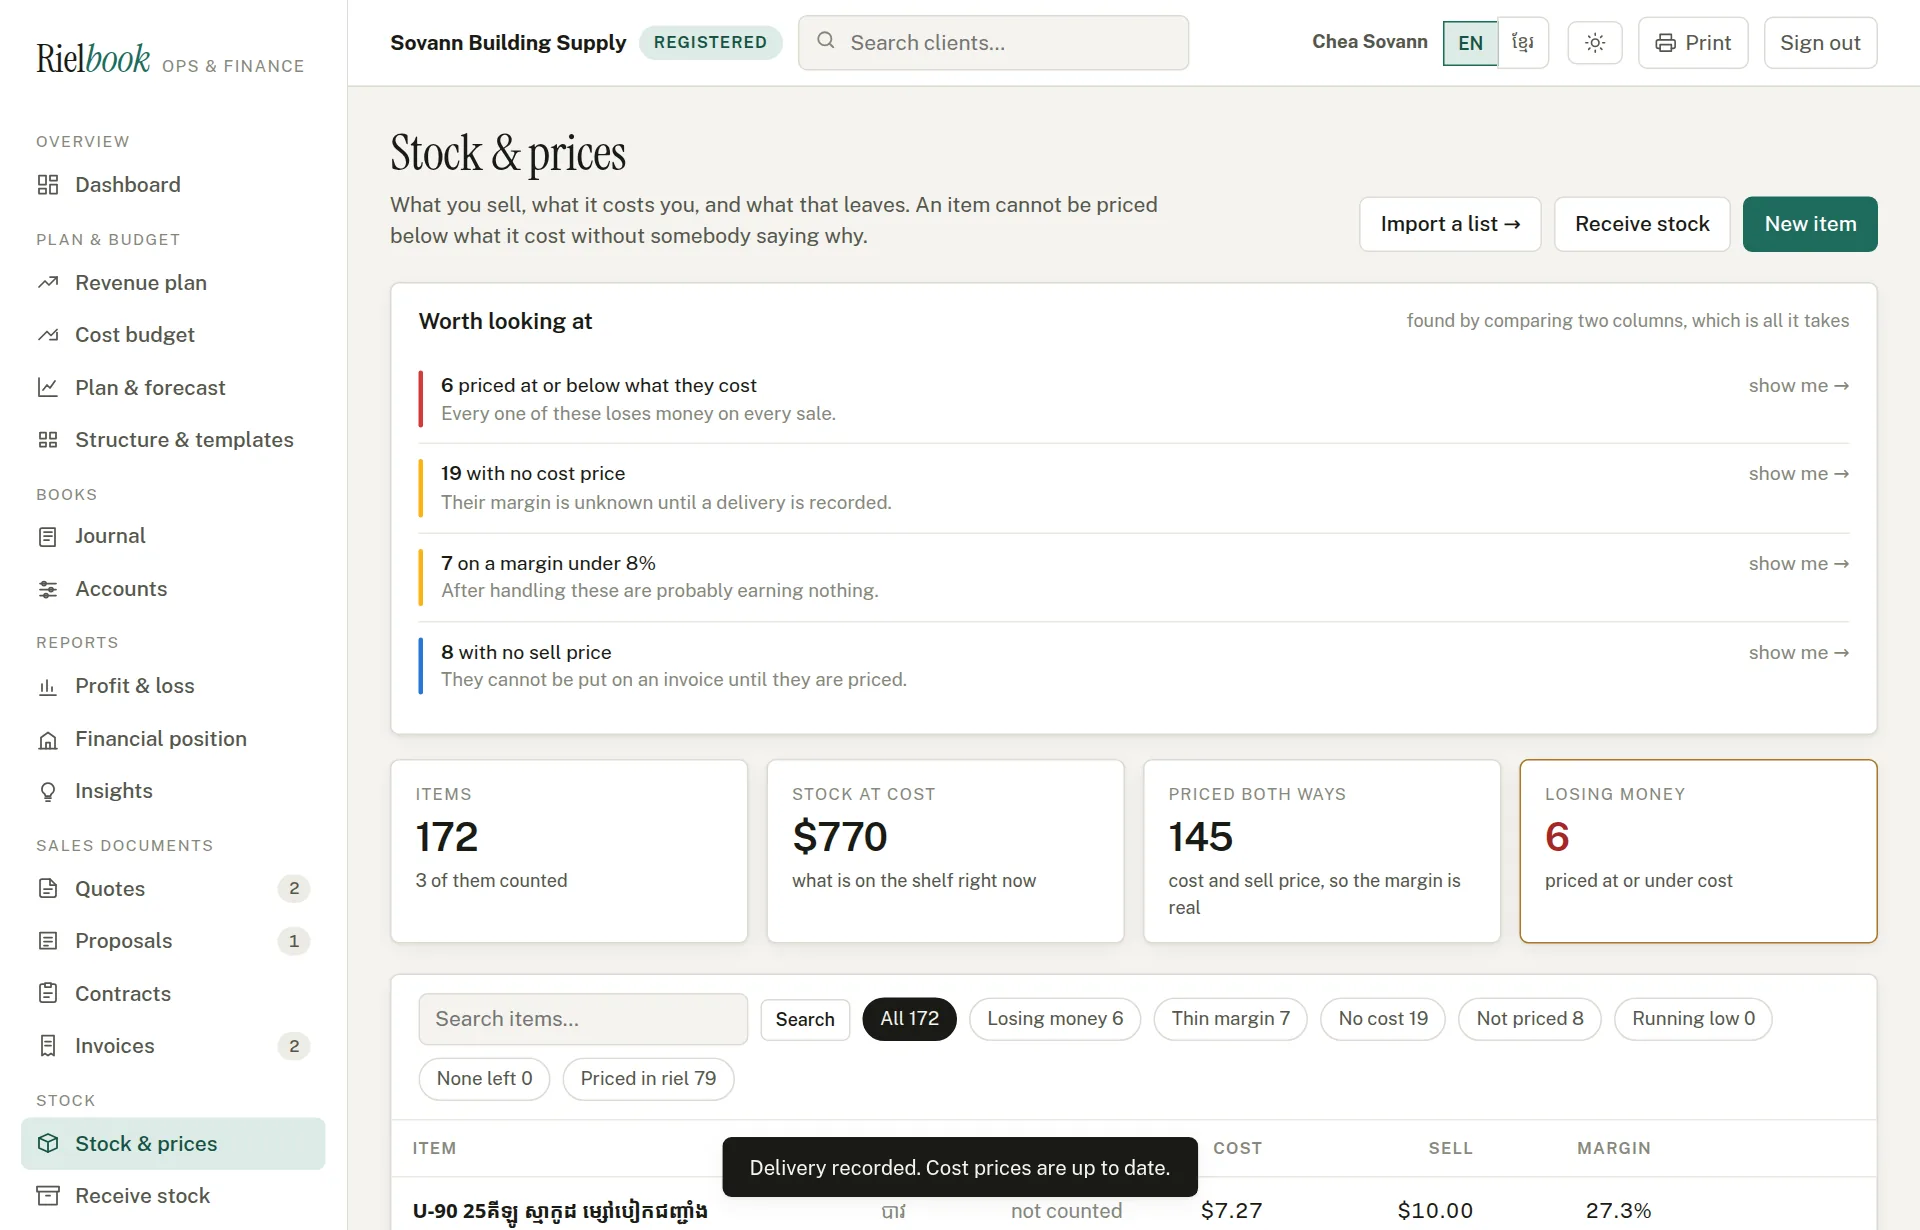
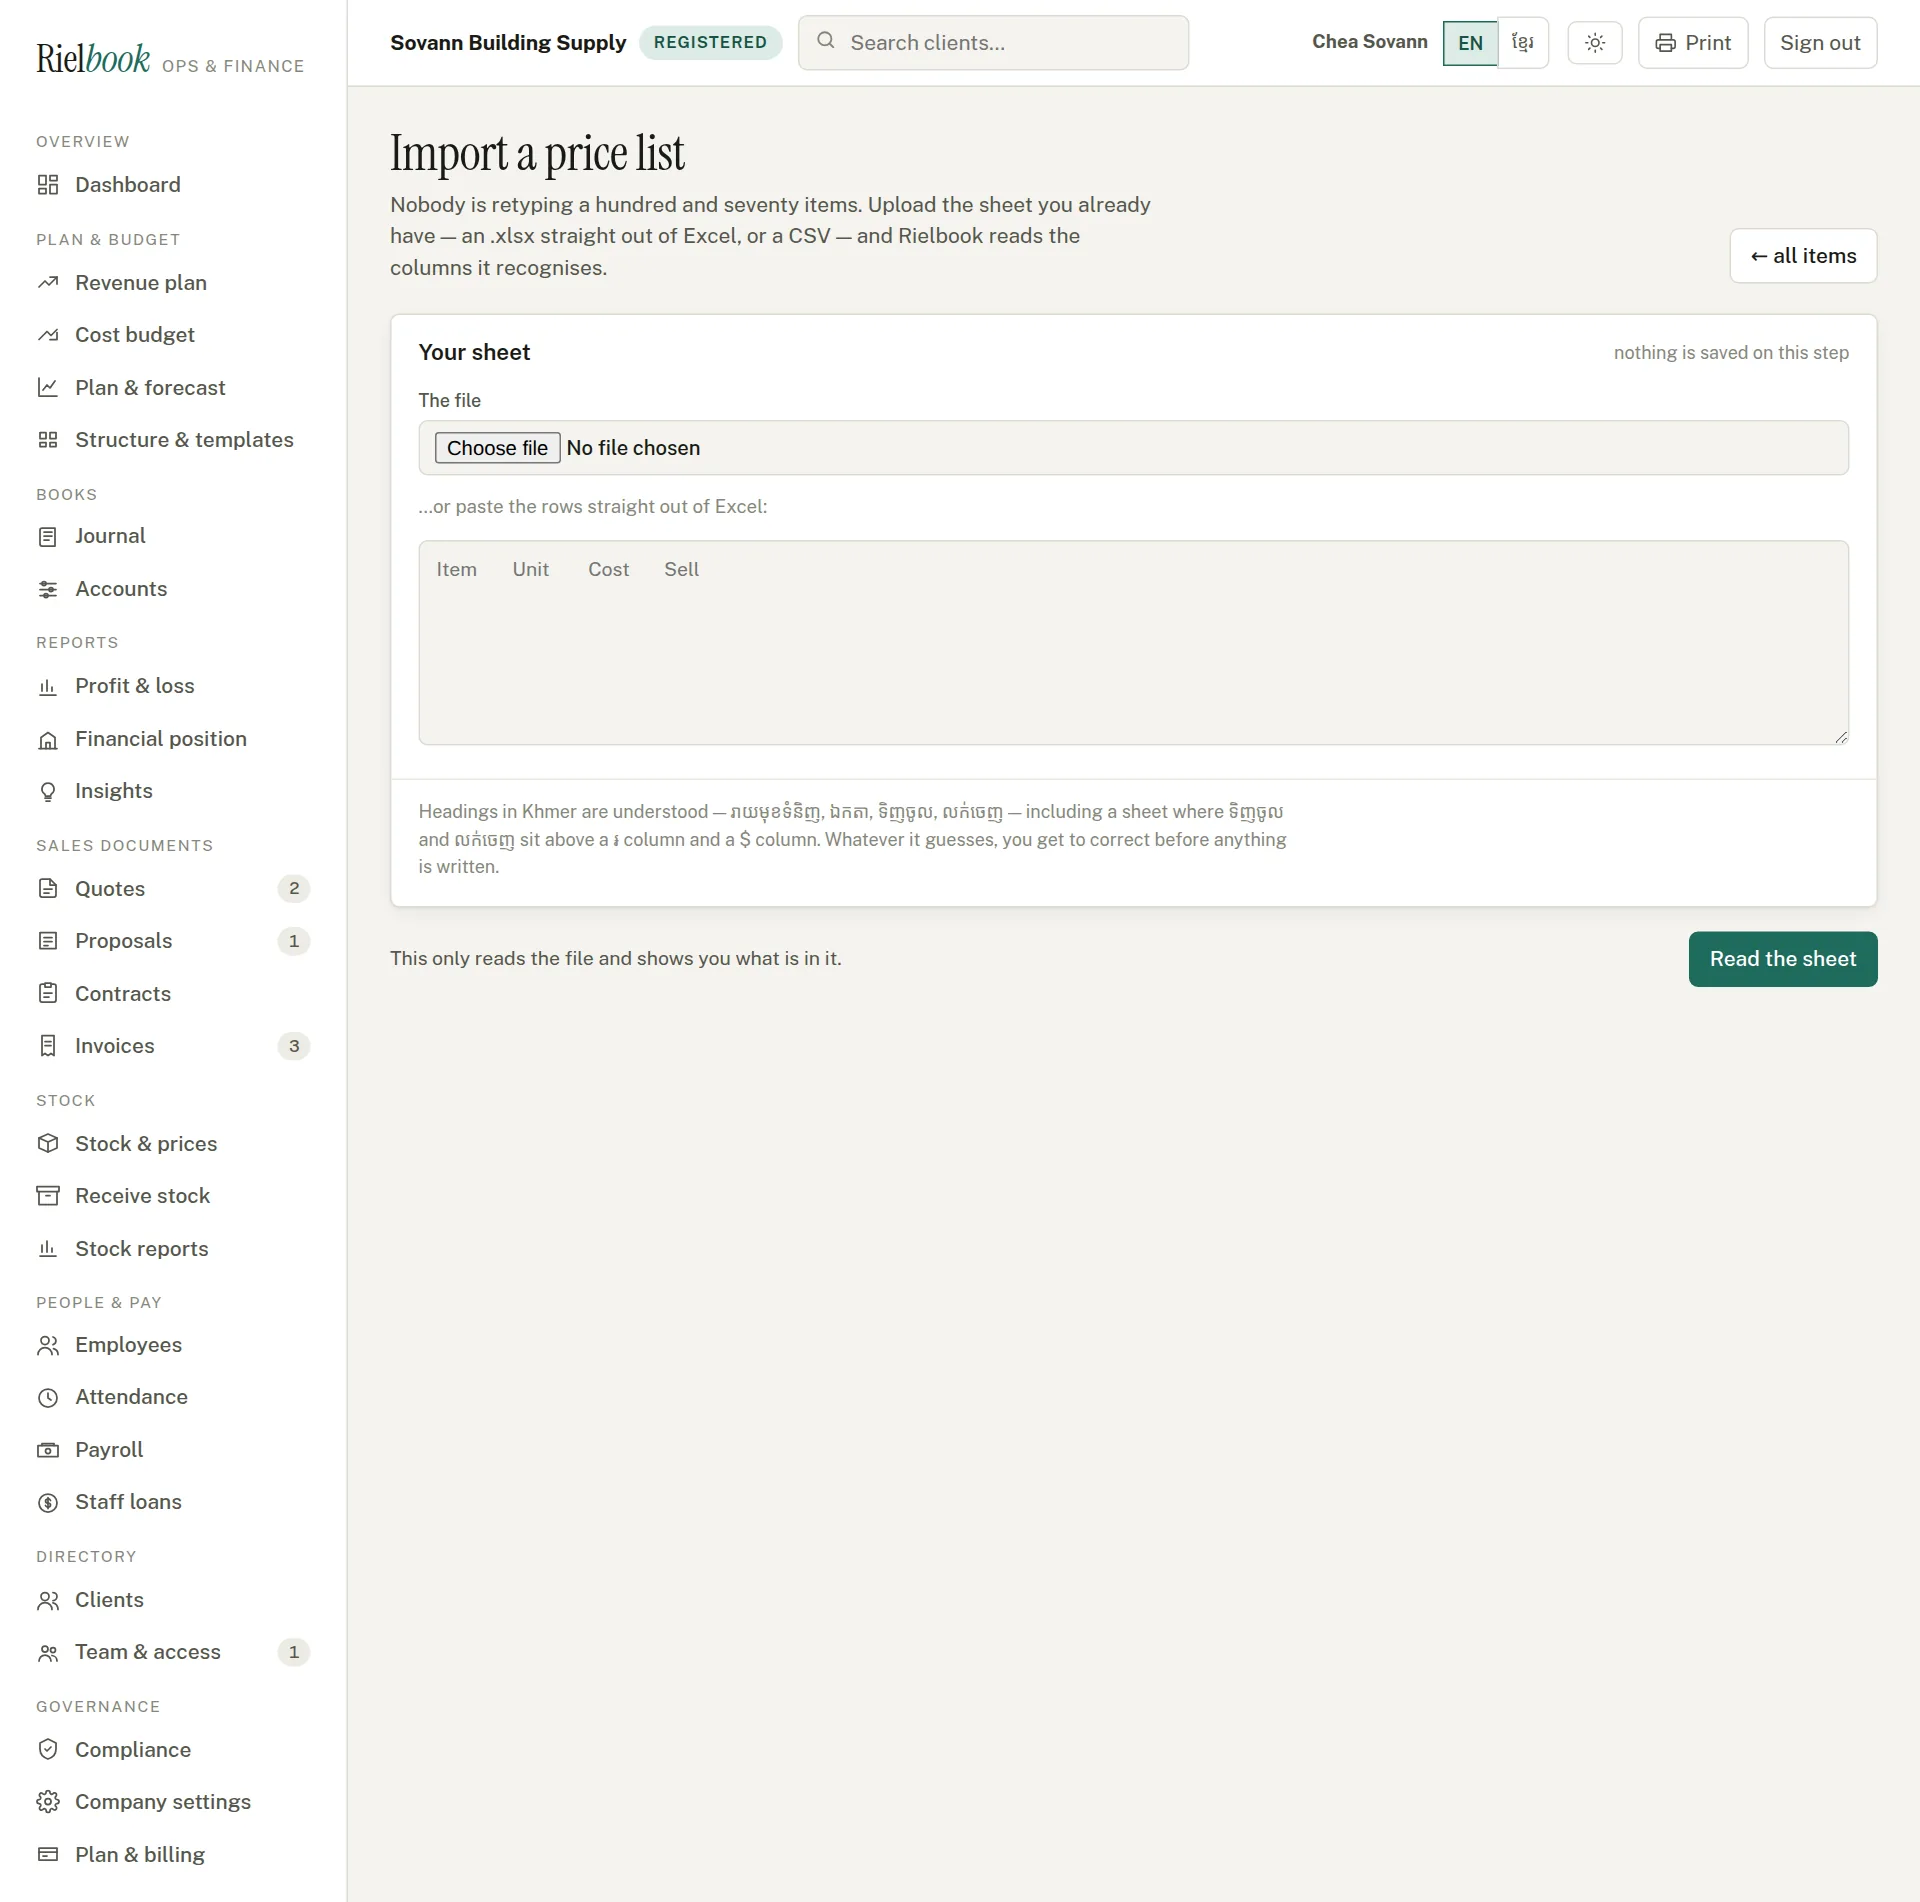
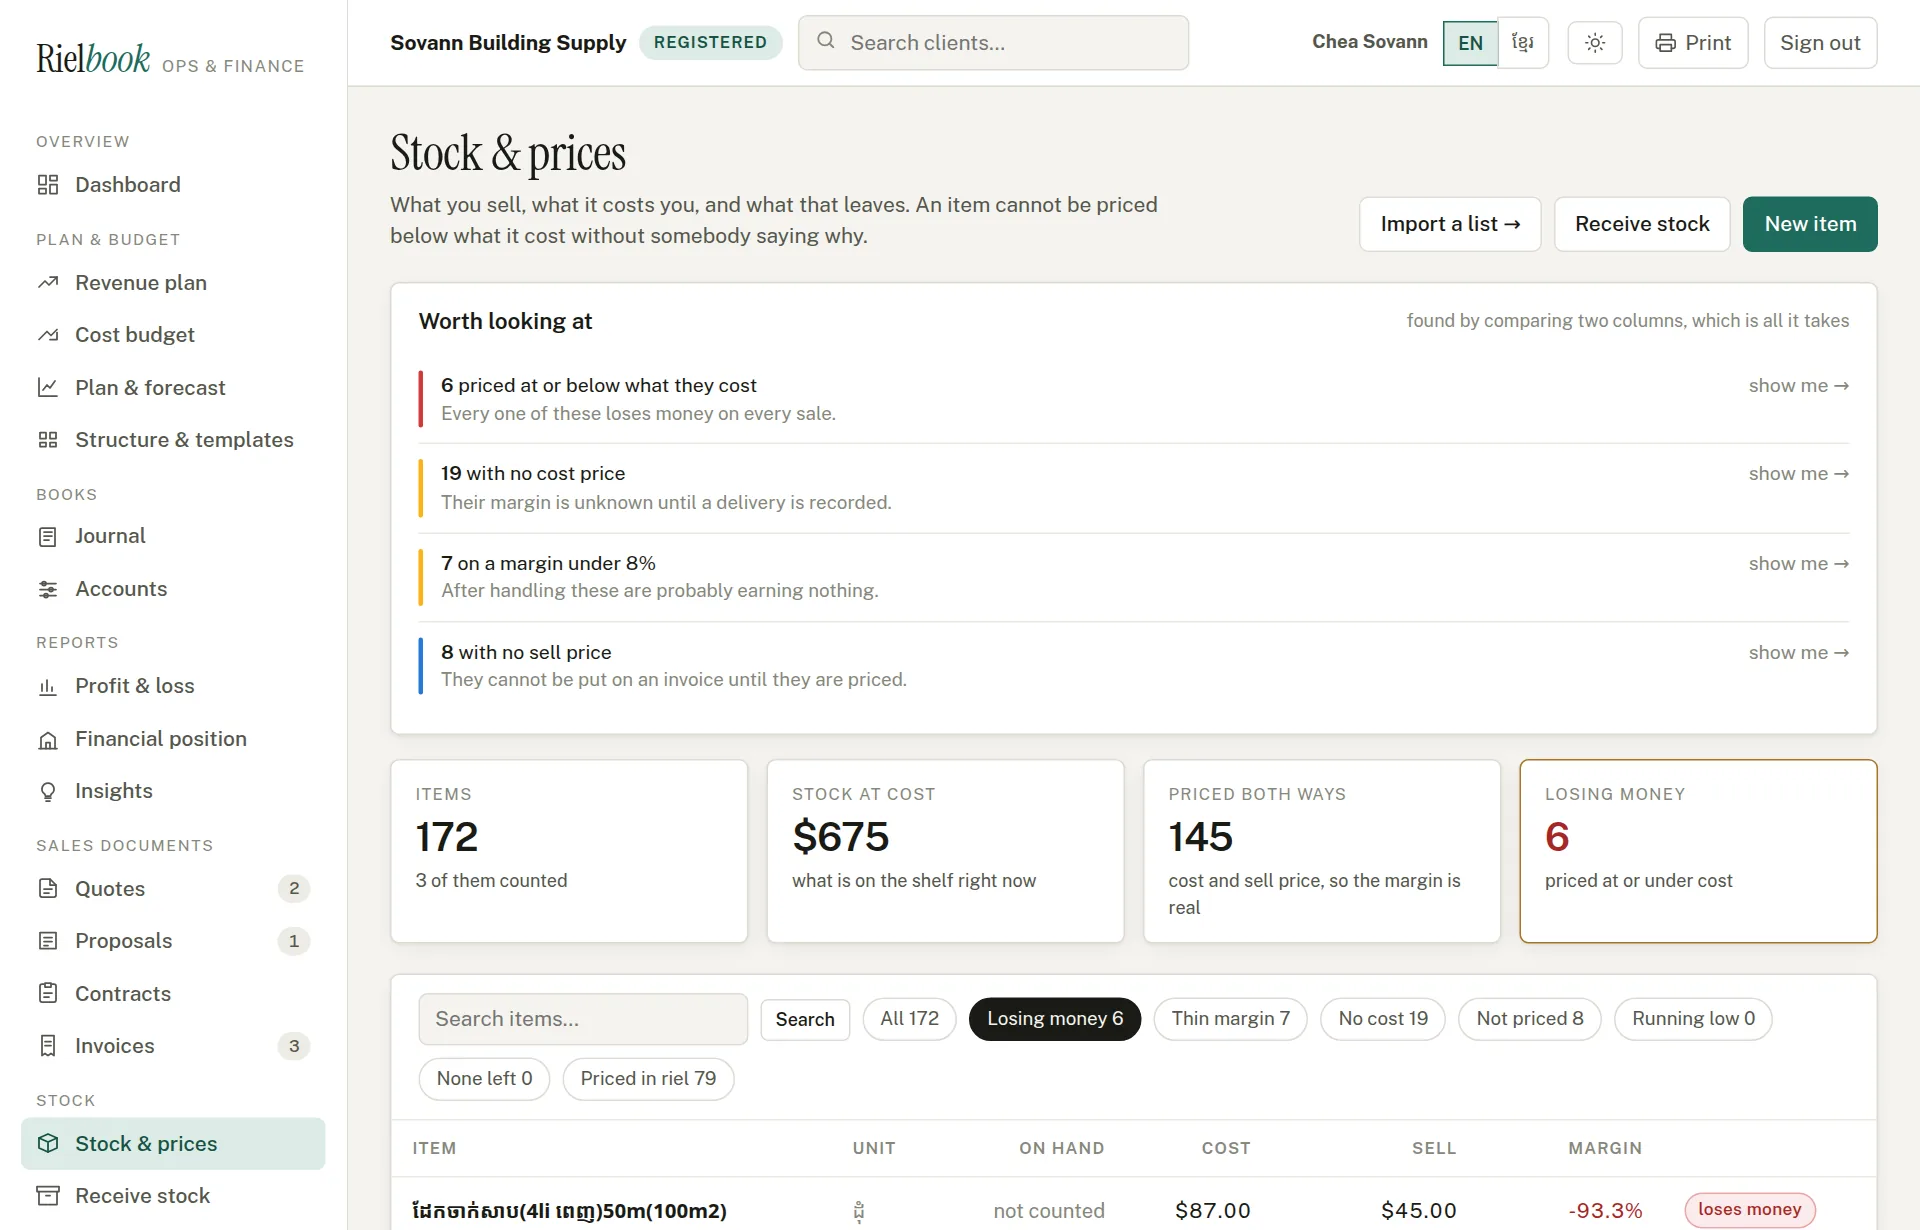
- Worth looking at lists the problems: items priced at or below cost, with no cost price, on a margin under 8%, or with no sell price. Press show me → to see only those.
- The tiles count all items, the stock value at cost (for counted items), items priced both ways, and those losing money.
- Search by name, or use the filters: Losing money, Thin margin, No cost, Not priced, Running low, None left, Priced in riel.
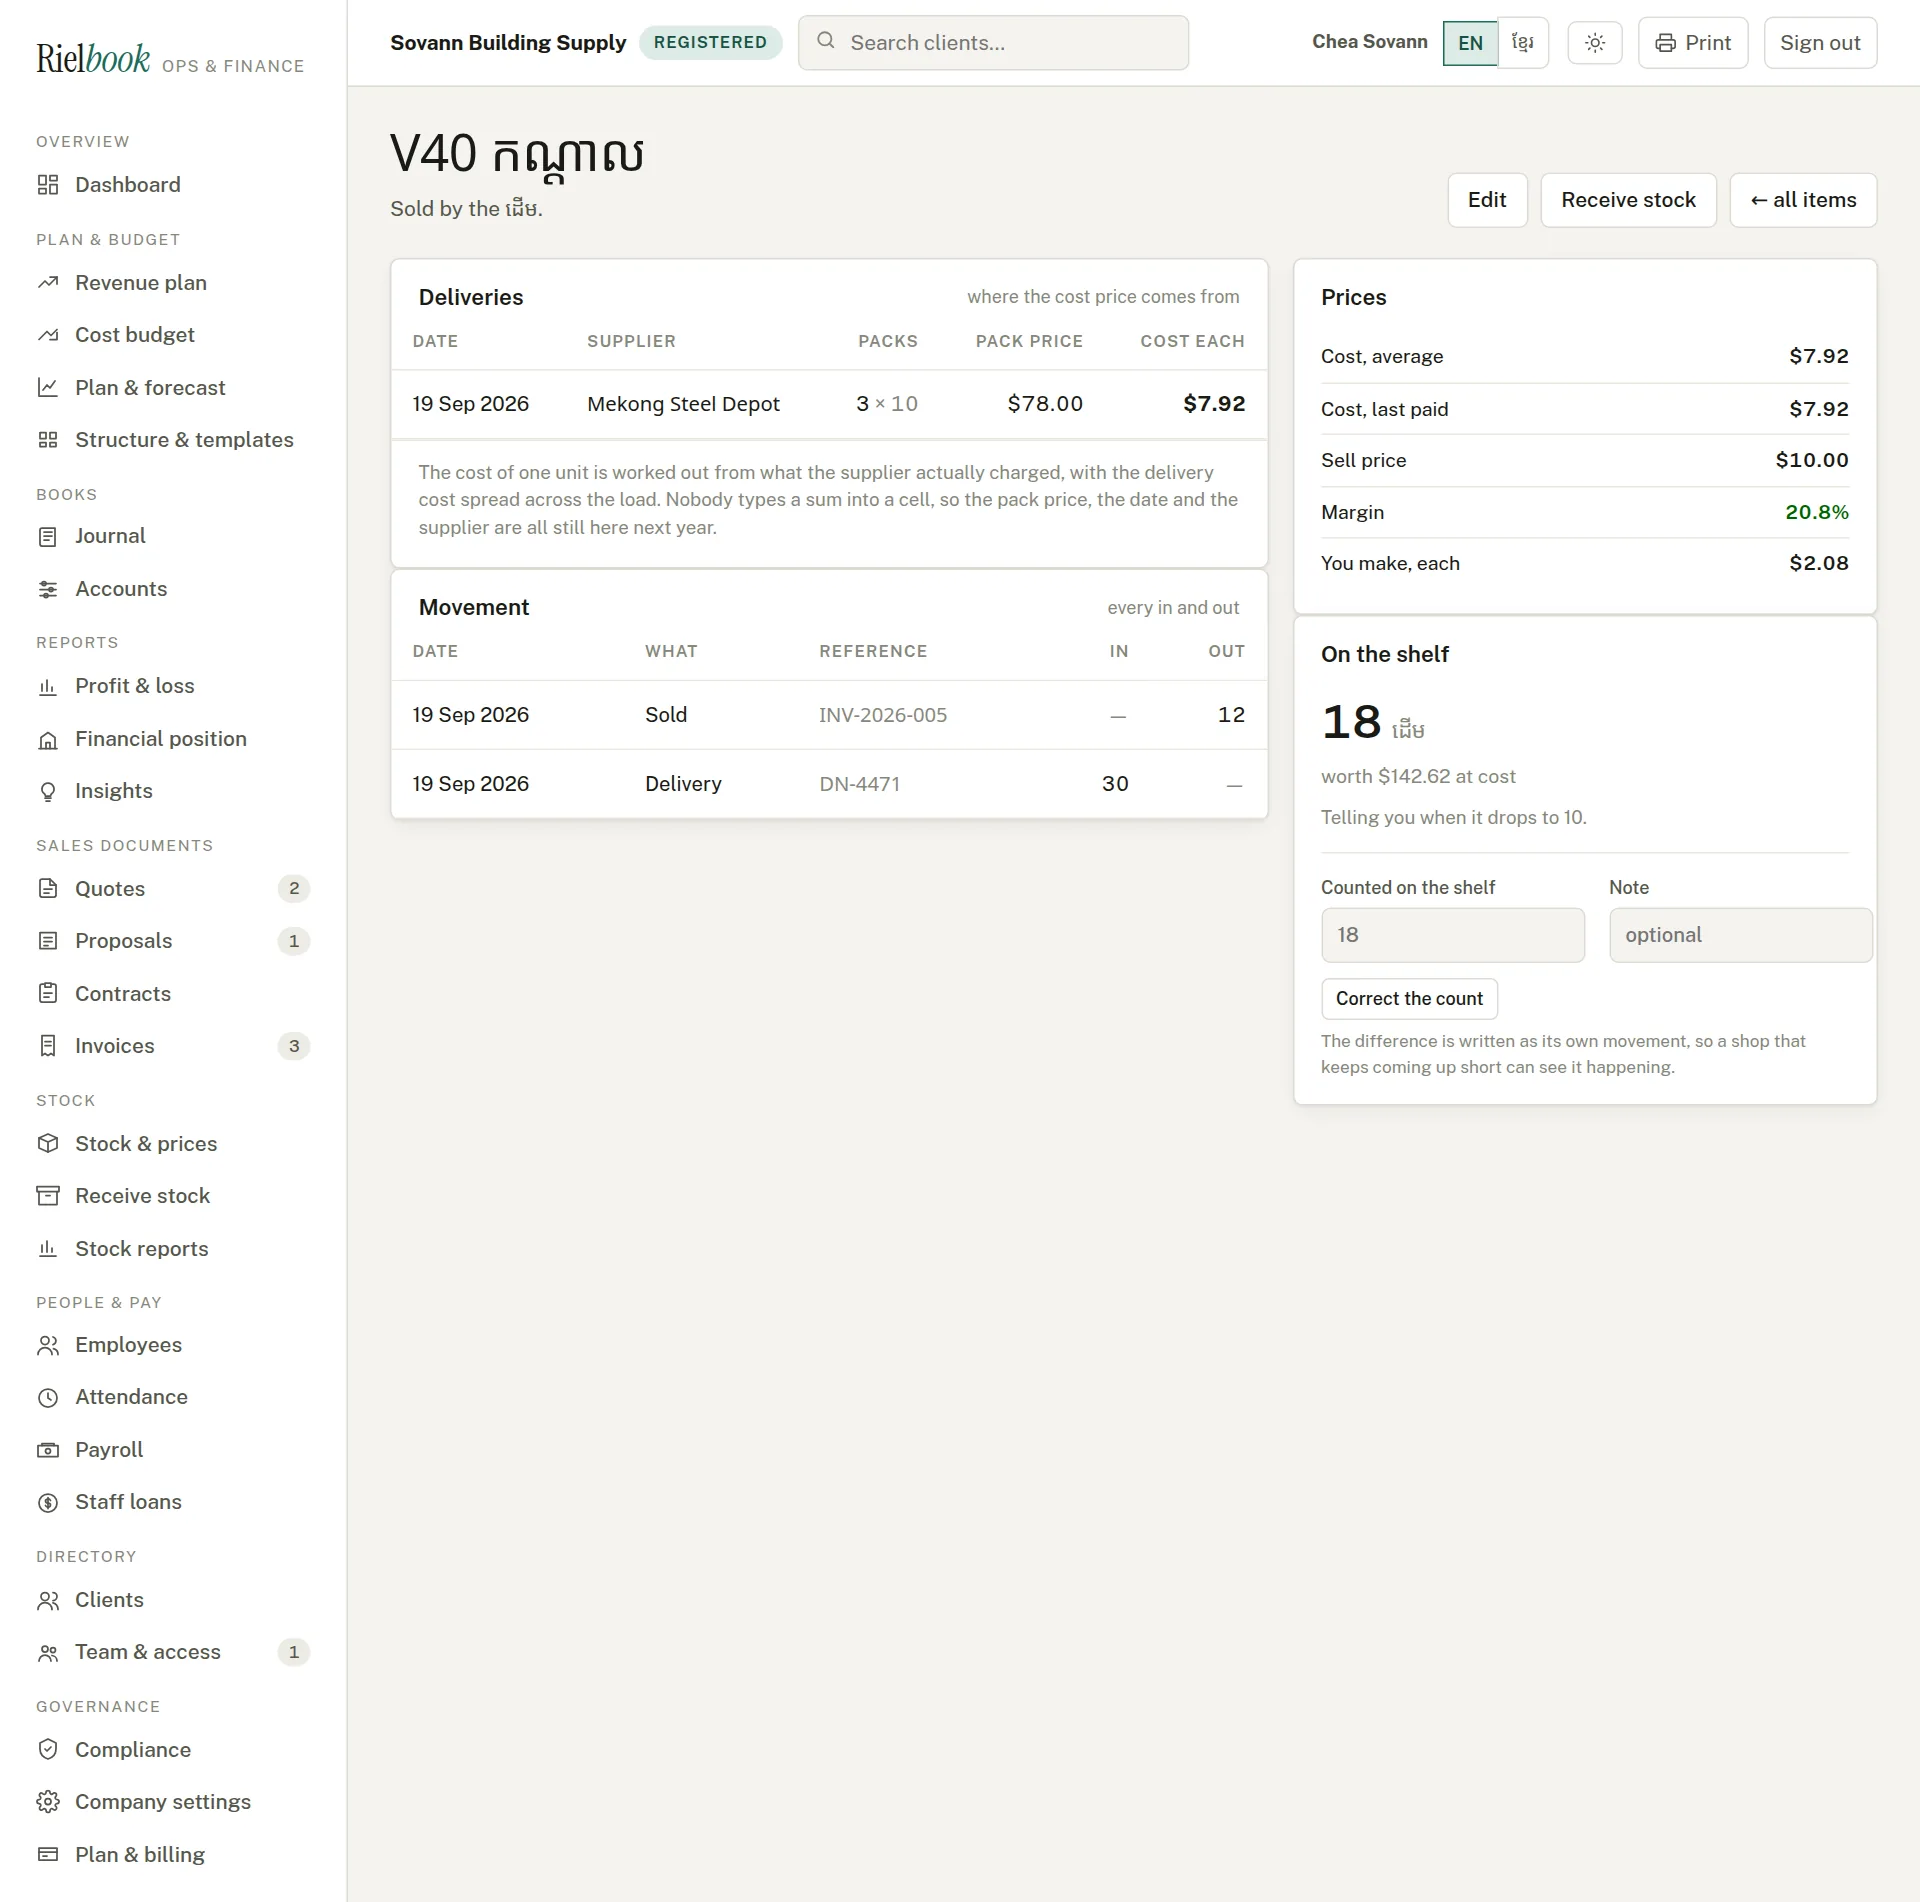
One item
Press an item to see its prices — average cost, last cost paid, sell price, margin and what you make on each — every delivery it came in on, every movement in and out, and, if it is counted, how many are on the shelf.
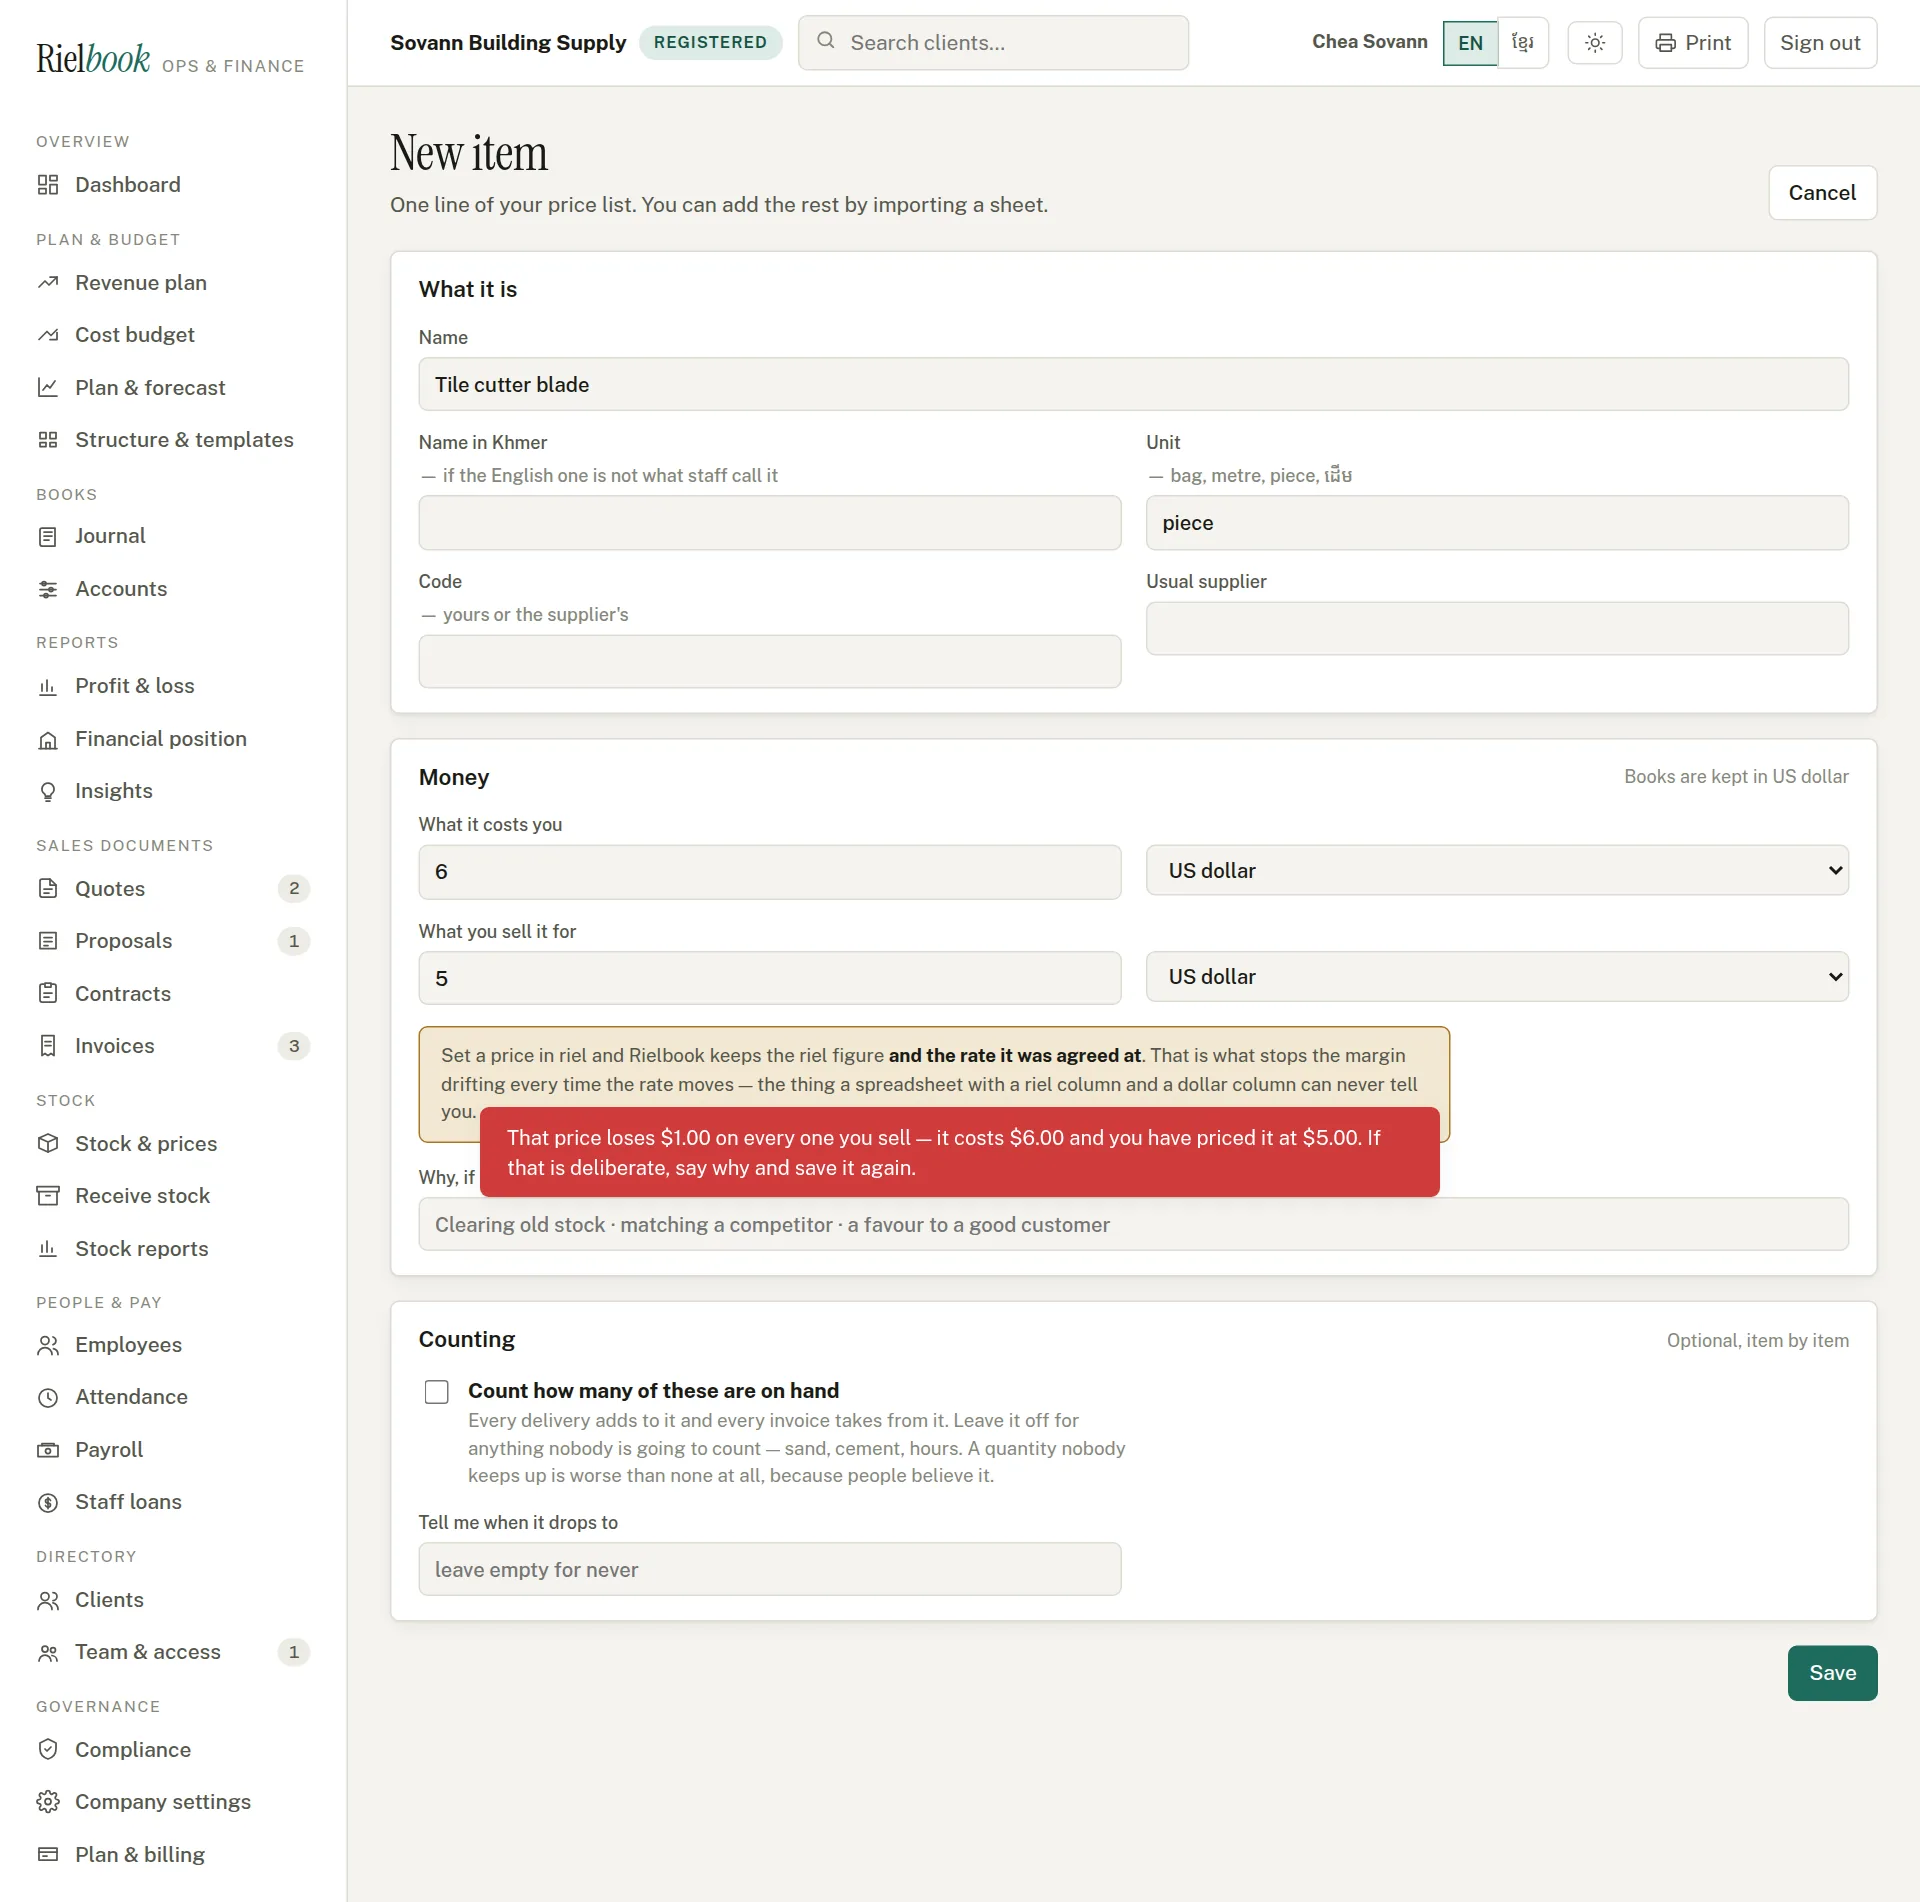
Add or change an item
- Press New item, or Edit on an item.
- Type the name, the name in Khmer if staff call it something else, the unit (bag, metre, piece, ដើម), a code and the usual supplier.
- Type what it costs you and what you sell it for, each in dollars or riel.
- If the sell price is at or below the cost, Rielbook refuses to save it — unless you type why: clearing old stock, matching a competitor, a favour to a good customer. The reason stays with the item.
- Tick Count how many of these are on hand only for items you really will count, and set Tell me when it drops to for a reorder warning. Press Save.
Receiving a delivery
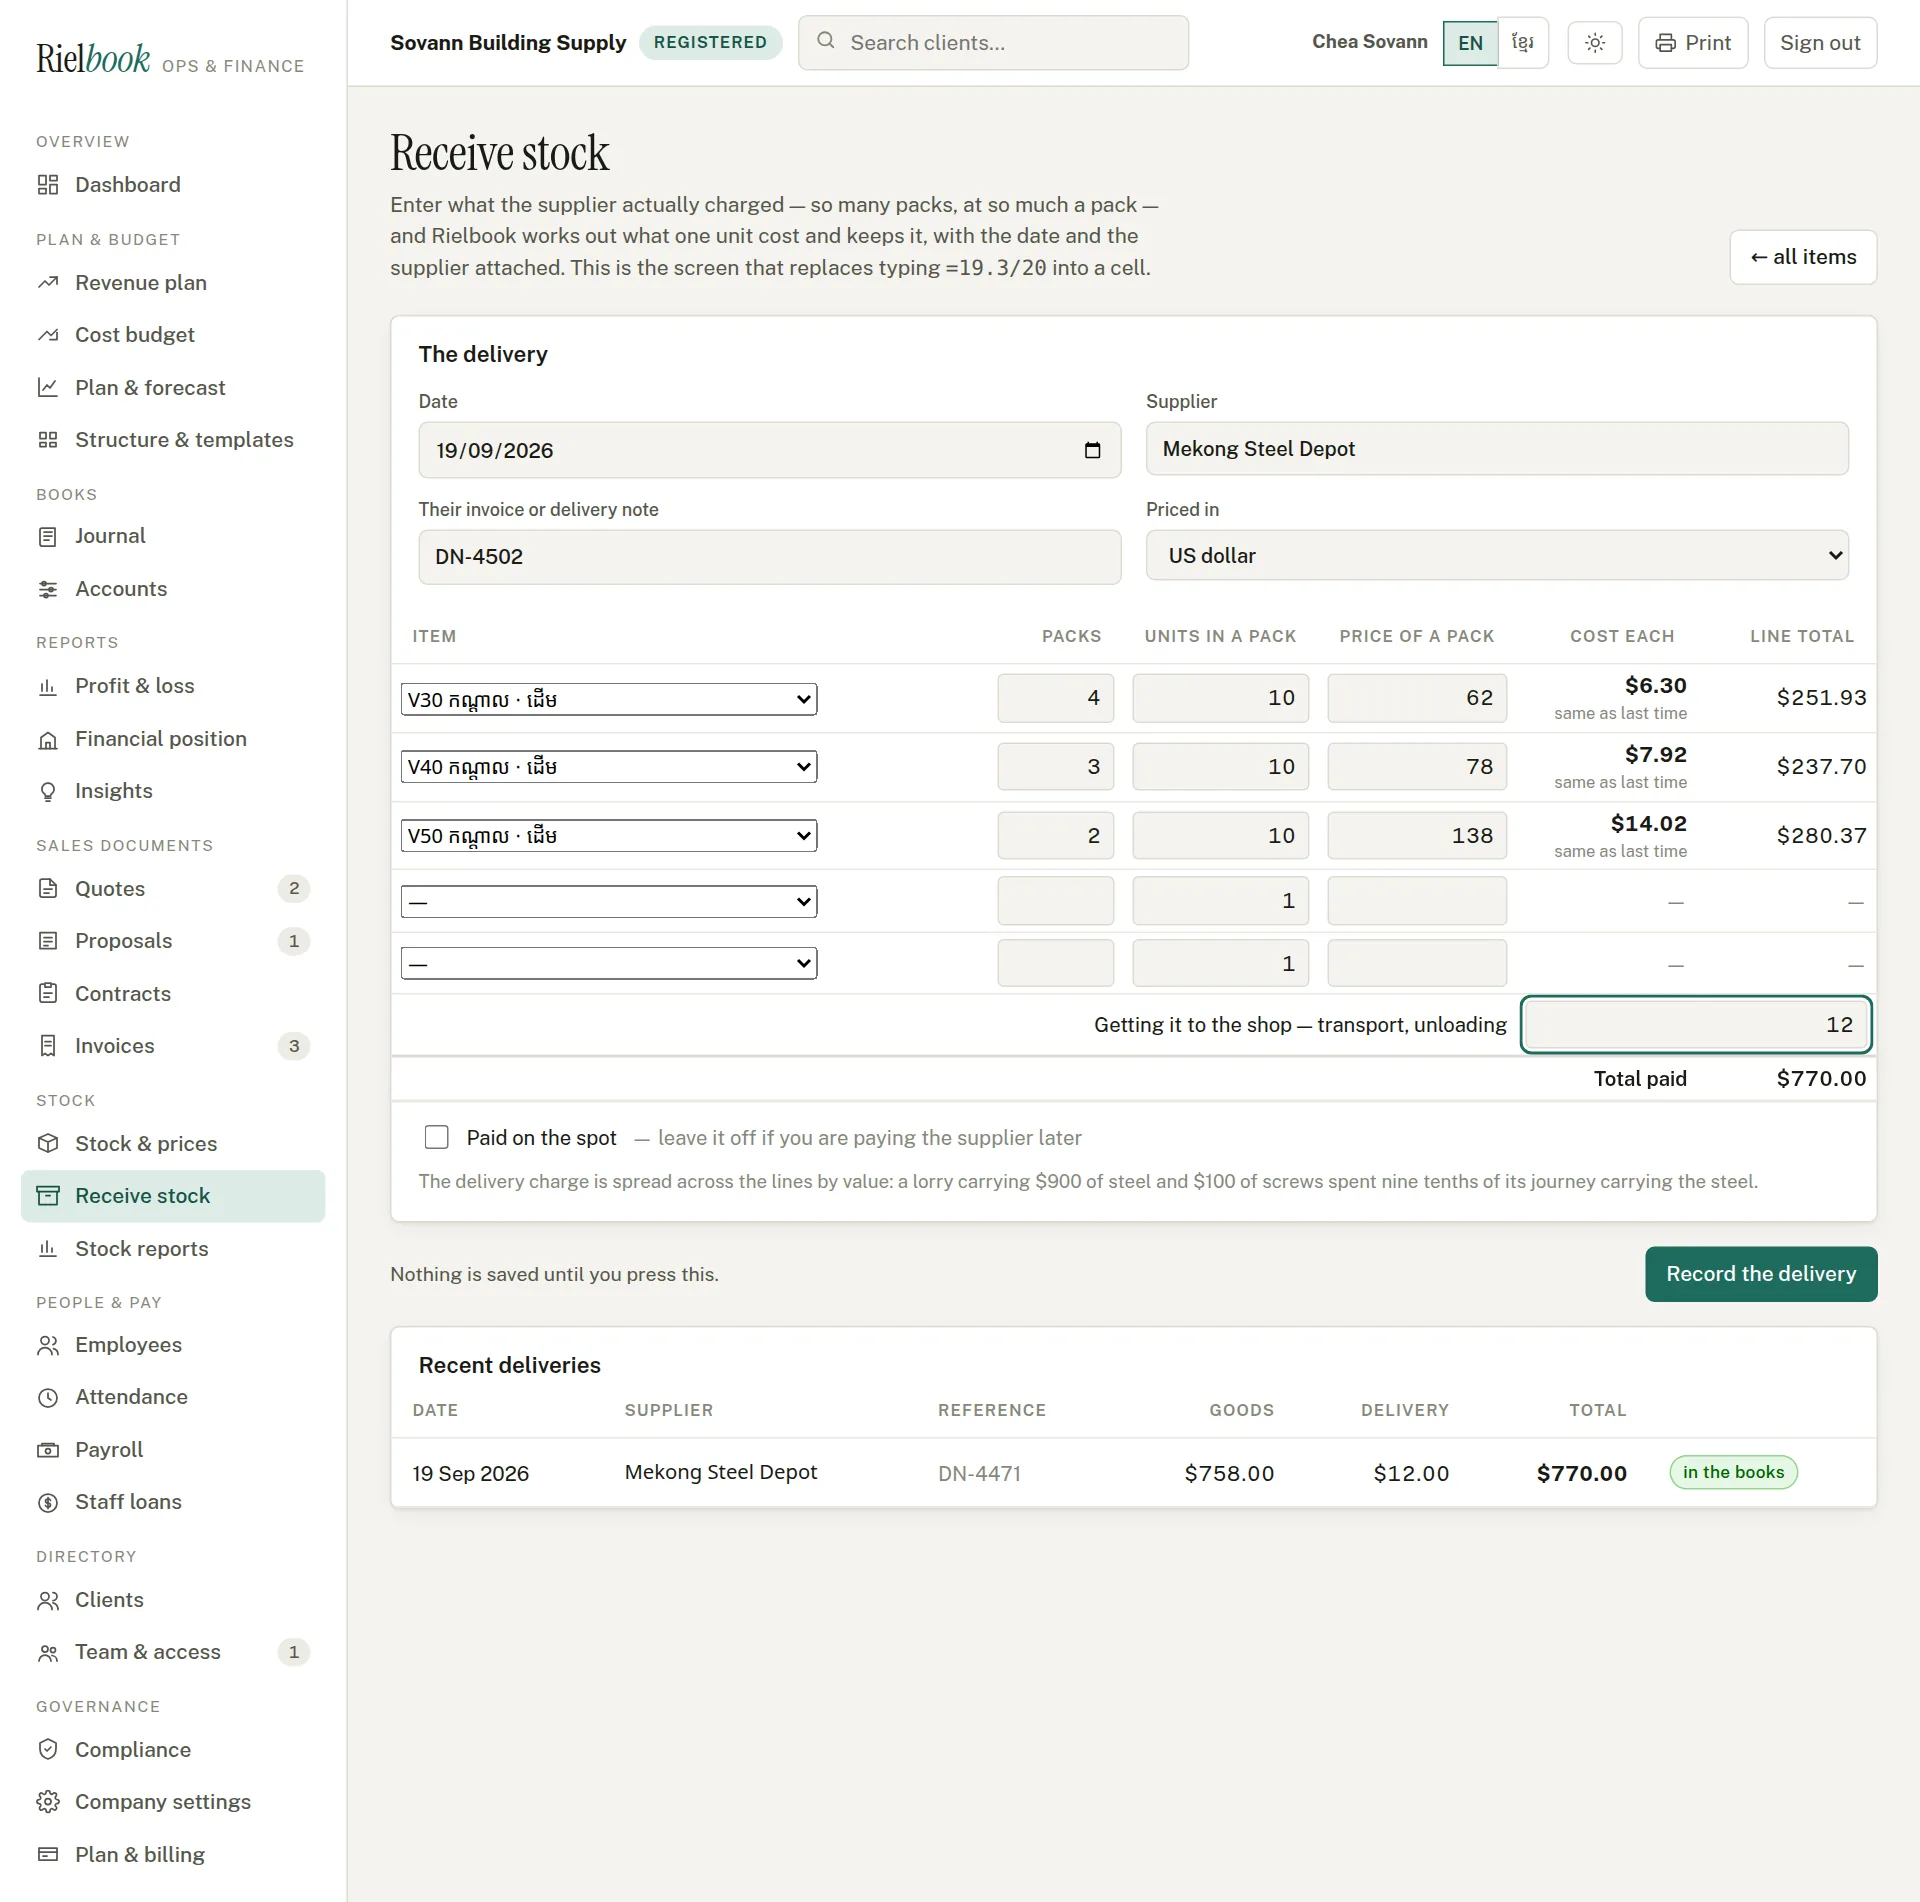
Type what the supplier actually charged — so many packs, at so much a pack — and Rielbook works out what one unit cost, keeps it with the date and the supplier, and updates the average cost. This replaces typing =19.3/20 into a cell.
Stock›Receive stock
- Set the date, the supplier, their invoice or delivery note number, and whether they priced it in US dollars or riel.
- For each item: choose it, then type the number of packs, the units in a pack and the price of a pack. Cost each appears, with how it compares to last time.
- Type what it cost to get it to the shop — transport, unloading. It is spread across the lines by value, so a lorry carrying $900 of steel and $100 of screws charges nine-tenths of the journey to the steel.
- Tick Paid on the spot if you paid cash on delivery. Leave it off if you will pay the supplier later — the amount then waits under Accounts payable.
- Press Record the delivery. Counted items go up, costs update, and the delivery goes into the books as stock you own — not as an expense.
Selling from stock, counting, and the stock reports
Selling
On a new invoice, pick items in the From the price list column; the description and sell price fill in. If you change the price to below what the item cost, a red Below cost warning appears under the lines. When you press Mark sent, the items leave the shelf and their cost is charged to Cost of goods sold in the same entry — so the month's profit is right the day you sell, not after a stock-take. Deleting the invoice puts the items back.
Correcting a count
On a counted item, type what is really on the shelf under Counted on the shelf, add a note, and press Correct the count. The difference is written as its own movement and its own entry in the books, so a shop that keeps coming up short can see it happening.
Stock reports
Stock›Stock reports
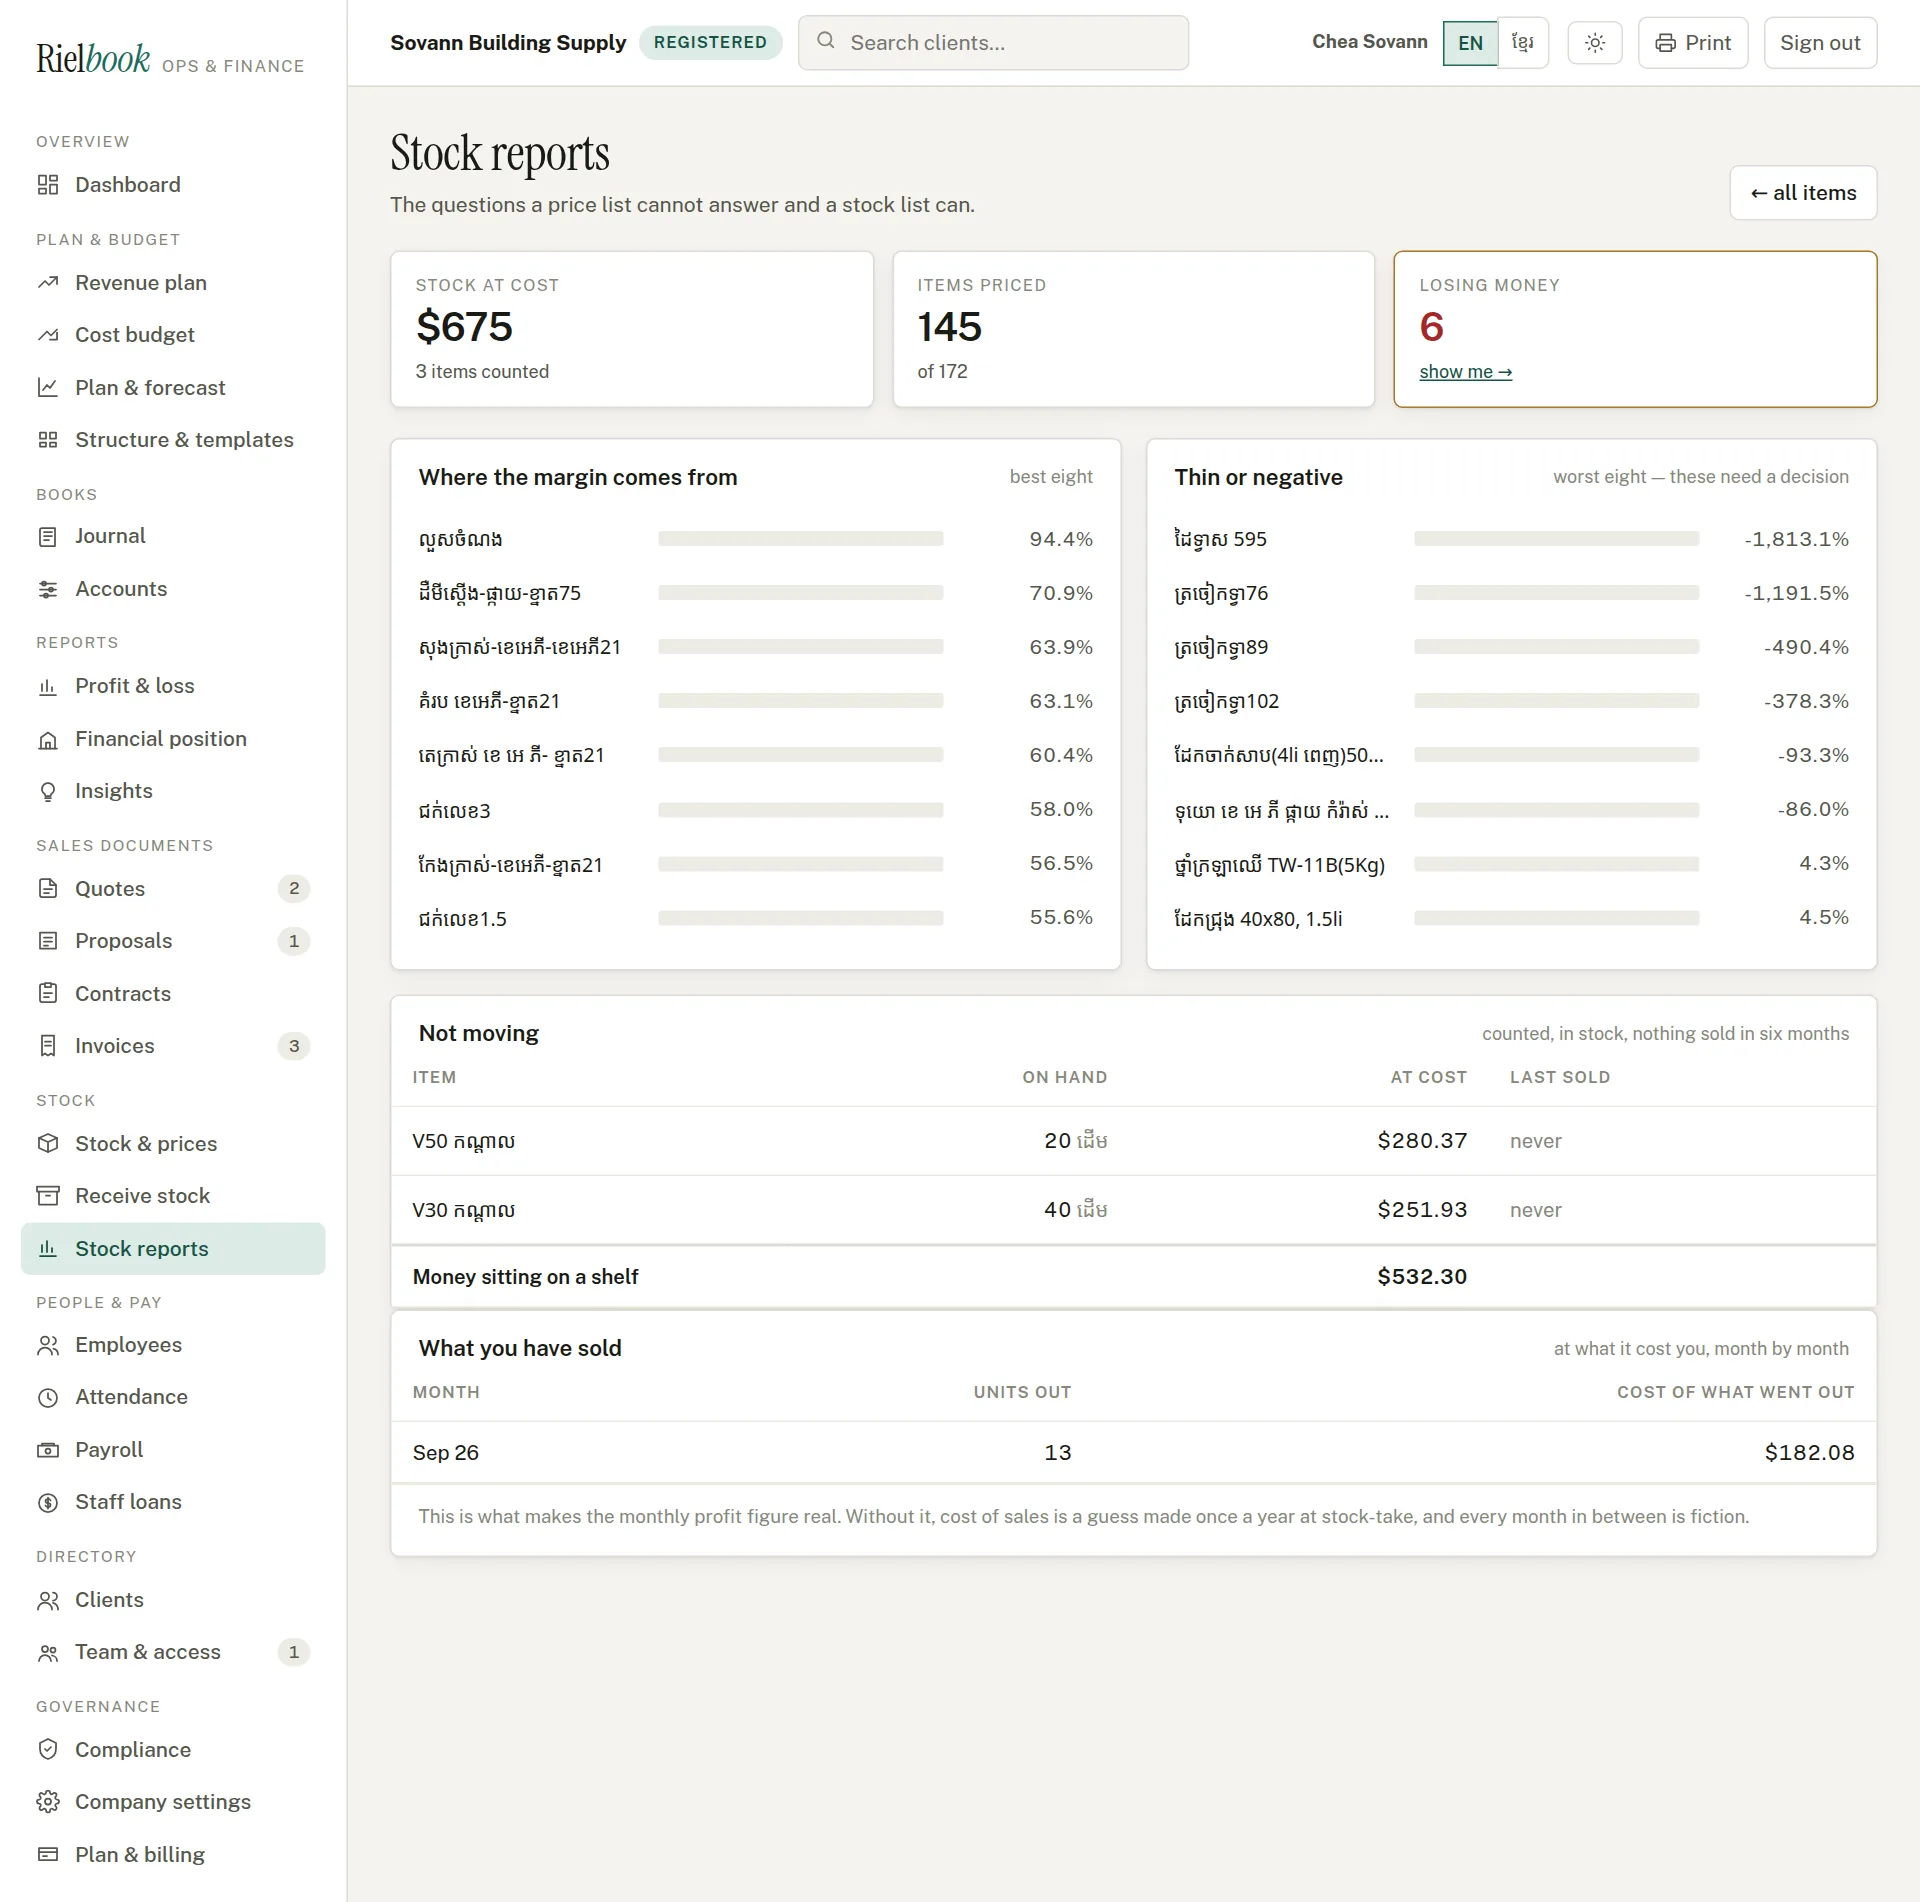
The questions a price list cannot answer: the money sitting on the shelf at cost, the best eight margins and the worst eight, what has not sold in six months, and what is running low against the level you set.
Staff loans
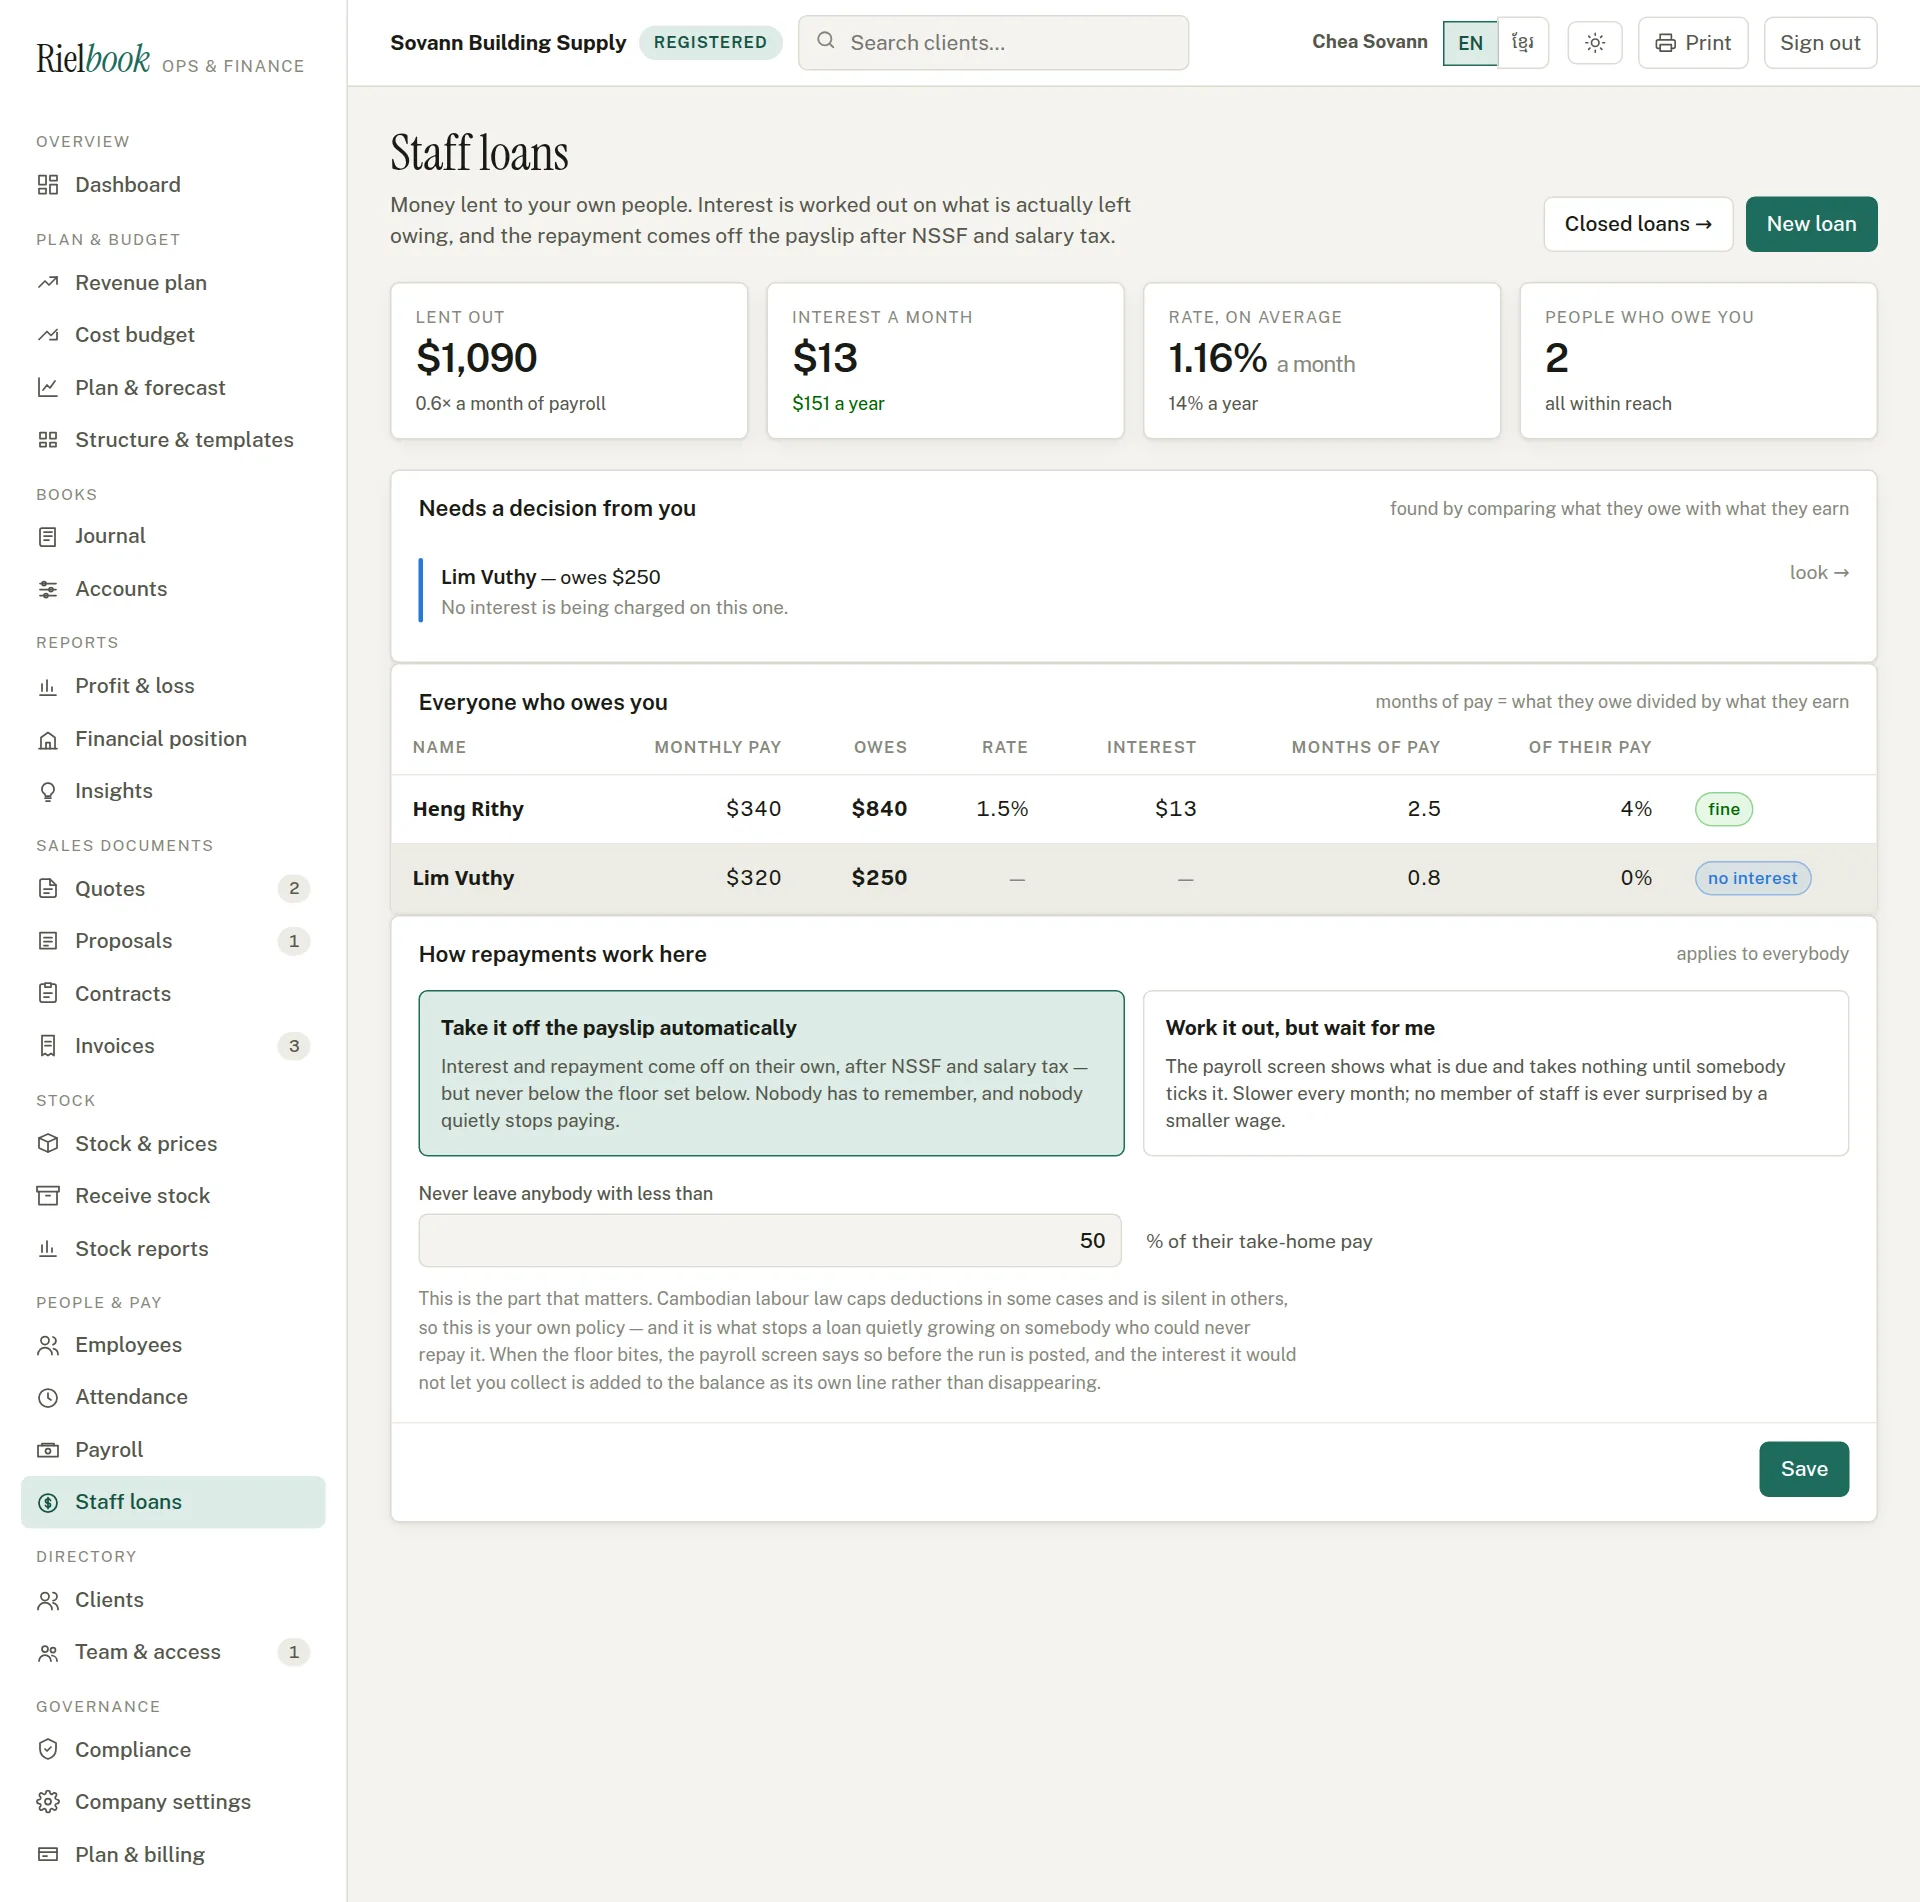
Money the company lends its own people, with the interest worked out each month on what is actually still owed, and the repayment taken off the payslip after NSSF and salary tax.
People & pay›Staff loans
First, decide how repayments work
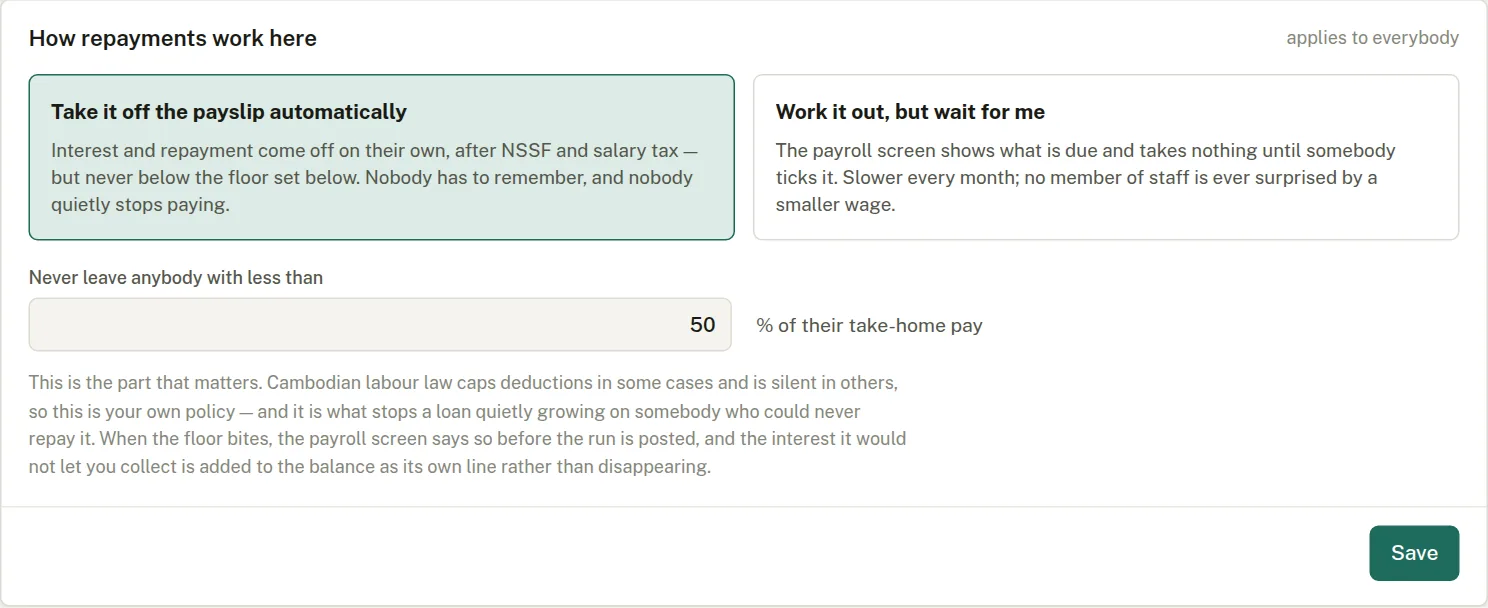
Under How repayments work here, an Owner chooses once for the whole company:
- Take it off the payslip automatically — interest and repayment come off on their own each payday, after NSSF and salary tax.
- Work it out, but wait for me — the payroll screen shows what is due and takes nothing until somebody confirms it.
- Never leave anybody with less than a share of their take-home pay — 50% unless you change it. If a repayment would go below that, Rielbook takes less and says so on the payroll screen. Interest it could not collect is added to what they owe, as its own line, instead of quietly disappearing.
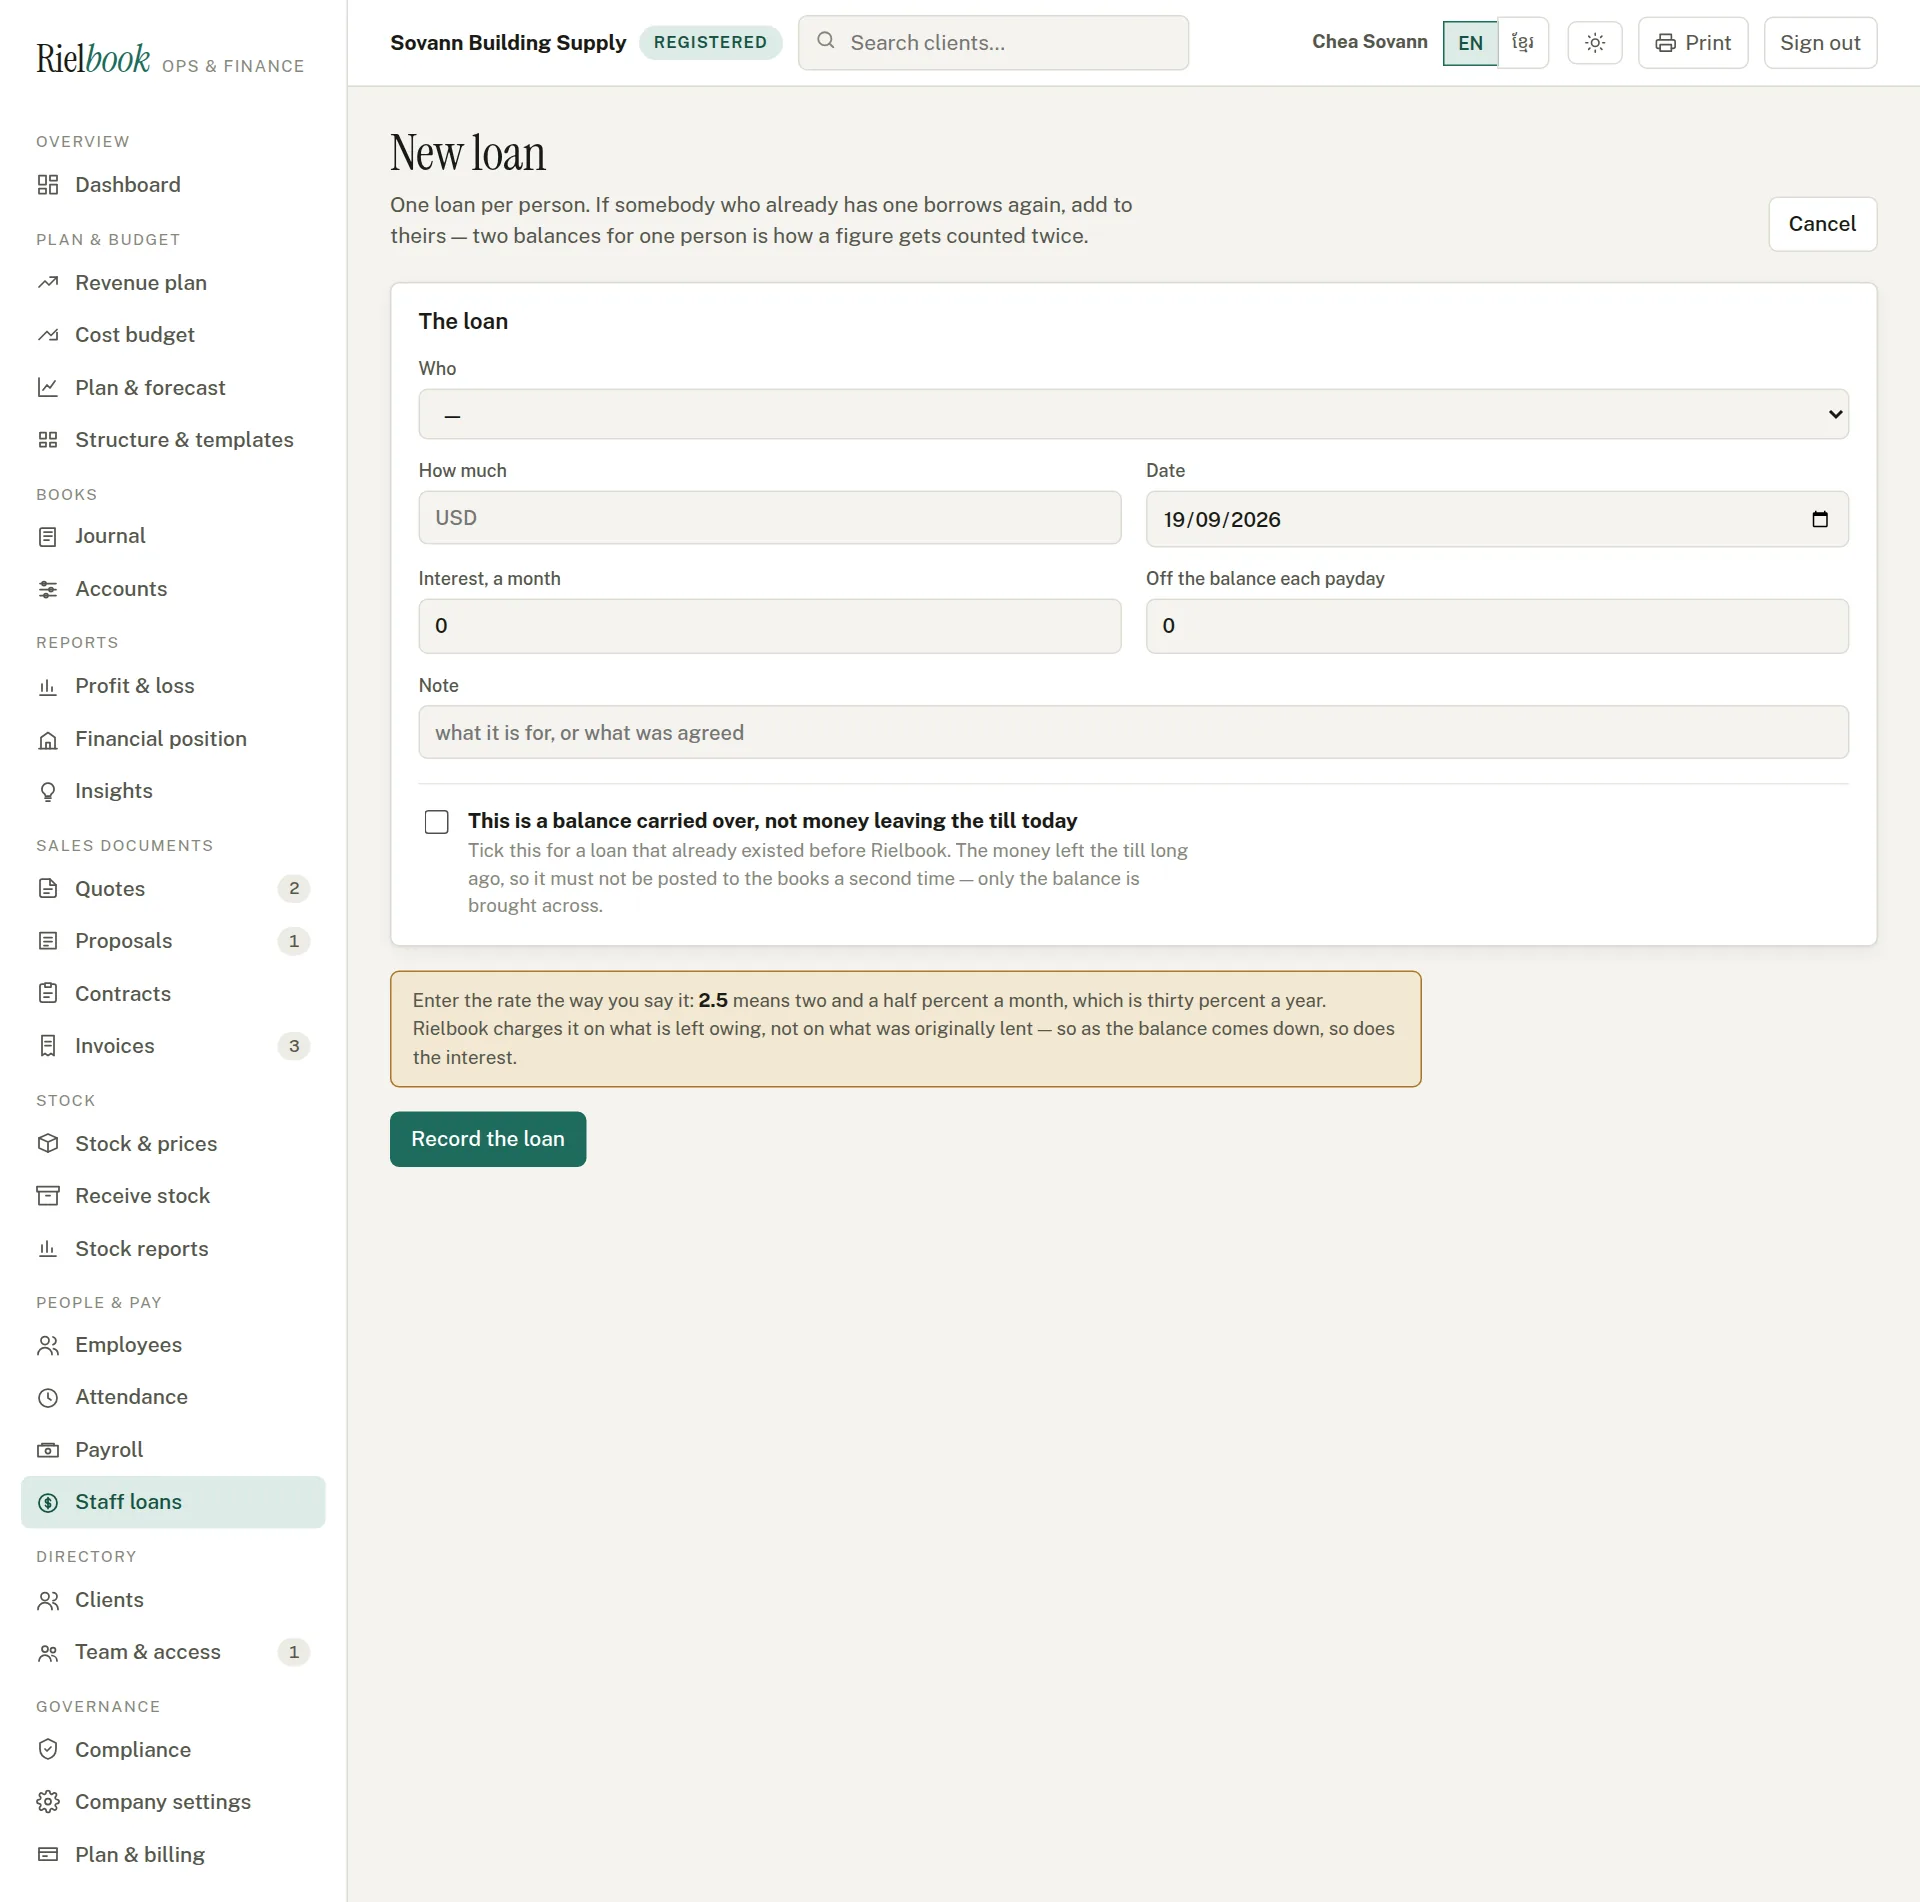
Record a loan
- Press New loan.
- Choose who, and type how much and the date.
- Type the interest a month the way you say it: 2.5 means two and a half percent a month, which is thirty percent a year. Type 0 for an interest-free advance.
- Type how much comes off the balance each payday, and a note of what it is for or what was agreed.
- If this is a loan that already existed before Rielbook — written in a notebook — tick This is a balance carried over. It is put into the books as money owed to you without taking it out of the bank a second time.
- Press Record the loan.
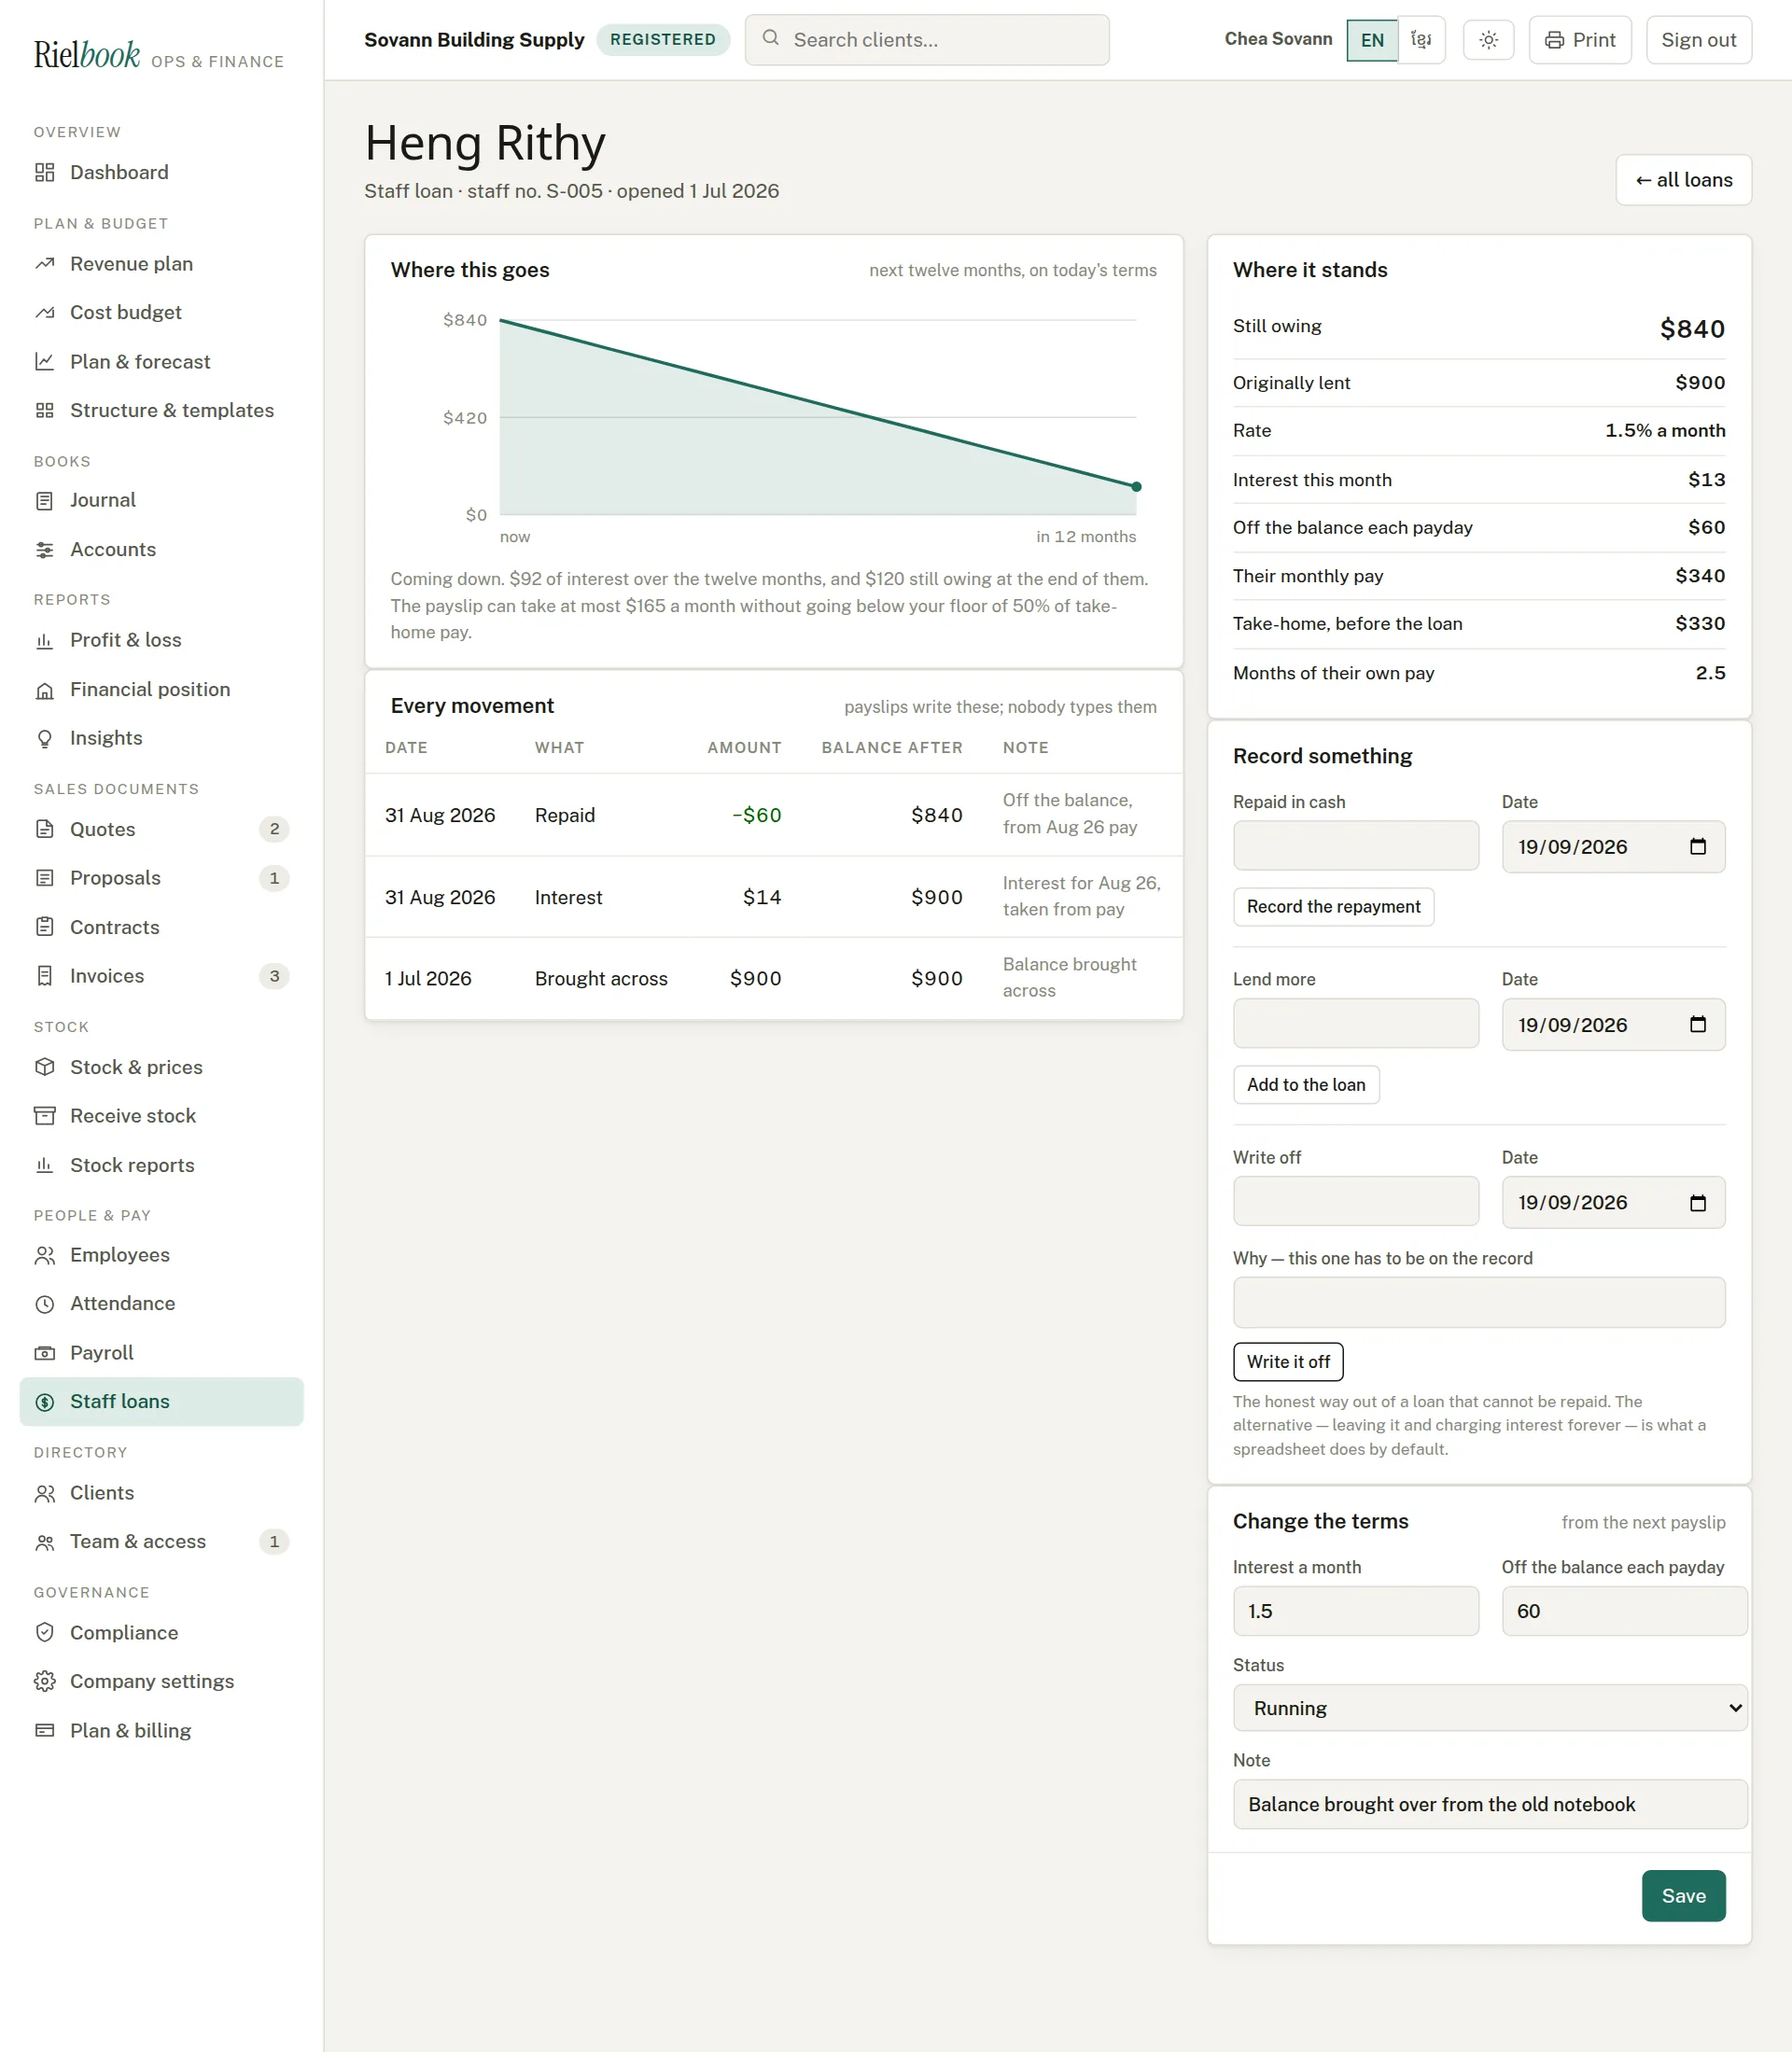
One person's loan
Open a loan to see where it stands, where this goes over the next twelve months on today's terms, and every movement — written by payslips, nobody types them. Under Record something:
- Repaid in cash → Record the repayment, for money handed back outside payroll.
- Lend more → Add to the loan.
- Write off → Write it off, for what will never be repaid. A reason is required and stays on the record.
Under Change the terms you can change the rate or the monthly repayment, or pause the loan. A loan closes by itself when it reaches zero.
Running the account
Filing deadlines, your plan and its add-ons, your data, and working from a phone.
The compliance calendar
Filing dates, tax rates and invoice rules for your kind of company in Cambodia, with the number of days left on each.
Governance›Compliance
The menu name follows your kind of company: Compliance for a registered company, Get registration-ready for an early startup, Tax & obligations for a freelancer.
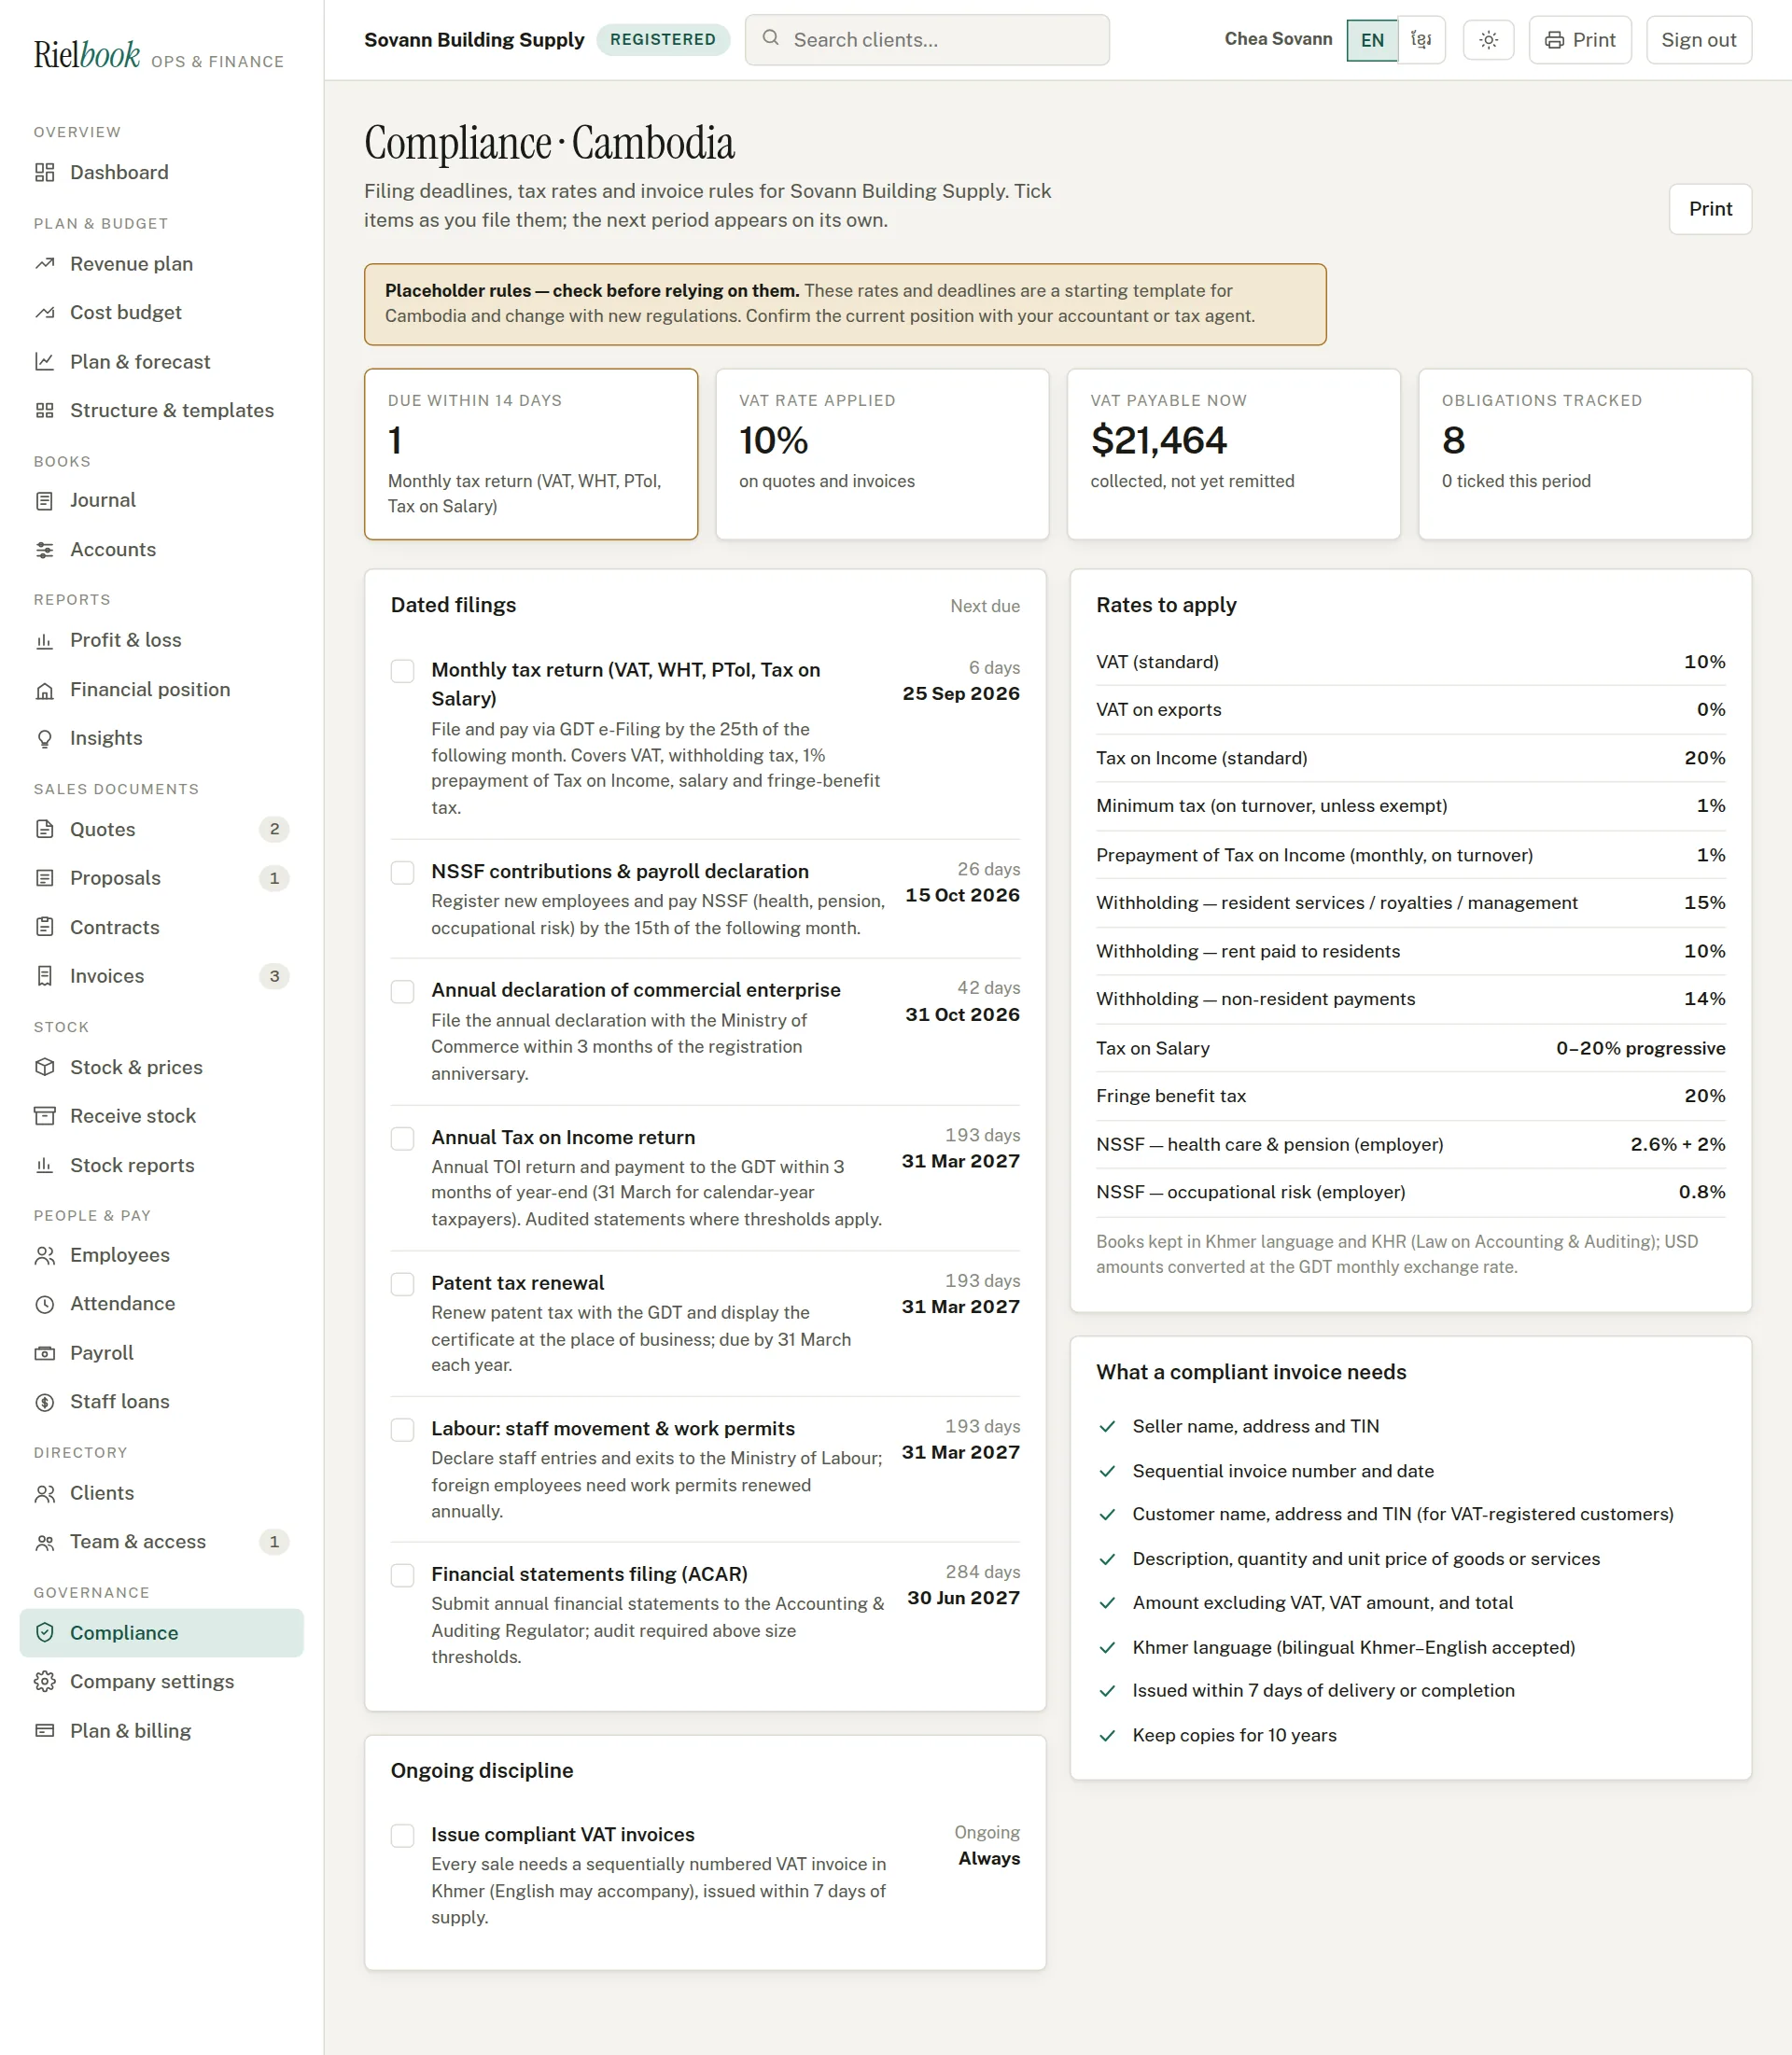
- Check Due within 14 days at the top — the same items appear under Needs attention on your dashboard.
- When you have filed something, tick the box beside it. The next period appears by itself.
- Press Print for a paper copy to keep by the desk or give your accountant.
Your plan and what you pay
Governance›Plan & billing
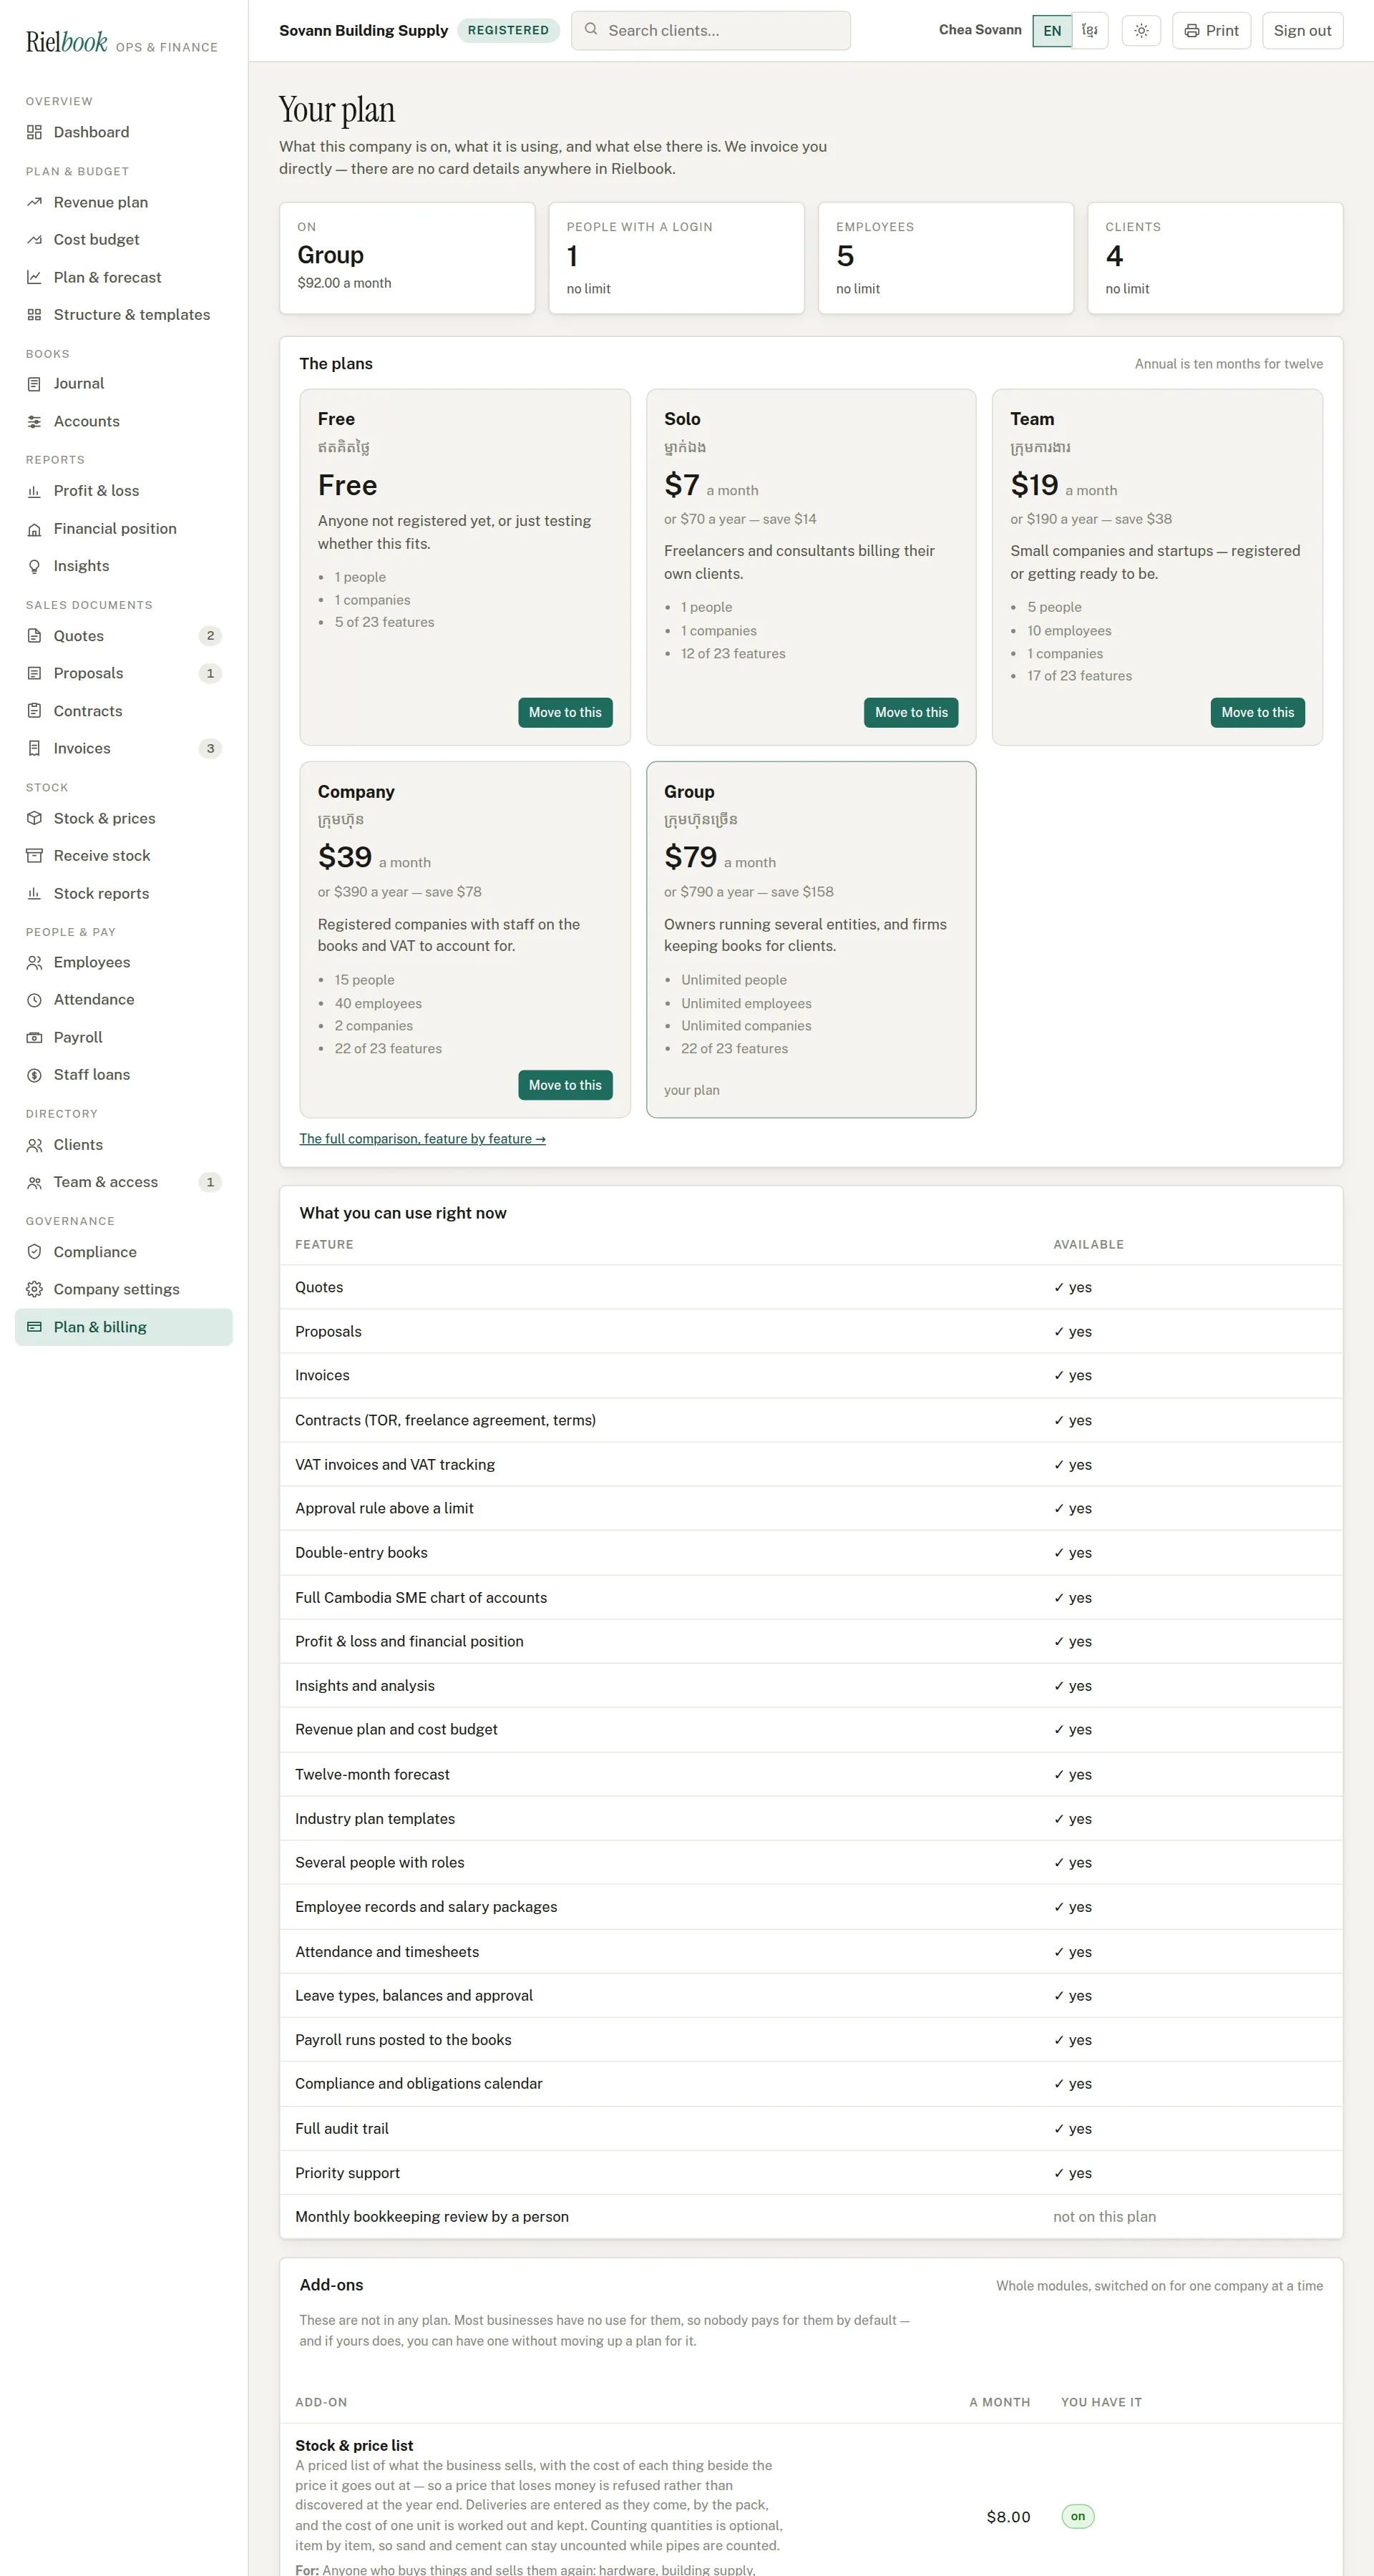
- The first tile shows your plan and your monthly total — the plan, plus any add-ons.
- The plans compares what each includes. Pressing Move to this writes an email to us; we move you over and send the new invoice.
- What you can use right now lists every feature and whether you have it.
- We invoice you directly; no card details are kept anywhere in Rielbook. Pay by bank transfer or ABA as the invoice says. Paying for a year costs ten months.
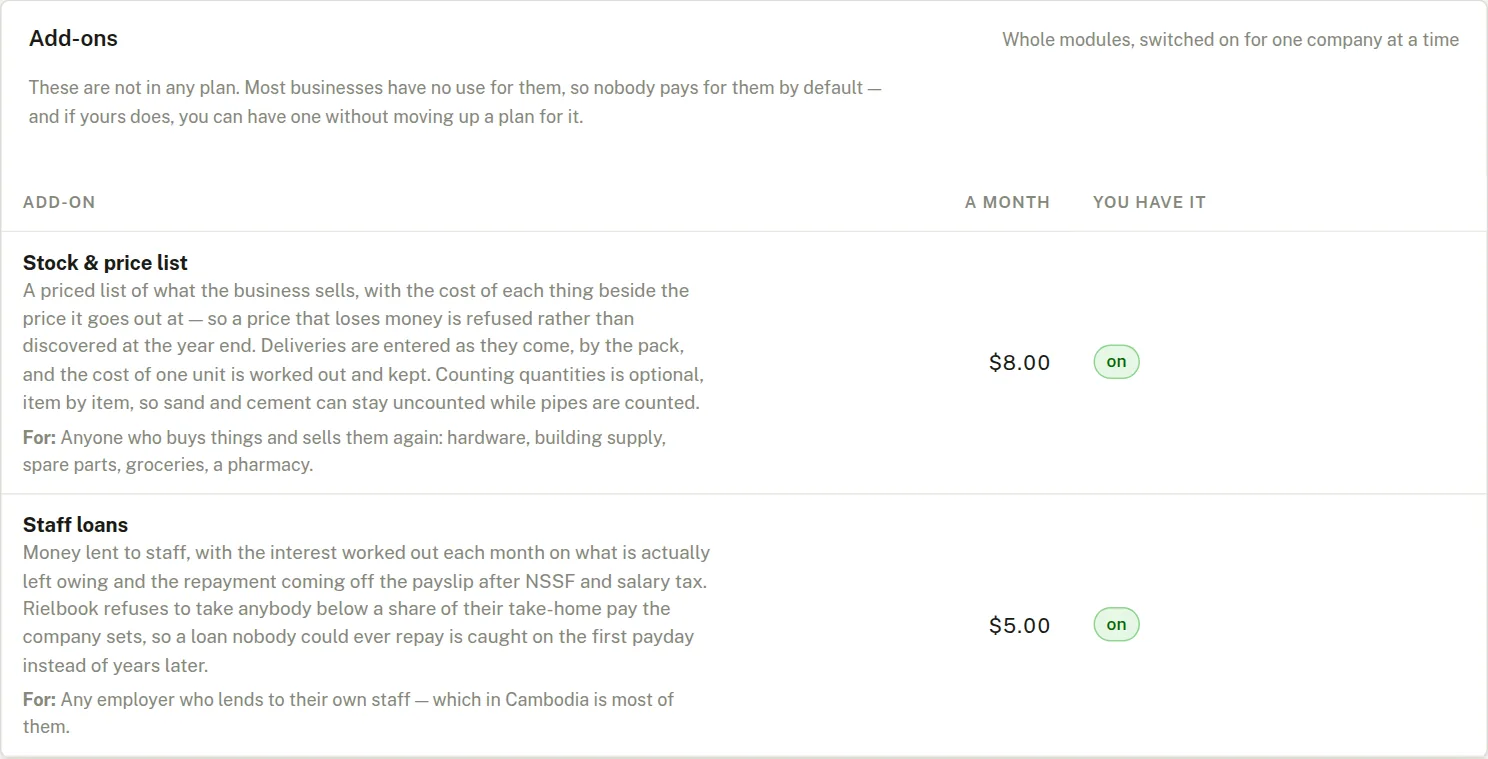
Switching an add-on on
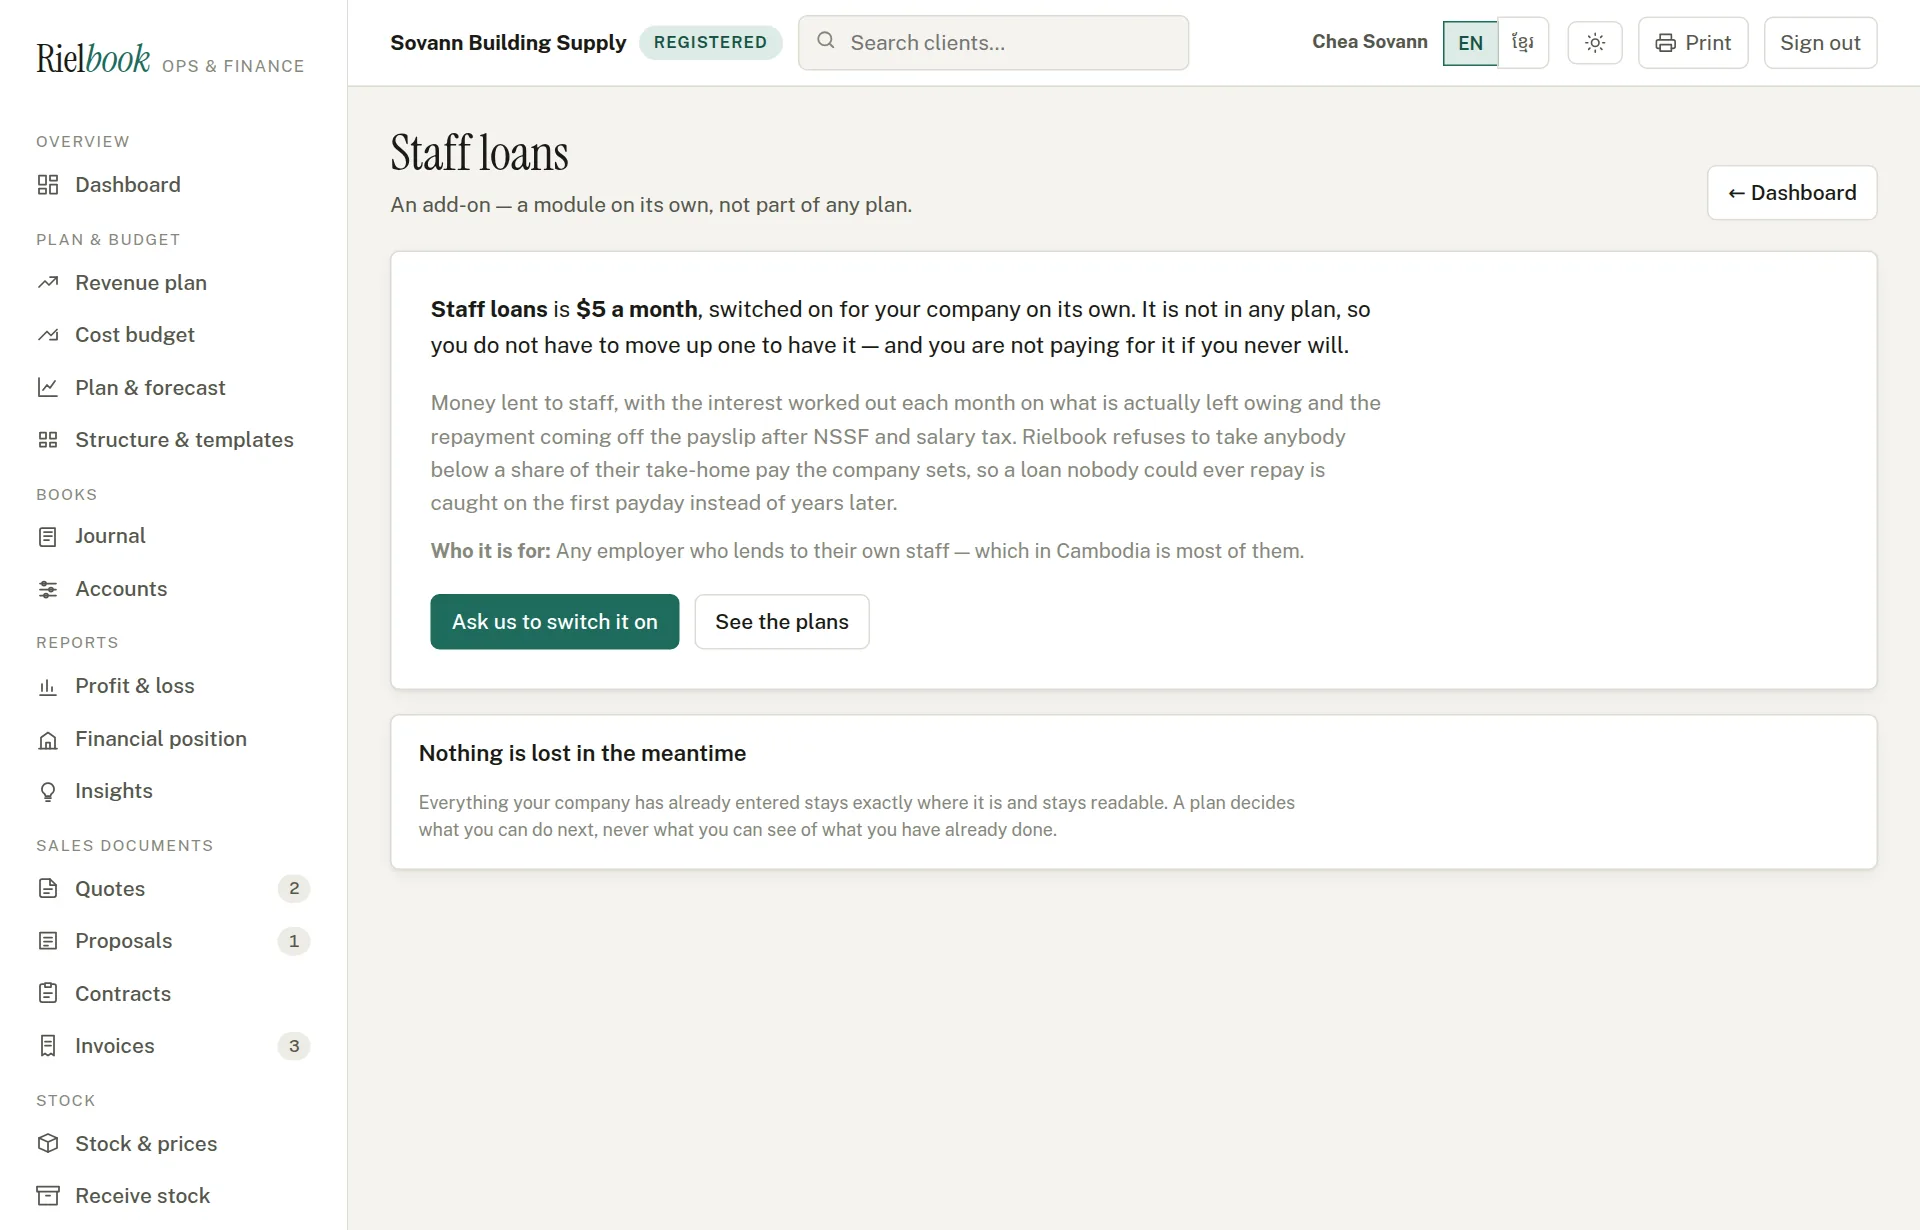
If you open a page your company does not have yet, you see what it does and what it costs instead. Press Ask us to switch it on — this writes an email to hello@rielbook.com — and it is usually on the same day. Its price is added to your next invoice.
Your data: download it, clear it, start again
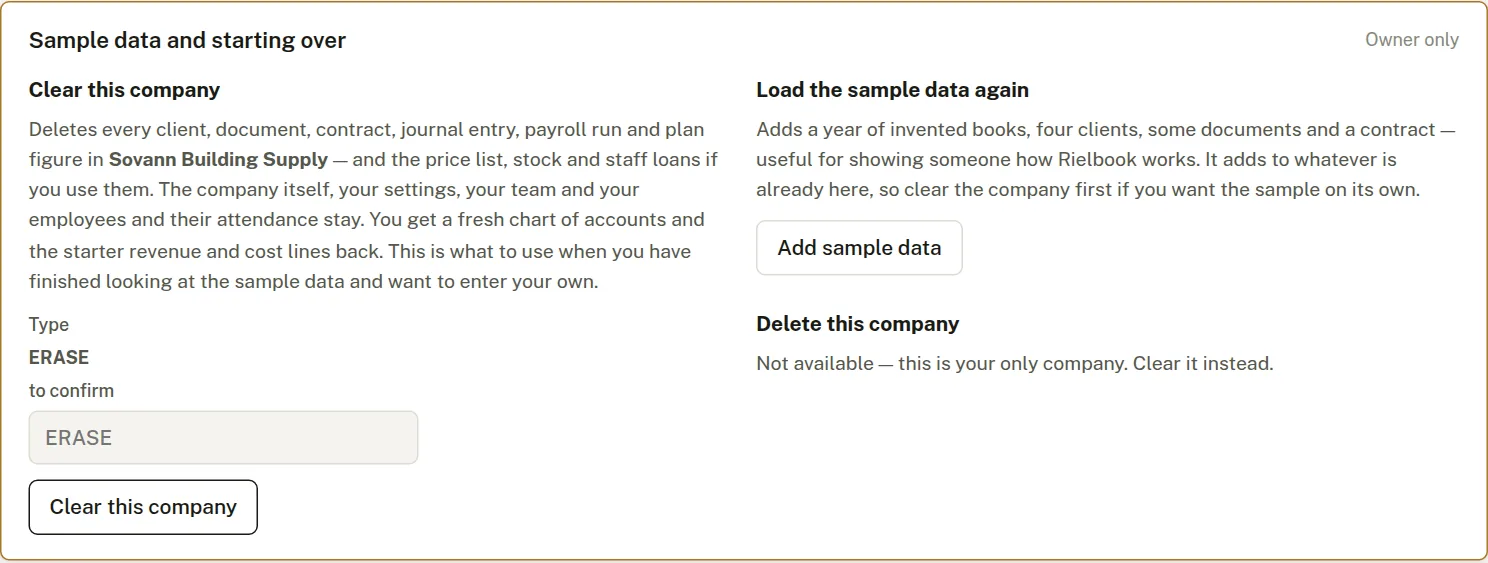
At the bottom of Company settings. Owner only.
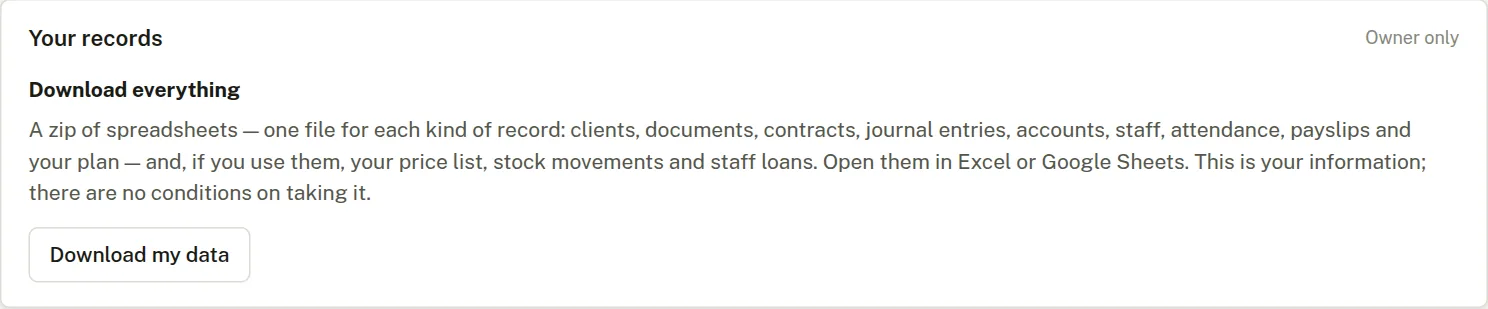
- Download my data — clients, documents, contracts, journal entries, accounts, staff, attendance, payslips, the plan, and your price list, stock movements and staff loans. Opens in Excel or Google Sheets. Do it once a month and keep the file.
- Clear this company — type ERASE and press the button. Every client, document, contract, journal entry, payroll run and plan figure is deleted, with the price list, stock and staff loans. The company, its settings, its team, and your employees with their attendance stay. Use this after trying the sample data, before entering your own.
- Add sample data — a year of invented books, four clients, some documents and a contract, for showing someone how Rielbook works. It adds to whatever is there.
- Add another company — if you run more than one business, each keeps its own books, clients, documents and team; switch between them from the name at the top left.
On your phone
Rielbook works in the phone's browser — there is nothing to install. The menu becomes a row you swipe along at the top; tables scroll sideways. It is comfortable for checking the dashboard, looking up a client, recording attendance, or sending an invoice from the shop floor. Long jobs — importing a price list, running payroll — are easier on a computer.
When something looks wrong
| What you see | Why, and what to do |
|---|---|
| A menu item described here is missing | Your plan does not include it, or your role cannot open it. Check Plan & billing, or ask your company's Owner. |
| A page says it is part of an add-on | Your company does not have that add-on yet. Press Ask us to switch it on. |
| The currency cannot be changed | Figures have already been entered. If they are only sample or test figures, clear the company and change it. Employees with a salary also keep it locked — write to us and we will help. |
| An item will not save — "that price loses money" | The sell price is at or below the cost. Correct it, or say why in the reason box. |
| Stock did not go down after an invoice | The invoice is still a Draft. Stock moves when it is marked sent. Only items ticked Count how many keep a quantity. |
| A document will not leave Draft | It is above your company's approval limit and has not been approved. Someone with Owner or Finance role — not the person who raised it — must approve it. |
| A journal entry will not post | Debits and credits are not equal. The totals under the lines show the difference. A line with an amount and no account picked is also refused — the box turns red. |
| An entry has no Edit entry button | It was written by an invoice, a payment, payroll, a delivery or a staff loan. Change that document instead and the entry changes with it. |
| An account will not change its kind | Money has been posted through it. Its code and names can still change; its kind cannot, or old reports would be rewritten. |
| An imported account did not replace ours | The old account has entries on it, a plan line is built on it, or an add-on posts to it. The import message lists which and why. |
| Payroll shows "no attendance recorded" | Nobody recorded that person's days. A monthly salary is still paid in full; record attendance if there were absences or overtime. |
| A loan repayment is smaller than agreed | It hit the company's take-home floor. The payroll screen says so; the uncollected interest is added to the balance. |
| Khmer shows as boxes or broken letters | The computer is missing a Khmer font and the page could not load one. Check the internet connection and reload; on Windows, install a Khmer font such as Khmer OS. |
Still stuck? Write to hello@rielbook.com with the company name and what you pressed. If we need to see what you see, we can look at your company read-only — nothing can be changed, and the visit is written in your own records.